Snipping Tool Not Working Windows 11
Snipping Tool is a Microsoft Windows screenshot utility included in Windows Vista and later. But now it has been replaced by Snip & Sketch. The snipping tool can take still screenshots of an open window, rectangular areas, a free-form area, or the entire screen.
It also allows you to edit the image with Touch Writing, Ballpoint pen, Pencil, Highlighter, Eraser, Ruler, and Image Crop tools.
However, some people report that they have encountered the Snipping Tool not working Windows 11 issue. The symptoms include that they cannot use the Windows + Shift + S to open the snipping tool and that some features of this tool don’t work.
How to Solve the Snipping Tool Not Working Windows 11 Issue
Is your Windows 11 Snipping Tool not working? If so, you can try the following ways to troubleshoot this issue.
Way 1. Use Another Way to Open the Snipping Tool
You can try the following ways to open the snipping tool when the Snipping Tool Windows 11 not working issue occurs.
1. Use Windows Search to find and open the snipping tool.
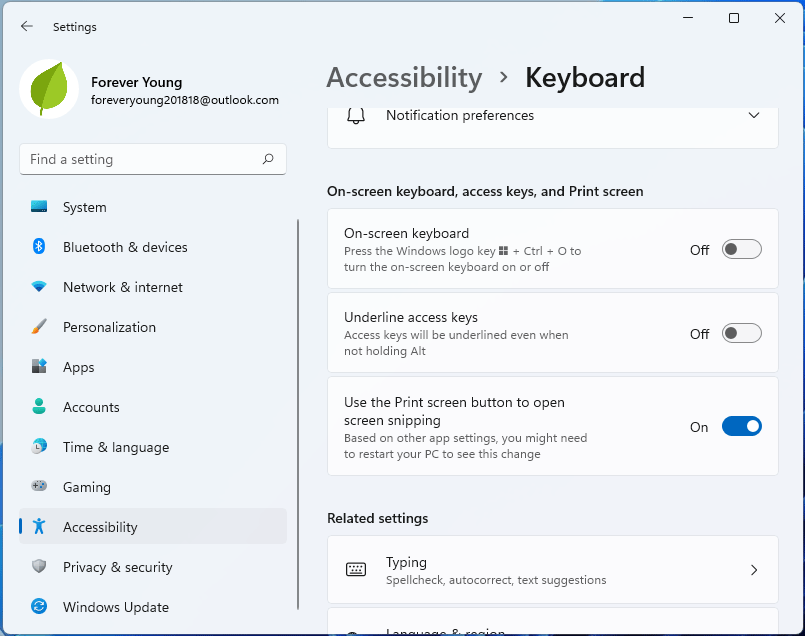
2. Use the Print Screen button to open the snipping tool. But to use this method, you need to make some changes in Settings. Press the Windows logo key + I to open Settings, go to Accessibility > Keyboard, and enable the option “Use the Print screen button to open screen snipping”.
3. Pin the snipping tool to the Taskbar. Find the snipping tool using Windows Search. Right-click this tool and select More > Pin to Taskbar. Then, you can open the snipping tool from the Taskbar directly.
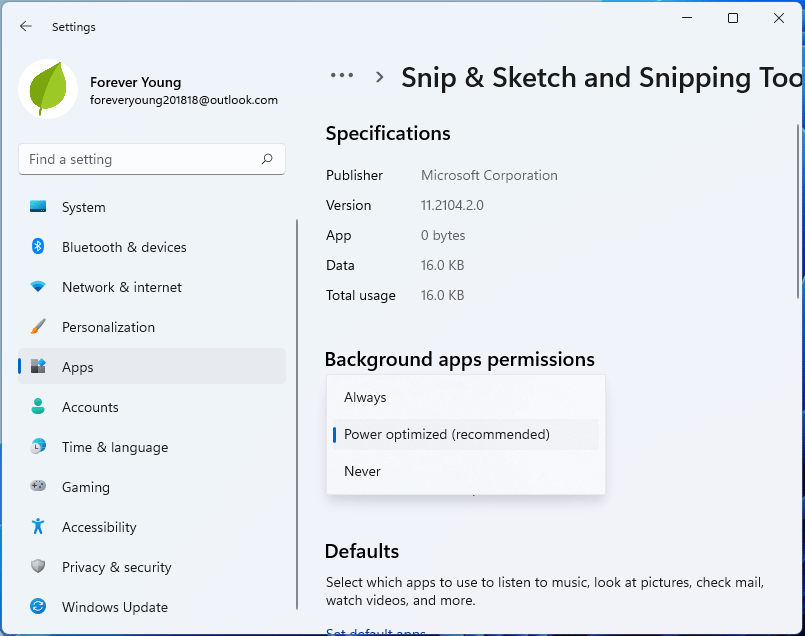
Way 2. Turn on the Background Apps Permissions
- Open Settings and go to Apps > Apps & features.
- Find the Snip & Sketch and Snipping Tool app and click the three-dot icon.
- Select Advanced options.
- Make sure the Background apps permissions option is set to Always or Power optimized (recommended).
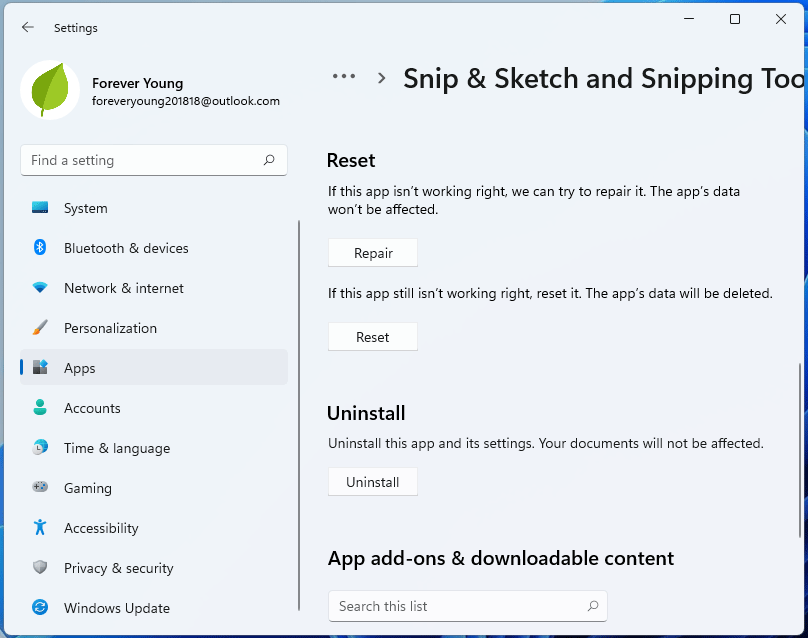
Way 3. Repair or Reset the Snipping Tool
This will repair the snipping tool, solving the Windows 11 Snipping Tool not working issue.
- Similarly, open the Advanced options of the snipping tool.
- Find the Reset section.
- Click Repair to repair the tool. If this feature doesn’t work, click Reset.
Way 4. Change the Default Apps
If you lose the capability to view the Preview/Editing windows when taking screenshots using the Snipping Tool, this method may help.
- Navigate to System Settings > Default Apps > Snipping Tools.
- Scroll to the bottom of the page where there is a selection for MS-SCREENSKETCH.
- Select the Snipping Tool option to change the default app.
- Instead of selecting the upper Snipping Tool (Keep using this app), instead select the lower Snipping tool (Other options), and select OK.
Many people report that this method works for them, and you can also have a try.
Way 5. Enable the Clipboard History
The Snipping Tool saves screenshots to your clipboard first. So, if you’ve disabled clipboard history, the Snipping Tool won’t work. You can follow the guide below to enable it:
- Go to System > Clipboard.
- At the top of the window, you’ll see the Clipboard history option.
- Turn it On.
Way 6. Update the Snipping Tool from the Microsoft Store
Updating the tool may also solve the Snipping Tool Windows 11 not working issue.
- Open the Microsoft Store and search for “Snip & Sketch” or “Snipping Tool”.
- Click Update if available.
- Wait for the update to complete.
Way 7. Reinstall the Snipping Tool
- Open Settings and go to Apps & features.
- Find the Snip & Sketch and Snipping Tool app and click the three-dot icon.
- Click Uninstall.
- Then, reinstall the snipping tool from the Microsoft Store.
Way 8. Perform a System Restore
If all the above ways can’t solve the Snipping Tool not working Windows 11 issue, you can perform a system restore to go back to a previous state, in which the Snipping Tool works well.
Bottom Line
MiniTool Partition Wizard is a functional tool. It can convert MBR to GPT without data loss, migrate OS, clone hard drive, recover partitions, recover data from hard drive, etc. If you have this need, download it to have a try.
MiniTool Partition Wizard DemoClick to Download100%Clean & Safe
About The Author

Position: Columnist
Linda has been an editor at MiniTool for seven years. She continuously learns about computers and puts her knowledge into practice. Moreover, she is particularly knowledgeable in disk management, data recovery, system installation, and PDF editing. Her articles typically reference multiple examples or are based on her own experience, providing users with the most suitable solutions.
User Comments :