QNAP NAS is a device consisting of one or more hard drives connected to the Internet continuously. QNAP can be your backup “hub” or storage unit for all your important files and media such as photos, videos, and music.
QNAP can use different peripherals to satisfy the services it provides. QNAP external hard drives are often used in Windows and Mac systems. When using an external drive, you may want to consider the QNAP external drive format. In QNAP NAS, external devices can be formatted as Ext4, FAT32, NTFS, or HFS+ file systems.
So, which format is most suitable? How to format it? Please keep reading.

Which Is Suitable for QNAP External Drive Format?
Some of the most common external drive formats used on QNAP are listed below. So, which format is most suitable? It depends on your needs.
- If you want to access the drive from a Mac OS computer, format it with the HTFS+ file system.
- If you want to access the drive from a Windows PC, format it with a FAT32 or NTFS file system. Also, if you want to put files larger than 4GB on the partition, please format it as NTFS. In addition, NTFS file system is more secure than FAT32.
- If you care about backup performance and stability, please format it as Ext4. Note that Windows cannot read either format.
- For disk volumes larger than 2TB, it is recommended to format them with the Ext4, NTFS, or HFS+ file system.
How to Format QNAP External Drive?
In this part, we will introduce how to format QNAP external drive. Here are two ways to do that.
Way 1: Format External Hard Drive on QNAP
The steps of formatting an external hard drive on QNAP are very simple. To do QNAP format the external drive, you can follow the steps below.
Step 1: Connect the external drive to a USB or an eSATA port of the NAS.
Step 2: Go to Storage & Snapshots > Storage > External Storage.
Step 3: Select a storage partition.
Step 4; Click on Action, and then select Format.
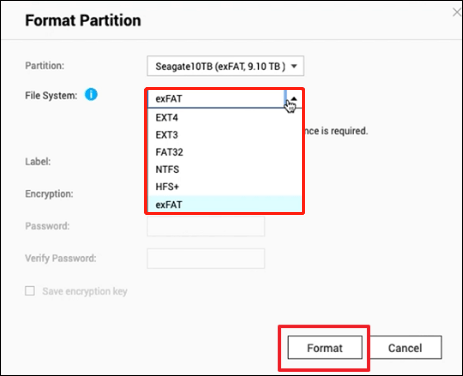
Step 5: Then the Format Partition window will open. You need to select a file system and define the required parameters.
Step 6: Click Format to execute formatting the external hard drive on QNAP. Then click OK when a warning message appears.
Despite the simplicity of the approach, problems can sometimes arise. For example, when formatting an external disk in a QNAP NAS, you may encounter a “Format failed (disk could not be unmounted)” or an unknown file system error. If you are unfortunate enough to encounter one of these problems, then using method two is very useful.
Way 2: Format QNAP External Hard Drive on Windows PC
The solution to formatting an external hard drive for QNAP is to use a professional formatting tool in other operating systems such as Windows OS.
Although Windows provides built-in utilities that will format the drive, they cannot help you format to Ext4. Fortunately, MiniTool Partition Wizard is a great alternative to QNAP for external drive formatting. It allows you to easily format external hard drives to Ext2/3/4, FAT32, exFAT, and NTFS.
Here are the steps to format the external drive with MiniTool Partition Wizard. First of all, you need to download and install it on your computer.
MiniTool Partition Wizard FreeClick to Download100%Clean & Safe
Step 1: Connect the external drive to Windows PC. Then launch MiniTool Partition Wizard to enter its main interface.
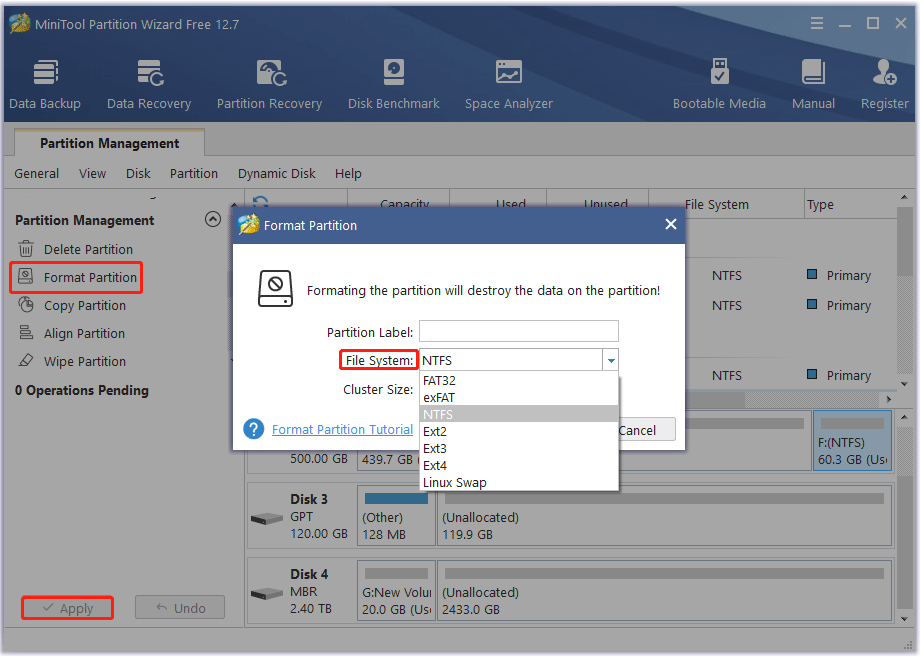
Step 2: Select the partition you would like to format and choose Format Partition from the left action panel.
Step 3: Then you set the Partition Label, File System, and Cluster Size, and click on OK to continue.
Step 4: Click on Apply to confirm the changes.
![[Fixed] Setup Does Not Support Configuration of or Installation](https://images.minitool.com/partitionwizard.com/images/uploads/2023/07/setup-does-not-support-configuration-of-or-installation-usb-thumbnail.png)
About The Author

Position: Columnist
Vega enjoys helping people with computer problems, including disk management, data recovery, data backup, and more. She is constantly expanding her knowledge in related fields. And she will continue to bring more easy-to-understand professional articles to help people solve various problems on the PC.
User Comments :