This post is worth reading when your Windows 10/11 experiences the l1c63x64 sys blue screen error. Here, Partition Magic provides a couple of methods that may help get rid of the blue screen error effectively. You can have a try.
Many users complain about the l1c63x64 sys blue screen error in Windows 10/11. Sometimes, Windows may show the DRIVER_IRQL_NOT_LESS_OR_EQUAL error code on the blue screen. The l1c63x64 sys Windows 10/11 error may occur due to multiple reasons, like hardware problems, corrupted system files, outdated drivers, etc.
To assist in solving the l1c63x64 sys Windows 11/10 error, this post summarizes several workable solutions below.
Solution 1: Run a Full Virus Scan
Any virus or malware infection can cause the l1c63x64.sys error. To troubleshoot it, you can perform a full virus scan. Here’s how to do this in Windows 10.
Step 1: Press Windows + I to open Windows Settings. Then select Update & Security.
Step 2: Switch to Windows Security and then click Virus & threat protection in the right panel.
Step 3: In the next window, click Scan options.
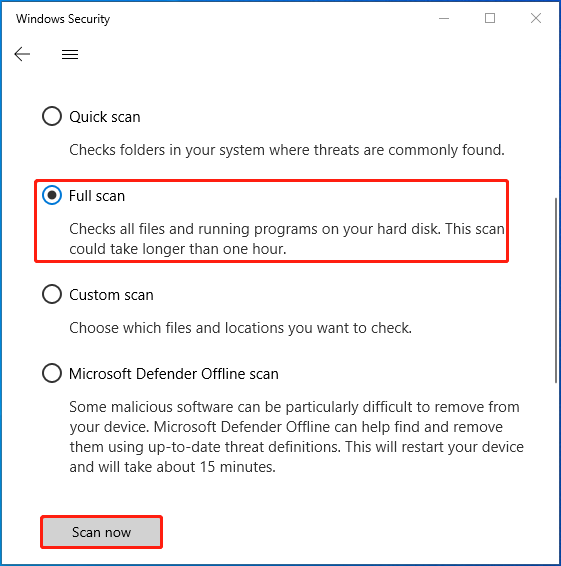
Step 4: Choose Full scan and click Scan now.
Solution 2: Clean Up the Temporary Folders
Emptying the temporary folders and files on your PC may help solve the l1c63x64 sys Windows 10/11 error. To execute the operation successfully, you can refer to this guide: How to Delete/Clean Temporary Files in Windows 11? (5 Ways).
Solution 3: Disable Fast Startup
Fast Startup is a Windows built-in feature that can make the system start up faster. It may also lead to the DRIVER_IRQL_NOT_LESS_OR_EQUAL (l1c63x64.sys) error. If it’s the culprit, you’d better disable Fast Startup for a repair.
Step 1: Press Windows + R to open the Run dialog.
Step 2: Type control.exe in the text box and press Enter.
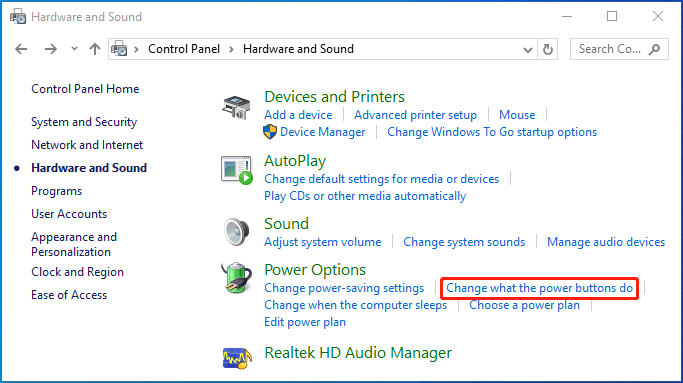
Step 3: Select Hardware and Sound and then click Change what the power buttons do under Power Options.
Step 4: In the next window, click Change settings that are currently unavailable. Then uncheck the Turn on fast startup (recommended) option.
Step 5: After that, click Save changes and restart your computer.
Solution 4: Run SFC and DISM Scans
In the case that corrupted or missing system files result in the l1c63x64 sys Windows 11/10 error, it’s recommended that you apply SFC and DISM scans.
Step 1: Open the Run dialog and input cmd in the box. Then press Ctrl + Shift + Enter to run Command Prompt as an administrator.
Step 2: In the elevated window, type sfc /scannow and press Enter.
Step 3: Once the scan ends, restart your PC and open Command Prompt as an administrator again.
Step 4: Type the following commands and press Enter after each.
- DISM /Online /Cleanup-Image /CheckHealth
- DISM /Online /Cleanup-Image /ScanHealth
- DISM /Online /Cleanup-Image /RestoreHealth
Step 5: Wait until the process is completed. Then restart your computer to see if the error persists.
Solution 5: Check Hard Drive Errors
In some cases, the l1c63x64 sys Windows 10 BSOD error may happen due to disk errors. To resolve the error, you may need to run Command Prompt with administrative rights and execute the chkdsk C: /f command. Replace C with the drive letter of your system drive.
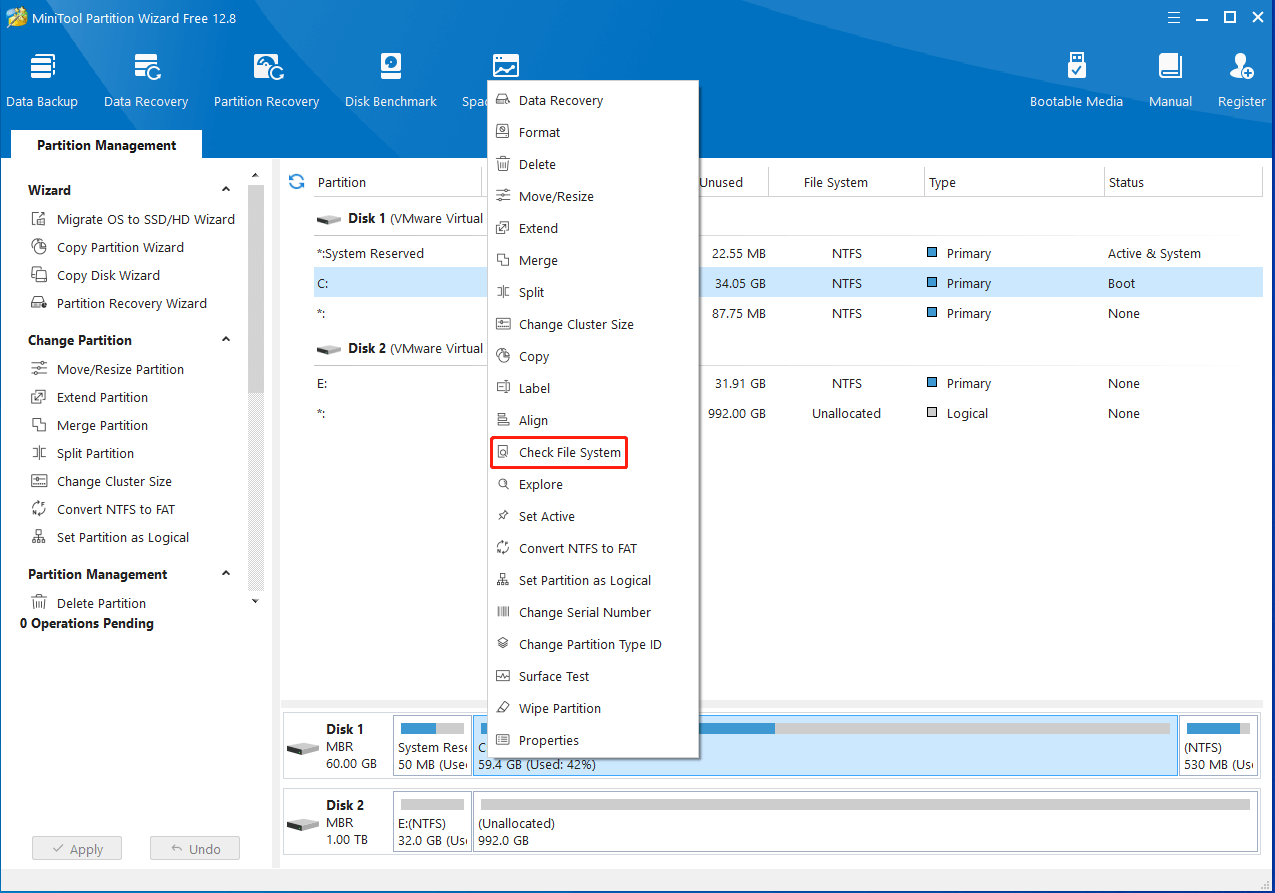
If you don’t want to use command lines to check disk errors, we highly recommend you turn to MiniTool Partition Wizard. It’s a professional partition manager that enables you to check hard drive health, clone hard drive, format SD card FAT32, recover data from hard drive, and more.
Download and install MiniTool Partition Wizard on your PC. Then use the Check File System feature for your hard drive.
MiniTool Partition Wizard FreeClick to Download100%Clean & Safe
Solution 6: Update Your Device Driver
The outdated device driver is another possible cause of the l1c63x64.sys error. In this case, you can try to fix it by updating your driver to the latest version.
Step 1: Right-click the Start icon and select Device Manager.
Step 2: Double-click Network adapters to expand the category.
Step 3: Right-click the driver to update and select Update driver.
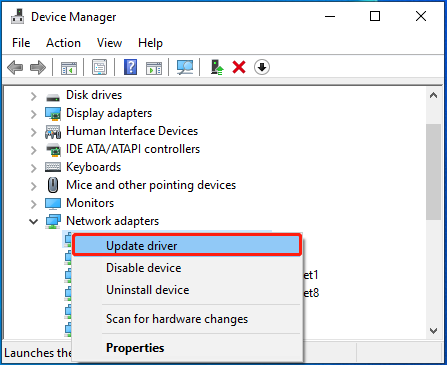
Step 4: Select Search automatically for drivers. Then Windows will search for and install the best available driver on your device.
Solution 7: Perform a System Restore
If you have created a system restore point before the l1c63x64.sys error shows up, you can perform a system restore. By doing so, your system will be reverted to an earlier state without the frustrating blue screen error. You can learn how to perform a system restore from this post: How To Do A System Restore On Windows 10 From Boot.
All these methods mentioned in this post are feasible. When you are facing the l1c63x64 sys Windows 10/11 blue screen error, try the above methods to fix it. If you have any other great solutions to the error, please share them with us.
User Comments :