How to fix the KB5033369 fails to install issue? If you also encounter the same issue when you install Windows 11 update KB5033369 on your computer, this post is worth reading. Here, MiniTool Partition Wizard provides 6 easy ways to fix it.
Windows 11 update KB5033369 (OS Build 22000.2652) was released on 12/12/2023, which addresses security issues for your Windows operating system. Installing the security updates is crucial for keeping your system secure and reliable.
However, some people report that they failed to install the update KB5033369 on their PCs. Have you also encountered the same error? If so, continue reading.
Way 1. Try Some Basic Tricks
Before trying other advanced ways to fix the Windows 11 21H2 update KB5033369 failed to install issue, you can try some basic tricks first. Here are the tricks you can try:
- Check the Internet connection.
- Disable antivirus.
- Disconnect VPN.
- Make sure there is sufficient storage space on your C drive.
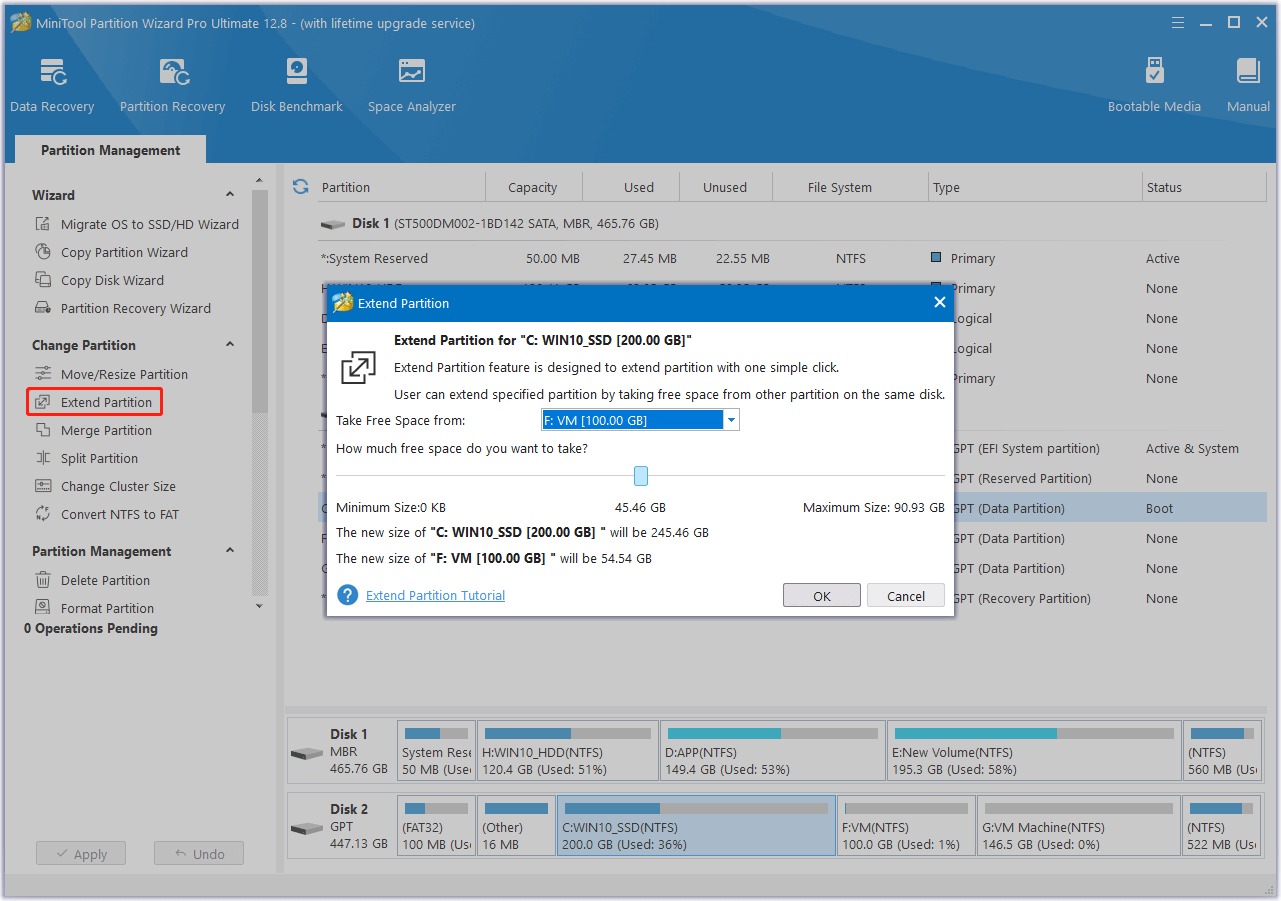
If you find there isn’t enough storage space on your C drive, you can try clearing the unwanted files or expanding the C drive to get more free space. To do that, I recommend MiniTool Partition Wizard for you. It provides the Space Analyzer feature to help you remove unnecessary files and the Extend Partition feature to get more free space from other partitions.
In addition, this feature-rich tool can also help you format USB to FAT32, format SD card FAT32, convert MBR to GPT, clone the system, manage disks better, and recover data from hard drive, and more.
MiniTool Partition Wizard DemoClick to Download100%Clean & Safe
Way 2. Run Windows Update Troubleshooter
You can also run the Windows update troubleshooter to fix the Windows 11 update KB5033369 fails to install issue. Here’s how to do it:
Step 1. Press the Windows and I keys simultaneously to open the Settings window.
Step 2. Navigate to Update & Security > Troubleshoot, and click Additional troubleshooters.
Step 3. Then, select Windows Update and click Run the troubleshooter.
Step 4. Wait for the process to complete. Once done, restart your PC and check if the error has been resolved.
Way 3. Clear Windows Update Files
If there is anything wrong with your Windows update files, you can also encounter the update failure including the Windows 11 21H2 update KB5033369 fails to install issue. In this case, you can try clearing the Windows update files to fix the error. Here’s the way:
Step 1. Press the Windows and R keys simultaneously to open the Run window, type “services.msc” in the box, and press Enter.
Step 2. In the Services window, scroll down and locate the Windows update service.
Step 3. Right-click it and select Stop. Then do the same steps for the Background Intelligent Transfer Service.
Step 4. Press the Windows and E keys simultaneously to open the File Explorer window.
Step 5. Navigate to this location: C:\Windows\SoftwareDistribution\Download. Then, delete all the files in this folder.
Step 6. Open the Services window again and restart Windows Update and Background Intelligent Transfer Service which you previously stopped.
Way 4. Perform A Clean Boot
Sometimes, the third-party apps that you installed on your PC and some of the background programs may also affect the Windows update installation and then result in the KB5033369 fails to install issue. So, you can try performing a clean boot to find out the culprit. Here’s the guide:
- Open the Run window, and then type “msconfig” in the box.
- Then, click on the OK button to open the System Configuration window.
- Select the Services tab.
- Check the Hide all Microsoft services option.
- Click on the Disable all button and then click on the Apply button.
- Next, go to the Startup tab.
- Click on Open Task Manager.
- Right-click the applications you suspect and select Disable option from the menu.
- Exit Task Manager.
- Click OK under the Startup tab.
- Then when you restart the computer, it is in a clean boot environment.
- Next, see if the problem occurs. If not, enable one program one by one until the problem occurs again. That program might be the source of the error. You’d better consider removing it.
Way 5. Run System File Checker
Corrupted system files can also cause the KB5033369 failed to install issue. In this situation, you can run SFC to scan and fix the error. Here’s the way:
Step 1. Open the Search window, type “cmd”, right-click Command Prompt, and select Run as administrator.
Step 2. In the elevated window, type “sfc /scannow” and press Enter.
Step 3. Once done, restart your PC and check if the error is fixed.
Way 6. Manually Install KB5033369
If none of the above solutions can help you fix the Windows 11 update KB5033369 fail to install issue, you can try manually installing the update by using the Microsoft Update Catalog website. To do that, you can refer to this post: How to Update Windows 11 Manually? [4 Simple Ways].
In Conclusion
How to fix the KB5033369 fails to install issue? This post provides 6 effective solutions to help you fix the KB5033369 failed to install issue.
About The Author

Position: Columnist
Charlotte is a technology columnist with a strong focus on the Windows operating system, specializing in disk management, backup, and data recovery. She is passionate about analyzing computer errors, identifying root causes, and delivering practical solutions. In her free time, she stays updated on the latest developments in computer systems and hardware while continuously learning new technologies to broaden her expertise. Her writing style is clear and easy to understand, making complex technical topics accessible even to users with limited computer knowledge.
User Comments :