How to fix ERROR_FILE_LEVEL_TRIM_NOT_SUPPORTED? If you are searching for a solution to this error, this post is what you need. Here, Partition Magic offers several effective solutions to solve the error.
Several users have mentioned experiencing ERROR_FILE_LEVEL_TRIM_NOT_SUPPORTED on their computers. This error indicates that the file system does not support the file-level trim operation.
Through my online research regarding this issue, I found that it can happen when files are compressed, encrypted, or when the storage device employs a file system such as FAT32, which does not support trimming.
Have you experienced this error on your PC as well? If that’s the case, keep reading for useful solutions.
![[Full Guide] Where Is Marvel’s Spider-Man 2 Save File Location?](https://images.minitool.com/partitionwizard.com/images/uploads/2025/05/marvels-spider-man-2-save-file-location-thumbnail.png)
Solution 1. Check the File System Compatibility
Just as above says, ERROR_FILE_LEVEL_TRIM_NOT_SUPPORTED can occur when the storage device employs a file system such as FAT32. So, when you come across the error, the first thing you can do is check the file system compatibility. Here’s the way:
Step 1. Press the Win + E keys simultaneously to open the File Explorer window.
Step 2. Select This PC from the left panel.
Step 3. Right-click the drive that you want to check and select Properties.
Step 4. Go to the General tab, and check the File system.
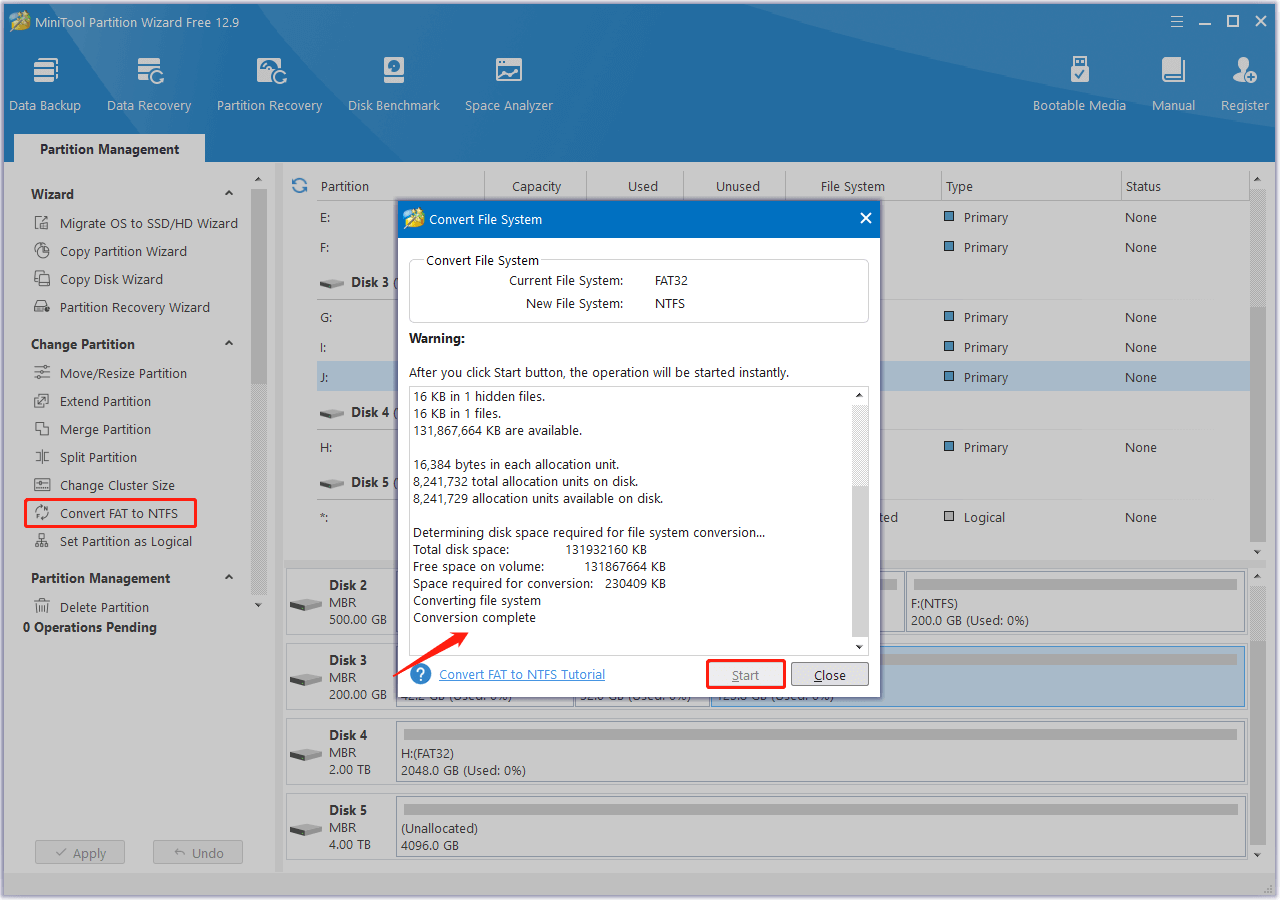
If the File system is FAT32, you don’t need to worry. MiniTool Partition Wizard is a professional partition disk manager that offers the Convert FAT to NTFS feature to do the conversion without data loss.
Besides, this powerful and feature-rich tool offers various features to help you manage partitions and disks。 For instance, you can use it to partition hard drive, change cluster size, convert MBR to GPT, rebuild MBR, recover data from hard drive, and more.
Here’s how to use the Convert FAT to NTFS feature:
MiniTool Partition Wizard FreeClick to Download100%Clean & Safe
- Download and install MiniTool Partition Wizard on your computer.
- Launch this app to enter the main interface.
- Choose the target partition from the disk map.
- Select Convert FAT to NTFS from the left panel.
- In the pop-up window, click Start.
- If a Question window prompt, click Yes to continue.
- Once done, you can see “Conversion Complete” in the window.
- Click Close to go back to the main interface.
- Then, you can see the partition is converted to NTFS successfully.
Solution 2. Update the Storage Drivers
ERROR_FILE_LEVEL_TRIM_NOT_SUPPORTED can also be triggered by a problematic storage driver, so you can try updating the storage driver to fix the error. Here’s the guide:
Step 1. Press the Win + X keys simultaneously to open the Quick Link menu.
Step 2. Select the Device Manager option from the menu.
Step 3. In the Device Manager window, expand the Disk drives category.
Step 4. Then, right-click your storage driver and select Update driver.
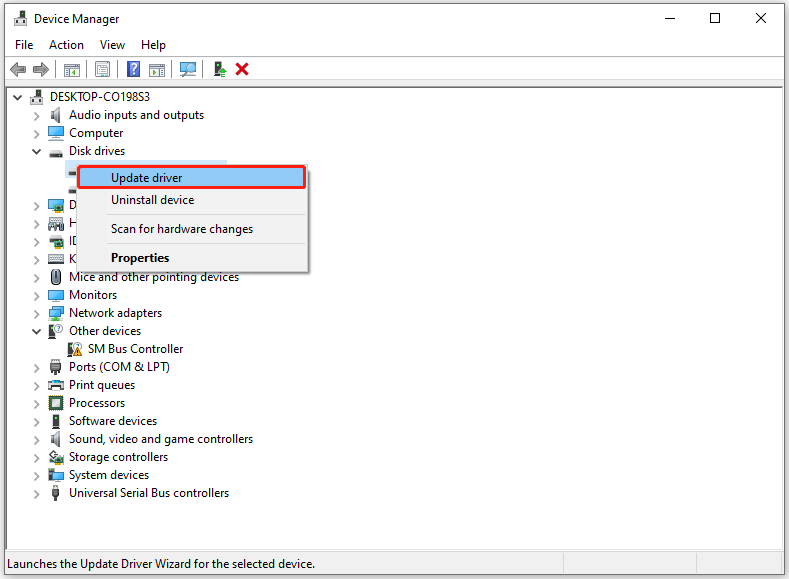
Step 5. In the pop-up window, select Search automatically for drivers.
Step 6. Next, follow the on-screen guide to complete the process. Once done, check if the error has been resolved.
Solution 3. Disable the Compression and Encryption
You can also try disabling the compression and encryption functions to avoid triggering ERROR_FILE_LEVEL_TRIM_NOT_SUPPORTED. Here’s how to do that:
- Open the File Explorer window and navigate to the folder that contains the file you want to trim.
- Right-click the file and select Properties.
- Go to the General tab and click Advanced.
- Ensure that the Compress contents to save disk space and Encrypt contents to secure data options are unchecked.
- Click OK to save the changes.
Solution 4. Disable the Trim Function
Some people report that they get rid of ERROR_FILE_LEVEL_TRIM_NOT_SUPPORTED successfully by disable the trim function. You can also have a try. Here’s the way:
Step 1. Press the Win + R keys simultaneously to open the Run window.
Step 2. Type “cmd” and press Enter to launch Command Prompt.
Step 3. In the prompt window, type the following command and press Enter.
fsutil behavior query DisableDeleteNotify
Step 4. If the result is DisableDeleteNotify =1, it means that trim is disabled. If it is 0, trim is enabled. Then, you can run the following command to disable trim:
fsutil behavior set DisableDeleteNotify 1
Solution 5. Run Disk Optimization
If none of the above solutions can help you fix ERROR_FILE_LEVEL_TRIM_NOT_SUPPORTED, you can try running disk optimization to solve the error. Here are the detailed steps:
Step 1. Press the Win + S keys simultaneously to open the Search window, type “Defragment and Optimize Drives” in the search box, and press Enter.
Step 2. Select your SSD or drive under the Status section, and click Optimize.
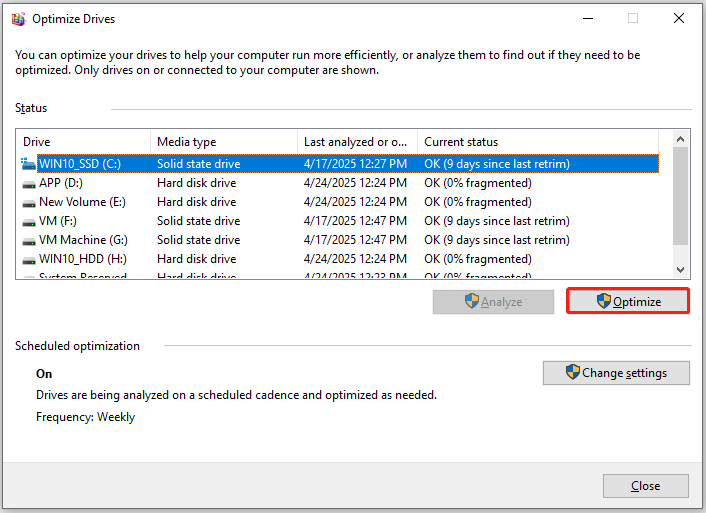
Step 3. After that, the utility will show you the progress and the status of the drive.
Step 4. Once the process is complete, you should see “OK” in the Current Status column.
In Conclusion
After reading this post, you may already know how to fix ERROR_FILE_LEVEL_TRIM_NOT_SUPPORTED. This post summarizes some useful solutions to solve the error. You can try them one by one until you fix the error successfully.
About The Author

Position: Columnist
Charlotte is a technology columnist with a strong focus on the Windows operating system, specializing in disk management, backup, and data recovery. She is passionate about analyzing computer errors, identifying root causes, and delivering practical solutions. In her free time, she stays updated on the latest developments in computer systems and hardware while continuously learning new technologies to broaden her expertise. Her writing style is clear and easy to understand, making complex technical topics accessible even to users with limited computer knowledge.
User Comments :