What if you want to enable Secure Boot without BIOS? Don’t worry. This article of MiniTool Partition Wizard will provide a full guide to enable Secure Boot without BIOS. You can have a try.
You should have heard that TPM and Secure Boot are required to install Windows 11. Secure Boot is a feature that prevents security threats during Windows startup. Most modern motherboards with UEFI firmware have this feature, providing a secure environment that prevents unauthorized computer access.
This security feature relies on UEFI firmware, allowing PCs to boot using trusted software from OEMs (original equipment manufacturers). But what if you can’t boot into the BIOS to turn on Secure Boot? Don’t worry. There are other ways to enable Secure Boot without going into the BIOS. This article will guide you to enable Secure Boot without BIOS.
To avoid data loss caused by the following operations, you should clone your important data to another storage device. For this purpose, you can try a professional partition manager, MiniTool Partition Wizard. Besides, it can migrate OS, clone disk, convert MBR to GPT, etc. If you have this need, download it to try.
MiniTool Partition Wizard DemoClick to Download100%Clean & Safe
How to Enable Secure Boot Without BIOS
Before you begin the process of enabling Secure Boot, make sure that your hardware is compatible with this feature. Here are the factors to be aware of before enabling Secure Boot:
- Disable CSM in BIOS.
- Install the latest Windows version.
- Make sure your BIOS is up to date.
- Set the boot mode to UEFI instead of Legacy.
Also, check its status on Windows to see if it is already enabled before enabling it. To check if Secure Boot is enabled on your PC, you can follow the steps below:
- Press the Windows + R key to open the Run box.
- In the Run box, type msinfo32 and press Enter to open the System Information window.
- On the right panel, scroll down to locate BIOS Mode and Secure Boot State. If the BIOS Mode is UEFI and the Secure Boot State is On, it means that the Secure Boot on your PC has been enabled.
If Secure Boot is disabled, you can try the ways below to enable Secure Boot without BIOS.
Way 1. Use Registry Editor
You can use Registry Editor to enable Secure Boot without BIOS. The steps are as follows:
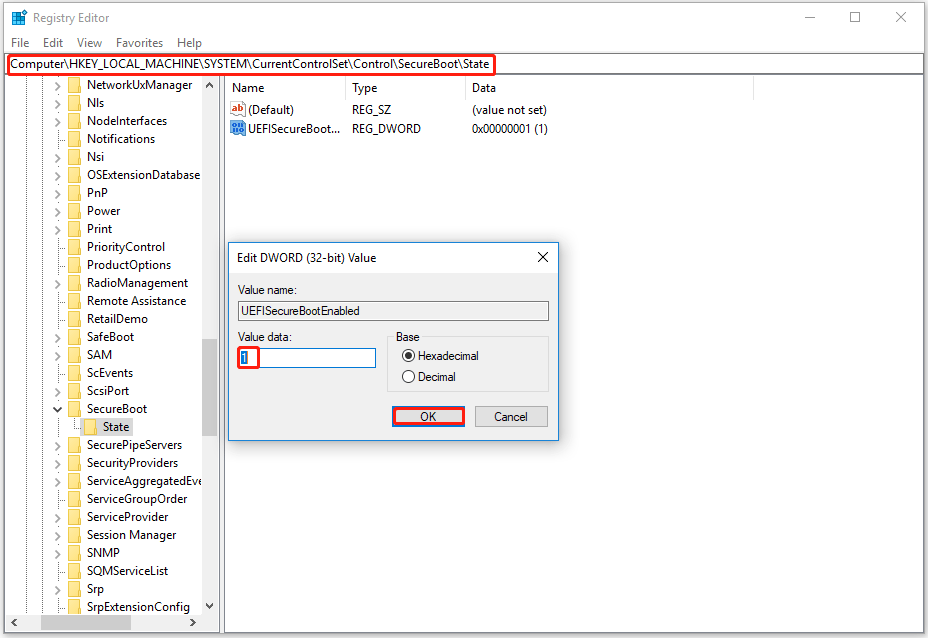
Step 1: Press the Win + R to open the Run dialog box. Then type regedit in it and press Enter to open Registry Editor.
Step 2: Navigate to the following path:
Computer\HKEY_LOCAL_MACHINE\SYSTEM\CurrentControlSet\Control\SecureBoot\State
Step 3: In the right panel, double-click on UEFISecureBootEnabled. Then set the Value data to 1 and click on OK.
Once done, restart your PC, and then check that the Secure Boot should be enabled on your PC.

Way 2. Use Windows PowerShell
You can also use Windows PowerShell to set the Secure Boot status to enabled. Proceed as follows:
Step 1: Type Windows PowerShell in the Search bar. Right-click on the best match to select Run as administrator.
Step 2: In the pop-up PowerShell window, type Set-SecureBootUEFI-Enable and press Enter.

Once done, restart your computer and check if Secure Boot is enabled.
Bottom Line
How to enable Secure Boot without BIOS? This post has provided a full guide. If you want to enable Secure Boot without BIOS, try the given methods now!
About The Author

Position: Columnist
Vega enjoys helping people with computer problems, including disk management, data recovery, data backup, and more. She is constantly expanding her knowledge in related fields. And she will continue to bring more easy-to-understand professional articles to help people solve various problems on the PC.
User Comments :