Once you can’t move mouse in NVIDIA Overlay, you will fail to interact with its features and perform the needed functions. This is pretty frustrating! Fortunately, there’s a workaround for the issue. This post collects 5 troubleshooting methods for you. Simply have a try!
MiniTool Partition Wizard DemoClick to Download100%Clean & Safe
Fix 1: Restart the Game
When you can’t move mouse in NVIDIA Overlay, the first thing you should do is to restart the game. Sometimes, the issue is nothing but some temporary glitch, so restarting the game is an effective way to solve the problem. To avoid data loss, you need to save any progress before closing the game.
Then exit the game from the game menu options. Alternatively, open Task Manager and close all background processes related to the game. Wait for a few moments and launch the game again. Then check if you can move mouse in NVIDIA Overlay.
Fix 2: Enable Borderless Window
After the mouse not moving in NVIDIA Overlay issue occurs, enable borderless window with the steps below. This method works sometimes.
Step 1: Click the gear icon to open the Settings menu.
Step 2: Go to the Video tab and change the Display Mode to Borderless Window.
Step 3: Change the Aspect ratio to 4:3 and 5:4.
Step 4: Set the Resolution to 1280 x 980.
Step 5: Save the changes and go back to NVIDIA Overlay to see if the mouse not moving in NVIDIA Overlay issue disappears.
Fix 3: Switch Between Programs with Keyboard Shortcuts
When you can’t move mouse in NVIDIA GeForce Experience Overlay, use the Alt + Tab keyboard shortcuts to switch between programs. This way allows you to switch to another already-open program while the game is still running. Then press the key combinations again to restore functionality within the NVIDIA Overlay.
Fix 4: Restarting In-Game Overlay
According to user reports, restarting in-game Overlay is an effective way to refresh its settings and restore normal functionality. You can also have a try when you can’t move mouse in NVIDIA GeForce Experience Overlay. Here are the steps for doing that.
Step 1: While you are in the game, press the Alt + Z or Alt + F3 keyboard shortcuts to bring up the Overlay.
Step 2: Tap on the gear icon to open the Overlay Settings menu.
Step 3: Find and toggle off In-Game Overlay under the General tab.
Step 4: Wait for some time before you enable the option again.
Step 5: Relaunch the game and check if the mouse not moving in NVIDIA Overlay issue is solved.
Fix 5: Update Graphics Drivers
Graphics drivers act as a crucial link between the hardware components and software applications on the PC. If the graphics drivers get outdated or incompatible with the running program, then you can’t move mouse in NVIDIA Overlay. In this case, try updating graphics drivers to solve the issue.
Step 1: Go to the official NVIDIA Drivers website to download the latest version of your graphics card driver.
Step 2: Type the necessary details and click on the Search button.
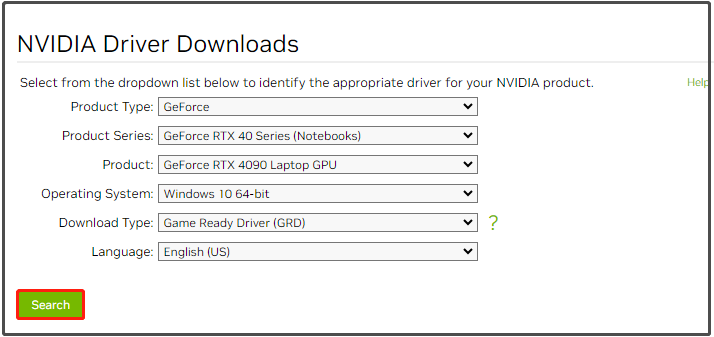
Step 3: Click on Download to get the latest driver version of your card model.
Step 4: After the download process ends, head to the location of the file and initiate the installation process.
Step 5: Follow the on-screen instructions to complete the update process.
User Comments :