For some reason, your BIOS recognizes SSD but won’t boot from it after you insert a new SSD. How can you solve the issue? In this post, Partition Magic introduces several feasible troubleshooting fixes for this annoying issue. You can have a try.
Many users report BIOS recognizes SSD but won’t boot the system from it after they replace or upgrade to a new SSD. This issue may occur due to multiple reasons, such as misconfigured BIOS settings, wrong boot mode, outdated BIOS, and so on.
After exploring why BIOS detects SSD but won’t boot, we summarize some workable solutions that may assist in repairing the issue. If you experience the same issue, you can refer to the following fixes.
Fix 1: Set the SSD as Active
It’s possible that BIOS sees SSD but won’t boot if the system partition on the SSD isn’t set as the active partition. To solve it, you need to set the specific partition as active. The following are detailed steps for you.
Step 1: Boot your computer from the old system hard disk.
Step 2: After your PC boots up normally, press Windows + R to open the Run dialog. Step 3: Type diskpart in the text box and then click OK.
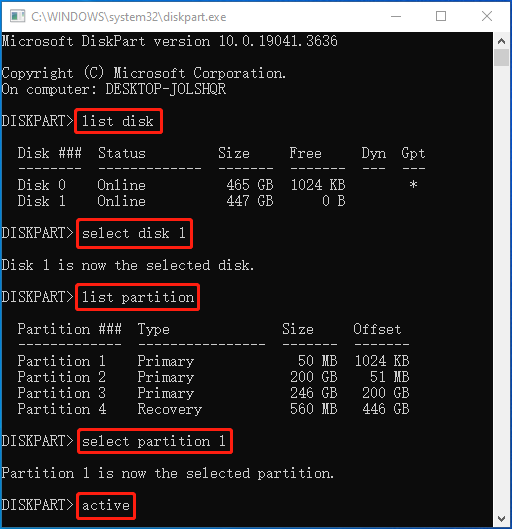
Step 4: In the prompted window, type the following commands and press Enter after each.
- list disk
- select disk N (replace N with the number of your SSD)
- list partition
- select partition X (X represents the number of the system partition on the SSD)
- active
If you are not familiar with Diskpart, we’d like to recommend you turn to MiniTool Partition Wizard to set the partition as active.
In addition, it is free disk partition software that is specially designed for managing partitions and disk usage. It has powerful functions, and it can handle various disk problems and partition jobs, such as creating partitions, formatting partitions from USB, changing cluster size, etc,
Simply download and install MiniTool Partition Wizard on your PC. Then follow this guide to set the partition as active: Should System Partition Be Active Partition for Normal Boot?
MiniTool Partition Wizard FreeClick to Download100%Clean & Safe
Once you set the system partition on the SSD as active, reboot your computer from the SSD to see if it can boot properly.
Fix 2: Enable Legacy Boot
The compatibility problems between the system and SSD may cause the issue that BIOS detects SSD but won’t boot from it. In this case, you can try to fix the issue by changing the boot mode from UEFI to Legacy. Here’s how to do this.
Step 1: Reboot your computer into BIOS.
Step 2: Go to the Boot tab. Then locate UEFI/BIOS Boot Mode and change the boot mode from UEFI to Legacy.
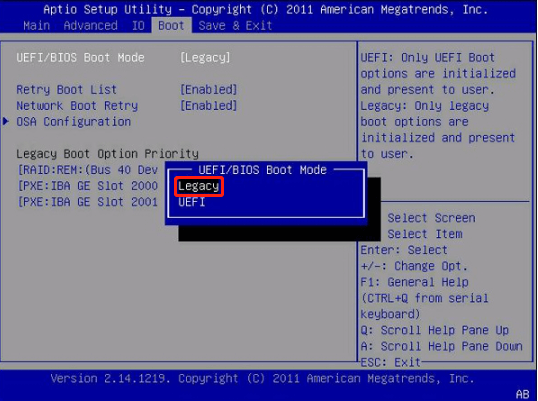
Step 3: After that, save the changes and exit the BIOS Setup Utility. Then check if your PC can boot from the SSD properly.
Fix 3: Reset BIOS
Resetting BIOS to the factory settings may also work when BIOS sees SSD but won’t boot. You can execute the operation easily with the given steps.
Step 1: Boot your computer into BIOS.
Step 2: Once you access the BIOS Setup Utility, switch to the Save & Exit section.
Step 3: Choose Restore Defaults and then tap Yes on the pop-up screen to confirm the operation.
Fix 4: Update BIOS
It’s also recommended that you update your BIOS if the BIOS recognizes SSD but won’t boot. By updating BIOS to the latest version, you are likely to fix existing problems on your computer. You can learn how to update BIOS from this tutorial: How to Update BIOS Windows 10 | How to Check BIOS Version.
Fix 5: Clean Install Windows
If none of the above methods help fix the issue that BIOS recognizes SSD but won’t boot, then you’d better try reinstalling Windows. It’s also an effective way that can solve lots of system issues on the PC. The following are detailed instructions on reinstalling Windows 10 and 11.
- Detailed Steps and Instructions to Reinstall Windows 10
- How to Reinstall Windows 11? Try 3 Simple Ways Here Now!
When BIOS recognizes SSD but won’t boot from it, you can try to fix it with the methods listed in this post. If you have any other great solutions to this issue, please send a message to share them with us.
About The Author

Position: Columnist
Cecilia has been an editor at MiniTool for two years. She primarily focuses on disk and partition-related content, with particular expertise in disk cloning, partition recovery, and PDF document conversion. She is dedicated to providing users with clear and accurate solutions to help them efficiently resolve common computer problems.
User Comments :