If you are looking for an AHCI Port0 Device Error fix guide, this post is what you need because it collects several solutions to the error. To view the details, explore the content in this post of MiniTool Partition Wizard.
Symptoms and Causes of AHCI Port0 Device Error
AHCI Port0 Device Error usually occurs during the PC boot-up process. Once the error happens, you can’t access the main screen. Besides, your PC may have one of the following symptoms due to this error.
- Application or the system freezing: Neither the application nor the OS reacts to your mouse clicks or other commands. The freeze is usually short-lived before your system goes back to normal operation.
- Application or OS crashing: The application or the system doesn’t respond to any of your commands.
- Your system reboots randomly and without your prompting.
- Connection problems
- Other error messages or BSOD errors
What causes this boot menu error – AHCI Port0 Device Error? After looking into the error, we find that the issue often occurs due to the reasons below.
- There’s a failing hard drive.
- The SATA port is malfunctioning.
- There are corrupted system files related to AHCI.
Related article: 6 Methods for Troubleshooting PCI Express Root Port Error
Fix 1: Restart the PC
If the AHCI Port0 Device Error occurs, you can perform a restart on your PC. As you know, restarting the PC solves many errors with the computer. Here, you can also have a try. As AHCI Port0 Device Error blocks access to the main screen, you can’t make use of the startup menu or utilize shortcut keys.
Therefore, you need to manually restart the PC with the steps below.
Step 1: Hold the Power button of the PC for 5 seconds to turn it off.
Step 2: Let your PC keep the off status for about 30 seconds. This prevents the motherboard, power supply, and other essential hardware from getting damaged.
Step 3: Then turn on your computer by pressing the Power button again.
Fix 2: Switch to the IDE Port
Another AHCI Port0 Device Error fix is to switch the AHCI port to IDE port. You can do that by using these steps.
Step 1: Disconnect external devices from your PC.
Step 2: Switch AHCI to IDE port if you are using a SATA disk.
Step 3: Check if there are any loosely connected power or data cables on the PC.
Step 4: Reboot the computer and check if the error is fixed.
Also read: AHCI vs IDE: What’s the Difference Between AHCI and IDE
Fix 3: Check Hard Drive for Errors
It’s also necessary to check hard drive for error when the boot menu error – AHCI Port0 Device Error occurs. Since your computer can’t boot normally, you should create a bootable CD/DVD/USB drive via MiniTool Partition Wizard on another working PC.
MiniTool Partition Wizard DemoClick to Download100%Clean & Safe
Then boot the problematic computer from the burned MiniTool bootable flash drive. After entering the main interface of MiniTool Partition Wizard, follow the steps below to check hard drive for errors.
Step 1: Right-click on the system disk and choose Surface Test.

Step 2: In the prompted window, click the Start Now button to begin the scan process.
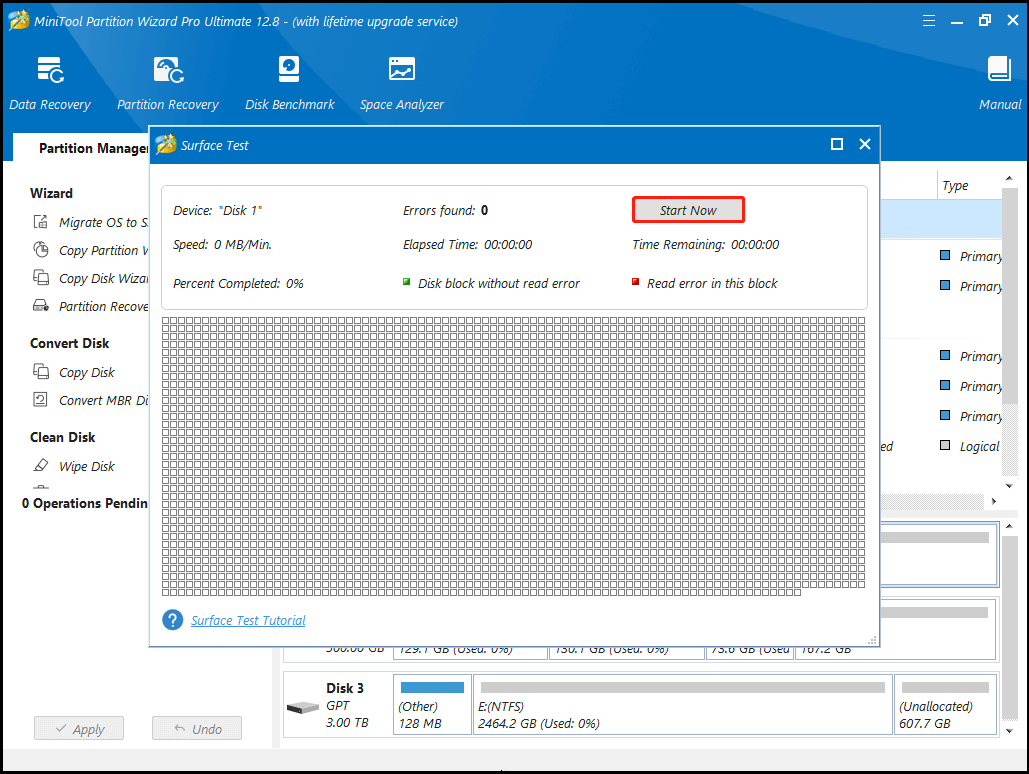
Step 3: After the scanning process ends, the full scan result will be displayed. If any blocks are marked with red, it means that your hard drive has bad sectors. You need to shield them or directly replace the hard drive.
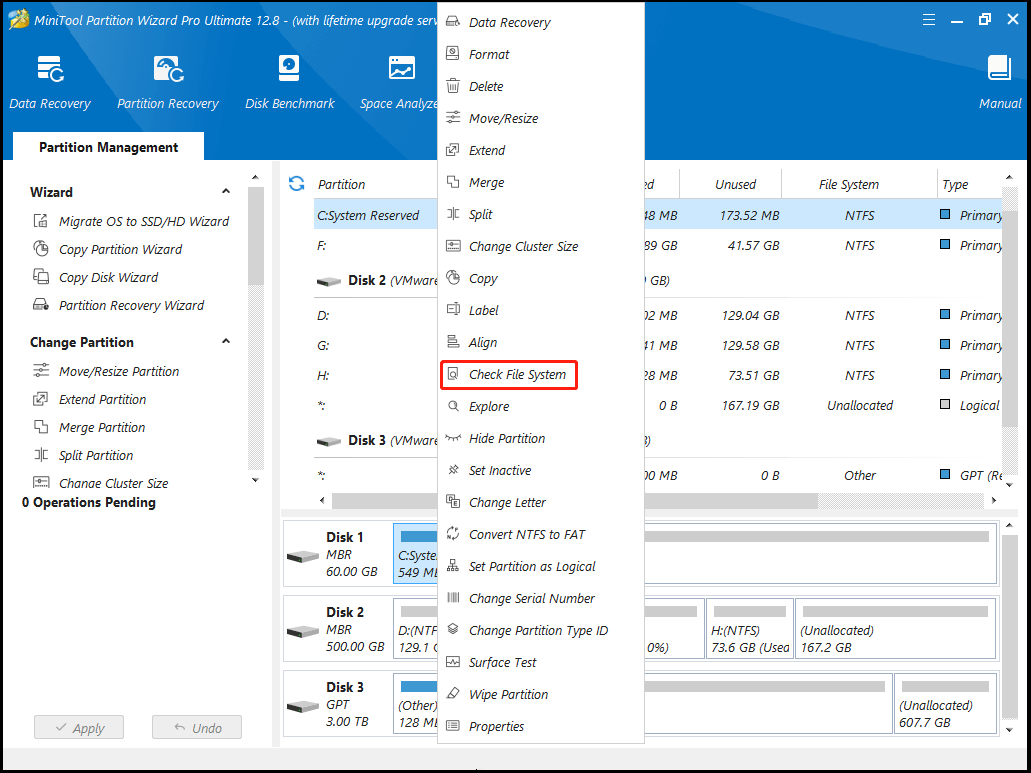
Step 4: To check if your drive has file system errors, right-click on the target disk and select Check File System in the context menu.
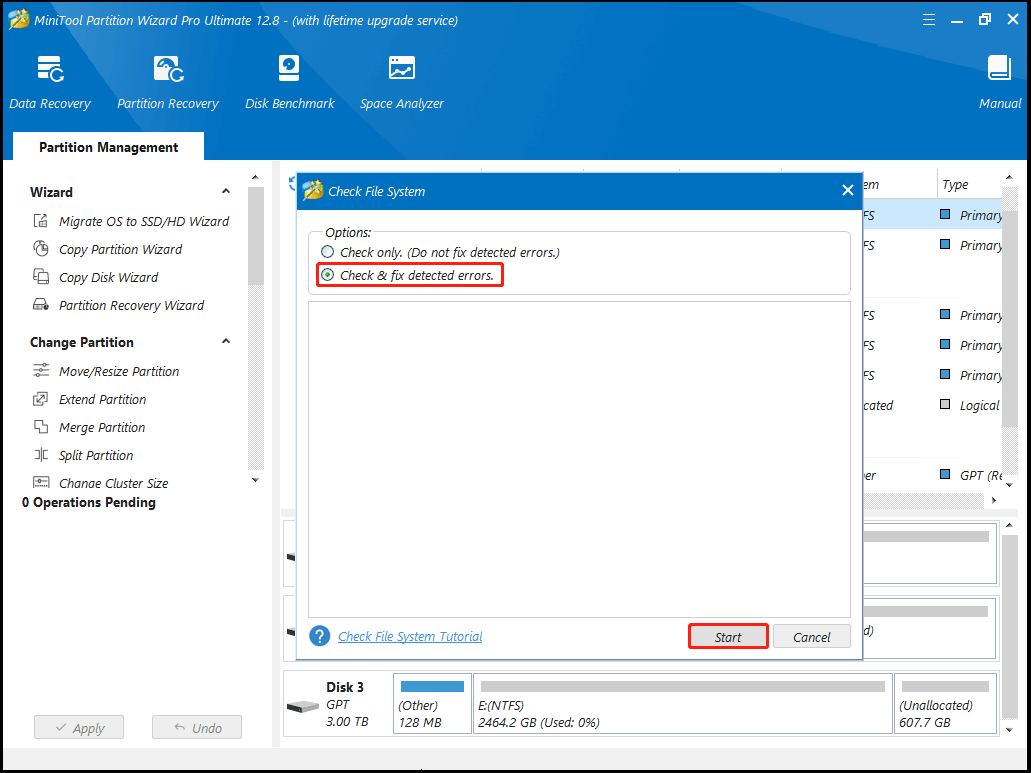
Step 5: In the next window, choose a scan way based on your demands and click Start. Here, we select Check & fix detected errors. Any found file system error will be fixed after the process ends.
Fix 4: Reset BIOS to Default Settings
Step 1: Switch off the computer and turn on it again. Once the display appears, keep pressing the BIOS key (F1, F2, F10, F12, or Del key) to access the BIOS.
Step 2: Find and click on the Load Optimized Defaults or Defaults option.
Step 3: In the pop-up confirmation window, click OK to proceed.
If you can’t access BIOS, remove and reinsert the CMOS battery to reset the BIOS to default. However, this operation requires an overall understanding of the PC hardware components. If you are not fully capable, you’d better contact a repair professional.
User Comments :