What should you do to fix the Windows update error 0x8024F001? If you come across the same error on your PC, you don’t need to worry. This post of Partition Magic offers several effective methods to help you get rid of the error.
Keeping Windows up-to-date can maintain system security, improve performance, and ensure compatibility with newer software and hardware. However, some people report that they encounter error code 0x8024F001 when they try to install Windows updates on their PCs.
For example, here is a user report from the answers.microsoft.com forum:
0x8024F001 starts when installing updates
Downloading updates doesn’t have a problem. However, when it comes to the part that it will install, I will receive this error code. Didn’t Microsoft already fix this issue? Why is it always happening to people?https://answers.microsoft.com/en-us/windows/forum/all/0x8024f001-starts-when-installing-updates/6d013e0d-cf27-4059-8230-2b54567cbd37
Have you also run into the same error? No worries. Continue reading, you can get a comprehensive guide to solve the error.
What Causes the Windows Update Error 0x8024F001?
What causes the Windows update error 0x8024F001? After searching for this error on various forums and posts, I found that the error can mainly be triggered by these reasons:
- Corrupted update files
- Issues with the update services
- Third-party software interferences
- Missing or corrupted update components
- Low disk space
- Corrupted system files
After knowing the possible causes of the Windows update error 0x8024F001, you can continue and try the following methods to solve the error.
Method 1. Run Windows Update Troubleshooter
When facing issues related to updates on your PC, using the Windows Update Troubleshooter is an effective option. This tool helps resolve problems associated with Windows updates. Here’s the way:
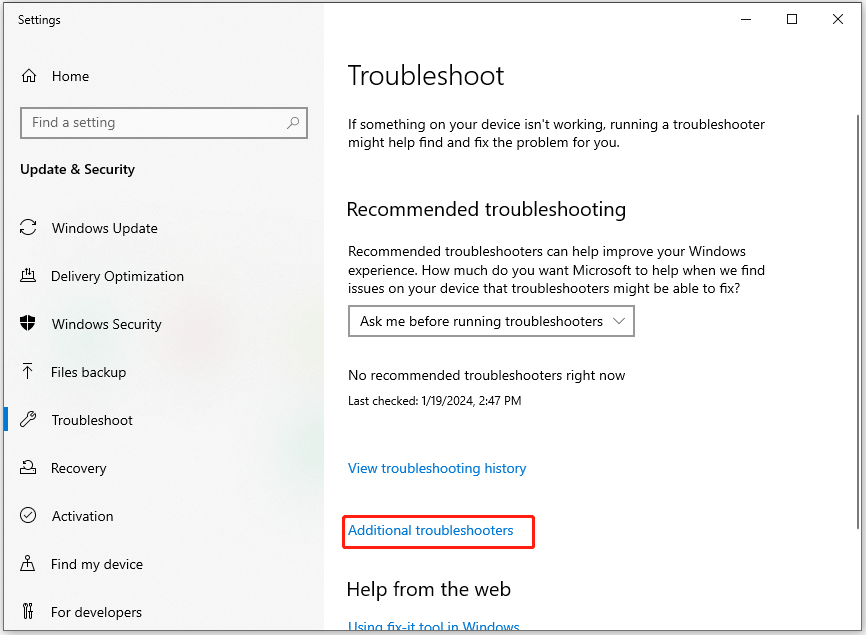
Step 1. Press the Win + S keys simultaneously to open the Search window.
Step 2. Type “troubleshoot settings” in the search box, and press Enter.
Step 3. In the pop-up window, click Additional troubleshooter in the right panel.
Step 4. Then, choose the Windows Update option and click the Run the Troubleshooter button.
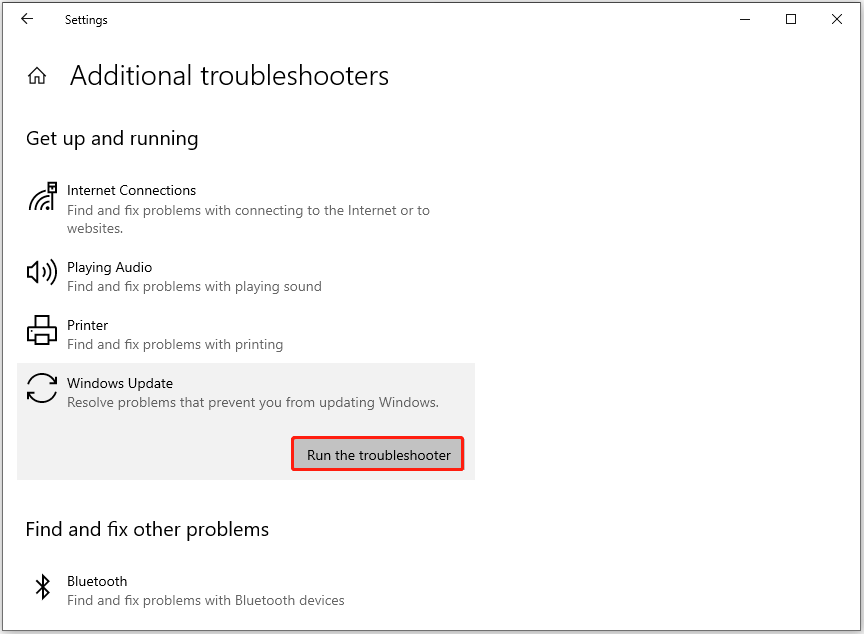
Step 5. Once done, if there are any issues found, follow the on-screen guide to fix them. After that, restart your PC and check if the Windows update error 0x8024F001 has been resolved.
Method 2. Check Update Relevant Services
If there are any issues with the update-related services, you can encounter errors easily, including the Windows update error 0x8024F001. So, you can try restarting all the update-relevant services by following the steps mentioned below to fix the error:
- Press the Win + R keys simultaneously to open the Run window.
- Type “services.msc” in the box and press Enter.
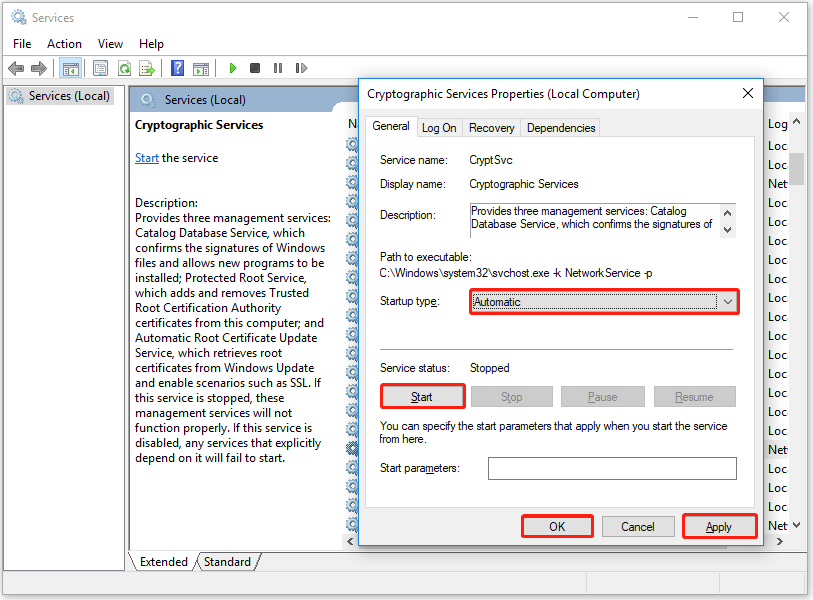
- In the Services window, right-click Background Intelligent Transfer Service and select Properties.
- Select Automatic from the drop-down menu of Startup type.
- Then, click on Start in the Service status section.
- Click Apply and OK to save the changes.
- Next, do the same operations with Cryptographic Services and Windows Update.
- Once done, restart your PC and check if you fixed the Windows update error 0x8024F001 successfully.
Method 3. Run Disk Cleanup
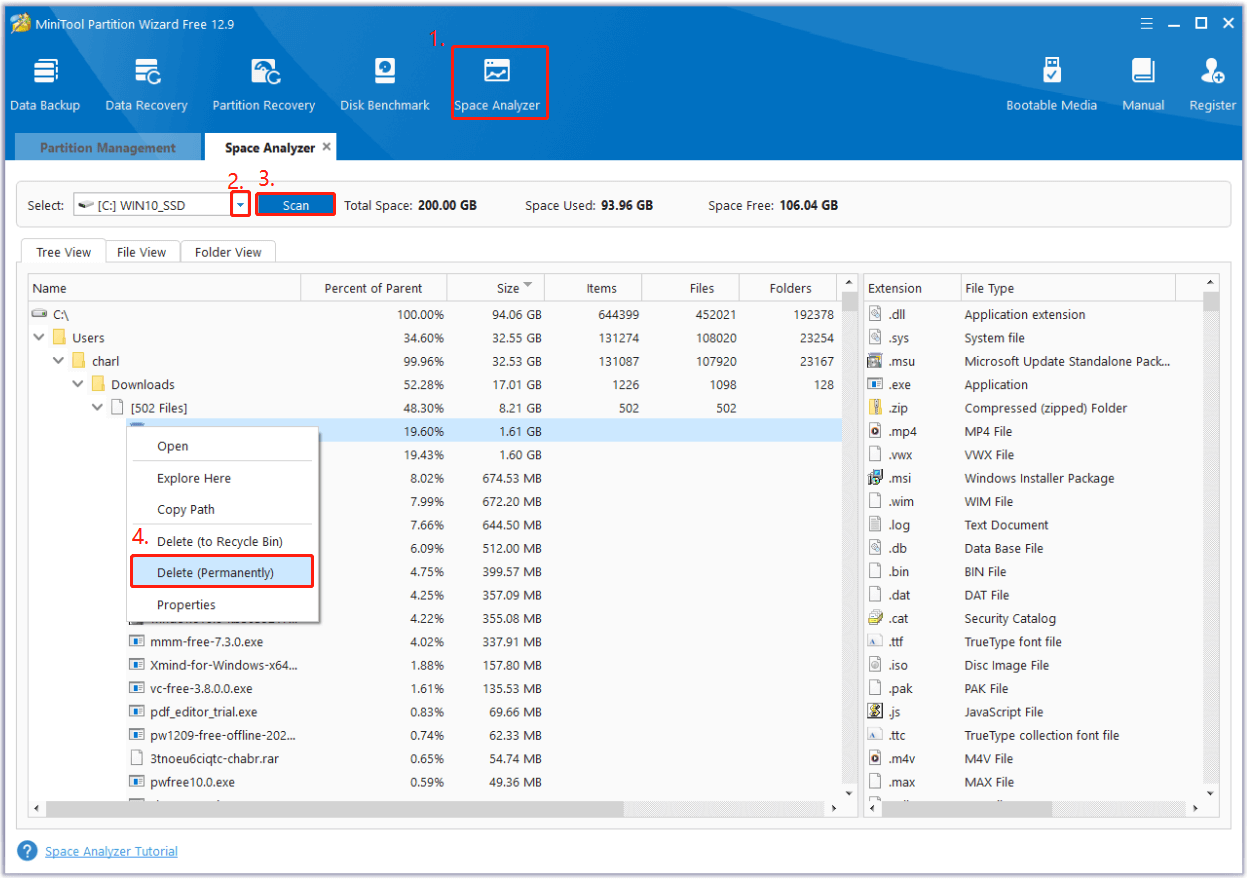
Low disk space can cause the Windows Update error 0x8024F001 as well. Therefore, you can try removing unwanted/unnecessary files to get more free space. To do that, I highly recommend MiniTool Partition Wizard.
It is a powerful partition disk manager that offers the Space Analyzer feature to scan and layout disk storage usage. You can find and remove your unwanted/unnecessary files easily with its help.
What’s more, this multifunctional tool can also help you partition hard drive, check disk for errors, change cluster size, convert MBR to GPT, rebuild MBR, recover data from hard drive, and so on. Here’s the guide:
MiniTool Partition Wizard FreeClick to Download100%Clean & Safe
- Download and install MiniTool Partition Wizard on your PC.
- Launch this app to enter its main interface.
- Click Space Analyzer from the top toolbar.
- Select your system drive from the drop-down menu of Select, and click Scan
- Right-click the file/folder you don’t want, and select Delete (Permanently).
Method 4. Check Time and Date
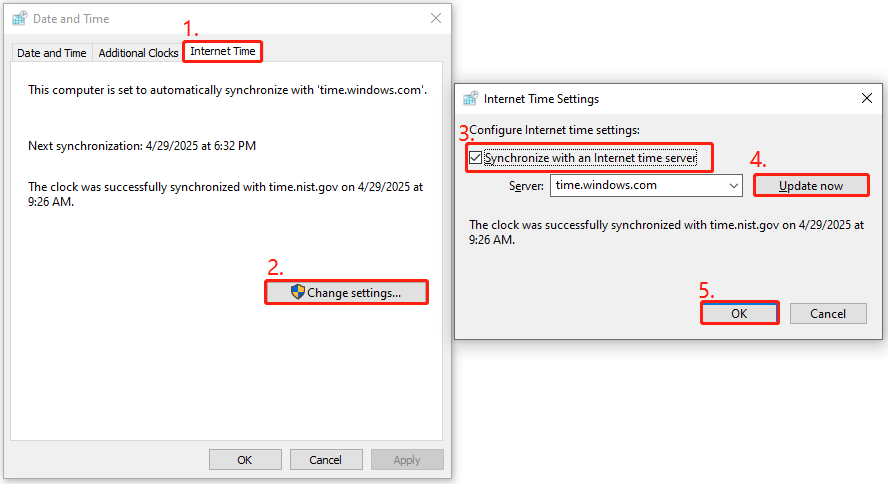
The wrong time and date may easily cause the Windows update error 0x8024F001. So, you can try to check and update the time and date to fix the error. Here’s the way:
- Open the Search window, type “control panel” and press Enter.
- Set View by as Category, and click Clock and Region > Date and Time.
- Then, go to the Internet Time tab, and click Change Settings.
- Check the box of the Synchronize with an Internet time server option.
- Then, click Update now and click OK.
Method 5. Reset Windows Update Components
Missing or corrupted update components can lead to the Windows update error 0x8024F001 as well. In this situation, you can try resetting Window update components to fix the error. Here’s the guide:
Step 1. Open the Search window, type “cmd” in the search box. Then, right-click Command Prompt and select Run as administrator.
Step 2. If the User Account Control window pops up, click Yes to continue.
Step 3. In the elevated Command Prompt window, execute the following commands, and don’t forget to press the Enter key each time:
- net stop bits
- net stop wuauserv
- net stop appidsvc
- net stop cryptsvc
- Del “%ALLUSERSPROFILE%\Application Data\Microsoft\Network\Downloader\*.*”
- rmdir %systemroot%\SoftwareDistribution /S /Q
- rmdir %systemroot%\system32\catroot2 /S /Q
- regsvr32.exe /s atl.dll
- regsvr32.exe /s urlmon.dll
- regsvr32.exe /s mshtml.dll
- netsh winsock reset
- netsh winsock reset proxy
- net start bits
- net start wuauserv
- net start appidsvc
- net start cryptsvc
Step 4. Once done, reboot your system and check if the error code 0x8024F001 has been resolved.
Method 6. Use the “Fix Problems Using Windows Update” Option
In Windows 11, if 0x8024F001 starts when installing updates, you can try using the “Fix problem using Windows Update” option to fix the error. Here’s how to do that:
- Press the Win + I keys simultaneously to open the Settings window.
- Select System from the left panel.
- Scroll down to find and select Recovery.
- Then, you can see the “Fix problem using Windows Update” option.
- Click Reinstall now.
- Next, follow the on-screen instructions to complete the process.
- Once done, check if the error has been resolved.
Method 7. Install the Update Manually
You can also try downloading the Windows update from the Microsoft Catalog and then installing it manually on your PC. Here are the detailed steps:
- Open your browser, and then navigate to Microsoft Update Catalog.
- Type the KB number in the search box and press Enter.
- Find the file that matches your device’s system type and click Download.
- Then, click the links in the pop-up window.
- After that, double-click the executable file and follow the on-screen instructions to complete the installation process.
In Conclusion
This post analyzes what causes the Windows update error 0x8024F001 and provides some helpful methods to fix the error. You can try the mentioned methods one by one until you fix the error successfully.
About The Author

Position: Columnist
Charlotte is a technology columnist with a strong focus on the Windows operating system, specializing in disk management, backup, and data recovery. She is passionate about analyzing computer errors, identifying root causes, and delivering practical solutions. In her free time, she stays updated on the latest developments in computer systems and hardware while continuously learning new technologies to broaden her expertise. Her writing style is clear and easy to understand, making complex technical topics accessible even to users with limited computer knowledge.
User Comments :