Disk/Partition Turns to RAW
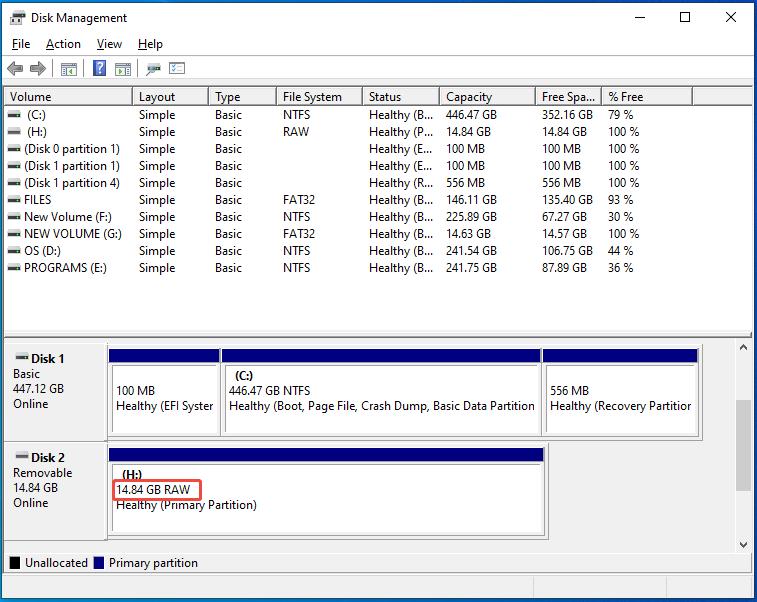
A disk or partition sometimes becomes RAW. If so, you will see a “RAW” label next to its capacity in Disk Management as shown in the picture below.
Most of the time, a drive turns RAW because of physical failure. However, sometimes factors like file system corruption, incompatible file system, incorrect or improper disconnections, and malware attacks can turn a partition into RAW.
The partition can also become RAW in the following scenarios.
- You cancel the formatting process before it finishes.
- You create a partition without a file system
- If you connect an HFS+ formatted drive to a Windows computer, it will register as RAW.
What Is a RAW Partition
A RAW partition is a disk area that the operating system can’t recognize or access. In essence, RAW means the data is here but the operating system can’t interpret it as files and folders.
The RAW partition is unusable, which means that you are unable to write new data or access files saved on the RAW partition until it is fixed.
Nevertheless, you can still perform certain actions on the RAW partition, such as changing drive letter and paths, formatting/shrinking/deleting the partition.
Common Errors Related to RAW Partitions
Once a partition becomes RAW, you can receive some errors while accessing it. Here, I summarize common errors related to the RAW partition.
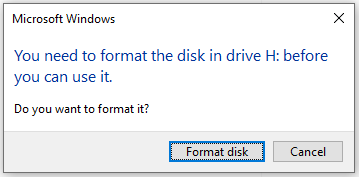
#1: You need to format the disk in drive X before you can use it.
While you access a RAW drive, the error “You need to format the disk before you can use it” will appear. In this case, you can’t access the drive unless you format it with a recognizable file system like NTFS, FAT32, exFAT, etc.
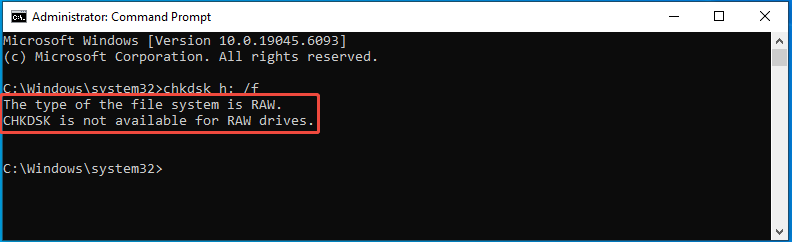
#2: The type of the file system is RAW. CHDKSK is not available for RAW drives.
If you run CHKDSK on the RAW partition, you will receive the “CHKDSK is not available for RAW drives” error. Likewise, you need to turn the RAW partition into a normal one to run CHKDSK on it successfully.
#3: The disk in drive X is not formatted. Do you want to format it?
When you connect a USB drive to a Windows computer and try to access its data, you may receive “The disk is not formatted” or “USB drive not formatted” error.
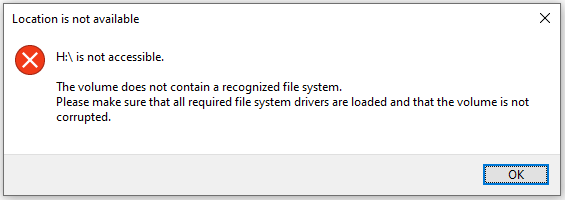
#4: There was an error accessing drive X: The disk is not formatted.
While you access a RAW drive, you may receive error messages like “H:\ is not accessible. The volume does not contain a recognized file system” or “There was an error accessing drive X: The disk is not formatted”.
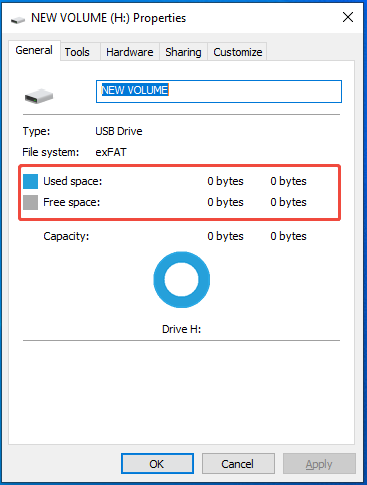
#5: Disk space is 0 bytes.
After opening the properties of the RAW partition, you will find that its disk space is 0 bytes.
Preliminary Methods for Fixing for RAW Drive
You must repair the RAW drive first before accessing the RAW partition and the saved data on it. Here are some basic troubleshooting methods for you.
- Scan the RAW partition with antivirus software.
- If the RAW partition is on removable storage devices, disconnect them > restart the computer > reconnect them.
- Connect the external hard drives to other available USB ports or another PC to see if you can access them normally.
Reasons for Converting RAW to NTFS
As mentioned earlier, you can’t access the RAW partition unless you convert or format it into a recognizable file system. NTFS, FAT32, and exFAT are three main file systems on Windows PCs.
NTFS is the primary file system for Windows, while FAT32 and exFAT are often used for compatibility with other systems or older devices.
Compared with FAT32 and exFAT, NTFS takes some advantages. For instance, it contains powerful user permission management, compression, file encryption, as well as journaling and audit functions.
Besides, it can be integrated with the security and management mechanisms of the Windows system. It’s also worth noting that NTFS supports big drives (up to 16TB) and large files (up to 16TB).
Therefore, it’s recommended to convert RAW to NTFS. Here comes the question: how to convert a RAW partition to NTFS without losing data? The following section shows you a step-by-step tutorial.
Convert RAW to NTFS Without Losing Data
You should take 2 moves if you want to convert a RAW partition to NTFS without losing data. Firstly, you need to recover the data from the RAW partition and save it to a removable storage device like USB or external hard drive.
Secondly, you convert/format the RAW partition to NTFS by using tools like Command Prompt, File Explorer, Disk Management, and MiniTool Partition Wizard. Choose a preferred tool and follow the corresponding steps to finish the operation.
Move 1: Recover the Data from the RAW Drive
To convert RAW to NTFS without losing data, you should bring the data back from the RAW partition and save it to an external drive before starting the conversion. For doing that, you need to use a piece of data recovery software.
MiniTool Partition Wizard is such software. Data Recovery is one of its featured functions, which can help you recover data from RAW drives and other storage devices.
Now, get MiniTool Partition Wizard installed on your computer. Then launch it and follow the steps below to recover the data from your RAW drive.
MiniTool Partition Wizard DemoClick to Download100%Clean & Safe
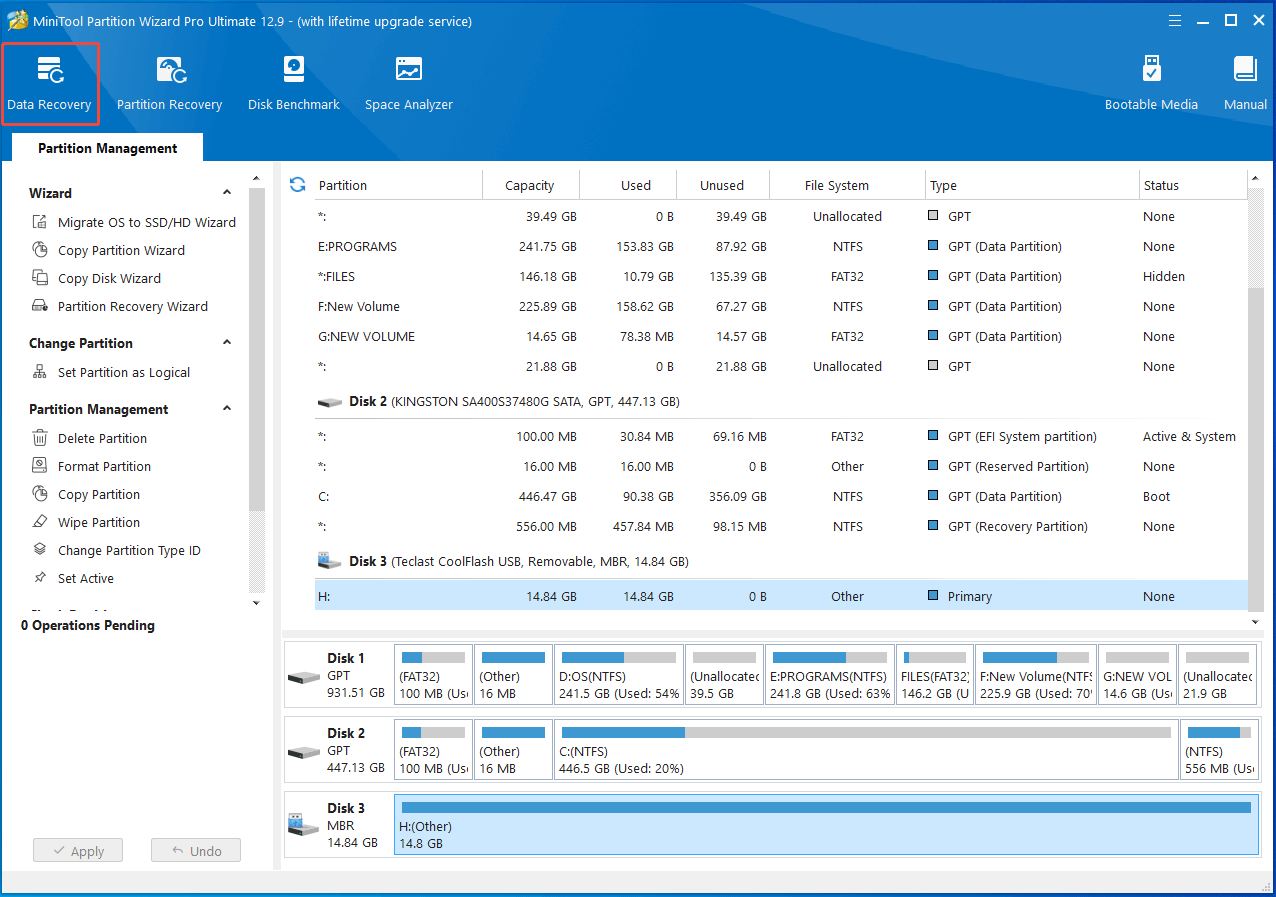
Step 1: In the main interface of the software, click Data Recovery in the tool bar.
Step 2: Under the Logical Drives section, hover over the RAW drive and click Scan.
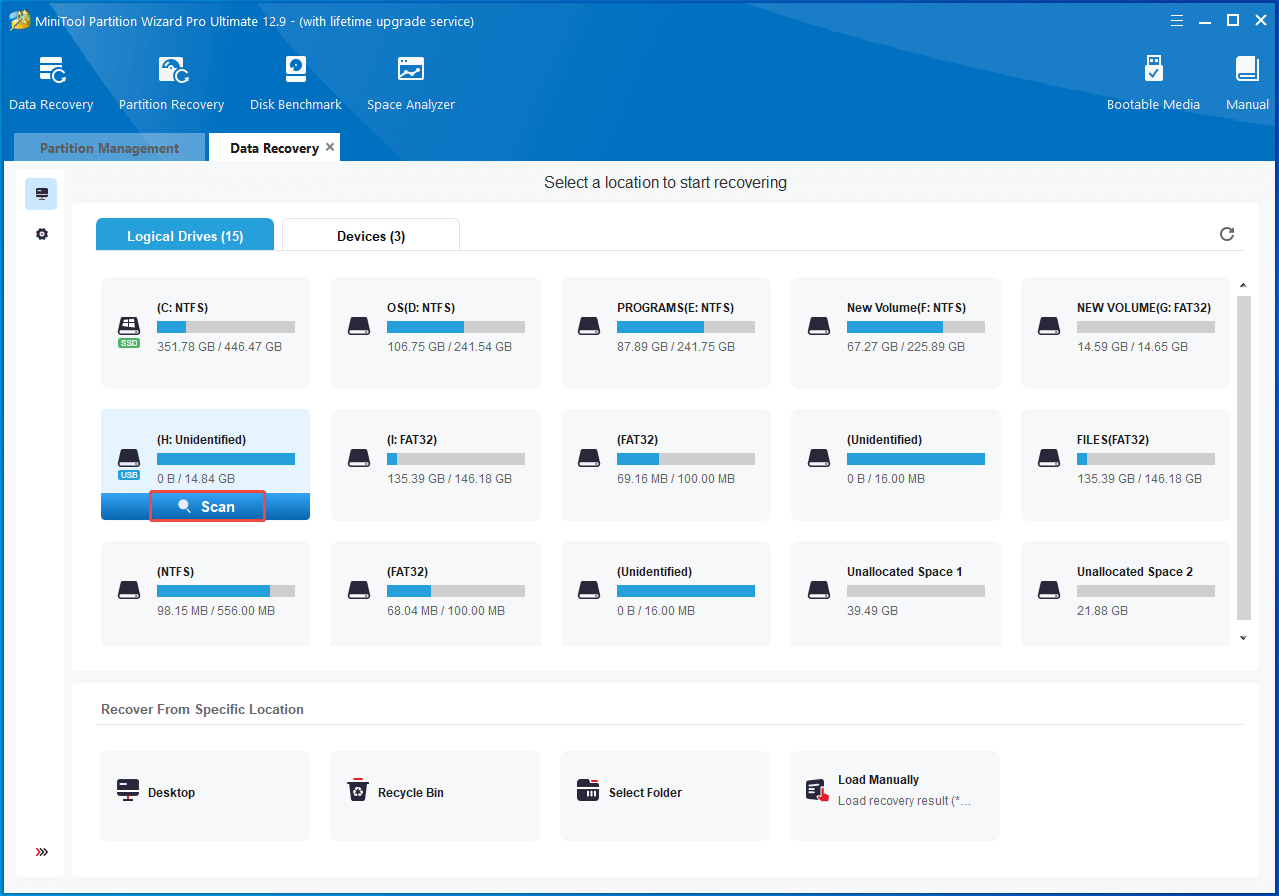
Step 3: Wait until the scanning process ends. Once done, find the needed data andclick Save.
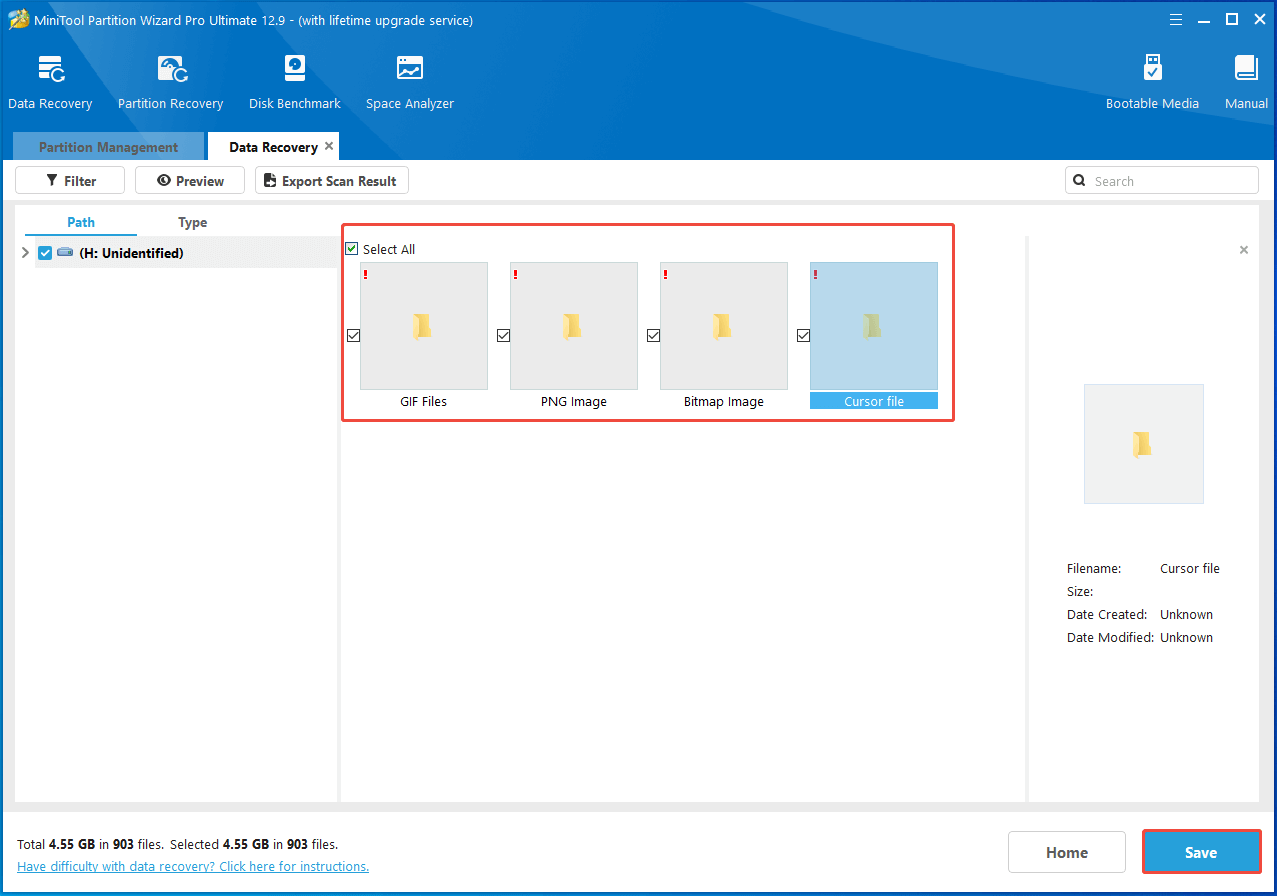
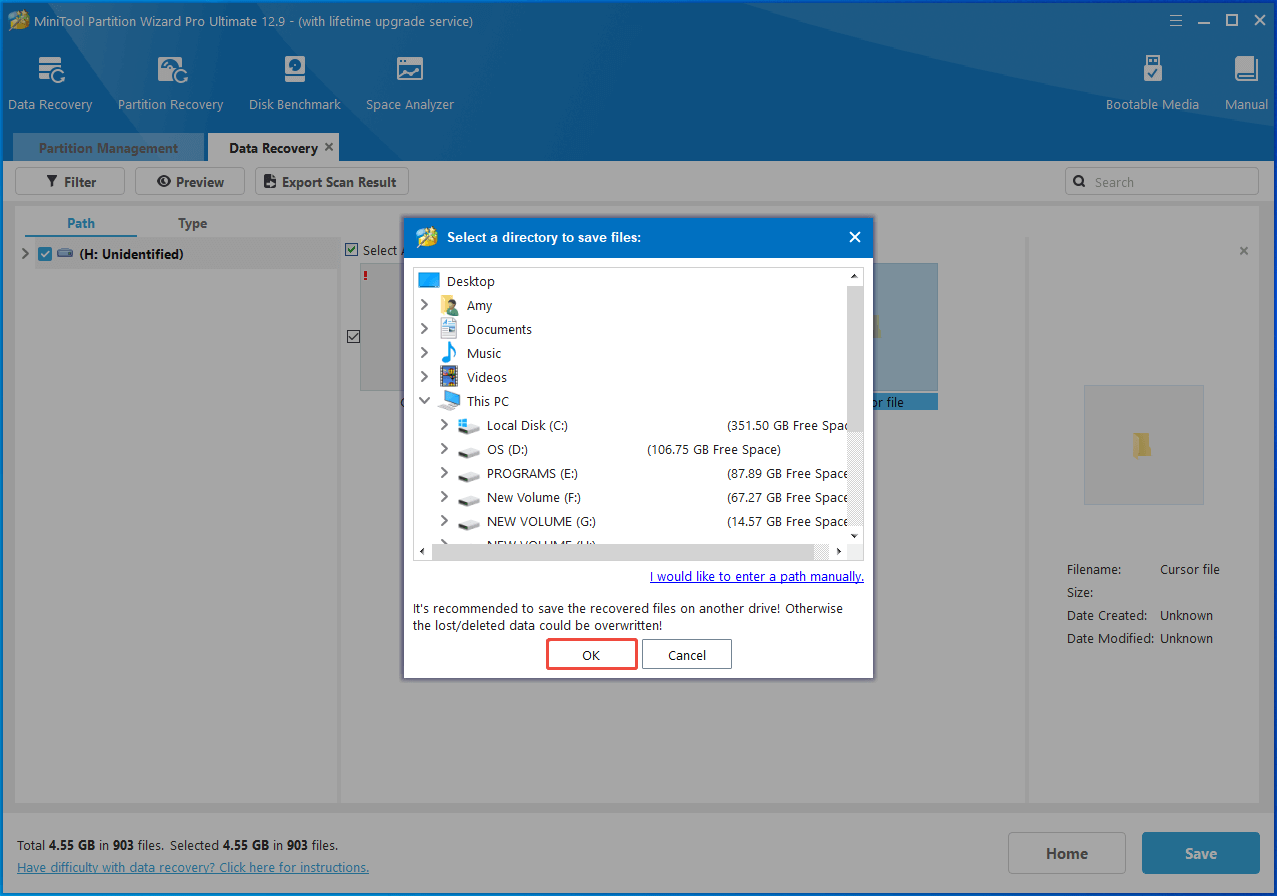
Step 4: In the prompted window, select a directory for the saved data and click OK to save changes.
Step 5: Wait for the finish of the process.
Move 2: Convert RAW to NTFS
After you save the lost data of the RAW partition to an external drive, you can convert RAW to NTFS by formatting it.
Here, I collect several available methods for you. According to your condition, select a suitable one. If you are an experienced advanced user, you can convert RAW to NTFS using CMD. If you want to apply a simple method, use File Explorer or MiniTool Partition Wizard to perform the conversion.
#1: Format RAW to NTFS with CMD
Command Line is a command-line tool on Windows. It helps you perform various tasks, including creating/formatting/extending/shrinking/deleting/cleaning partitions, adding drive letters, converting MBR to GPT, etc.
Here, you can convert RAW to NTFS CMD. The following steps show you how to convert RAW to NTFS without losing data using CMD.
Step 1: Run Command Prompt as administrator from the search box.
- Type cmd in the search box.
- Click Run as administrator under Command Prompt on the right pane.
Step 2: In the User Account Control window, click Yes to allow the operation.
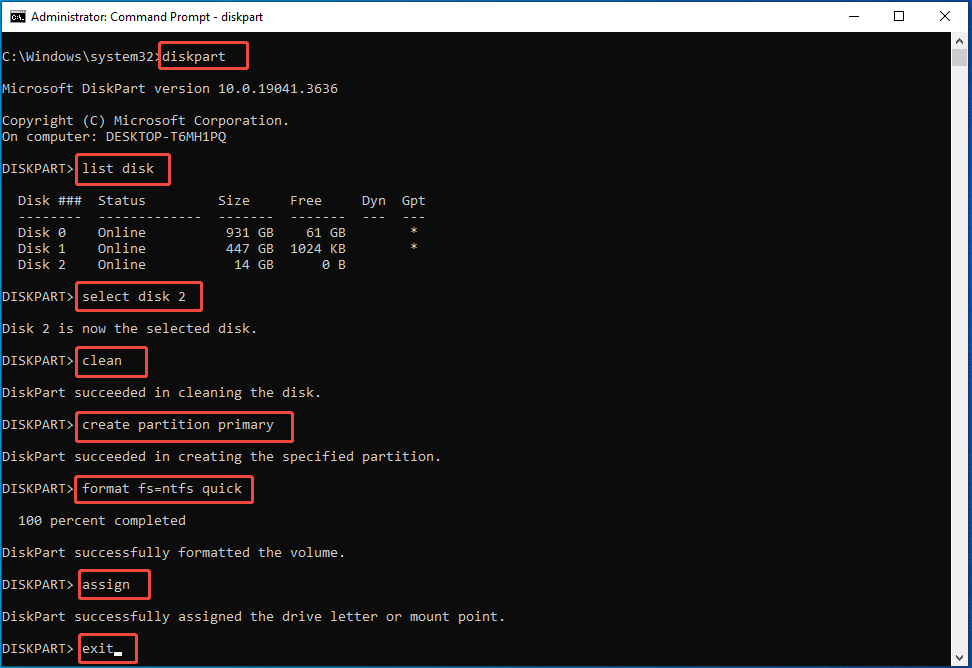
Step 3: In the Command Prompt window, type the following commands and hit Enter after each.
- diskpart
- list disk
- select disk 2 (replace 2 with the actual disk number)
- clean
- create partition primary
- format fs=ntfs quick
- assign
- exit
#2: Format RAW to NTFS with File Explorer
File Explorer not only helps you manage files/folders, but also allows you to format drives connected to the computer. Now, you can use it to convert RAW to NTFS. Here’re detailed steps for you.
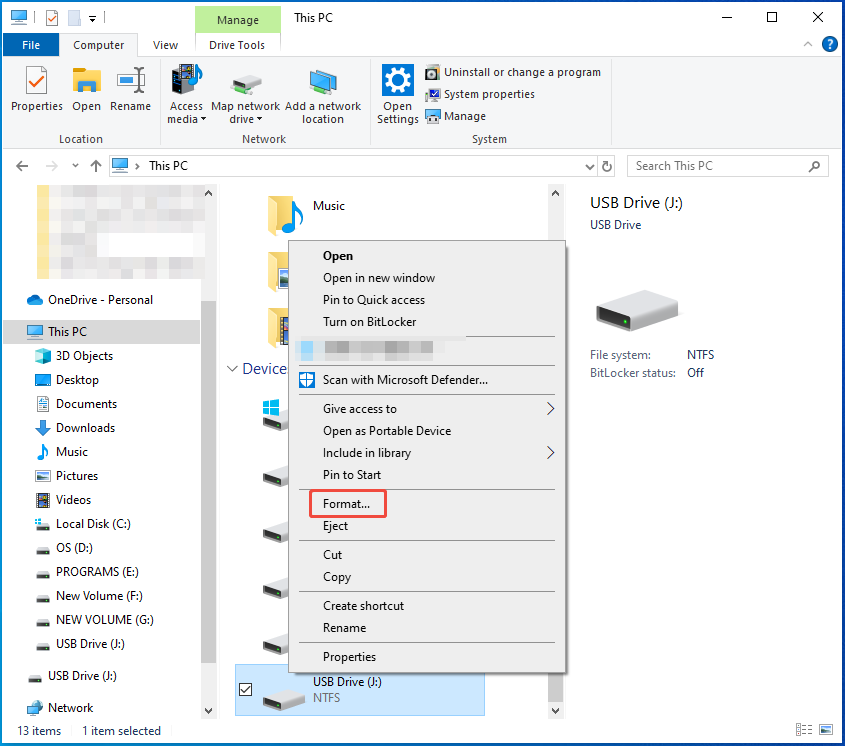
Step 1: Open File Explorer by pressing the Windows and E keys.
Step 2: Tap This PC in the left pane, and then move to the right side of the window and locate the RAW drive.
Step 3: Right-click the RAW drive and hit the Format option.
Step 4: Select NTFS from the file system drop-down menu and click Start.
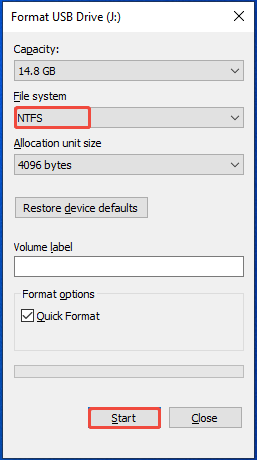
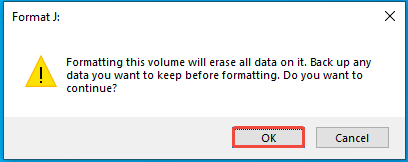
Step 5: In the warning window, click OK to confirm the operation.
#3: Format RAW to NTFS with Disk Management
Disk Management is a built-in disk manager on Windows computers. With it, you can set the disk online/offline, initialize the disk, convert the disk to dynamic/basic one, mark partition as active, change drive letter and path, and create/extend/shrink/format/delete volumes.
Now, open Disk Management and use it to format the RAW drive into NTFS with the steps below.
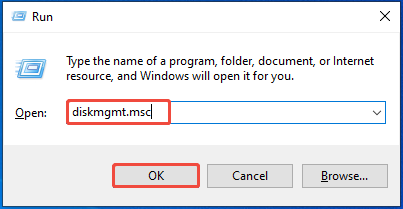
Step 1: Open Disk Management from the Run window.
- Open the Run window by holding the Windows + R keys.
- Type diskmgmt.msc and click OK.
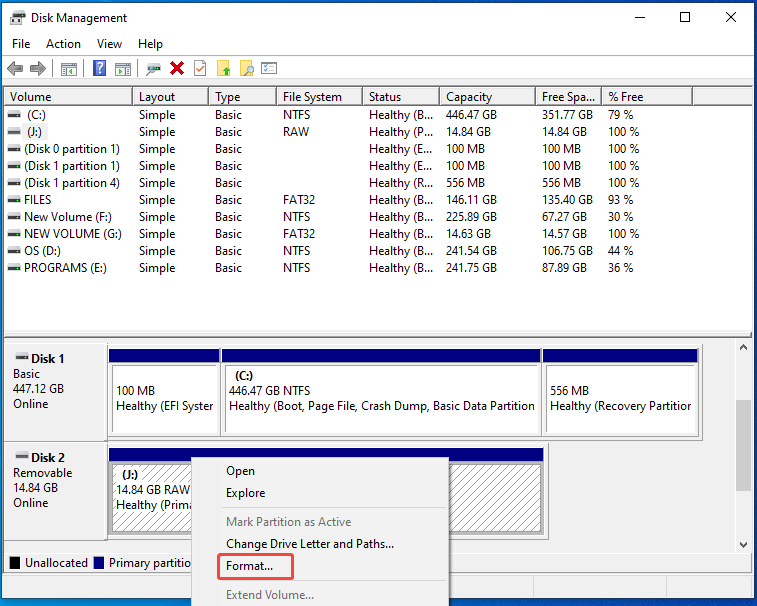
Step 2: In Disk Management, right-click the RAW partition and pick Format on the context menu.
Step 3: In the prompted window, select NTFS from the drop-down menu and click OK to save changes.
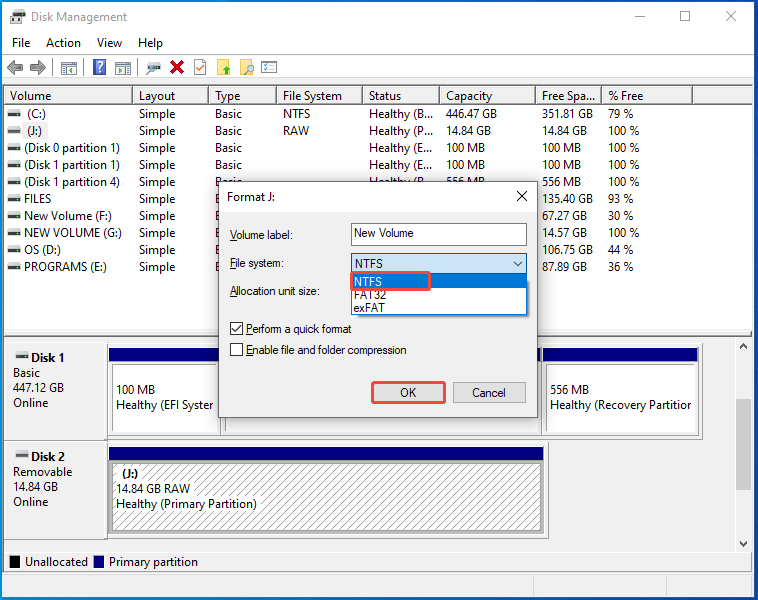
Step 4: Likewise, click OK in the warning window to execute the operation.
#4: Format RAW to NTFS with MiniTool Partition Wizard
In addition to above Windows built-in tools, third-party partition software like MiniToolPartition Wizard also helps you format RAW to NTFS. Given that fact, it can be used as a RAW format tool.
Additionally, it is also considered as a FAT32 formatter, USB formatter, SD card formatter because of its powerful features. Get this software installed and use it to format your RAW partition to NTFS.
MiniTool Partition Wizard FreeClick to Download100%Clean & Safe
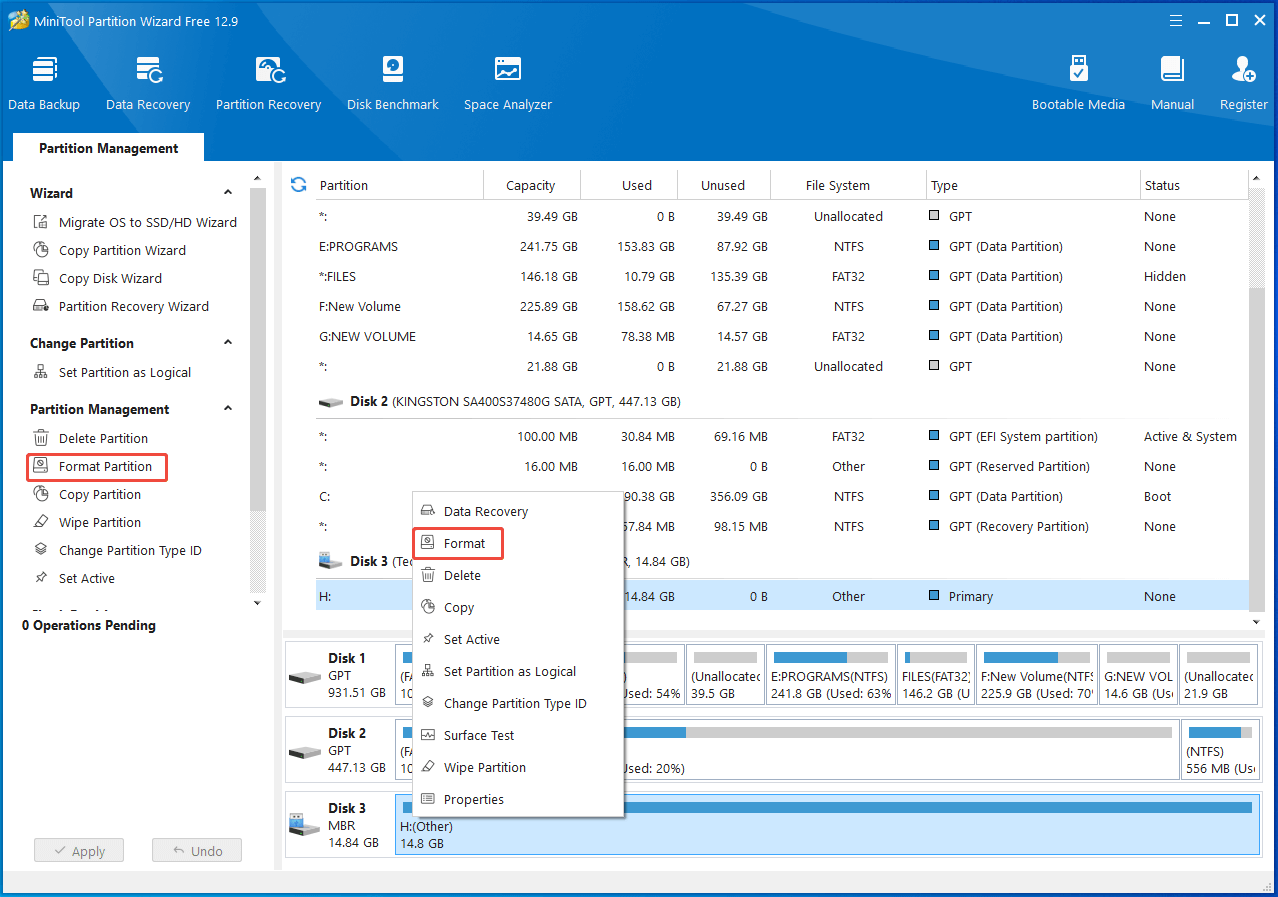
Step 1: Run the software to access its main interface.
Step 2: Right-click the RAW partition from the disk map and select the Format option.
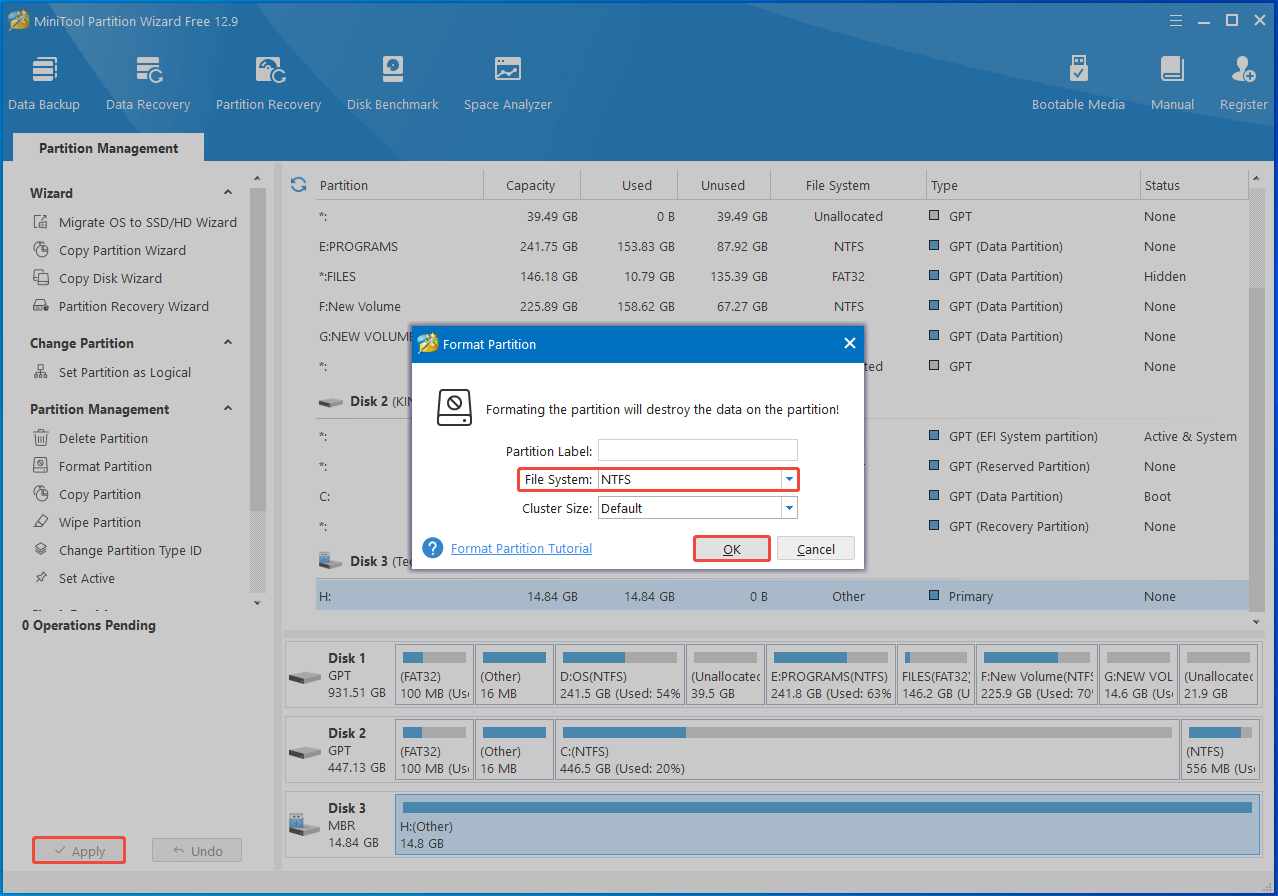
Step 3: In the prompted window, click NTFS from the drop-down menu and click OK.
Step 4: Tap Apply > Yes to carry out the pending operation.
Once done, the RAW drive will be formatted with NTFS.
Tips for Preventing the Partition from Becoming RAW
As mentioned before, you can’t access the drive and will encounter various errors once the drive becomes RAW. That’s quite annoying. So, you’d better prevent the drive from becoming RAW.
Here is some useful advice for you.
1. Perform hard disk health checks
You should often monitor the health condition of your hard disk. You can perform HDD/SSD health checks with MiniTool Partition Wizard. Its Check File System and Surface Test features help you detect disk errors.
Once you find errors on the disk, repair them by running the CHKDSK (like chkdsk /r) command or using hard drive repair tools.
2. Ensure that the disk/partition has a compatible file system
Before you connect an external hard drive or removable drive to your computer, make sure its file system is compatible with your system. For instance, if you connect a Linux-formatted hard drive to a Windows PC, the Windows system won’t recognize the drive.
3. Regularly run a virus scan
Make sure that your hard disk is virus free by scanning the hard disk for viruses periodically. You can run Virus & threat protection or professional antivirus software to protect your hard disk.
Bottom Line
After reading the post, you may have a better understanding of RAW partitions because it offers a brief introduction to the RAW partition. Besides, it shows you how to convert RAW to NTFS without losing data.
You can also refer to the given tips to prevent your partition from becoming RAW in the later use.
If you encounter any issues while using MiniTool Partition Wizard, contact us by sending an email via [email protected]. We will get back to you as soon as possible.
User Comments :