Bothered by “We can't create a recovery drive on this PC. Some required files are missing” when creating the recovery drive? Don’t worry. This post from Partition Magic provides some useful ways to fix it. Pick one to have a try!
Some people report that they encounter errors when they try to create a recovery drive on their computers. This error bothers them a lot. For instance, here is a user report from the answers.microsoft.com forum:
When I try to create a recovery drive, I am told "We can't create a recovery drive on this PC. Some required files are missing" I upgraded 3 PCs to Windows 10; only one has this problem.https://answers.microsoft.com/en-us/windows/forum/all/cant-create-a-windows-10-recovery-drive-some/6dd29184-2ddd-48f2-803a-a788cf9345b0

If you also receive the same error message while creating a recovery drive, you can continue reading to get the reasons and solutions for this error.
Why Encounter “We Can’t Create a Recovery Drive on This PC. Some Required Files Are Missing”?
Receiving the error message “We can’t create a recovery drive on this PC. Some required files are missing” is very annoying. So, you may want to figure out why you get this error. After investigating extensive user reports and posts, I find that the error can mainly be caused by these reasons:
- The USB drive is not formatted, faulty, or less than 16 GB.
- The recovery partition information is missing.
- The winre.wim file is missing.
- The current system structure does not have a recovery environment.
- The system files are corrupted.
How To Fix the “Can’t Create a Recovery Drive Some Required Files Are Missing” Error?
If you encounter the “can’t create a recovery drive some required files are missing” error, you can try the methods mentioned in this section:
- Recreate the Recovery Environment via CMD
- Recover the winre.wim File
- Regain the Lost Recovery Partition Information
- Clone your computer and save it to a USB HDD
- Perform an In-place upgrade
Way 1. Recreate the Recovery Environment via CMD
The first way you can try to fix the “We can’t create a recovery drive on this PC. Some required files are missing” error is to recreate the recovery environment via CMD. You can walk through these steps:
Step 1. Press the Win + R keys simultaneously to open the Run window, type “cmd” and press Ctrl + Shift + Enter to run Command Prompt as administrator.
Step 2. Type the following commands in order, and press Enter after each command line:
- reagentc /disable
- reagentc /setreimage /path \\?\GLOBALROOT\device\harddisk0\partition1\Recovery\WindowsRE
- reagentc /enable
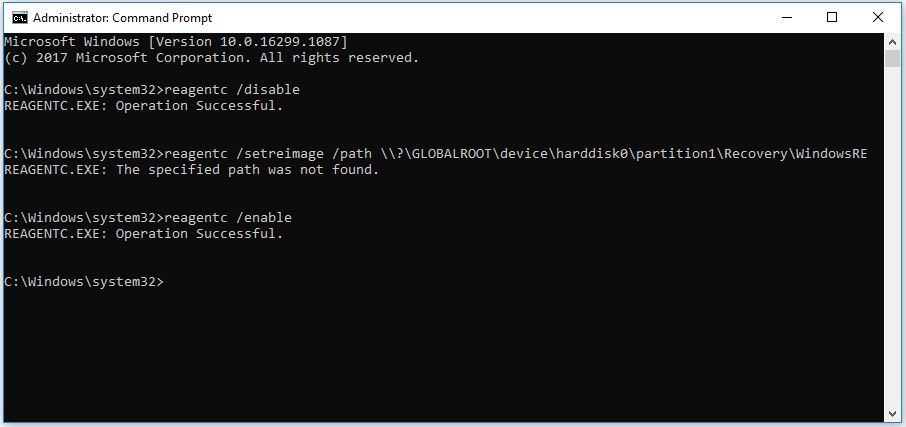
Step 3. After that, reboot your PC and check if the error has been resolved.
Way 2. Recover the winre.wim File
The winre.wim file is essential for storing Windows recovery files. Without it, a recovery drive cannot be successfully created. So, if the winre.wim file is missing on your PC, you may encounter the “We can’t create a recovery drive on this PC. Some required files are missing” error as well.
Here, I list 2 different options to recover the winre.wim file. You can choose the one you like to recover the missing file.
# 1. Copy the winre.wim File from a Different Windows 10 System
Step 1. On another normal working Windows 10 computer, run Command Prompt as administrator.
Step 2. In the elevated Command Prompt window, type “reagentc /disable” and press Enter to disable the Recovery Environment and move the winre.wim file from the hidden recovery to C:\windows\system32\recovery.
Step 3. Press the Win + E keys to open the File Explorer window, go to this directory C:\windows\system32\recovery, and then copy the winre.wim file to a USB storage drive.
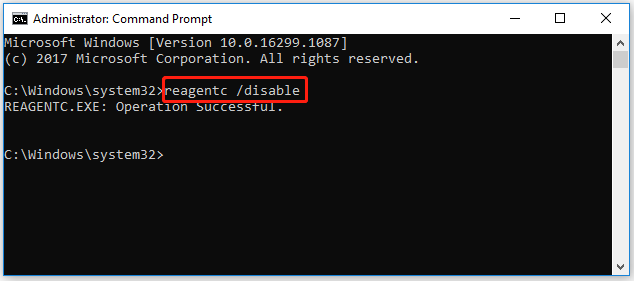
Step 4. After that, type “reagentc /enable” and press Enter in the same elevated window to re-enable the Windows Recovery Environment again.
Step 5. Plug the USB drive that contains the winre.wim to the affected computer. Then copy and paste the winre.wim file to this directory C:\system 32\Recovery.
Step 6. Once done, try to create a recovery drive again and check if the error persists.
# 2. Copy the winre.wim File from Windows 10 Installation Media
Step 1. Insert the DVD/USB or mount the Windows installation media.
Step 2. Then go to your OS drive (C:\), and then create an empty directory called Mount.
Step 3. Launch Command Prompt as administrator again.
Step 4. Type the following command and press Enter to mount the install.wimfile and make the winre.wim file visible inside the new directory.
dism /Mount-wim /wimfile:D:\sources\install.wim /index:1 /mountdir:C:\mount /readonly
Step 5. Open the File Explorer window, go to this path “C:\mount\windows\system32\recovery“, and then copy winre.wim file there to “C:\windows\system32\recovery“.
Step 6. Back to the elevated Command Prompt window and execute this command “dism /Unmount-Wim /Mountdir:C:\mount /discard” to unmount the install.wim. After that, remove the installation media.
Step 7. Next, type the command “reagentc /enable” to enable the Recovery Environment.
Step 8. Once done, restart your PC and check if the error is fixed.
Way 3. Regain the Lost Recovery Partition Information
If the recovery partition information is missing, you can also encounter the “can’t create a recovery drive some required files are missing” error. In this situation, you can try performing the following steps to regain the lost recovery partition information:
Step 1. Press the Win + X keys to open the Quick Link menu, and then select Windows PowerShell (Admin) from the menu.
Step 2. Type the following commands, and press Enter after each line:
- diskpart
- list volume
- select volume X (X is the Recovery volume number)
- detail volume
- select disk X
- list partition
- exit
Step 3. Next, type the following command and press Enter:
reimage /path \\?\GLOBALROOT\device\harddiskX\partitionY\Recovery\WindowsRE
Step 4. After that, type “reagentc /enable” to activate the recovery partition.
Step 5. Once done, restart your computer and check whether you can create the recovery drive.
Way 4. Use MiniTool Partition Wizard
If none of the above ways can help you fix the “We can’t create a recovery drive on this PC. Some required files are missing” error, you can try using MiniTool Partition Wizard to clone your whole system disk to an external hard drive.
Its Copy Disk feature can help you clone the whole disk to another place, and the Migrate OS to SSD/HD can help you migrate your system. You can choose one feature to clone your system disk.
In addition to being disk clone software, MiniTool Partition Wizard can also be used as a FAT32 formatter, MBR2GPT converter, hard drive data recovery tool, SSD data recovery software, etc.
Here’s how to use the Copy Disk feature to clone the whole system disk:
Step 1. Click the Download button below to get the MiniTool Partition Wizard installation package, and then install it on your computer. Then, launch the MiniTool Partition Wizard to enter its interface.
MiniTool Partition Wizard DemoClick to Download100%Clean & Safe
Step 2. Choose your system disk from the disk map, and then click Copy Disk from the left panel.
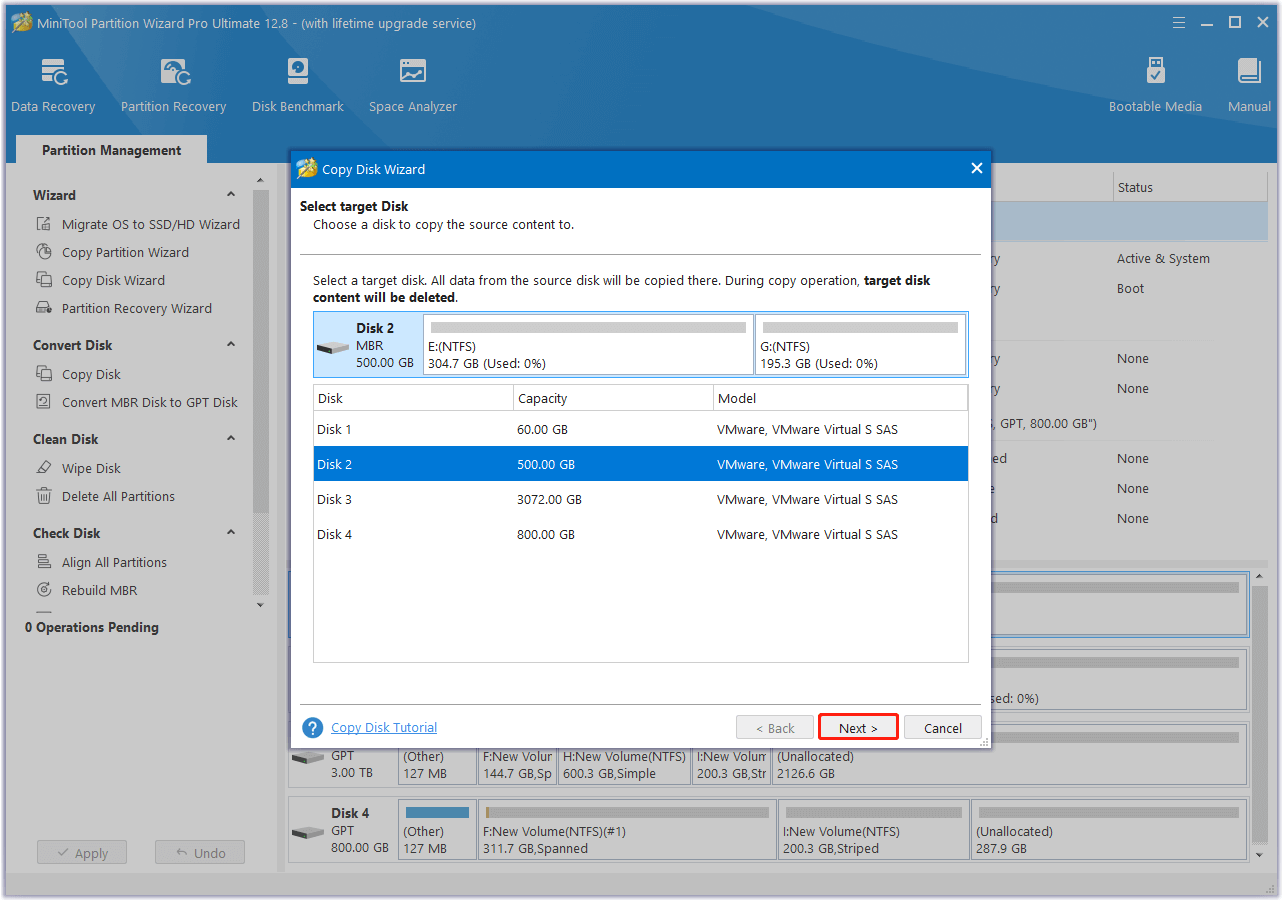
Step 3. In the pop-up Copy Disk Wizard window, select your target disk from the list, and click Next. Click Yes in the Warning window if the target disk has no important data or is already backed up.
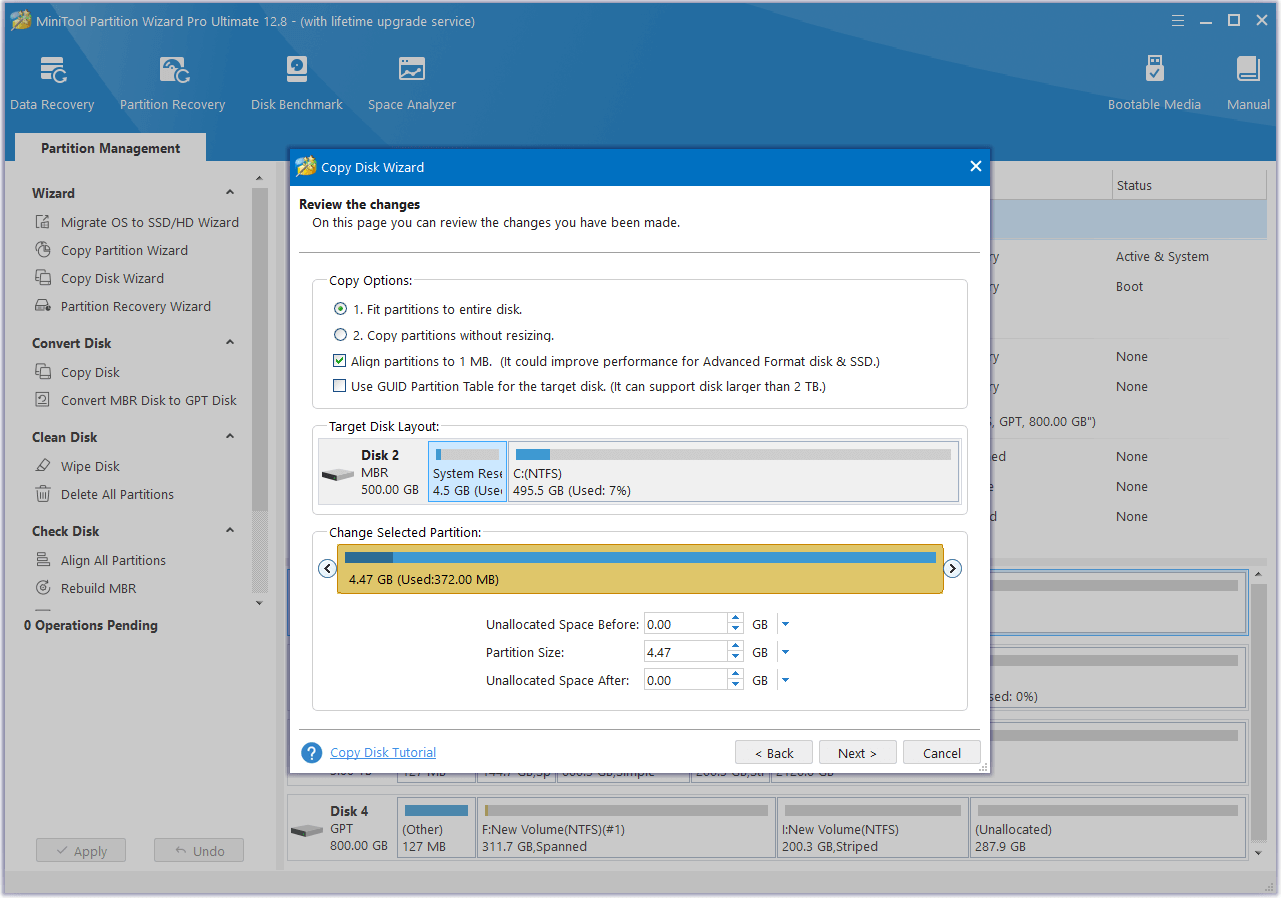
Step 4. In the next screen, set the Copy Options according to your needs, adjust the Target Disk Layout, by making changes in the Change Selected Partition section, and then click Next.
- Fit partitions to entire disk: The target disk partition size will be adjusted automatically to fit the entire disk.
- Copy partitions without resizing: This means that the size of the source disk partitions will not be changed in the destination disk
- Align your partitions to 1MB: It could improve performance for Advanced Format disk & SSD.
- Use GUID Partition Table for the target disk: This can support disk larger than 2 TB.
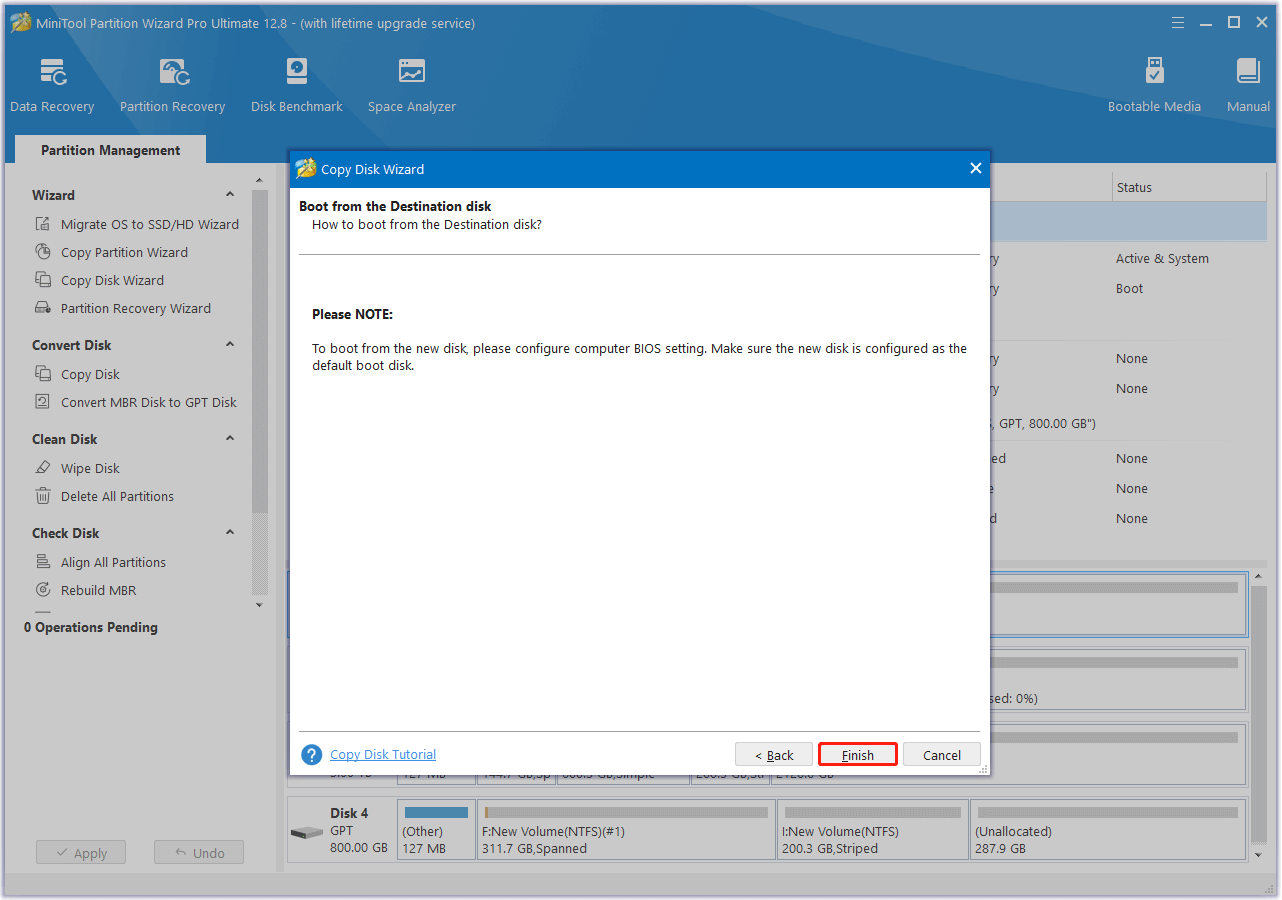
Step 5. Read the NOTE on the next screen and click Finish.
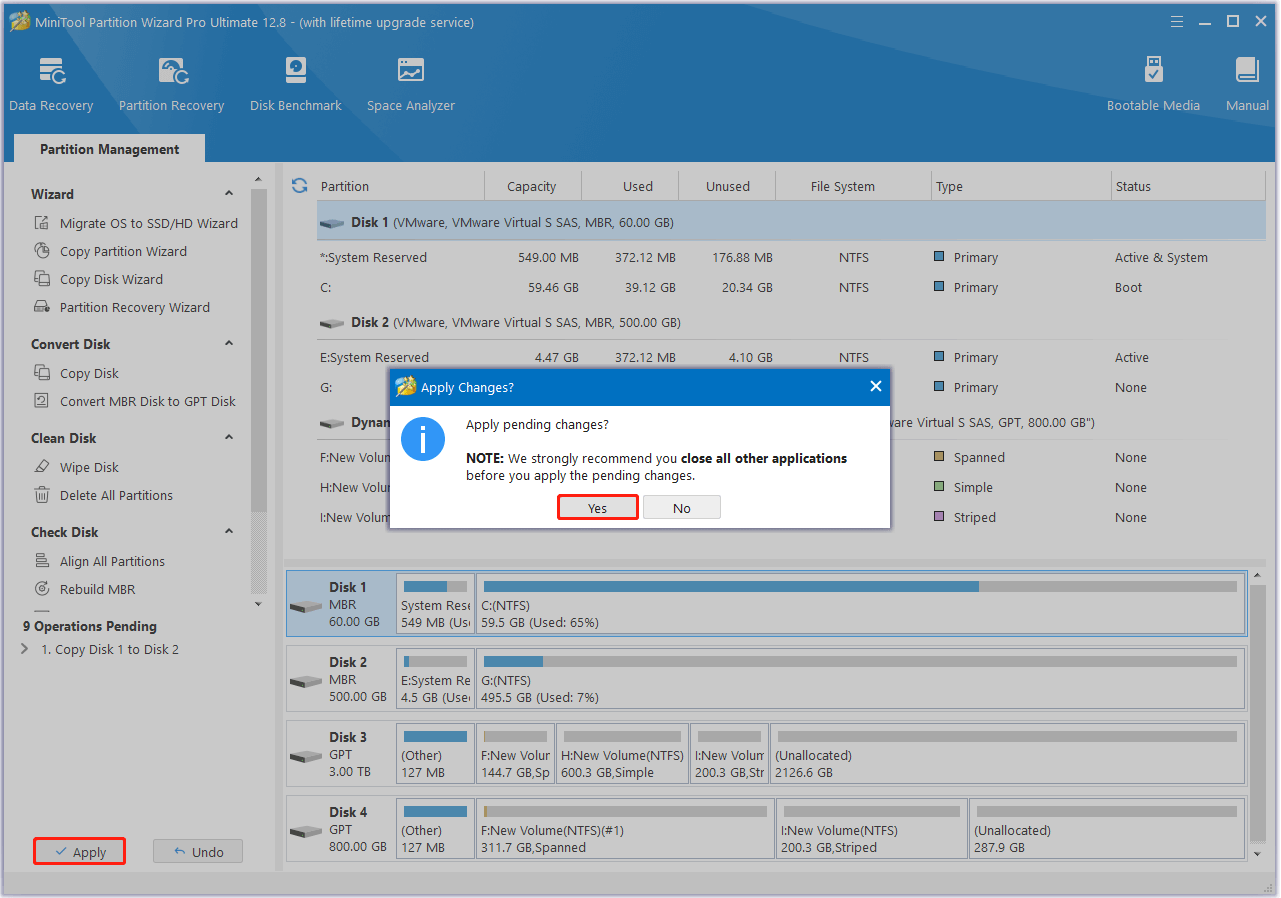
Step 6. Next, you can preview the changes in the disk map. Click Apply and Yes sequentially to execute the changes.
Way 5. Perform In-place Upgrade
If you don’t like to use a third-party app to clone the whole disk as a backup, you can perform in-place upgrade to fix the “We can’t create a recovery drive on this PC. Some required files are missing” error. Here’s how to do that:
Step 1. Navigate to the Windows 10 download website, and then download the Windows Media Creation Tool to your PC.
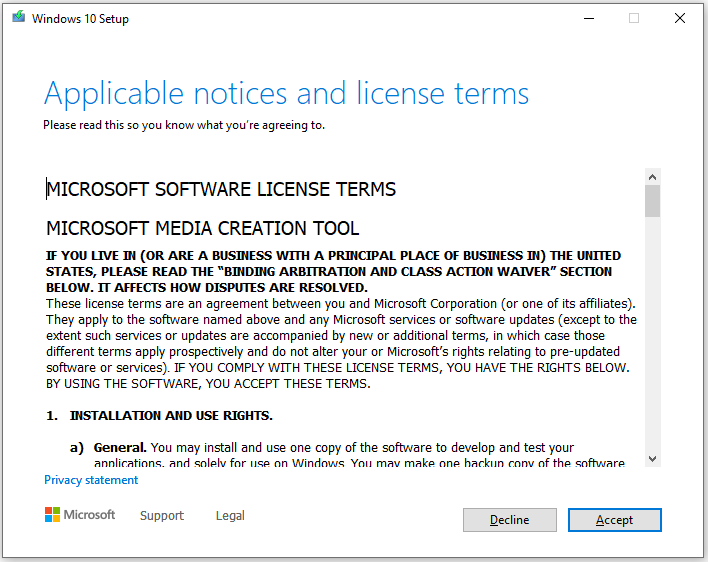
Step 2. Then, run the MediaCreationTool.exe and accept the license agreement.
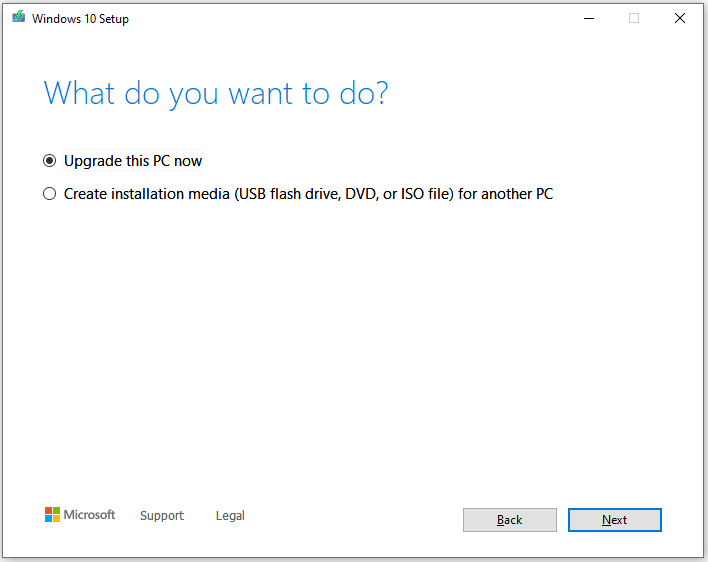
Step 3. Choose Upgrade this PC now, and click Next to perform the in-place upgrade.
Step 4. Then, the Windows 10 Setup will start preparing. It will take a while to finish the job. You just need to wait.
Step 5. After downloading, you need to choose to keep your personal files or start fresh.
Step 6. Then, you can see the message “Your computer will restart several times. This might take a while” showing on your screen. Be patient to wait for the process to complete.
Step 7. Once done, you will enter the login screen. Log into Windows 10 and set the basic settings according to your preference.
Also read: Windows 10 In-Place Upgrade: a Step-by-Step Guide
Bottom Line
Why “We can’t create a recovery drive on this PC. Some required files are missing” error occurs? How to solve the error? This post shows the possible causes of the error and offers 5 effective ways to troubleshoot the error. If you are troubled by the same error, try these ways.
You can send us an email via [email protected] if you encounter issues while using MiniTool Partition Wizard. We will send a reply as soon as possible.



User Comments :