How to migrate Windows 11 to another drive? This post from MiniTool Partition Wizard offers a detailed guide. In addition, it answers some questions related to OS migration.
How to Migrate Windows 11
Windows 11 is the latest PC system version released by Microsoft. It is a free upgrade to Windows 10 and many people have upgraded from Windows 10 to Windows 11. However, sometimes, you may want to move Windows 11 to another drive, as in the example below:
The laptop is configured with two M.2 SSDs, a small drive currently connected to a PCIe 4.0 port in the first position, and a bigger drive (2 TB) connected to a PCIe 3.0 port in the second position. Windows is currently installed on the first (smaller) drive.
After some speed measurements, I now want to swap the 2 drives, so that the bigger drive is then connected to the fast PCIe 4.0 port in the first position. After performing the swap of the 2 drives, I plan to move or reinstall Windows to an appropriate partition on the bigger drive, then on the first position.answers.microsoft.com
How to move Windows 11 to another drive? If you need to clone Windows 11 to SSD, you can use MiniTool Partition Wizard. It is not only disk clone software, but also can manage disks and partitions. For example, it can convert MBR to GPT, convert a partition between FAT and NTFS without formatting, recover data from hard drive, etc.
How to move Windows 11 to another drive using MiniTool Partition Wizard? Here is the guide:
MiniTool Partition Wizard DemoClick to Download100%Clean & Safe
Step 1: Download, install, and launch MiniTool Partition Wizard. On its main interface, click on Migrate OS to SSD/HDD in the toolbar.
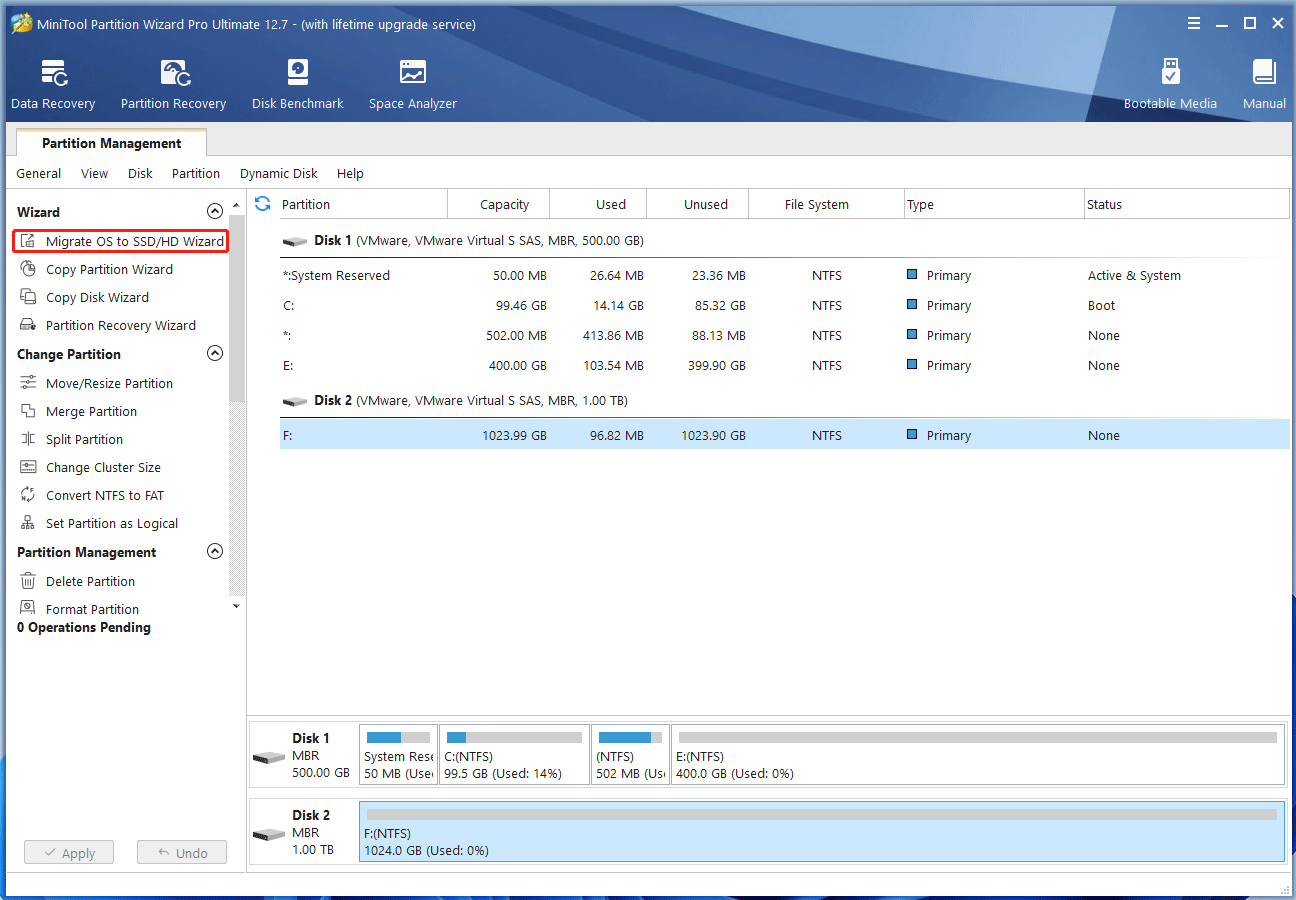
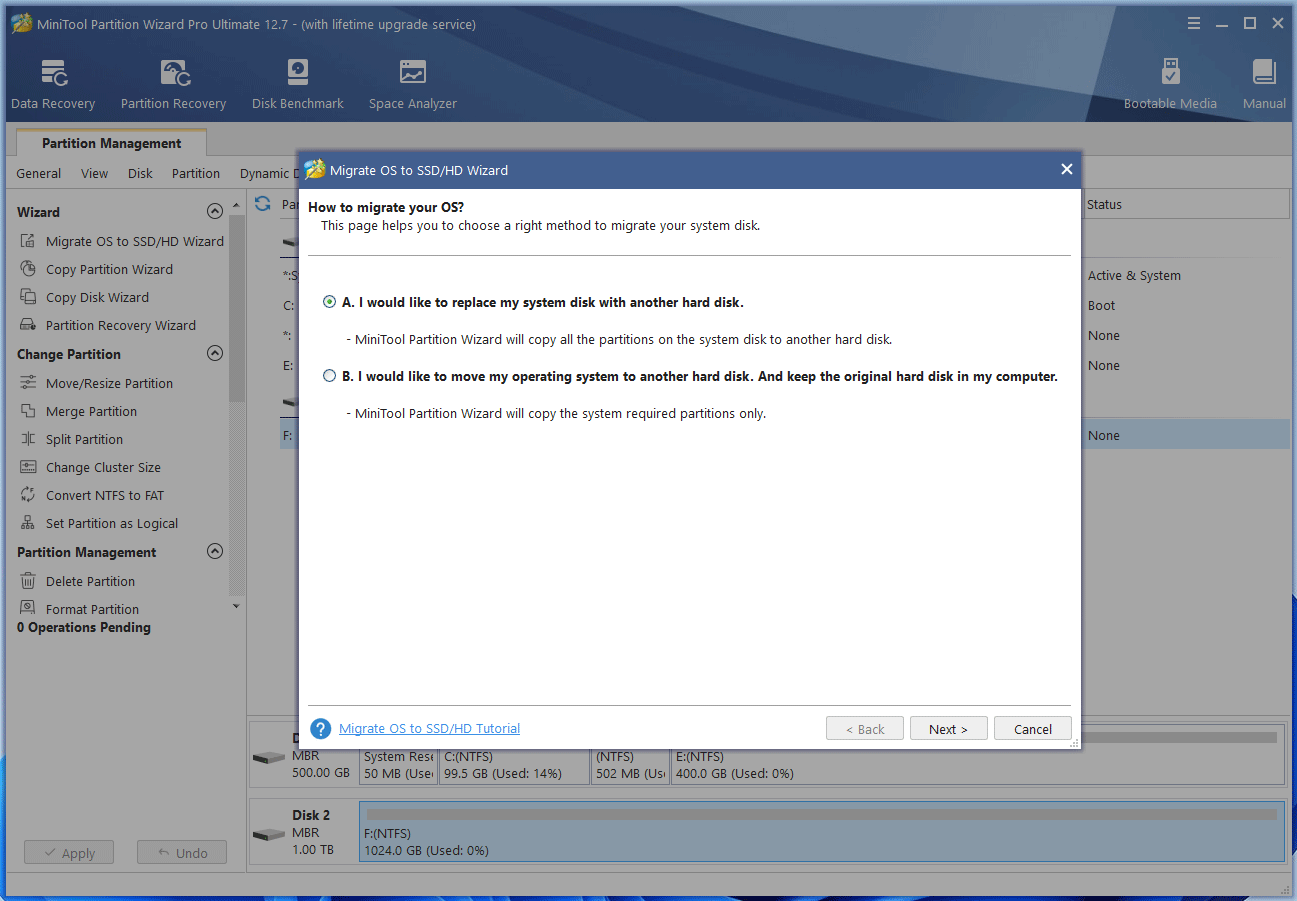
Step 2: Choose the method you want to migrate the OS and click Next. Note that no matter which method you choose, the data on the original disk won’t be deleted.
- Option A. All the partitions on the system disk will be copied to another disk.
- Option B. Only the C drive and the System Revered or EFI partitions are copied to another disk. They are partitions required for Windows boot.
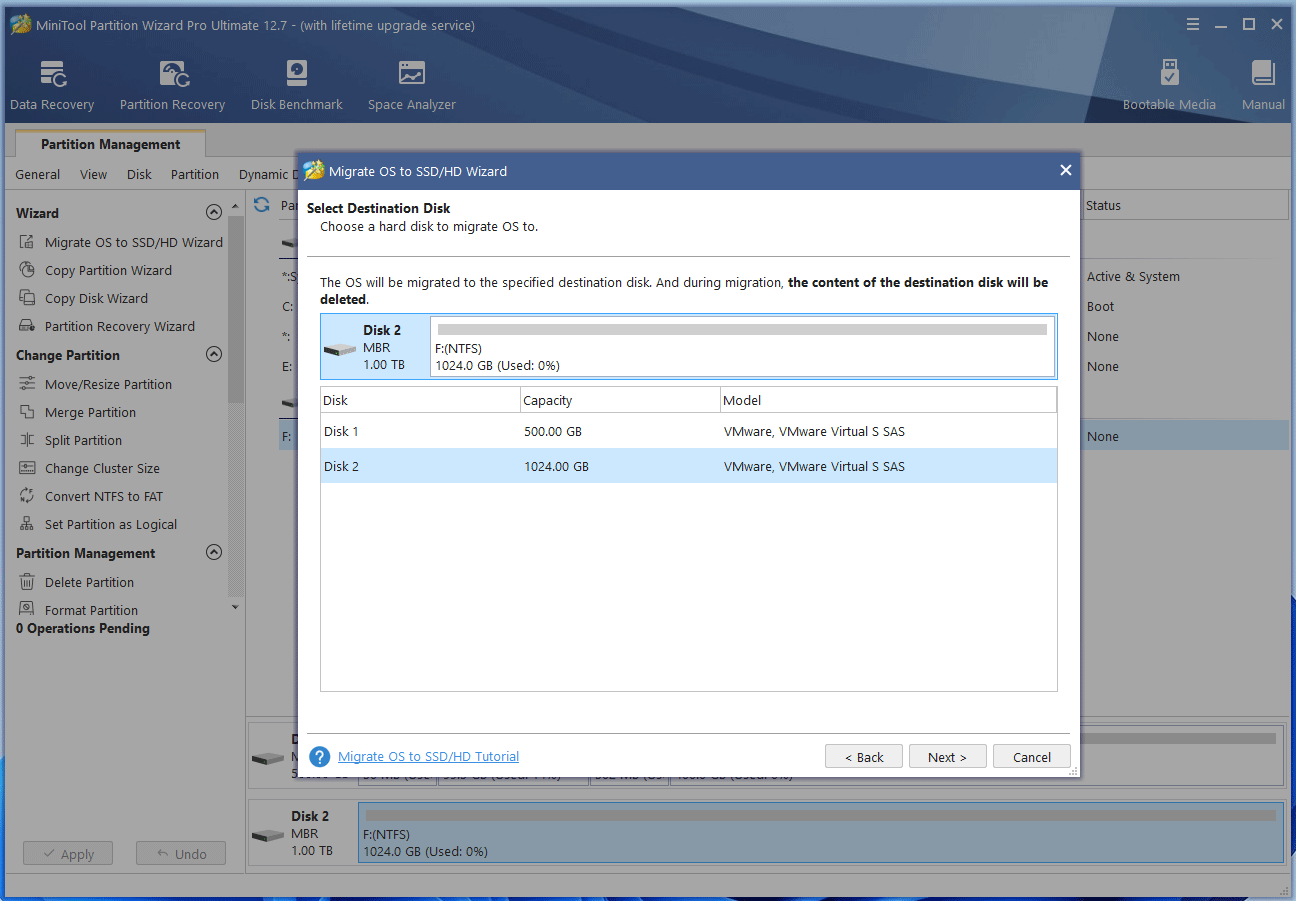
Step 3: Choose the destination disk you want to migrate Windows 11 to and click Next. A warning window will pop up warning you that the data on the destination disk will be destroyed. Read it and click Yes.
2. If there is important data on the destination disk, you should back up it to another disk first because the OS migration operation will delete all partitions and data on the disk.
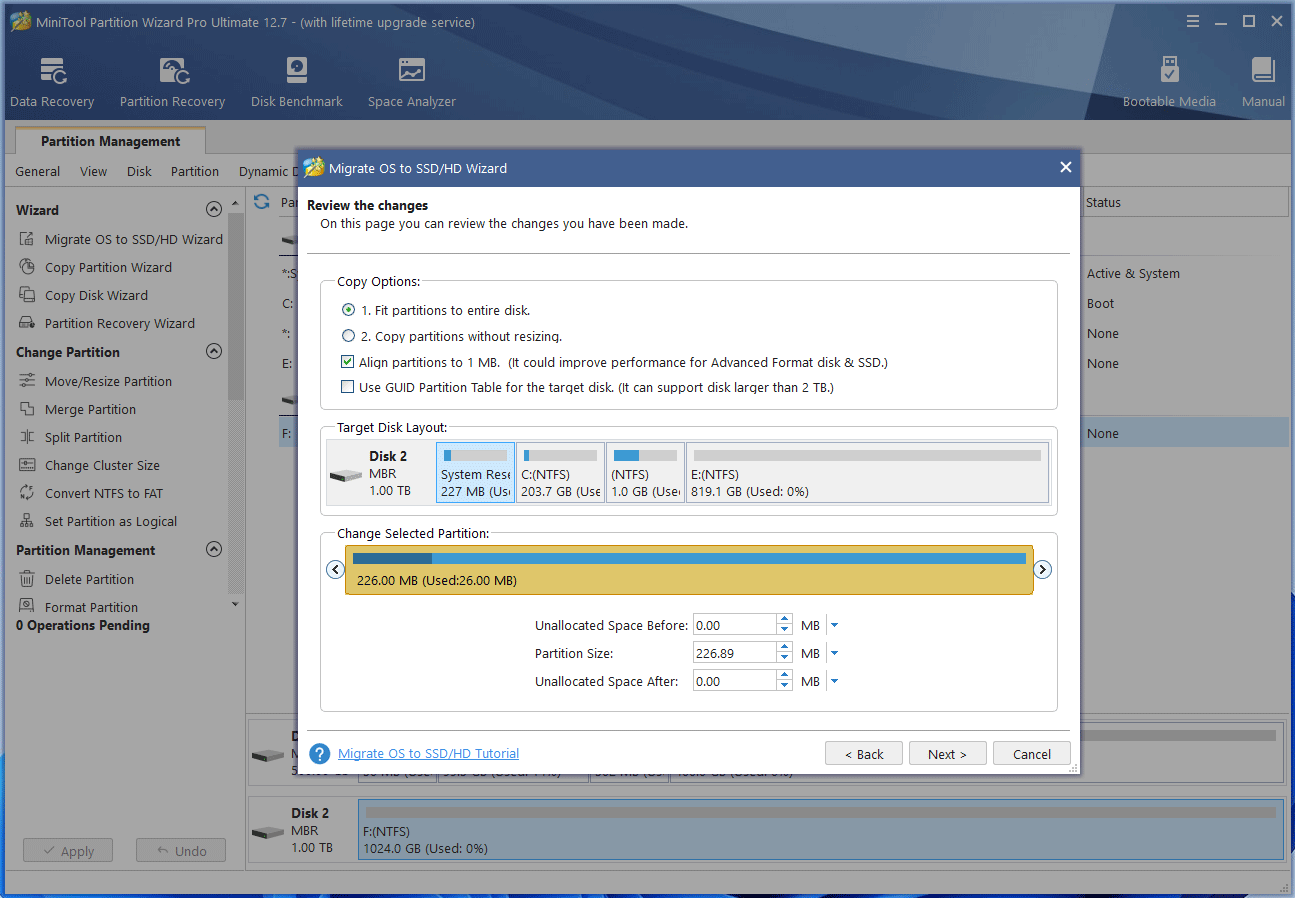
Step 4: Review the changes. In this step, if necessary, you can change some copy options and adjust the target disk layout. Then, click Next.
- Fit partitions to entire disk: This option is selected by default. All the partitions on the original disk are shrunk or extended by an equal proportion to fill the entire target disk.
- Copy partitions without resizing: All the partitions on the original disk are copied into the target disk without changes in size or location. If you clone SSD to larger SSD Windows 11, you can choose this option. Otherwise, this option is greyed out.
- Align partitions to 1 MB: This option is selected by default. It can keep the 4K alignment of all partitions to improve performance.
- Use GUID Partition Table for the target disk: This option only appears when the system disk is an MBR disk. If this option is selected, after the OS migration, the destination disk will become a GPT disk.
2. You can drag the arrow icons to change the partition size and drag the partition block to change the partition location.
Step 5: Read the note and click Finish. Then, click Apply on the toolbar to execute the pending operation. After the operation is completed, you can see that Windows 11 has been moved to another drive.
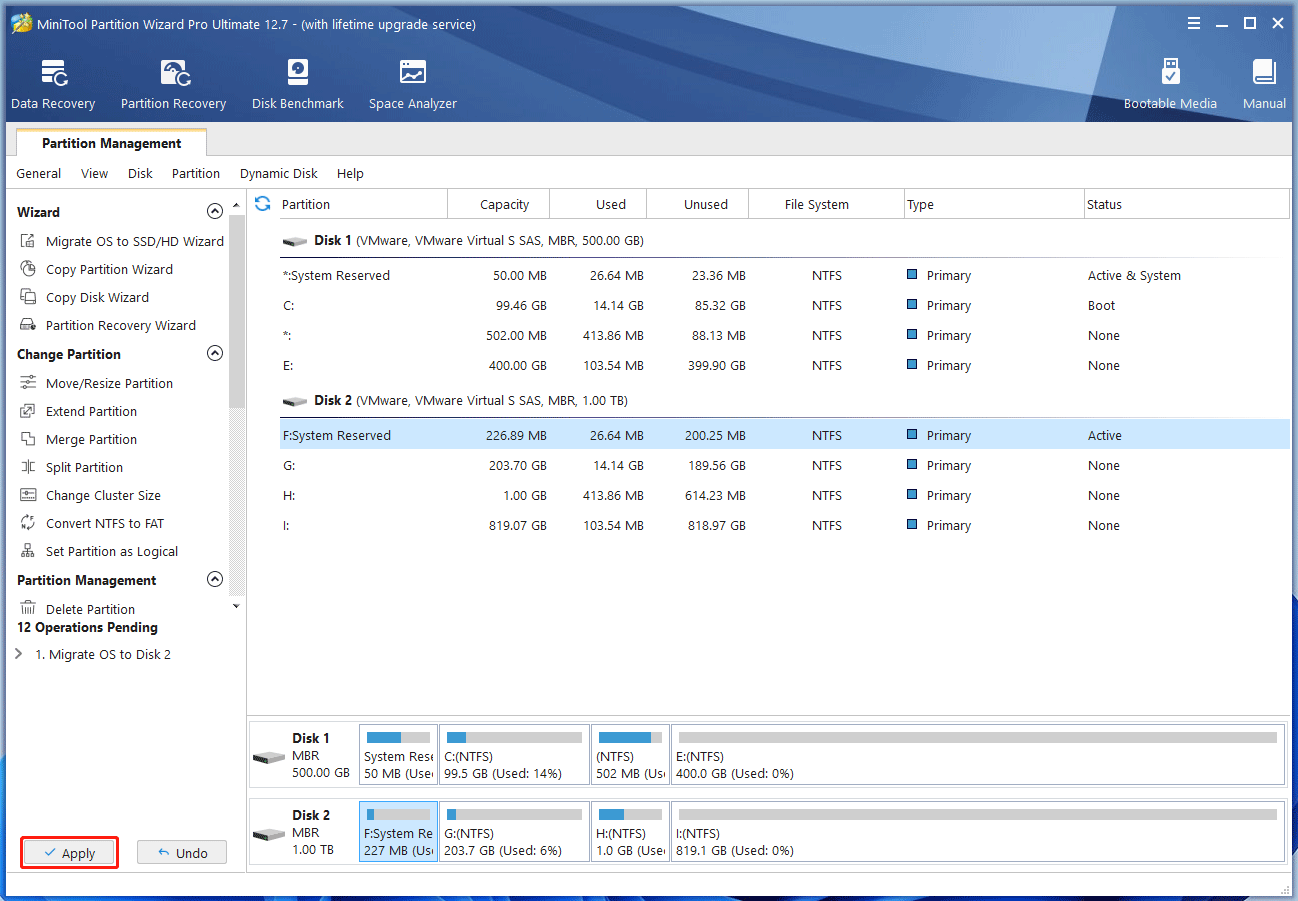
Some people may install both an HDD and an SSD on their PC. Then, they want to clone Windows 11 to SSD. The above steps can also do that.
Frequently Asked Questions Related to Windows 11 Migration
1. Shut down your computer.
2. Power on your computer and press the BIOS key (Del, Esc, F2, etc.) when the PC logo appears. In this way, you can enter the firmware.
3. Go to the Boot tab and set the destination disk as the first boot device.
4. Save changes and exit the firmware. Now, the PC will boot from the destination disk.
To know the detailed steps, you can read this post: How To Change Boot Order Safely On Windows Device.
If you need to reactivate Windows, you can refer to the guides in this post: Reactivating Windows 10 after a Hardware Change [with Pictures].
Difference 1. Data Deletion
Windows reinstallation only deletes data in one partition on the destination disk while OS migration will delete all partitions and data on the destination disk.
Therefore, if there are important files on the destination disk and you don’t have an external drive to back up them, you can do as follows:
1. Shrink partitions to get enough free space and then use it to create a partition. This partition should be enough for Windows 11 installation.
2. Create a Windows 11 installation media and then install Windows 11 on this empty partition.
Difference 2. Software Reinstallation
If you reinstall Windows, the C drive will be clean, but you may need to reinstall the software. However, OS migration can help you avoid the software reinstallation work. Because of this difference, many people may want to migrate Windows 11 other than reinstall Windows 11.
Difference 3. Disk Connection
When you do OS migration, the original disk and the destination disk should be connected to the PC at the same time. If your PC only has one slot to connect the drive, you need to connect the destination disk to your PC via a USB adapter, migrate the OS, and then install the destination to your PC.
However, Windows reinstallation only requires the destination disk to be connected to the PC.
After reading the above content, you can decide whether to migrate Windows 11 or reinstall Windows 11. Click clean install vs clone disk vs migrate OS to know more.
1. Install Windows on the new drive and then boot the PC from the drive.
2. Connect the original disk to the PC via a USB adapter.
3. Find the software installation location and then move the software installation folder to the new hard drive.
4. If the original disk is still kept inside of the PC, you can find the software executable file in the software installation folder and then send it to the desktop or create a shortcut on the desktop.
Note that if the original disk is an HDD while the new disk is an SSD, I recommend you move software installation folders to the SSD, instead of creating shortcuts. The reason is that you can’t enjoy the improvement of the app running speed brought by the SSD if the app is still installed on the HDD.
Therefore, I recommend you install Windows 11 on the new computer and then move the installed programs and other personal files from the old computer to the new computer via a USB drive or external drive.
After that, find the Windows 11 license key on the old computer and then use it to activate the new computer.
Bottom Line
Is this post useful to you? Do you have other opinions on the Windows 11 migration? Share them with us in the following comment zone. In addition, if you encounter problems when using MiniTool Partition Wizard, please feel free to contact us via [email protected]. We will get back to you as soon as possible.

User Comments :