Does your PC meet the Windows 11 TPM requirement? This post from MiniTool Partition Wizard tells you what to do if the TPM requirement is not met. It shows you how to enable TPM, how to upgrade the TPM to 2.0, how to add a TPM chip, and how to install Windows 11 without TPM.
Windows 11 TPM Requirement
Windows 11 is the latest Windows version released in 2021. It’s a free upgrade to Windows 10. Currently, Microsoft hasn’t announced the end date of this free upgrade and users can install Windows 11 for free still.
Compared to Windows 10, Windows 11 has a more beautiful UI, better gaming performance, and some new useful features. Therefore, many people would like to upgrade to Windows 11 as long as their PCs meet the Windows 11 requirements.
Among the Windows 11 requirements, there is a Windows 11 TPM requirement. To install Windows 11, your PC needs the Trusted Platform Module (TPM) version 2.0.
What Is TPM?
TPM is an international standard for secure cryptographic processors. It adds a dedicated TPM chip into the PC to handle encryption keys in the device. The chip may be integrated into the CPU chip or separately inserted into a slot on the PC motherboard.
The TPM chip is the core of many security applications like BitLocker, Windows Hello, etc. When you use these features, you need to generate, store, and verify the security keys. The TPM chip is designed to do these jobs.
In addition, because the TPM chip uses a complete dedicated circuit, the entire calculation and storage process of the keys can be done without going through memory and leaving no traces in the hard disk. Therefore, the security level is very high.
Why Does Windows 11 Require TPM 2.0?
TPM is not a new thing. Why does Windows 11 require TPM 2.0, the latest TPM version released in 2014? The answer is very simple. Compared to the previous TPM version – TPM 1.2 released in 2011, the TPM 2.0 has many advantages. For example:
1. More Security
TPM 2.0 adds more advanced encryption algorithms like ECC P256, ECC BN256, SHA-2 256, and SHA-2 256. So, your PC will be more secure.
2. Less Authorization Restriction
Only if a program passes the password verification of the TPM (this process is so-called authorization), the software can access the resources protected by the TPM. However, the authorization mechanism of TPM 1.2 lacks flexibility while the TPM 2.0 adopts the Enhanced Authorization.
3. Wider Application
Due to the rigid authorization mechanism, some people believe that the use of TPM 1.2 may lead to the binding of specific software to the PC and affect the use of other software. In particular, manufacturers can use this to promote their software. This behavior is criticized by users.
Therefore, to allay this concern, PC manufacturers disable the TPM feature by default. Some PC manufacturers even don’t add the TPM chip to their PCs. However, TPM 2.0 solves this problem. So, since 2016, most PCs have added the TPM chip and enabled the TPM 2.0 feature by default.
Does Your PC Meet the Windows 11 TPM Requirement?
To check whether your PC meets the Windows 11 TPM requirement, you can use the following methods.
Method 1. Use the PC Health Check App
The PC Health Check app is offered by Microsoft to check whether your PC can run Windows 11. If your PC doesn’t meet the Windows 11 TPM requirement, it will tell you “TPM 2.0 is a requirement for running Windows 11” or “The PC must support TPM 2.0.”
This PC Can’t Run Windows 11: What Should You Do to Fix It?
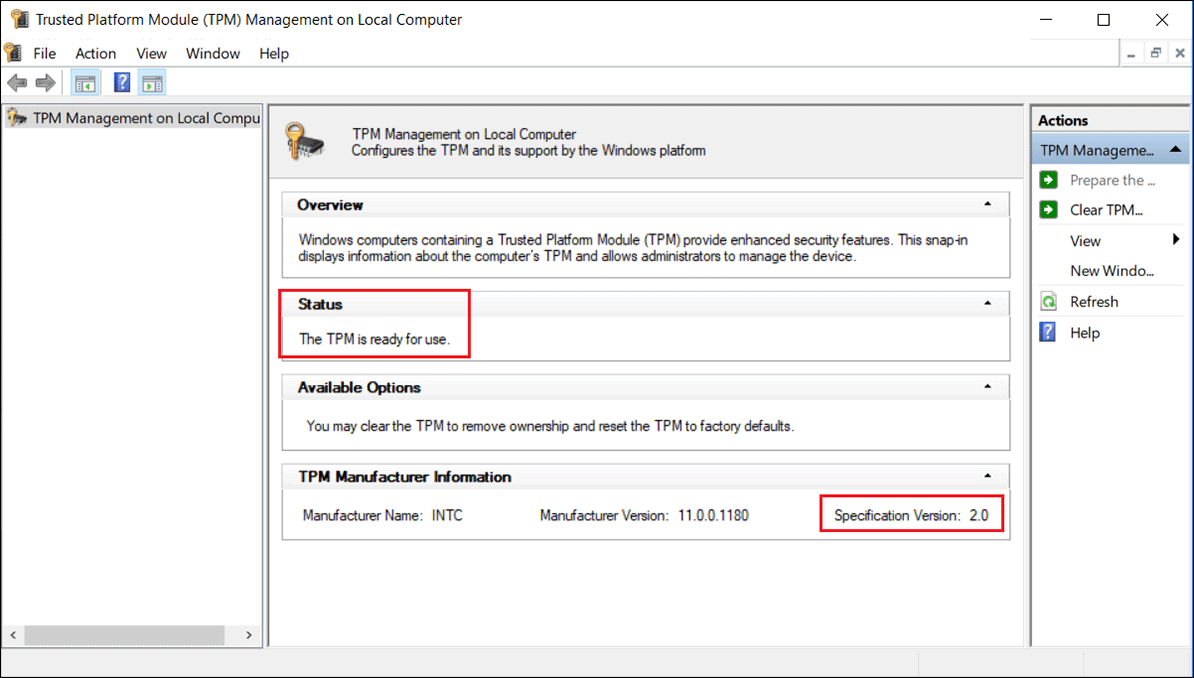
Method 2. Use TPM Management
- Press “Windows + R” keys to open the Run box.
- In the Run box, type “tpm.msc” and press Enter to open the TPM Management tool.
- On the window, you need to check whether the Specification Version is “2.0” and whether the Status is “The TPM is ready for use.” If they are, it means that your PC meets the Windows 11 TPM requirement.
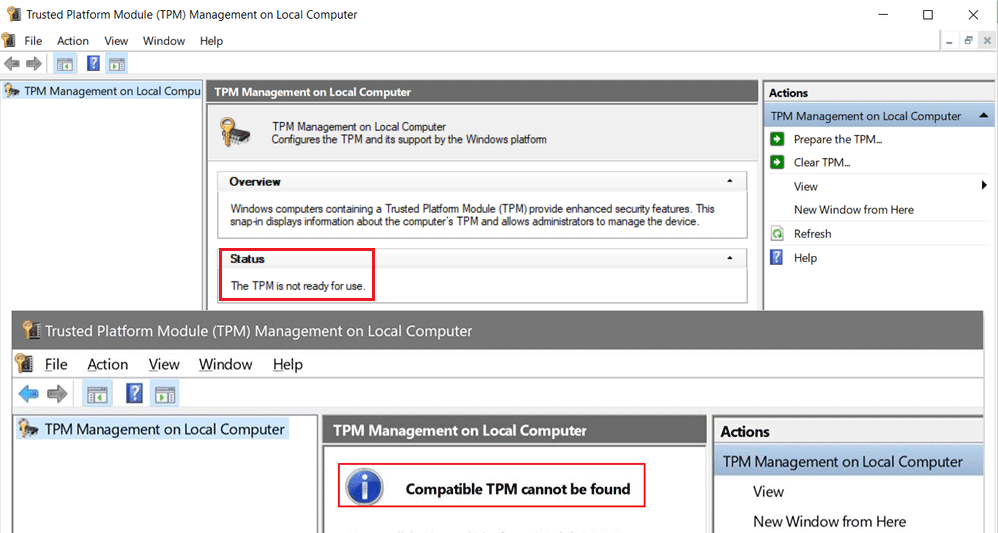
However, things do not go well always. Sometimes, you may encounter the following situations:
- The TPM Specification Version is “1.2”. In this case, you can upgrade your TPM version to 2.0 or install Windows 11 without TPM.
- The TPM Specification Version is “2.0” but the Status is “The TPM is not ready for use.” In this case, you need to enable the TPM feature in the firmware.
- It tells you “Compatible TPM cannot be found.” In this case, you should go to the firmware to check whether you can enable the TPM feature. If you can’t, your PC may be likely to have no TPM chip. In this case, you can add the TPM chip by yourself or install Windows 11 without TPM.
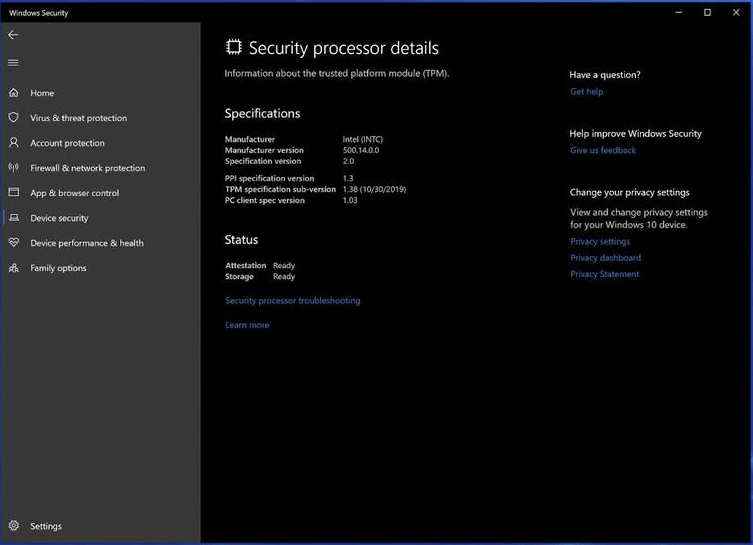
Method 3. Use Windows Security
- Open Windows Security.
- Go to Device security.
- On the right pane, under the Security process section, click the Security process details link.
- On the window, you should check whether the Specification version is 2.0 and whether the Attestation status and the Storage status are Ready. If any of them is Not ready or Not supported, you need to check whether the TPM feature is enabled in the firmware.
If you do not see a Security processor section, your PC may have no TPM or the TPM feature is disabled.
How to Enable TPM in the Firmware
Step 1: Enter the firmware. If your PC uses the UEFI boot mode, you can follow the first way. If your PC uses the Legacy boot mode (BIOS), you can follow the second way. Click UEFI vs BIOS to know more.
- On Windows, choose Settings > Update & Security > Recovery > Restart now. From the next screen, choose Troubleshoot > Advanced options > UEFI Firmware Settings > Restart.
- Shut down your PC completely. Power on your PC, and press the BIOS key immediately once the PC brand logo appears. The BIOS key may vary on different PC models, but you can try F2, Del, Esc, Sometimes, the BIOS key may appear on the PC screen.
- If your PC is using the Legacy boot mode, you will fail to install Windows 11 because Windows 11 requires UEFI boot mode. To solve this issue, you need to convert your system disk from MBR to GPT Click MBR vs GPT to know more.
- If you fail to enter the firmware after pressing the BIOS key, the possible reason is that the Fast Startup feature is turned on. You should turn off it first.
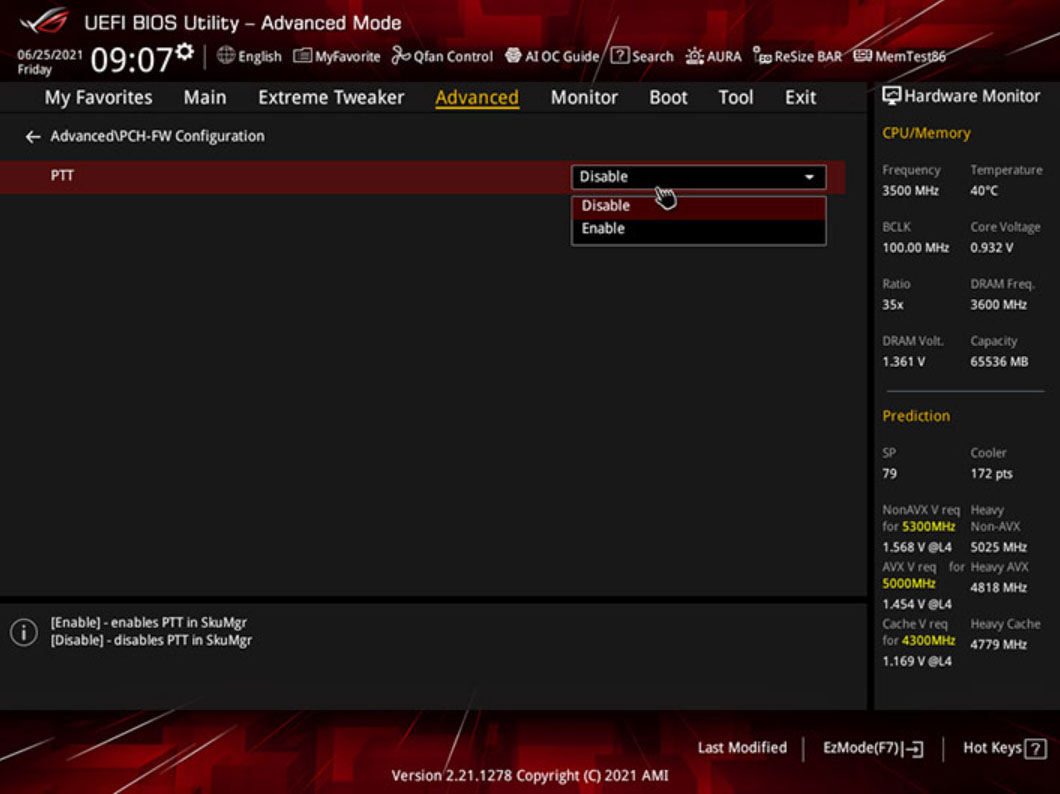
Step 2: Enable the TPM feature in the firmware.
- Open the tab labeled Advanced, Security, or Trusted Computing.
- Find the TPM feature under this tab and enable it. The TPM may be labeled Security Device, Security Device Support, TPM State, AMD fTPM switch, AMD PSP fTPM, Intel PTT, or Intel Platform Trust Technology.
How to Upgrade TPM to Version 2.0
Can your PC upgrade the TPM from 1.2 to 2.0? It depends on whether the PC manufacturer offers the TPM 2.0 firmware update utility. At the time of writing, only Dell offers the TPM 2.0 download and update tool for part of Dell PC models.
- Follow the guide on this page to check whether your Dell PC can upgrade from TPM 1.2 to 2.0.
- If your PC can upgrade from TPM 1.2 to 2.0, you can follow the guide on this page to update the TPM.
How to Add a TPM Chip to Your PC
Can you add a TPM chip to your PC? It depends on whether the PC motherboard has a TPM socket. You can check that on the motherboard’s manual. Only if the motherboard has a TPM socket, you can add a TPM to your PC.
However, you should note that the shape of the TPM sockets on the motherboards of different brands may be different. When purchasing, you must pay attention to not only the motherboard brand, but also the number of pins. If you buy the wrong one, you won’t be able to put it on the motherboard.
How to Install Windows 11 Without TPM
Can you install Windows 11 without TPM? Yes, you can. But Microsoft also states that installing Windows 11 on a device that does not meet Windows 11 minimum system requirements may cause compatibility issues and so on.
Stage 1. Back up System and Data
Therefore, if you want to install Windows 11 without TPM, I recommend you back up your current system and data first. To do that, you can use MiniTool Partition Wizard, a professional disk cloning program. Here is the guide:
MiniTool Partition Wizard DemoClick to Download100%Clean & Safe
Step 1: Launch MiniTool Partition Wizard. Click Migrate OS to SSD/HD Wizard on the action panel.
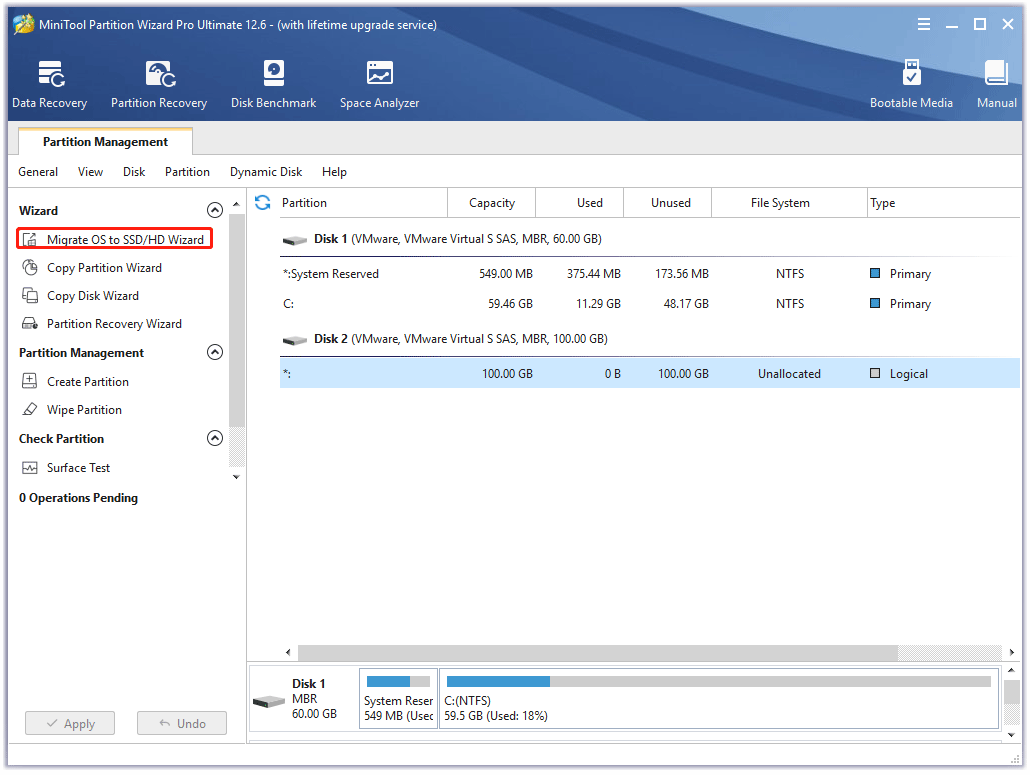
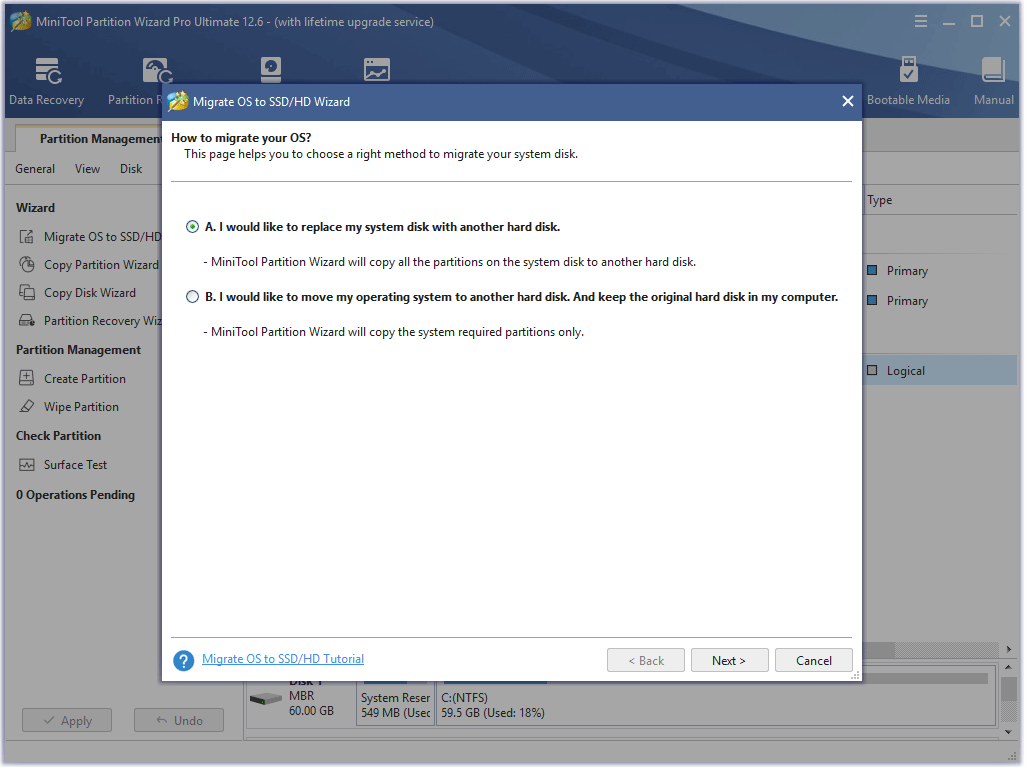
Step 2: Choose option A to clone the entire system disk and click Next.
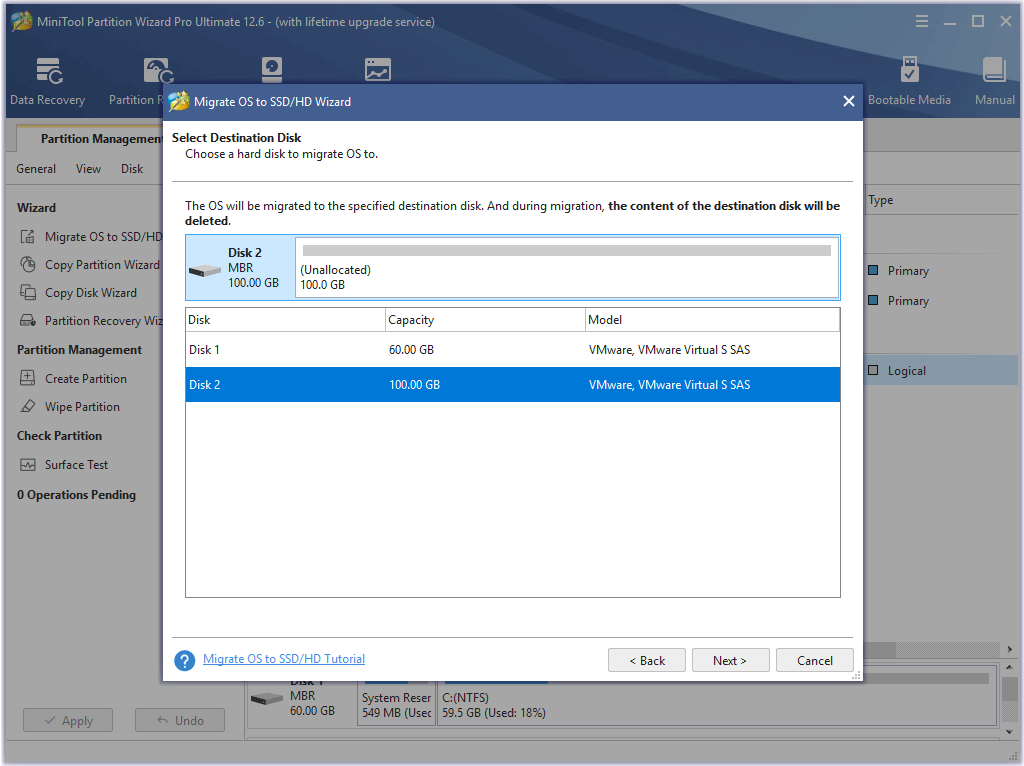
Step 3: Choose the destination disk and click Next. It can be a disk inserted into the PC or a USB drive connected to the PC. In addition, if there is data on the destination disk, please back up it first, because data on it will be deleted.
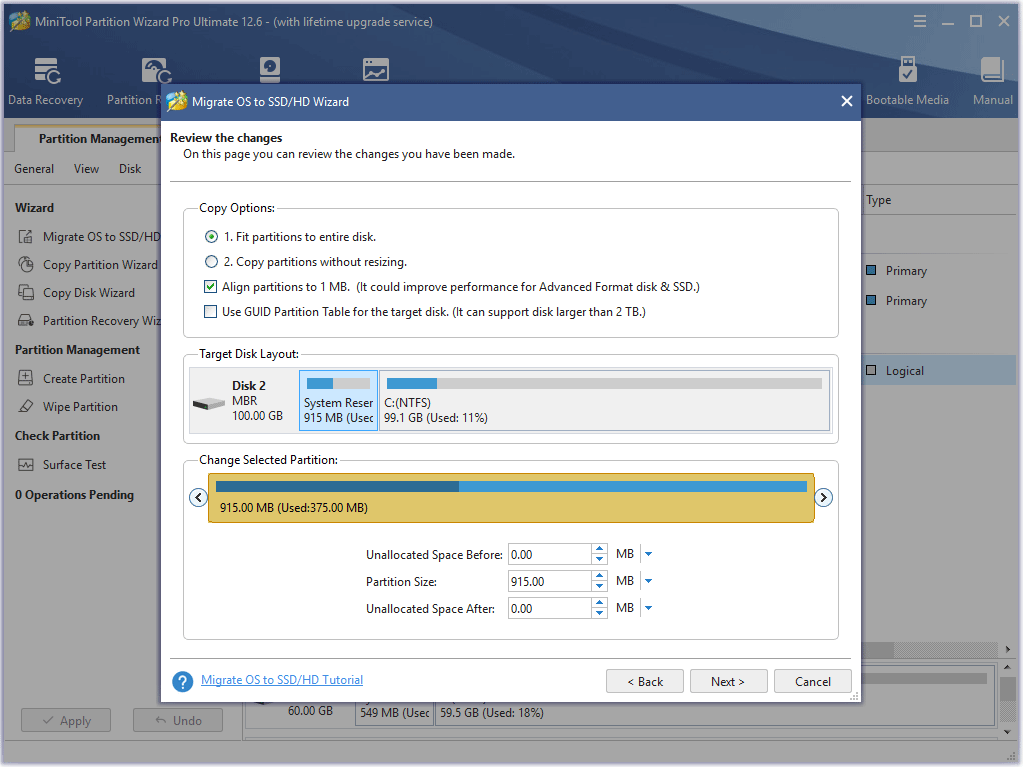
Step 4: Review the copy options and target disk layout. Then, click Next. You can change them as your will. If you have no special need, just keep the default options.
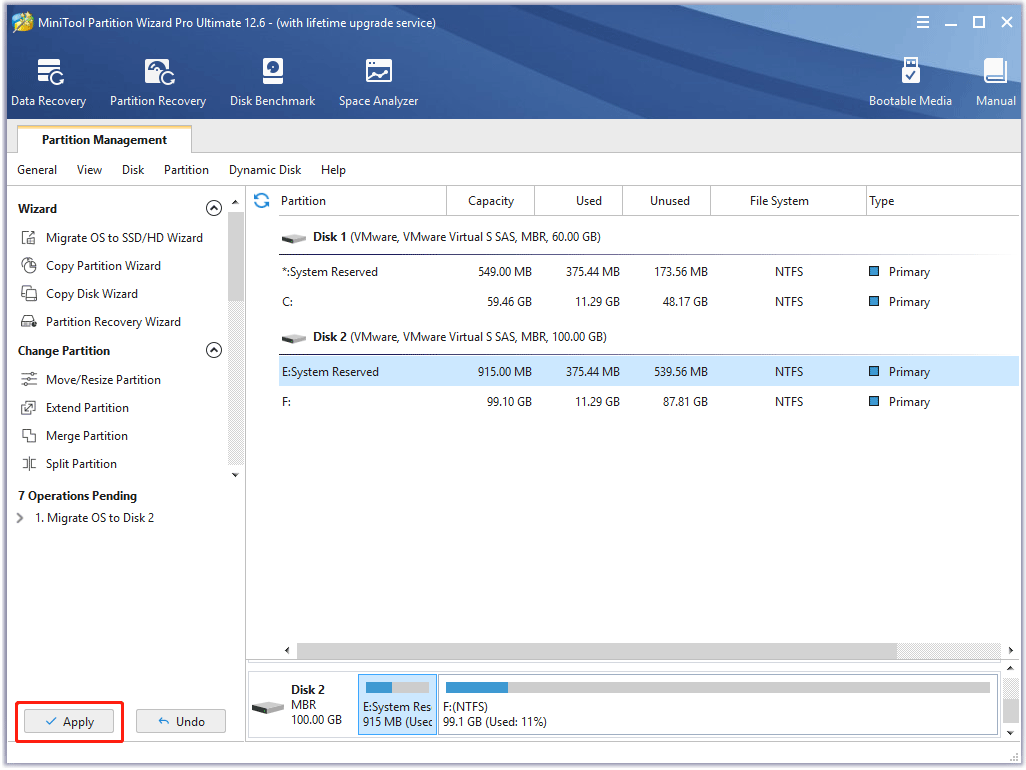
Step 5: Read the note and click Finish. Click the Apply button to execute the pending operation.
Stage 2. Windows 11 TPM Bypass
If you plan to upgrade to Windows 11 using the Windows 11 Installation Assistant:
- Press “Win + R” keys to open the Run box.
- In the Run box, type “regedit” and press Enter to open Registry Editor.
- Go to ComputerHKEY_LOCAL_MACHINESYSTEMSetupMoSetup.
- Right-click the MoSetup key and select New > DWORD (32-bit) Value.
- Name the new DWORD value AllowUpgradesWithUnsupportedTPMOrCPU.
- Double-click the new DWORD value and set it Value data to 1.
- Click OK to save changes.
- Now that you have made Windows 11 bypass TPM, you can use the Windows 11 Installation Assistant tool to upgrade your PC to Windows 11.
If you install Windows 11 using a USB drive:
- Once the Windows setup wizard launches, press Shift+F10 on your keyboard to open the Command Prompt.
- Type command “regedit” and press Enter to open Registry Editor.
- Then, follow the same steps to make Windows 11 bypass TPM. After that, you can continue to install Windows 11.
This post shows you how to check the TPM version, how to enable TPM, how to upgrade the TPM to 2.0, how to add a TPM chip, and how to install Windows 11 without TPM. You can choose one method according to your condition.
Bottom Line
Is this post useful to you? Have you encountered issues when you follow the guide in the post to install Windows 11 without TPM? Please leave comments in the following zone for sharing. In addition, if you encounter problems when using MiniTool Partition Wizard, please feel free to contact us via [email protected]. We will get back to you as soon as possible.
About The Author

Position: Columnist
Linda has been an editor at MiniTool for seven years. She continuously learns about computers and puts her knowledge into practice. Moreover, she is particularly knowledgeable in disk management, data recovery, system installation, and PDF editing. Her articles typically reference multiple examples or are based on her own experience, providing users with the most suitable solutions.
User Comments :