A virtual machine (VM) is the virtualization/emulation of a computer system. Virtual machines are based on computer architectures and provide functionality of a physical computer. If you want to run a different OS on the current operating system, creating a VM is a good choice.
Nowadays, many PCs are running Windows 10/11. If you have the demand of running Windows 7, you can use Hyper-V, VirtualBox, or VMware to create a virtual machine Windows 7.
Preparatory Work
Before you create a Windows 7 virtual machine, you should do some preparations.
1. Download Windows 7 ISO File
To create a virtual machine, you need an ISO file of the operating system. Please download a Windows 7 ISO file from a reliable website.
2. Install a Virtual Machine Program
I will recommend you to choose a VM program from Hyper-V, VirtualBox, and VMware.
Hyper-V is a virtualization technology tool embedded in 64-bit Windows 10 Pro, Enterprise, and Education. If you are using these Windows versions, you don’t need to install other VM programs.
As for VirtualBox and VMware, they are famous virtual machine programs. The former is totally open-source (free) while the latter is paid software. But VMware also offers the free version (VMware Workstation Player). You can choose a VM program according to you needs.
3. Make a Partition for the Virtual Machine Windows 7
Running virtual machines will generate a lot of disk fragmentation. Putting the VM file and other program files in the same partition will affect the running speed.
In addition, some operations like disk defragmentation cannot be performed on the partition storing the virtual machine, because that may cause the virtual machine to fail (virtual machine files are corrupted).
Therefore, I recommend you to create a partition dedicated to the virtual machine Windows 7. To do that, you can use MiniTool Partition Wizard. This software can complete this job well. Here is the guide:
MiniTool Partition Wizard FreeClick to Download100%Clean & Safe
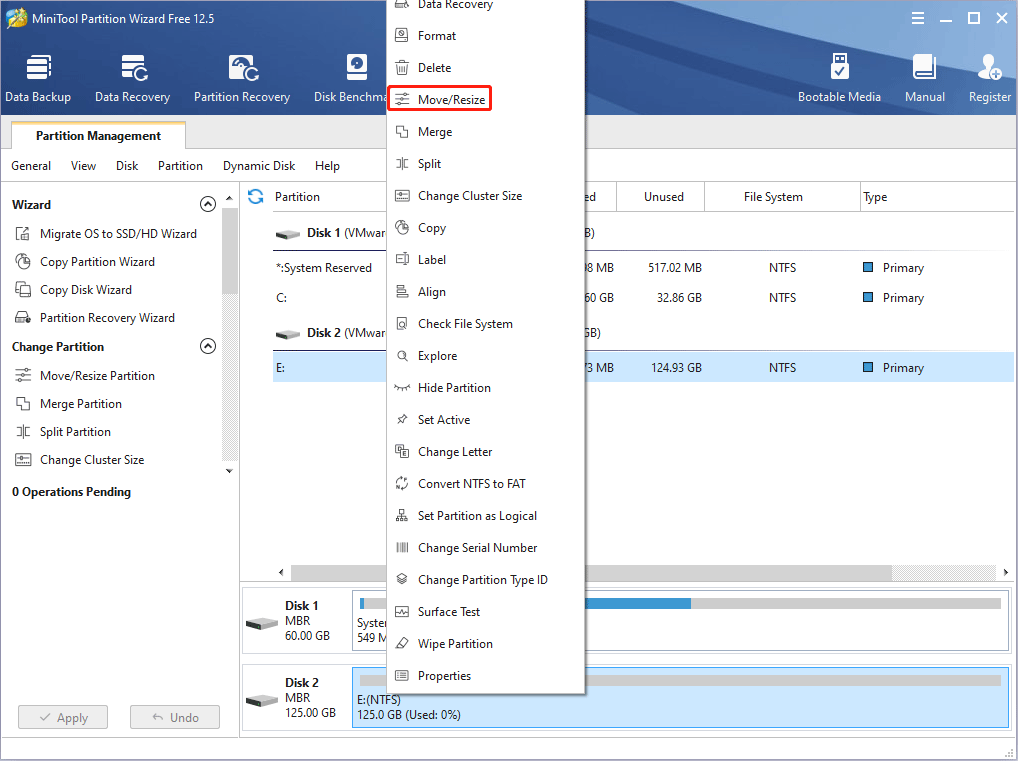
Step 1: Click the above button to download and install MiniTool Partition Wizard. Launch this software and go to its main interface. Then, right-click the partition you want to shrink and choose Move/Resize from the context menu.
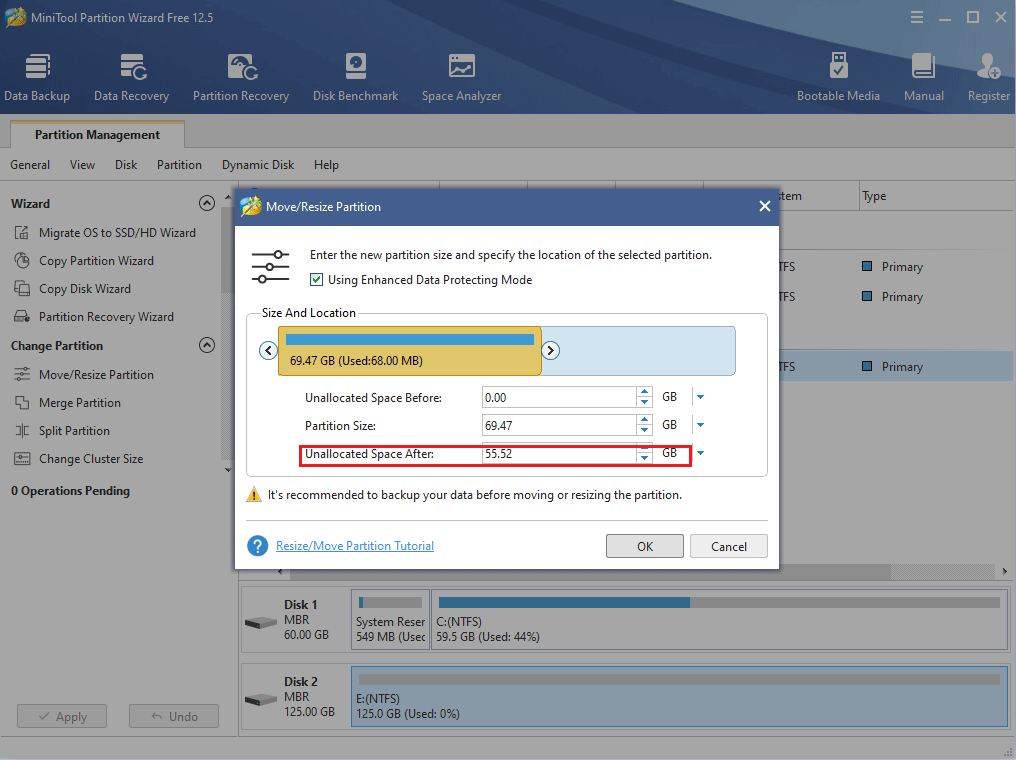
Step 2: In the pop-up window, drag the slider to choose how much size you want to shrink and click OK to continue. The number in the box following Unallocated Space After is the space size you reserve for the new partition.
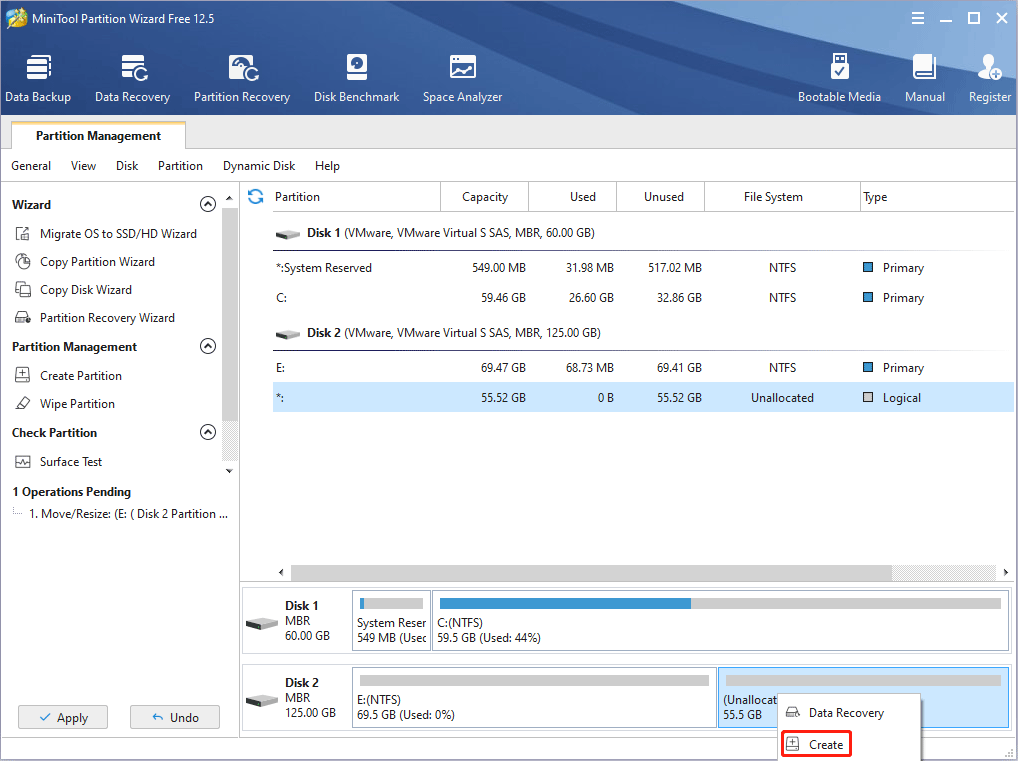
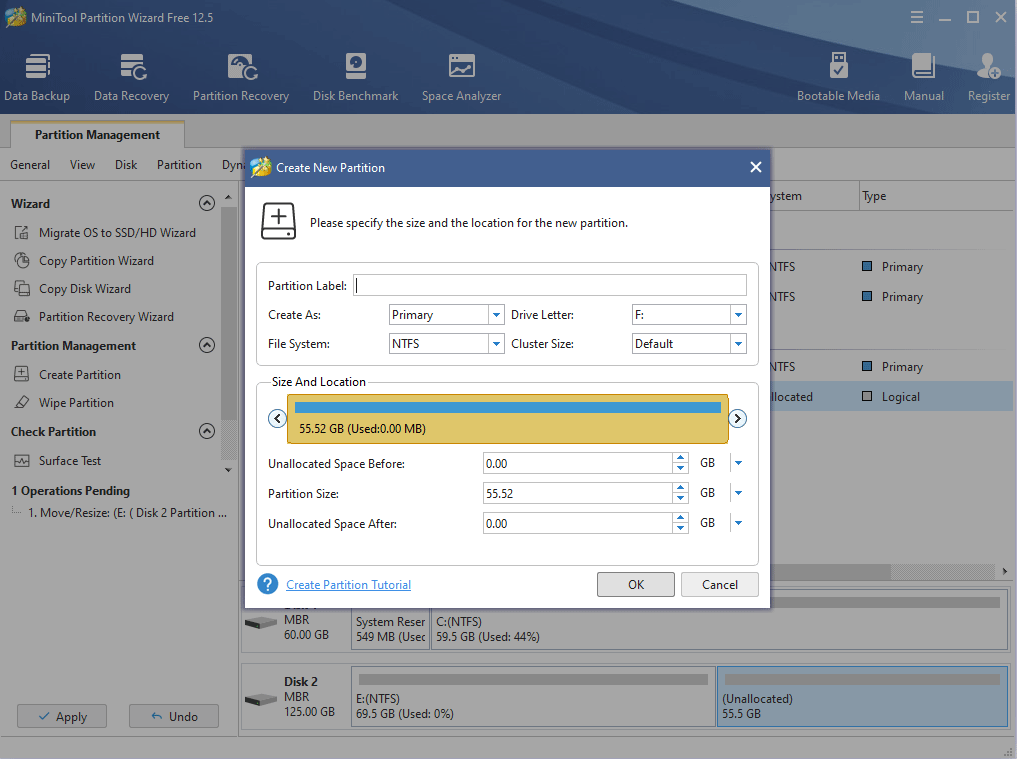
Step 3: Right-click the gray unallocated space and choose Create from the context menu.
Step 4: In the pop-up window, choose partition properties like file system, partition label, drive letter and so on. Then, click OK to continue.
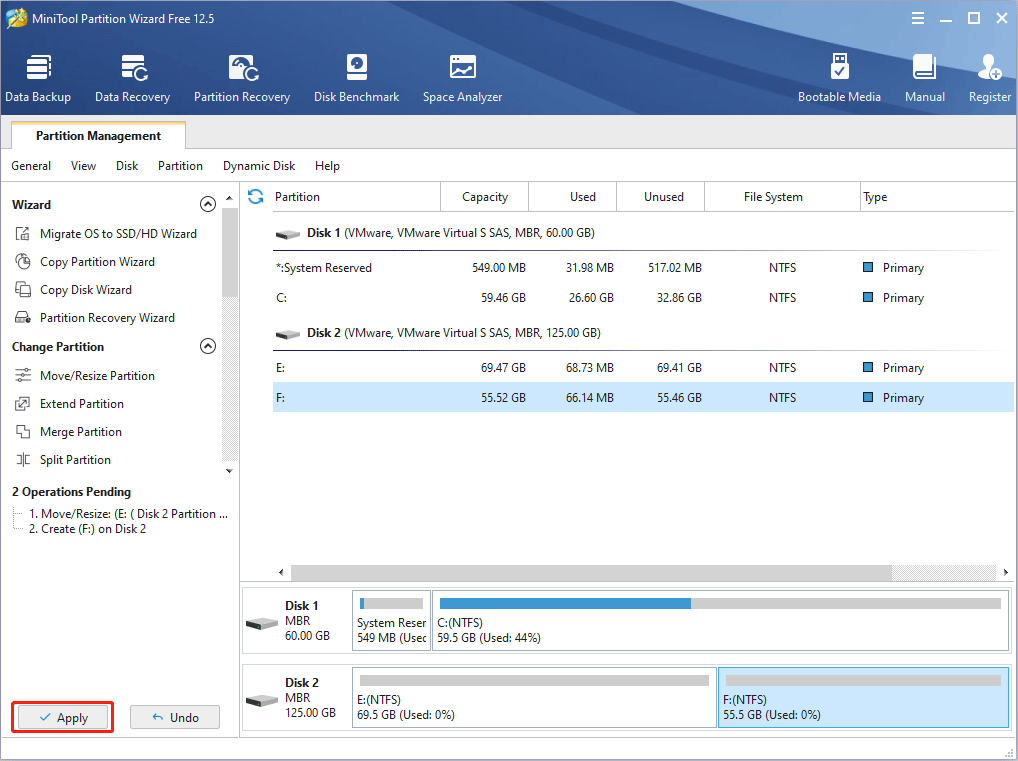
Step 5: Preview the changes and click Apply to confirm the changes.
How to Create a Windows 7 Virtual Machine
In this part, I will show you how to create a Windows virtual machine on Windows 10/11 using Hyper-V, VirtualBox, and VMware.
1. Create a Windows 7 Virtual Machine Using Hyper-V
Step 1: Verify whether the PC hardware is compatible with Hyper-V.
- Type “cmd” in the Windows search box. Then right click the best-matched result (Command Prompt) and click Run as administrator.
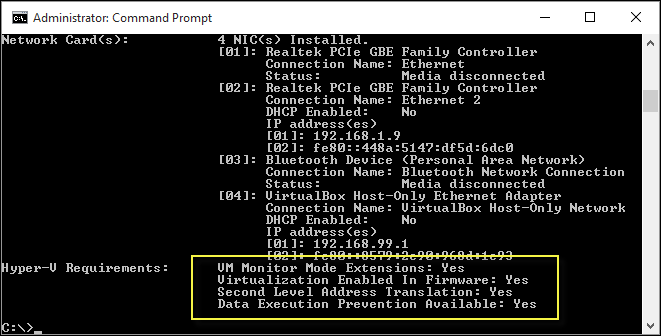
- Type the command “systeminfo” and then press Enter. After the result comes out, please check the Hyper-V Requirements Only when all Hyper-V requirements are Yes, you can run Hyper-V without problem. If you can’t run Hyper-V, please use VirtualBox or VMware instead.
Step 2: Update Windows to the latest version. If your Windows version is too old, the VM creation process may be a little different.
- Press Windows key + I to open Settings.
- Go to Update & Security > Windows Update > Check for updates. PC will download and install updates automatically.
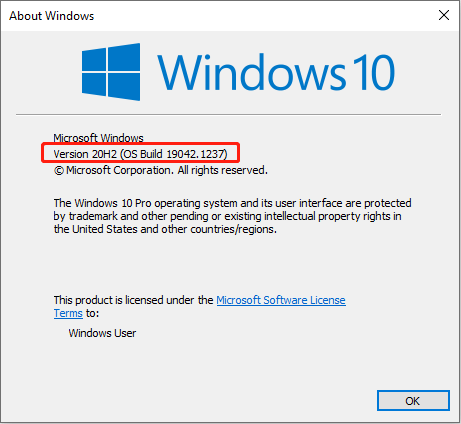
- After Windows updates are installed, press Windows key + R to call out the Run Type “winver” into the box and press Enter. Make sure the Windows version is later than 1709.
Step 3: Enable Hyper-V.
- Right-click on the Windows button and select Apps and Features.
- Scroll down the right pane to find Related settings. Under this section, click Programs and Features.
- On the new window, select Turn Windows Features on or off.
- On the Windows Features window, select Hyper-Vand click OK. Please make sure Hyper-V Management Tools and Hyper-V Platform under the Hyper-V directory are selected.
- When the installation has completed, you are prompted to restart your computer. Do as required.
Step 4: Open Virtual Switch Manager and create a virtual network for the Windows 7 VM.
- Search and open Hyper-V Manager.
- In the Hyper-V Manager tool, in the left pane, select your PC and then click the Action menu > Virtual Switch Manager…
- In the Virtual Switch Managerwindow, in the left pane, select New virtual network switch under the Virtual Switches
- In the right panel, choose External. Then, click the Create Virtual Switch
- For the new virtual switch, please type the name, ensure External network is selected, and select the physical network card to be paired with the new virtual switch.
- Then, click the OK button apply and save changes.
Step 5: Create a Windows 7 virtual machine.
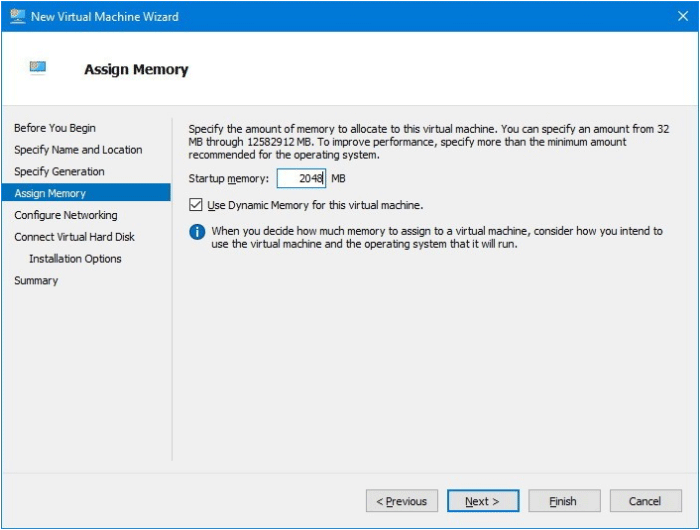
- In the Hyper-V Manager, click Action>New>Virtual Machine.
- Follow the wizard to configure the settings of the new virtual machine. For example, the name, the location, the memory, the network, the virtual hard disk. What’s more, you should choose the Windows 7 ISO file as the image file.
- Then, you can go through the Windows 7 installation process. After that, a Windows 7 virtual machined is created successfully.
If your Windows version is earlier than 1709, or you want to get a more detailed guide, please refer to the following post:
![How to Create a VM with Hyper-V [Virtual PC Windows 10]](https://images.minitool.com/partitionwizard.com/images/uploads/2020/02/virtual-pc-windows-10-thumbnail.jpg)
2. Create a Windows 7 Virtual Machine Using VirtualBox
Step 1: Open VirtualBox and click the New icon (the gear icon).
Step 2: Type the name of the new VM, choose the location of the VM, and the type and version of the VM. Then, follow the wizard to configure the memory size, virtual hard disk, etc.
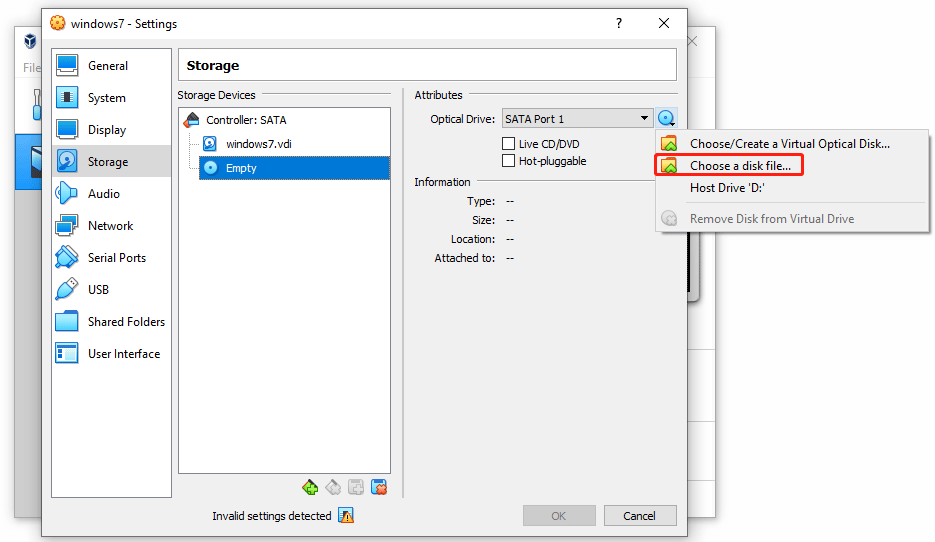
Step 3: After the VM is created, highlight the VM and then choose Settings icon. In the new window, you can configure more settings of the VM. But the most important thing is to load the Windows 7 ISO file. Please go to Storage, highlight Empty under the Controller, click the drop-down menu beside the Optical Drive, and then click Choose a disk file.
Step 4: After you have configured all settings, save changes and click the Start icon to go through the Windows 7 installation process.
If you want to get more detailed tutorial on VirtualBox, you can refer to this post: How to Install Ubuntu on VirtualBox? Here’s the Full Guide.
3. Create a Windows 7 Virtual Machine Using VMware
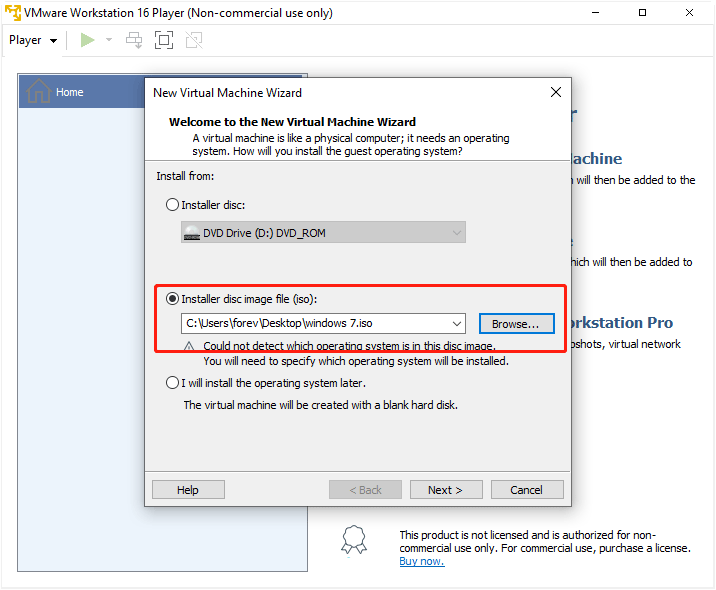
Step 1: Launch VMware Workstation, click Create a New Virtual Machine, and choose Typical (if you use the free version, the typical is chosen by default).
Step 2: Choose Installer disc image file (iso) and click Browse to find the Windows 7 ISO file. Then, follow the wizard to configure VM type, version, name, location, and disk size. Then, right-click the Windows 7 VM and choose Settings, you can configure/change network, memory size, and more parameters there.
Step 3: After all are configured well, you can right-click the Windows 7 VM and chose Power On.
If you want to get more detailed tutorial on VMware, you can refer to this post: How to Use Windows 10 as a Virtual Machine – A Step-by-Step Guide.
Bottom Line
Is this post useful to you? Which VM program are you choosing? Have you encountered problems when following the above guides? Do you know other good ways to create a virtual machine Windows 7? Please leave a comment in the following zone.
In addition, if you have difficulty in moving/resizing or extending a partition, please feel free to contact us via [email protected]. We will get back to you as soon as possible.
About The Author

Position: Columnist
Linda has been an editor at MiniTool for seven years. She continuously learns about computers and puts her knowledge into practice. Moreover, she is particularly knowledgeable in disk management, data recovery, system installation, and PDF editing. Her articles typically reference multiple examples or are based on her own experience, providing users with the most suitable solutions.
User Comments :