When trying to upgrade the UniFi controller software, a great many people encounter the UniFi controller startup failed error. What causes the UniFi controller not starting issue? How to fix it? In this article, MiniTool explores several possible reasons and effective methods for the issue.
What Causes UniFi Controller Startup Failed Error
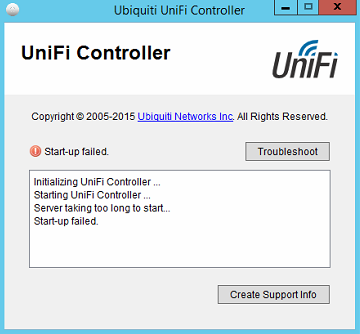
Lots of people reported that they encountered the UniFi controller startup failed issue. Some users encountered the issue when trying to upgrade UniFi controller software, while others got the error after launching the software for a few minutes. Up till now, the UniFi controller not starting error has been reported by many Windows 10 users.
What causes the error? After investigating many user reports, we found several possible reasons that can cause UniFi controller won’t start.
- Lack of free space on the host system drive.
- Incompatible or outdated JAVA installation.
- There are special characters in the Windows Profile username.
- The required ports are unavailable for UniFi controller.
- Database corruption.
- Corrupt UniFi logs.
- Temporary UniFi controller software glitches.
According to the above causes, the corresponding solutions will be illustrated. Now, let’s see how to fix UniFi controller startup failed.
How to Fix UniFi Controller Startup Failed Error
Top 8 Solutions to Fix UniFi Controller Startup Failed
- End all the UniFi-related controller processes
- Add a new user without any special characters
- Extend your system drive space
- Change the default port for the UniFi controller
- Rename the UniFi Logs
- Change the specified storage engine
- Reinstall JAVA
- Install the UniFi controller as a service
Solution 1. End the UniFi Controller Related Processes
In some cases, the UniFi controller failed to start as there are temporary software glitches caused by conflicting processes. To fix this issue, you can try ending all UniFi-related processes in Task Manager. Close the UniFi controller software, and then follow the steps below:
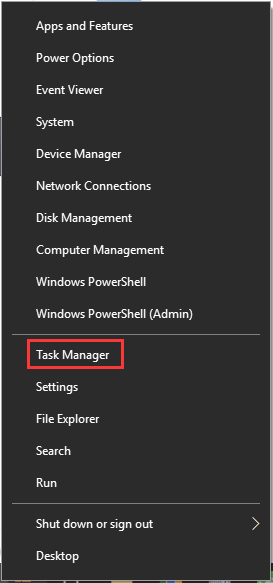
Step 1. Right-click the Start button and select the Task Manager option from the context menu.
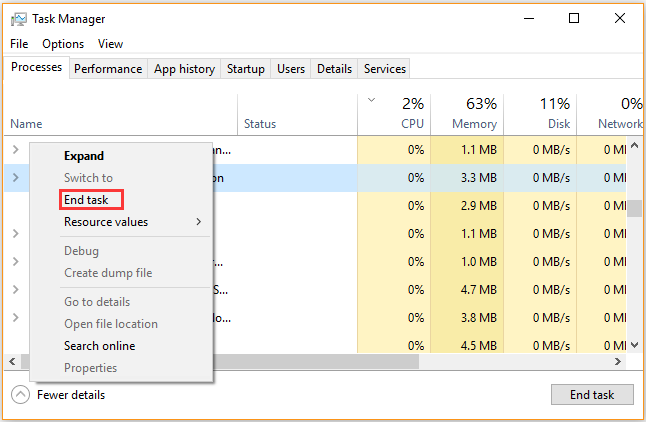
Step 2. In the Processes tab, right click the process related to the UniFi controller software and select End task. Then repeat this step to end all related processes.
Step 3. Then you need to end all processes belonging to JAVA and MongoDB.
Now, you can launch the software and check if UniFi controller not starting. If this method fails to work, just move on to the following methods.
Solution 2. Add a New User Without Any Special Characters
If Windows Profile username has special characters like á, ì, ô, and ç, UniFi controller won’t start because it can’t find the file. So, it is necessary to verify if there are any special characters in the username.
If it is indeed that the special characters cause the error, you can create a new user profile without special characters. Here’s how to do that:
Step 1. Start your Windows 10 PC in Safe Mode.
Step 2. Press Win + I keys to open the Settings app and click on Accounts.
Step 3. Select the Other people option from the left pane and click on Add someone else to this PC from the right side pane.

Step 4. Click on I don’t have this person’s sign-in informationin the pop-up window.
Step 5. Click on Add a user without a Microsoft account. Then Windows will prompt you to create a new Microsoft account. Here you need to enter a user name and assign a password for the new account, and click on Next.
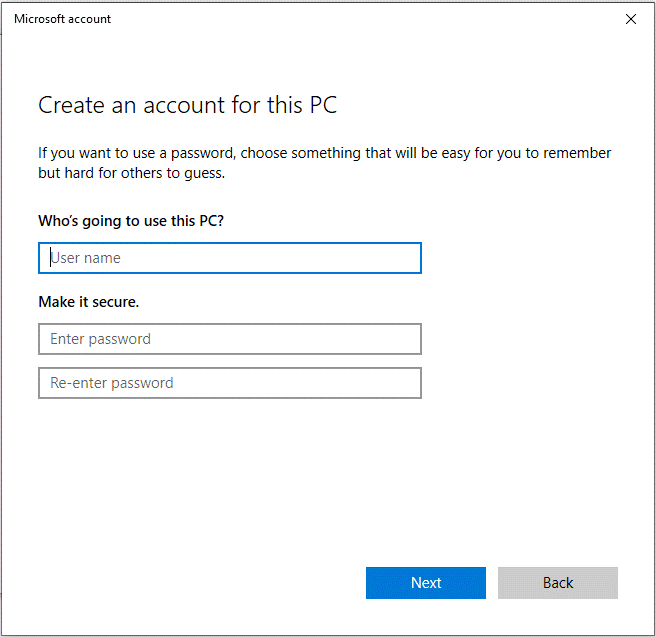
Step 6. You can transfer all of your personal data to the new user profile.
After that, restart your computer and see if the UniFi controller failed to start.
Solution 3. Extend the System Drive Space
As you know, the UniFi controller software requires enough free space on the system drive to complete its operation. If there is not enough free space on the system drive, your UniFi controller won’t start Windows 10. In this case, you need to increase space on the system drive.
How to extend system drive without data loss? To do so, you can utilize a professional software – MiniTool Partition Wizard to extend your system drive. It is a trusted partition manager that spares no efforts to provide various solutions like space analyzer, migrate OS to SSD, recover lost data, perform a disk benchmark, etc.
Click on the buttons below to download MiniTool Partition Wizard and install it on your computer.
MiniTool Partition Wizard FreeClick to Download100%Clean & Safe
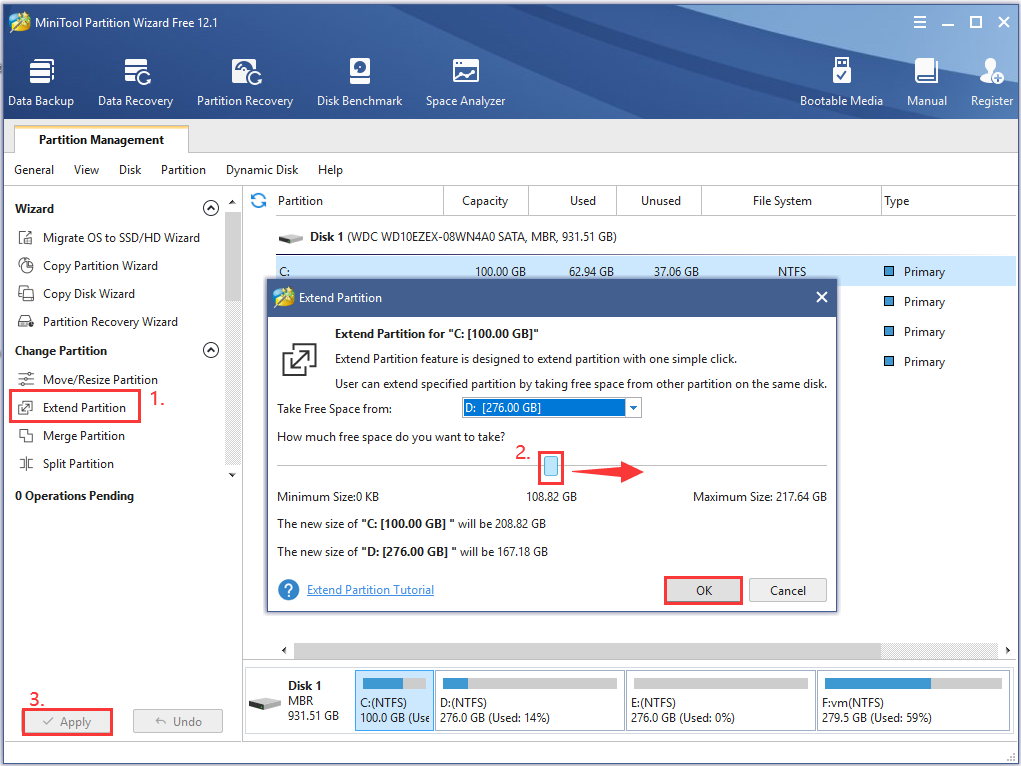
Step 1. Run this program to enter its main interface, and then select the system partition and click on Extend Partition from the left pane.
Step 2. Select a partition or unallocated space from the drop-down list of the Take Free Space from, and then drag the sliding handle leftwards or rightwards to enlarge the system space and click OK to continue.
Step 3. Click on the Apply button to execute this operation.
Now, your system drive should have enough free space to run the UniFi controller. Also, you can utilize a Junk File Cleaner to clean up the unnecessary files to free up C drive.
![How to Install an M.2 SSD on Windows PC [Complete Guide]](https://images.minitool.com/partitionwizard.com/images/uploads/2020/09/how-to-install-m2-ssd-thumbnail.jpg)
Solution 4. Change the Default Port for the UniFi Controller
If the needed ports are used by other programs, you may encounter the UniFi controller startup failed error. Usually, the UniFi controller software requires port 8080 to operate normally. In this case, you need to check if the default port is being used by a problematic program, and then set the default port for the UniFi controller application.
To do so, follow the steps below:
Step 1. Perform a clean boot to check which program causes the UniFi controller not starting error. If you don’t know how to do that, you can refer to this post. After you find the conflicting program, you can uninstall it from your computer.
Step 2. If the UniFi controller failed to start even after performing a clean boot, then you need to change the default port for the UniFi controller application.
Solution 5. Rename the UniFi Logs
Like many other applications, log files will be created during the process of running the UniFi controller app. Sometimes, the UniFi controller won’t start Windows 10 if the log files get corrupted. To fix the issue, you need to rename these log files, and then the newer log files will be created on the next launch. Here’s how to do that:
Step 1. Exit the UniFi controller software first and follow the steps in Solution 1 to end all UniFi-related processes in Task Manager.
Step 2. Press the Win + E keys to open the File Explorer, and then go to the UniFi controller directory folder. Usually, you can find the directory through the path: This PC > Local Disk C > Ubiquiti UniFi > logs.
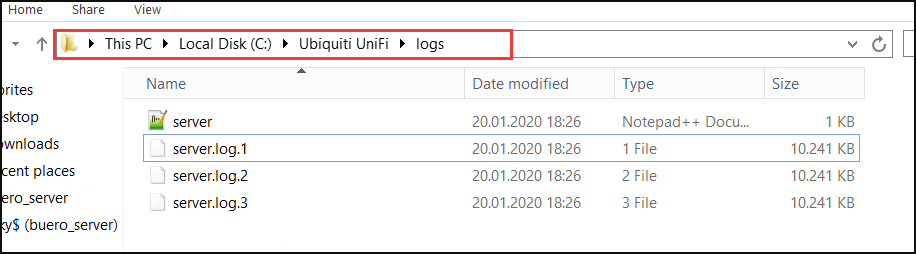
Step 3. Now, you can rename these log files in the UniFi controller directory. Here you can add the .old at the end of the file name extension.
Step 4. Relaunch the software and see if the UniFi controller startup failed error is fixed or not.
Solution 6. Change the Specified Storage Engine
According to a survey, the UniFi controller won’t start if its database is created by the “mmapv1” storage engine but the specified storage engine is “wiredTiger”. Under this situation, you can fix the error by forcing the UniFi controller to use the mmapv1 storage engine. For that:
Step 1. Open the File Explorer, and then go to the UniFi controller directory folder.
Step 2. Find the System.Properties file and open it with the Notepad, and then add the following line to the end of the text.
db.extraargs=–storageEngine=mmapv1
Step 3. Click on File > Save in the Notepad to save the changes and exit.
Now, you can relaunch the program and check if the UniFi controller not starting issue still persists.
Solution 7. Reinstall JAVA
It is well known that the operation of the UniFi controller application requires the right JAVA version. Although JAVA has been updated to the latest version, the JAVA version 9 is not supported for the UniFi Network Controller.
So, it is necessary to ensure that you have installed a correct JAVA version. Here’s how to uninstall your current JAVA and install the correct JAVA.
Step 1. Exit the UniFi controller software first and end all the UniFi-related processes in Task Manager.
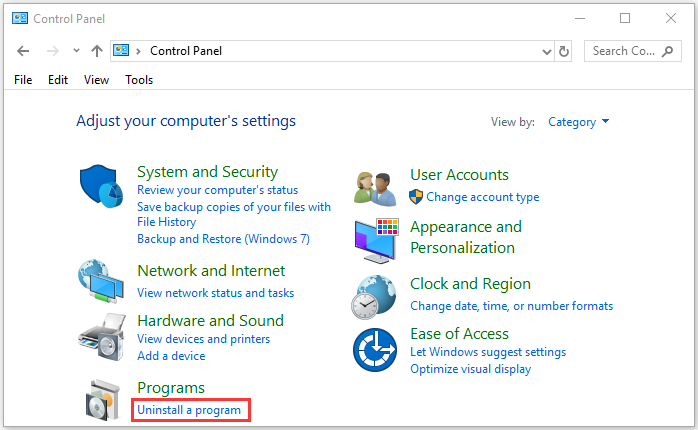
Step 2. Type control in the search box and select the Control Panel app from the context menu.
Step 3. Change the View by type to Category and click on Uninstall a Program under the Programs section.
Step 4. Right-click the JAVA from the list of installed programs and click on Uninstall. Once the JAVA is uninstalled, restart your computer.
Step 5. Click here to download the right JAVA version for your Windows PC and install it. If you are prompted with a message stating Firewall to allow JAVA, allow it.
Note: You should install the 64-bit JAVA version 8 to make sure the proper operation of the UniFi controller.
Now, you can launch the UniFi controller software and see if it can start up properly.
Solution 8. Install UniFi Controller as a Service
Some users reported that the UniFi controller won’t start Windows 10 if it is not installed as a service. You can try installing the UniFi controller software as a service to fix the issue. Here’s how to do that:
Step 1. Close all UniFi-related processes in Task Manager.
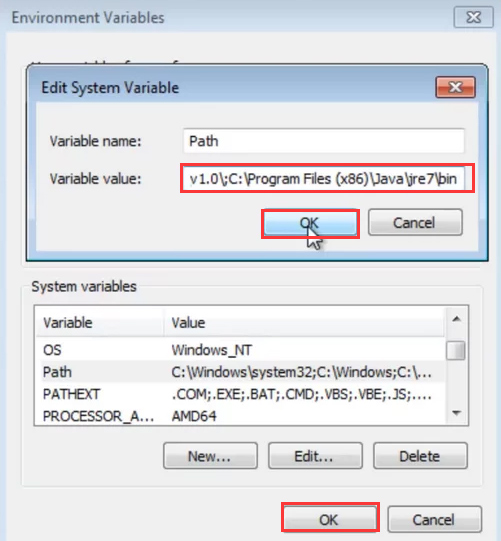
Step 2. Add the JAVA path: C:Program Files(x86)Javajre7binjavaw.exe in the environment variables of your Windows system (at the end of the path in the Temp variable). Then click on OK to save the changes.
Step 3. Type cmd in the search box, and then right-click the Command Prompt app and select Run as administrator.

Step 4. In the elevated command prompt, type the following commands one by one and hit Enter after each one.
- cd “%UserProfile%Ubiquiti UniFi”
- java -jar libace.jar installsvc
Step 5. When it is prompted with Complete Installation, type the following command and hit Enter. Then exit the command prompt.
java -jar libace.jar startsvc
Step 6. Open the Task Manager and see if the UniFi controller service is in the Services tab.
Now, restart the controller and check to see if the UniFi controller failed to start.
Bottom Line
How to fix UniFi controller not starting? I believe that you already have known the answer. There are 8 effective methods in this post. If you have any questions about the MiniTool software, please send us an e-mail via [email protected]. We also appreciate any ideas in the comment area.
User Comments :