This post will introduce you to how to install Android on PC using 3 main methods: replacing Windows with Android, installing Android alongside Windows in a dual-boot setup. And also tell you how to create a space for Android x86with MiniTool Partition Wizard.
Can you install Android on a PC?
The answer is yes.
Installing Android on your computer not only allows you to run Android apps and games but also lets you take full advantage of your computer’s hardware performance.
Whether you want to dual-boot Android alongside Windows or replace Windows completely, solutions such as Android-x86 and Bliss OS make it easy to install Android on your PC.
This guide provides step-by-step instructions on installing Android on your computer and helps you choose the Android operating system that best suits your needs.
Best Android OS for PC
Selecting the right Android operating system is a crucial step when installing Android on a PC.
Different Android OS versions vary in terms of compatibility, performance, features, and hardware support, making the right choice essential.
Below, we introduce several popular Android systems for PC to help you make your decision.
| Android OS | Use Cases | Key Advantages |
| Android-x86 | Play popular mobile games on a large-screen PC or laptop | Run large-scale Android apps with rich multi-window multitasking capabilities |
| Bliss OS | Playing mobile games on PC | Lightweight and highly compatible, supports UEFI booting |
| PrimeOS | Old computer, low-spec laptop | Extremely low hardware resource usage, suitable for both gaming and office work. |
| Phoenix OS | Multi-system collaborative office operations | Low hardware requirements |
Once you have selected a suitable Android OS, you can begin the pre-installation preparations. This step is crucial for avoiding boot failures or compatibility issues during the installation process.

Before Installing Android on a PC
Before installing Android on your computer, you need to complete some preparatory steps. These steps help ensure a smooth installation process.
#1. Check Hardware Requirements.
Ensure your computer meets the basic requirements for running Android. Most Android PC systems require at least a 64-bit processor and a minimum of 2GB of RAM. However, for a smoother experience, 8GB of RAM or more is recommended.
#2: Back Up Important Data.
Be sure to back up all important files before making any changes to your system.
#3: Create a Bootable Android USB Drive.
To install Android on your computer, you need to create a bootable USB drive using a tool like Rufus.
The following steps are illustrated using the Android-x86 operating system as an example.
Step 1: Download the Android ISO file.
- Go to the Android-x86 SourceForge Page to download the 64-bit ISO file.
- In the Android x86 interface, click the Download button.
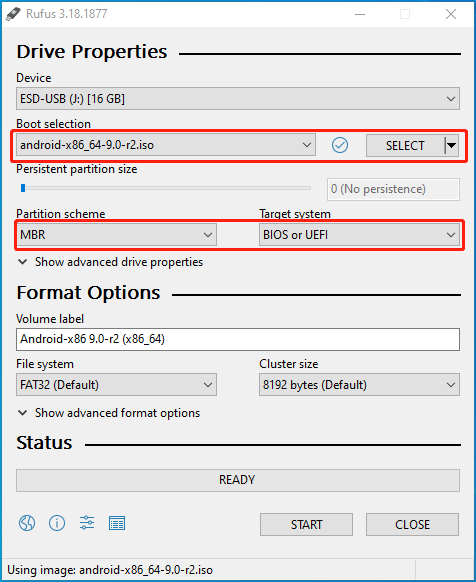
Step 2: Create a Bootable USB.
- Insert a USB drive into your PC.
- Download and then open Rufus, and select your USB drive in the Device dropdown.
- Click Select and choose the downloaded Android x86 ISO file.
- Choose MBR or GPT as the partition scheme according to what partition scheme the target disk uses.
- Click Start, select ISO image mode when prompted, and wait for the process to complete.
#4. Create a partition for Android x86.
If you plan to set up an Android-x86 dual-boot system on your Windows PC, you first need to create some unallocated space for the Android installation.
MiniTool Partition Wizard can help you easily accomplish this task.
MiniTool Partition Wizard FreeClick to Download100%Clean & Safe
Step 1: Open MiniTool Partition Wizard, and right-click a partition and choose Move/Resize.
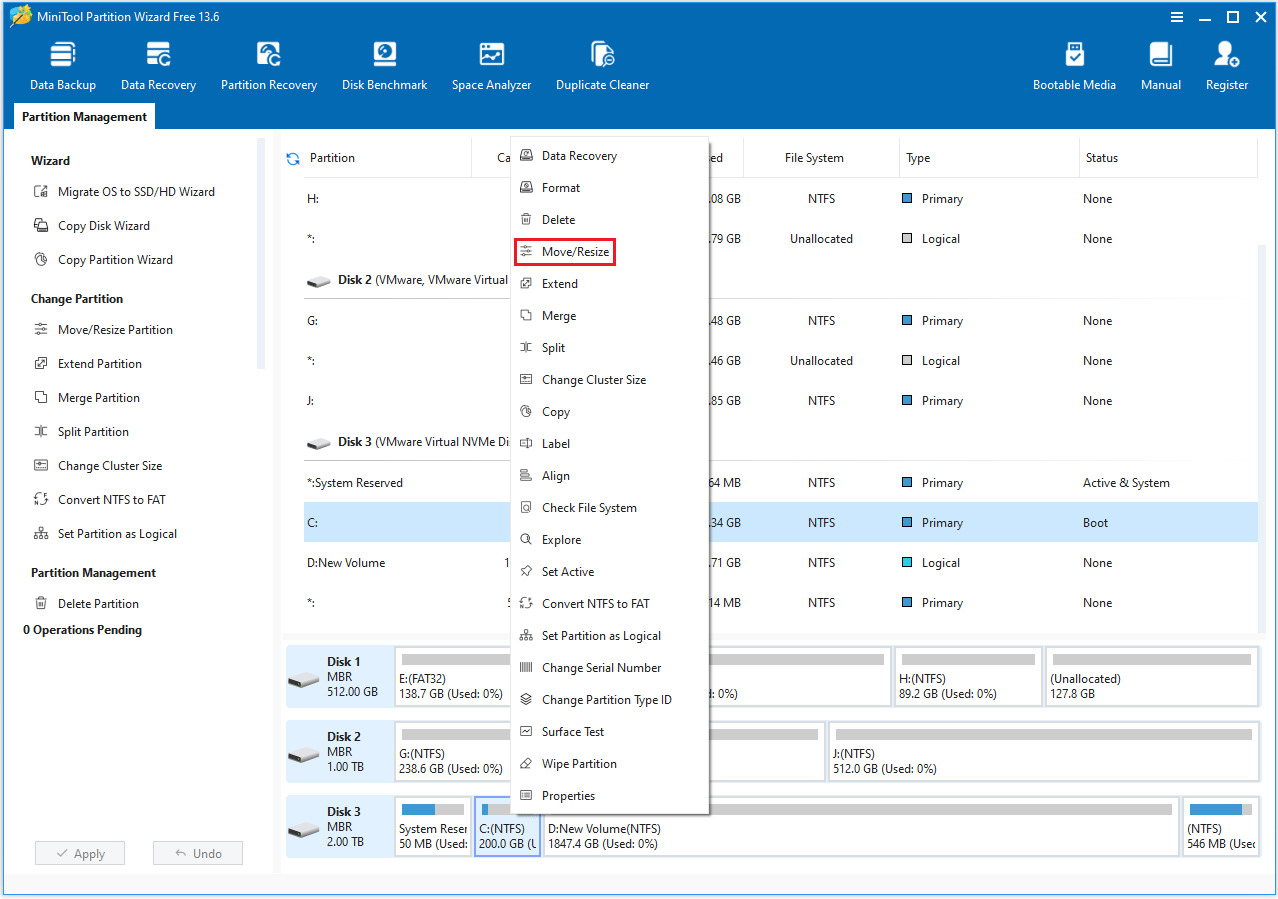
Step 2: Drag the arrow icon to decide how much space you want to shrink. Then, click OK.
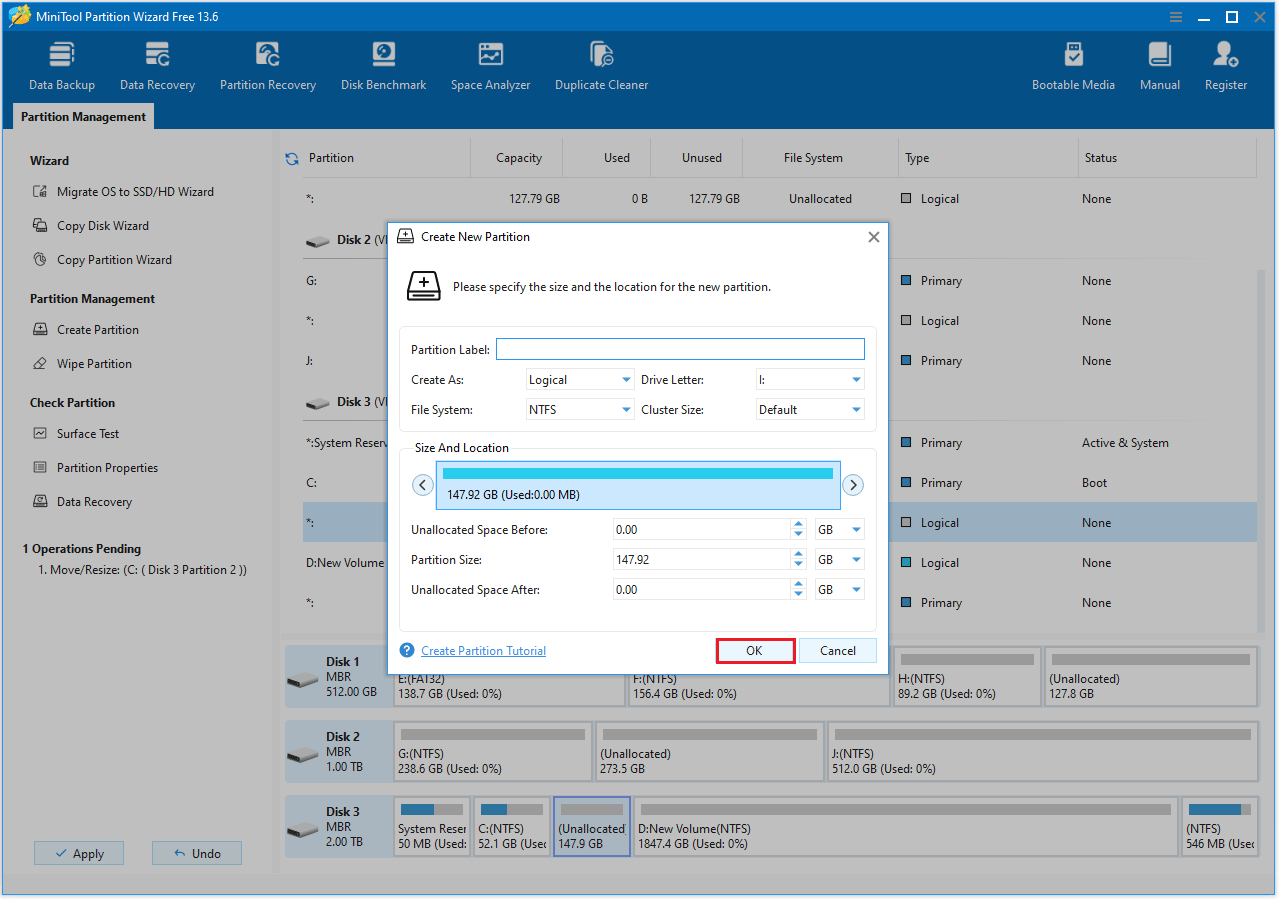
Step 3: Right-click the unallocated space and choose Create.
Step 4: Set parameters for the new partition and click OK.
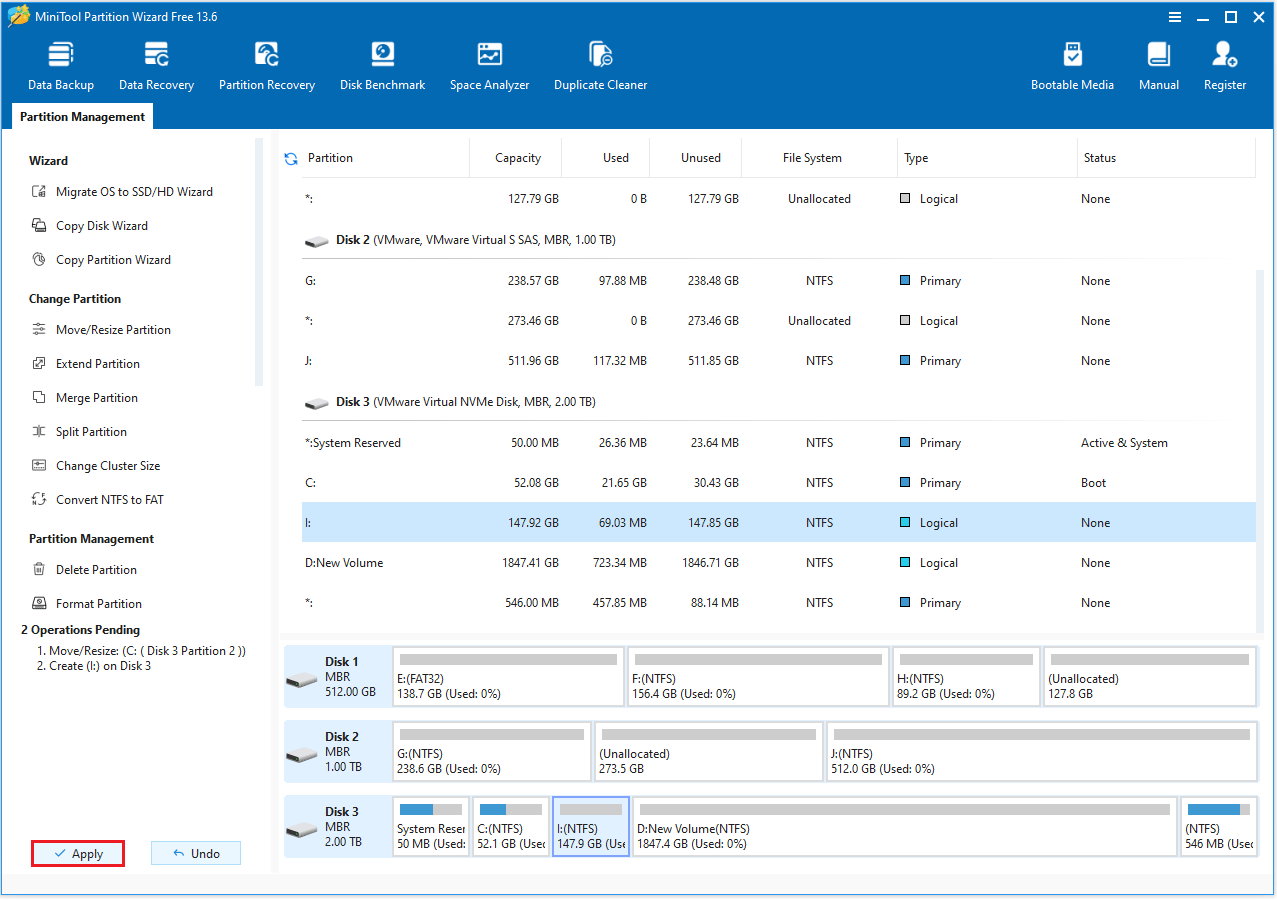
Step 5: Click Apply to execute pending operations.
Once these preparations are complete, you can proceed with installing Android on your PC.
How to Install Android on a PC
Currently, there are three main ways to run Android on a computer: using an Android emulator, replacing Windows with Android, and setting up a dual-boot system with both Android and Windows.
Here are the detailed steps:
Method 1: Run Android on a PC Using an Emulator
Android emulators are the easiest way to run Android on Windows without modifying hard drive partitions or installing a new operating system.
With an emulator, you can run Android apps and games directly on your PC while maintaining your existing Windows environment.
![How to Install Android on VirtualBox [A Step-by-Step Guide]](https://images.minitool.com/partitionwizard.com/images/uploads/2022/04/android-virtualbox-thumbnail.png)
Method 2: Dual Boot Android and Windows
Dual-booting allows you to install Android while keeping Windows, and freely choose between the systems when booting up.
Step 1: Insert the USB installation disk into the PC.
Step 2: Boot the PC into the firmware and set the USB disk as the first boot device. Press F10 to save changes.
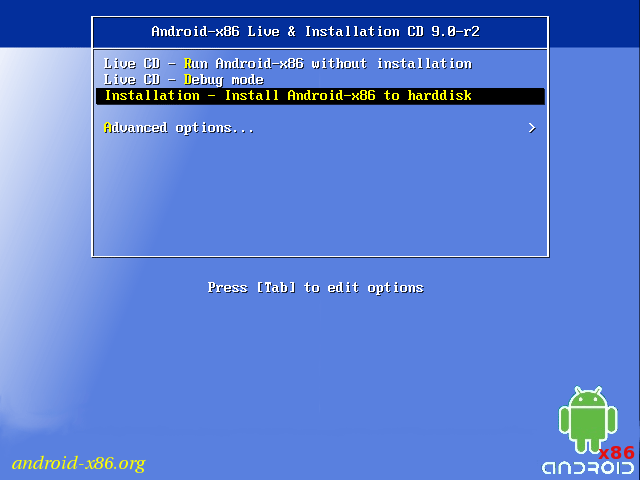
Step 3: Select Installation – Install Android-x86 to harddisk.
Step 4: Choose the new partition you just created for Android x86.
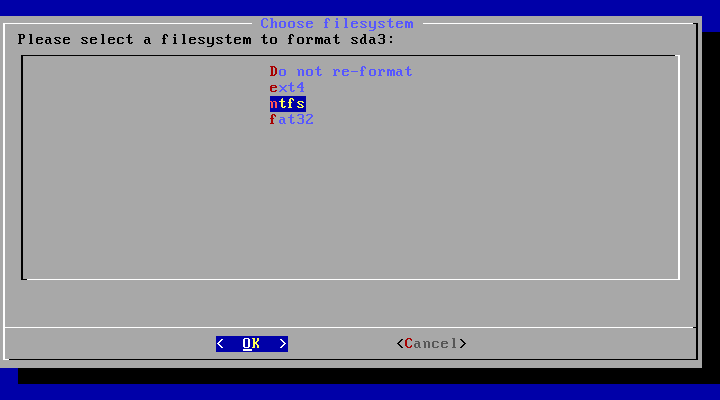
Step 5: Select a file system for the Android partition. NTFS is recommended.
Step 6: It will ask you some questions related to GRUB, /system directory, etc. Select OK or Yes for all of these questions after reading them.
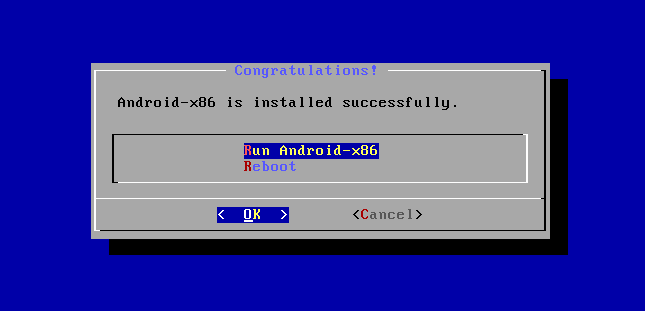
Step 7: After the installation process is completed, select Run Android-x86 to boot into it. Wait until you get into the GUI.
Method 3: Replace Windows with Android
If you no longer need Windows, you can install Android directly and use it as your sole operating system.
Be sure to back up important data before proceeding, as this process will erase the existing system and files.
Step 1: Boot the PC from the USB installation disk. When the installation wizard opens, select Installation – Install Android-x86 to harddisk.
Step 2: When it asks you to select a partition to install Android-x86, please choose Create/Modify partitions. Select a Windows partition and choose Delete. Please repeat this operation until you have deleted all Windows partitions.
Step 3: Select the free space, and select New > Primary. Then, press Enter to confirm the size. Once the partition is created, select Bootable. When “Boot” appears under the Flags tab, now you can select Write. Then, type “yes” and press Enter to write the partition table to the disk. Once the process is completed, select Quit.
Step 4: Now, select the partition to install Android. Then, follow the wizard to complete the installation.
This post provides you with 3 methods on how to install Android for laptop.Click to Tweet
Bottom Line
This article introduces three methods for installing Android on a laptop: using an Android emulator, setting up a dual-boot system, and replacing Windows entirely.
If you have any questions or feedback about MiniTool Partition Wizard, feel free to contact our support team at [email protected] for additional help.
About The Author

Position: Columnist
Cecilia has been an editor at MiniTool for two years. She primarily focuses on disk and partition-related content, with particular expertise in disk cloning, partition recovery, and PDF document conversion. She is dedicated to providing users with clear and accurate solutions to help them efficiently resolve common computer problems.
User Comments :