Why Do You Install Android on VirtualBox?
Android is a mobile operating system based on a modified version of the Linux kernel and other open-source software, designed primarily for touchscreen mobile devices such as smartphones and tablets.
Because the copyright of Android belongs to Google, over 70 percent of Android smartphones run Google’s ecosystem. Users can download and install apps and games from Google Play.
So far, the Google Play Store features over 3 million apps and most of them are not compatible with Windows PCs. If you want to run Android apps downloaded from Goggle Play on PC, you need to install an Android emulator.
Of course, you can install BlueStacks or other Android emulators, but most of these emulators use the Android-x86 On VirtualBox (AOVB) technology to emulate Android on PC. Then, why not you install Android x86 on VirtualBox directly?
In addition, if you want to test some features of Android, VirtualBox Android emulator is also a good choice.
Top 6 Free Android Emulators for Windows 10/11 PC to Play Games
What Is Android x86?
As you see, I mentioned Android x86 in the above content. You should note that Android x86 is not the same as the Android. Android is an operating system designed for ARM chips and it can’t run on x86 chips. To solve this problem, Android x86 comes out.
The Android x86 project was launched since 2009 and is a derivative of the open-source Google Android operating system, targeting x86 processors instead of RISC-based ARM chips. Currently, Android x86 has the following features:
- It can run on 32-bit/64-bit AMD and Intel processors.
- It inherits Android’s support for touch screen.
- It supports both BIOS and UEFI boot modes but uses grub as the bootstrap manager by default.
- It supports booting from FAT32, EXT4, and NTFS partitions.
Preparatory Work
To run Android x86 VirtualBox, you should do some preparations.
- Download the Android x86 ISO file.
- Prepare the space for Android VirtualBox.
- Install VirtualBox.
Download the Android x86 ISO File
Step 1: Go to the Android x86 official website (android-x86.org) and click the Download button. On the Android x86 download page, choose a download website as your will (FOSSHUB, OSDN, or SourceForge).
Step 2: The download website will usually offer 5 installation files for each Android x86 version. Wherein two RPM files are for Linux users and the K49 ISO file is for VMWare. The 32-bit and 64-bit ISO are what you need. You can use the two files to install Android on VirtualBox or physical devices.
Prepare the Space for Android VirtualBox
In general, to manage virtual machines better, a separate partition for VM is recommended. The Android x86 requires at least 4GB free space, but the VM file will become larger as you use it. In addition, you will need to install VirtualBox on this partition. Therefore, please create a slightly large partition for the VM.
To create a separate partition for VM, you should first shrink partitions to get enough unallocated space. If you can take enough unallocated space from one partition, you can shrink that partition in the Windows Disk Management tool.
If you need to shrink two or more partitions to get enough unallocated space, I recommend you use MiniTool Partition Wizard. Here is the guide:
MiniTool Partition Wizard FreeClick to Download100%Clean & Safe
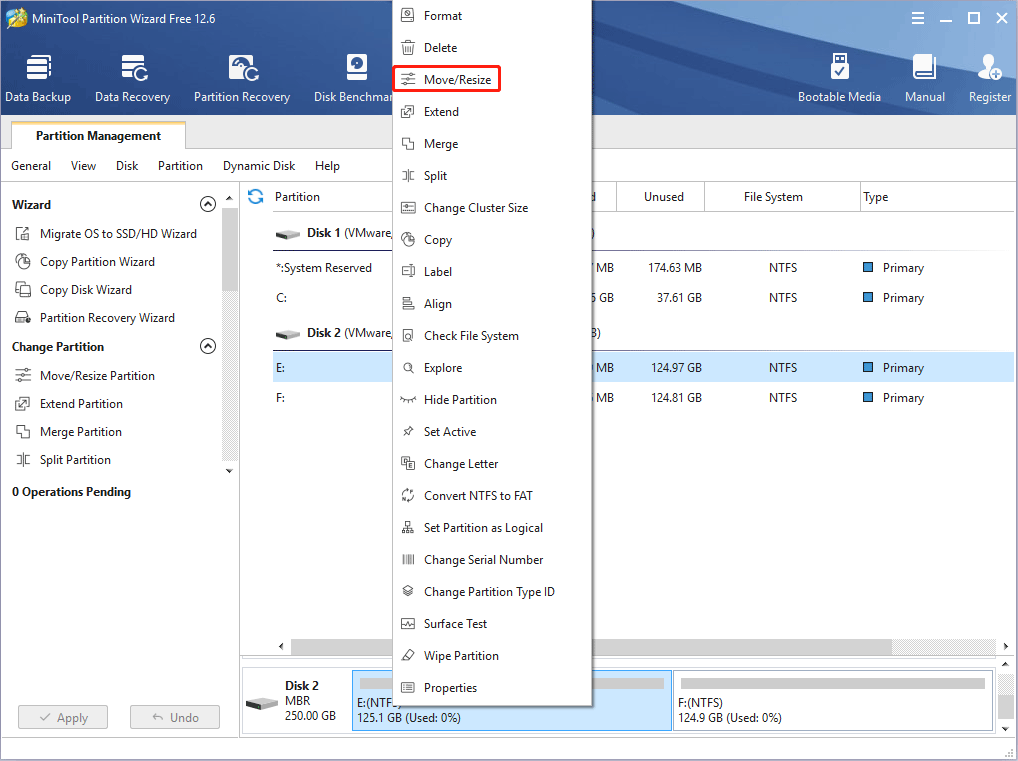
Step 1: Launch MiniTool Partition Wizard and go to its main interface. Right-click a partition and choose Move/Resize.
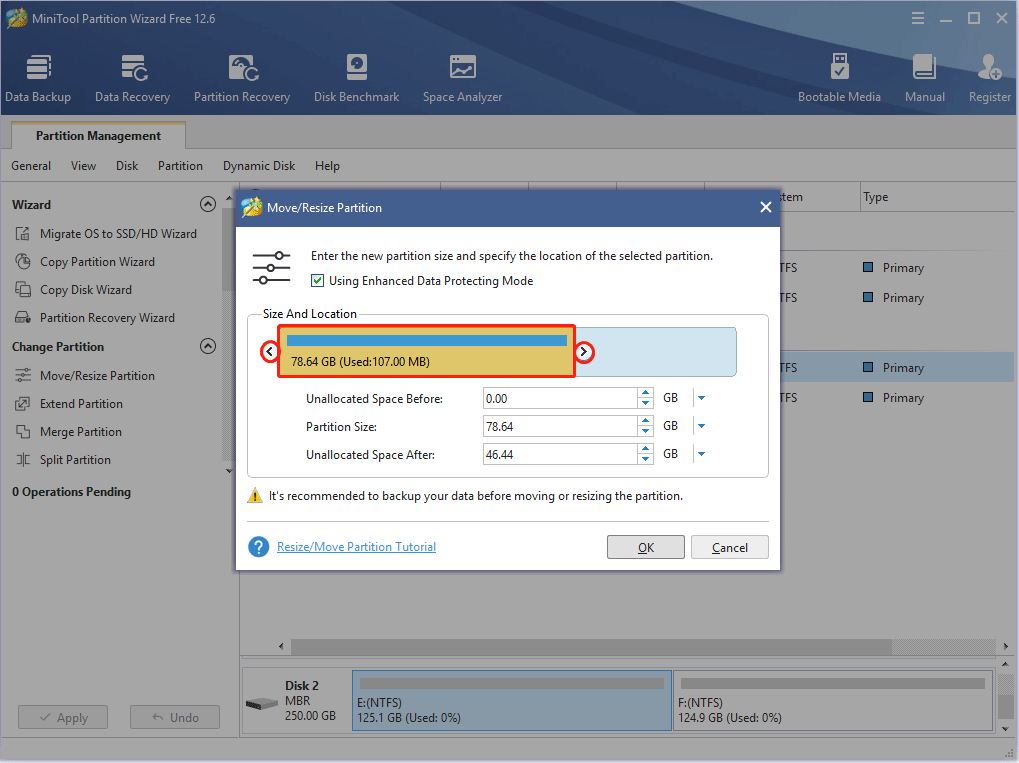
Step 2: Drag the arrow icon to decide how much space you want to shrink. Click the partition block and drag it to decide the location of the partition. Then, click the OK button. In the same way, you can take unallocated space from other partitions and then put the unallocated space together by moving the location of partitions.
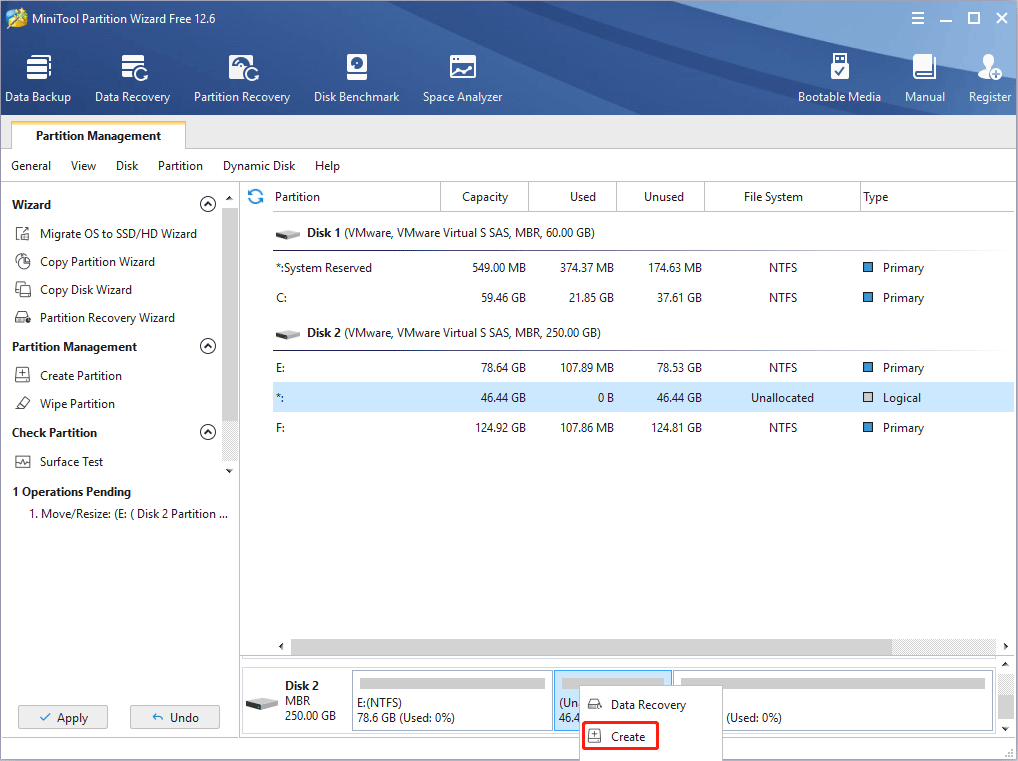
Step 3: Right-click the unallocated space and choose the Create button.
Step 4: Set parameters for the new partition. You can keep all of them to the default value if you don’t have specific demands. Then, click the OK button.
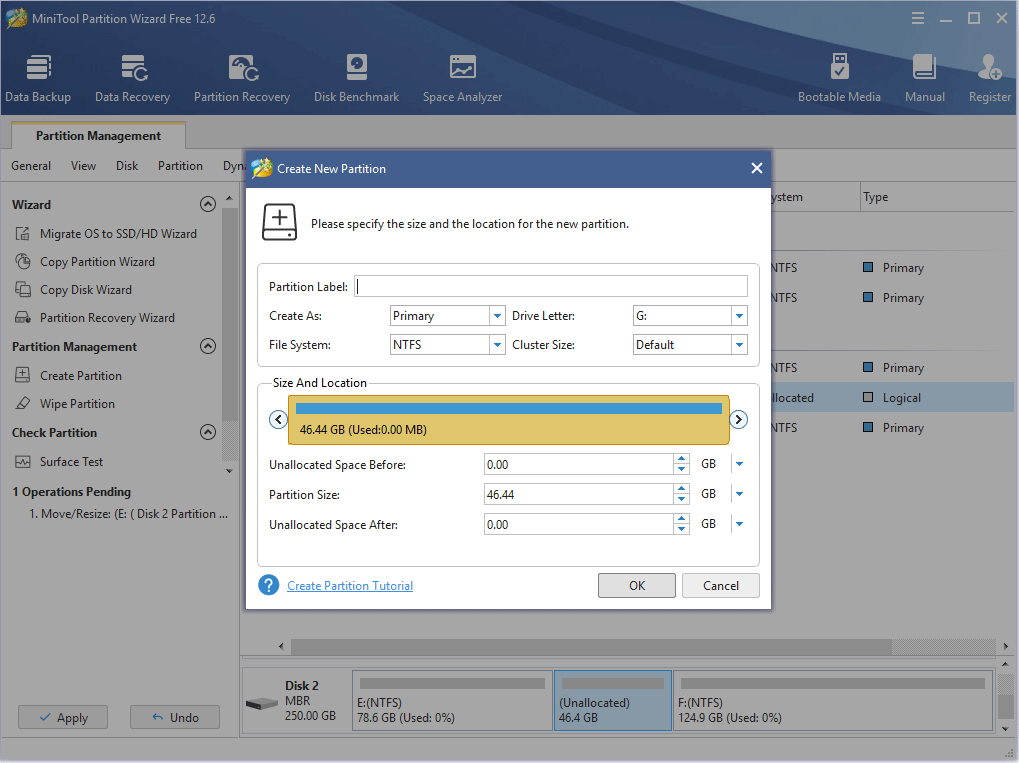
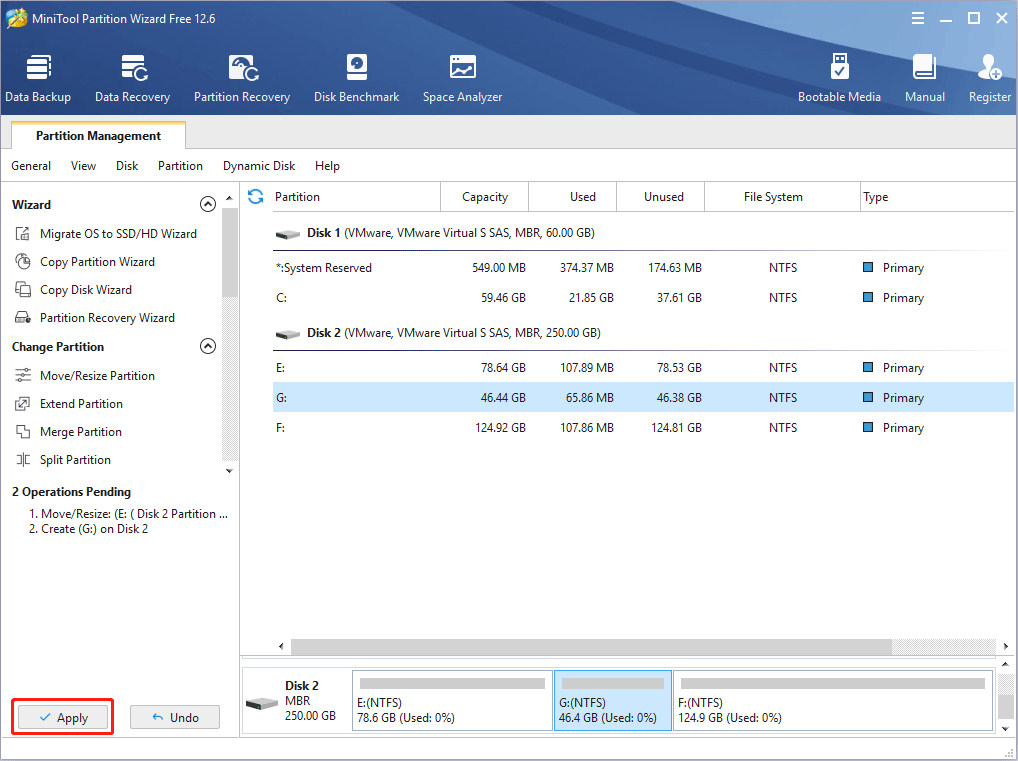
Step 5: Click the Apply button to execute pending operations.
Install VirtualBox
Now, you need to install VirtualBox on the partition you created just now. Please follow the guide below:
- Go to the VirtualBox Download page.
- Choose your computer type (Windows for example). Then, the VirtualBox installer file will be downloaded.
- Run the installer file and follow the on-screen instructions to install VirtualBox. When you are asked to choose the installation location, please change to the partition you created just now.
VMware Vs VirtualBox, Which Is Better For You
Install Android on VirtualBox
Now, let’s follow the guide below to install Android VirtualBox step by step.
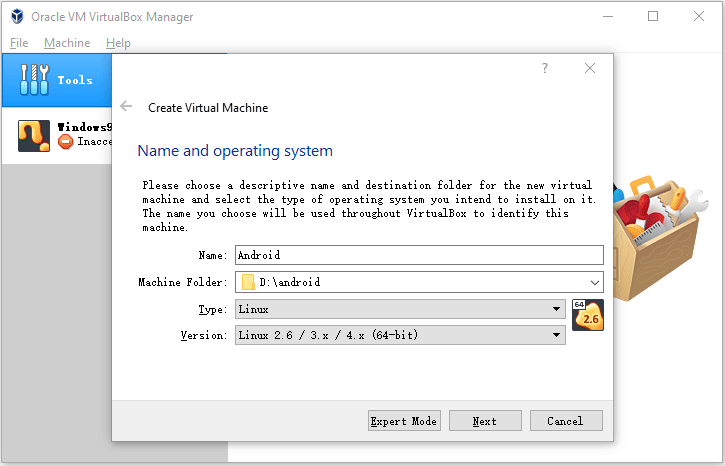
Step 1: Launch VirtualBox, click the New icon, name the VM “Android”, change the Machine Folder to a folder located in the partition you created especially for the VM, change Type to Linux, change Version to Linux 2.6 / 3.x / 4.x (64-bit), and then click the Next button.
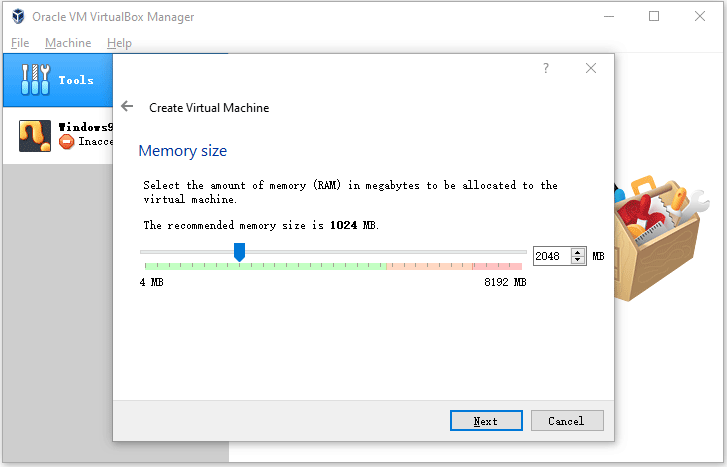
Step 2: Set the memory size for the Android VirtualBox. To run this VirtualBox Android smoothly, at least 2GB memory size is recommended. Then, click the Next button.
Step 3: During to following steps, there is no need to change parameters. You just need to agree with the default settings and follow the on-screen instructions to complete the creation process.
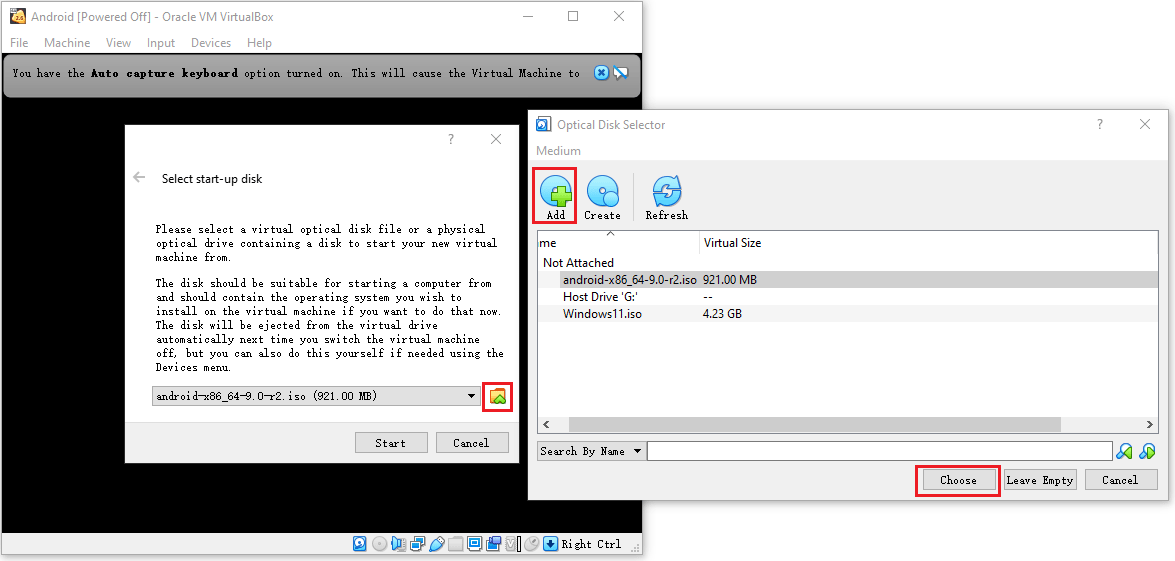
Step 4: After the Android VM is created, highlight it and click the Start button. Then, you will be asked to add an ISO file to perform the system installation process. Please click the folder icon, click the Add icon on the new window, navigate to Android x86 ISO file, and open it. Then, click the Choose button and the Start button.
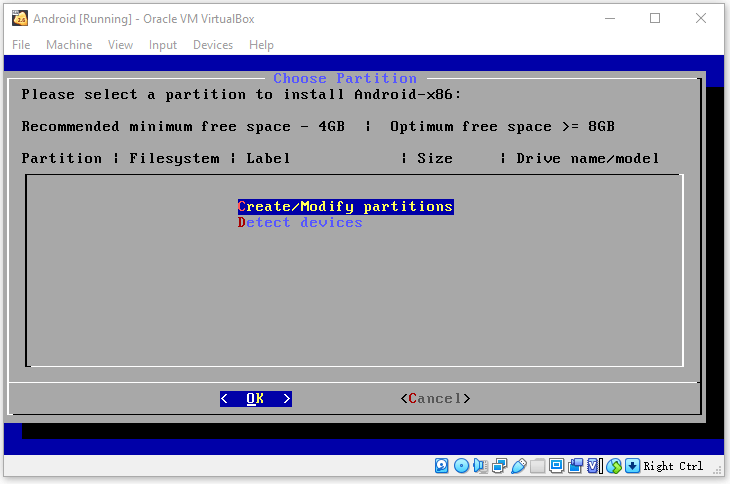
Step 5: Now, you can go through the Android installation process. Please select Installation – Install Android-x86 on to harddisk. If all is OK, you will be asked to select a partition to install Android-x86. Please choose Create/Modify partitions and then choose the OK button. When it asks you whether to use GPT, click No.
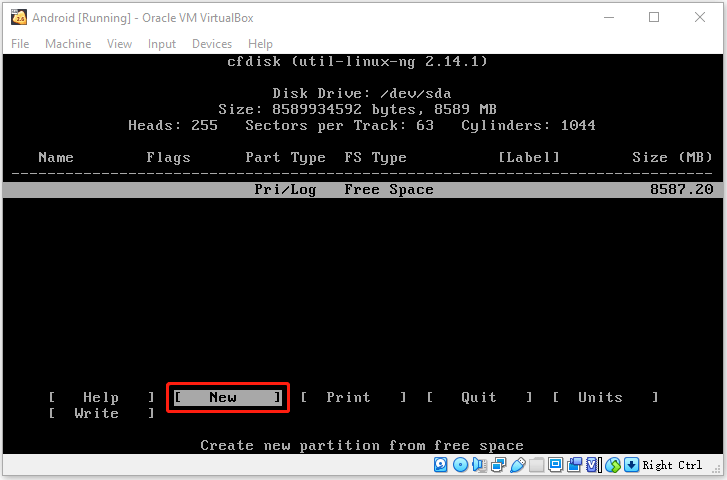
Step 6: On the new window, select New > Primary. It will tell you the size needed. Then, press Enter to confirm the size.
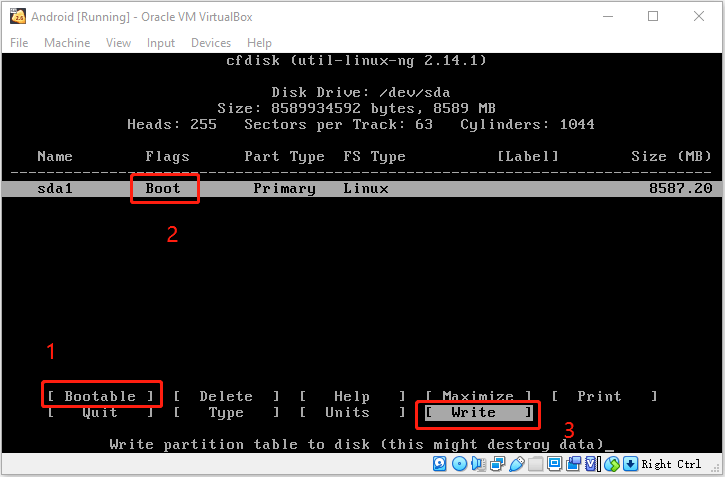
Step 7: Select Bootable. When you see “Boot” appears under the Flags tab, now you can select Write. Then, type “yes” and press Enter to confirm that you want to write the partition table to disk. Once the process is completed, select Quit.
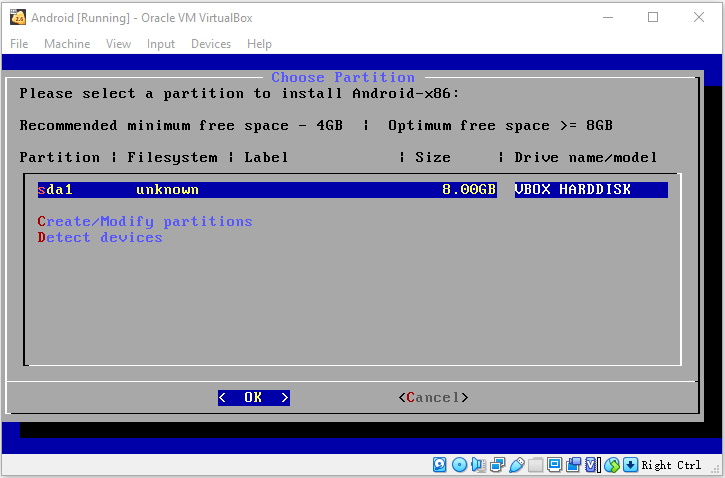
Step 8: Select the partition you just created to install Android x86.
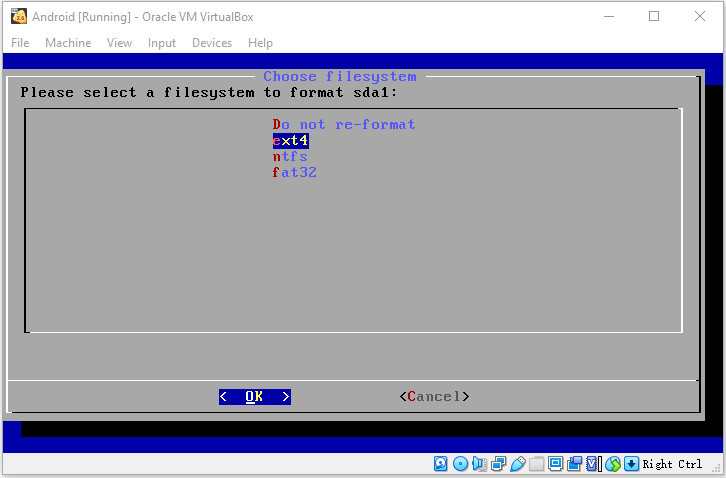
Step 9: Select a file system to format the partition. As Android x86 supports booting from EXT4, FAT32, and NTFS, each file system is OK. Choose Yes to confirm the format operation. After the format process is completed, choose Yes to confirm that you want to install boot loader GRUB. Then, select Yes to install /system directory as read-write.
Step 10: After the installation process is completed, select Run Android-x86 to boot into it. Wait until you get into the GUI. Then, you can enjoy the Android on VirtualBox.

What to Do If You Can’t Enter the GUI Properly
After Android is installed, you may find you can’t enter the GUI. It just gives you some command lines. In this case, you try the following method to solve the problem.
Step 1: Choose File > Close > Power off the machine. Start the Android VM again, but this time choose Advanced options > Boot from local drive > Android x86 debug mode.
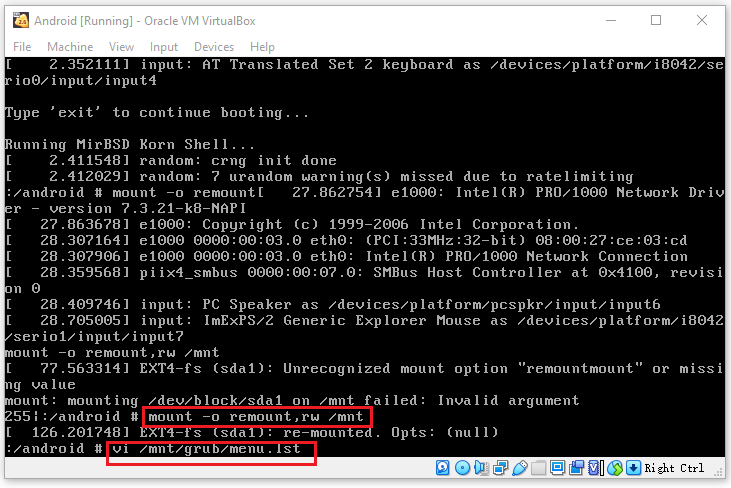
Step 2: Execute the following commands one by one to open the menu.lst file.
- mount –o remount,rw /mnt
- vi /mnt/grub/menu.lst
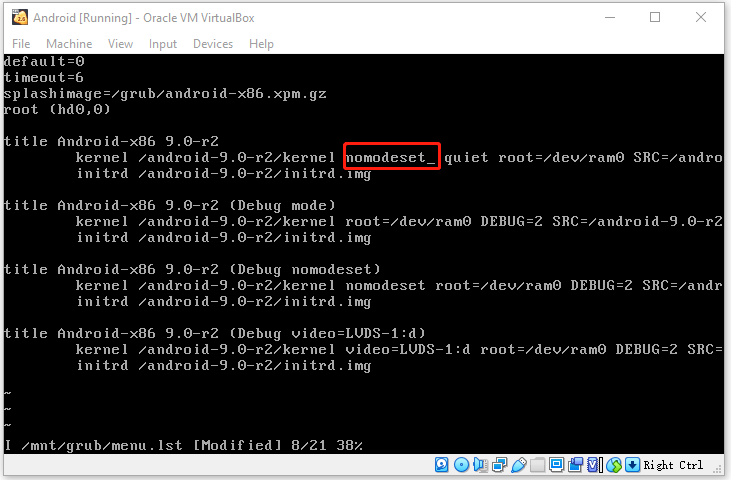
Step 3: After the menu.lst file is opened, press “i” key to enter the edit mode. Then, add “nomodeset_” before “quiet root”. After that, press “Esc” key to exit the edit mode. Then, press “:wq” and Enter to save changes and quit.
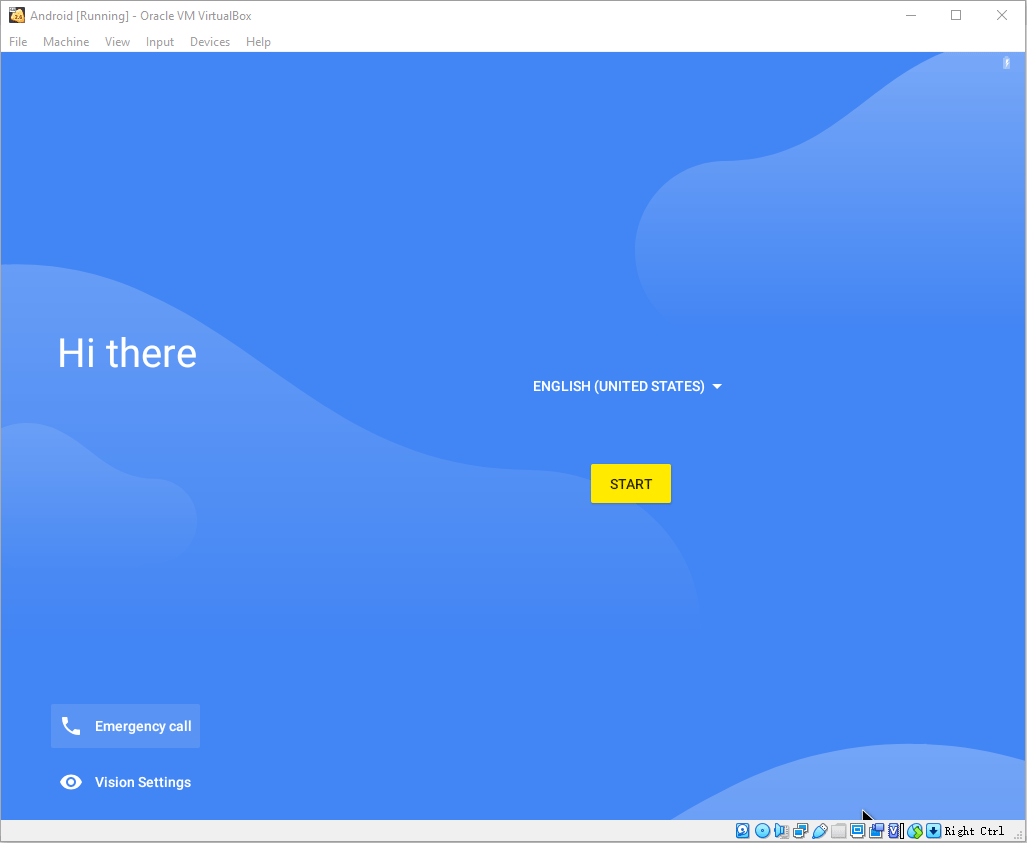
Step 4: Choose File > Close > Power off the machine. Then, start the Android VM again and choose Advanced options > Boot from local drive > Android x86. Wait until you enter the GUI. Then, you will get the following picture. Please follow the on-screen instructions to set up Android.
Bottom Line
Is this post useful to you? Do you have other ideas about Android VirtualBox? Have you encountered problems when you install Android on VirtualBox? Please leave comments in the following comments for sharing.
In addition, if you encounter problems when using MiniTool Partition Wizard, please feel free to contact us via [email protected]. We will get back to you as soon as possible.
About The Author

Position: Columnist
Linda has been an editor at MiniTool for seven years. She continuously learns about computers and puts her knowledge into practice. Moreover, she is particularly knowledgeable in disk management, data recovery, system installation, and PDF editing. Her articles typically reference multiple examples or are based on her own experience, providing users with the most suitable solutions.
User Comments :