Usually, Windows 10/11 saves the installed programs on the OS partition by default. With more programs installed, they will take up larger disk space, affecting the boot times and performance of your system. As for this, you may want to separate OS from programs.
How to separate OS from programs? If you have no clue, you can refer to the following content.

Why Need You Separate OS from Programs
Nowadays, as many large and high-speed SSDs with reasonable prices are available in the market, most users tend to upgrade their HDD to SSD so that they can save OS and programs in a single drive without worrying about performance issues. However, in some circumstances, there is still a need to separate OS from programs.
Here, we summarize some reasons why you need to separate partition for OS and programs Windows 10/11.
- It’s easier to manage and arrange your data by storing OS and programs on different partitions.
- Separating OS from programs can potentially improve read and write speed, making programs load faster.
- Frequent program installation and removal will shorten your drive’s lifespan. So, to keep your system drive in a good state and working as long as possible, it’s better to separate programs from it.
- If you separate OS from programs, you don’t need to reinstall programs while upgrading or reinstalling Windows OS.
- Separating OS helps protect your system from possible viruses, software conflicts, etc.
- Separating OS from programs can offer higher data security. If the system drive fails to work, you can still access the installed programs on another drive.
It’s good practice to separate OS from programs. You may get massive benefits from separate OS and programs. How can you execute the isolation of OS and programs? Below, this post offers a detailed guide on how to separate OS from programs. You can have a try.
Part 1: Create A New Partition
How to separate OS from programs in Windows 10/11? To do this, you should know how to separate partition for OS and programs Windows 10/11 first.
This part introduces how to create a new partition in two cases respectively. Figure out which one applies to your situation and then follow the corresponding steps to complete the partition creation.
Case One: There Is Unallocated Space on the Disk
If there is enough unallocated space on your disk, you can simply create a new partition by using the specific unallocated space. You can pick one of the following methods to complete the operation according to your preference.
Way 1: Use Disk Management
Disk Management is a Windows built-in utility that enables you to do basic management on partitions and disks, including creating new partitions. You can learn how to create a new partition with this tool from the given guide.
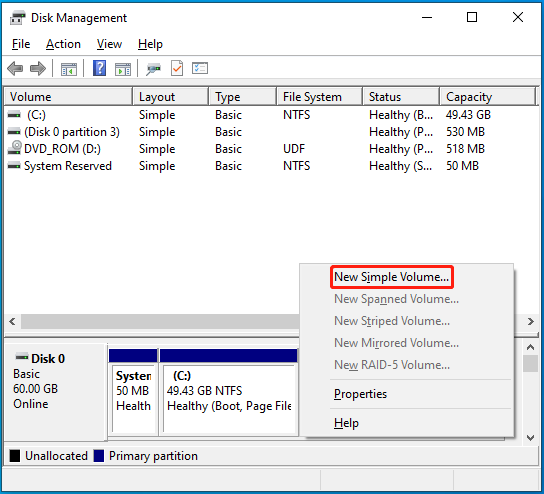
Step 1: Right-click the Start icon and select Disk Management.
Step 2: Right-click the unallocated space on the drive and then select New Simple Volume.
Step 3: In the New Simple Volume Wizard, click Next to move one.
Step 4: Enter the volume size in MB and then click Next.
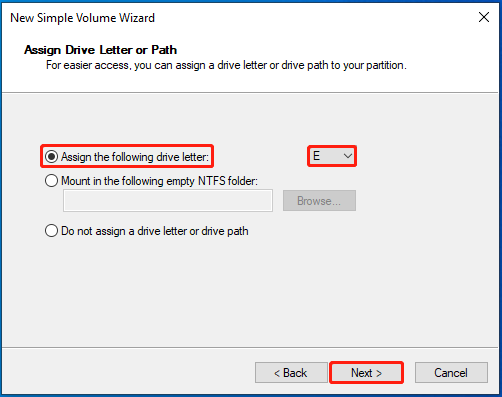
Step 5: In the next window, choose Assign the following drive letter. Then select a preferred available drive letter and click Next.
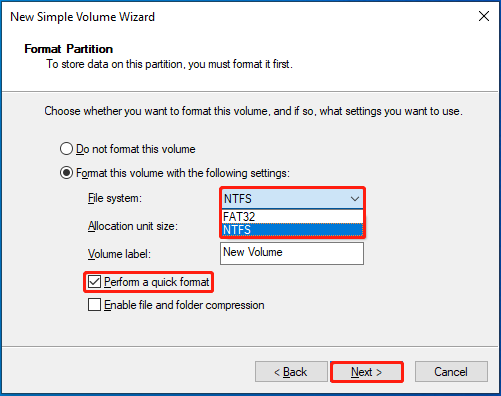
Step 6: In the Format Partition window, choose a file system from the drop-down menu. Then check the Perform a quick format option and click Next.
Step 7: After that, click Finish to complete creating the new partition.
Way 2: Use Diskpart
Diskpart is a disk partitioning utility that can help manage partitions and disks with different command lines. There is a step-by-step guide on how to create a new partition with Diskpart.
Step 1: Press Windows + R to open the Run dialog.
Step 2: Type cmd in the text box and press Ctrl + Shift + Enter to run Command Prompt as an administrator.
Step 3: In the elevated Command Prompt, type the following commands one by one and press Enter after each.
- diskpart
- list disk
- select disk N (N represents the number of the disk containing unallocated space)
- create partition primary size=M (Replace M with a specific partition size in MB)
- assign letter=E (You can choose any available drive letter besides E)
- format fs=ntfs quick
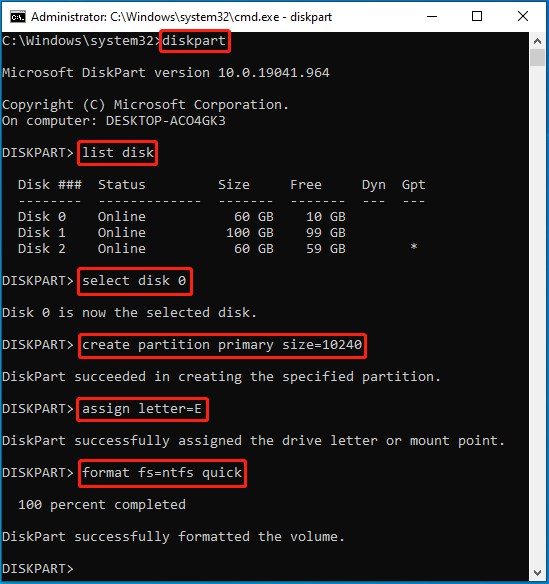
Step 4: Once the partition is created successfully, type exit and press Enter to close Command Prompt.
Way 3: Use MiniTool Partition Wizard
MiniTool Partition Wizard is a piece of professional and free disk partition software. It includes a wide range of features related to partition and disk management. For instance, it enables you to partition/format/clone hard drive, convert MBR to GPT without data loss, migrate Windows 10 to SSD, etc.
Below MiniTool Partition Wizard tells you how to create a new partition from unallocated space in detail.
Step 1: Download and install MiniTool Partition Wizard on your PC. Then launch this program to enter its main interface.
MiniTool Partition Wizard FreeClick to Download100%Clean & Safe
Step 2: Right-click the unallocated space and select Create. Alternatively, you can highlight the unallocated space and then select Create Partition from the left action panel.

Step 3: Modify partition label, drive letter, file system, cluster size, and partition size in the prompted window. Once done, click OK.
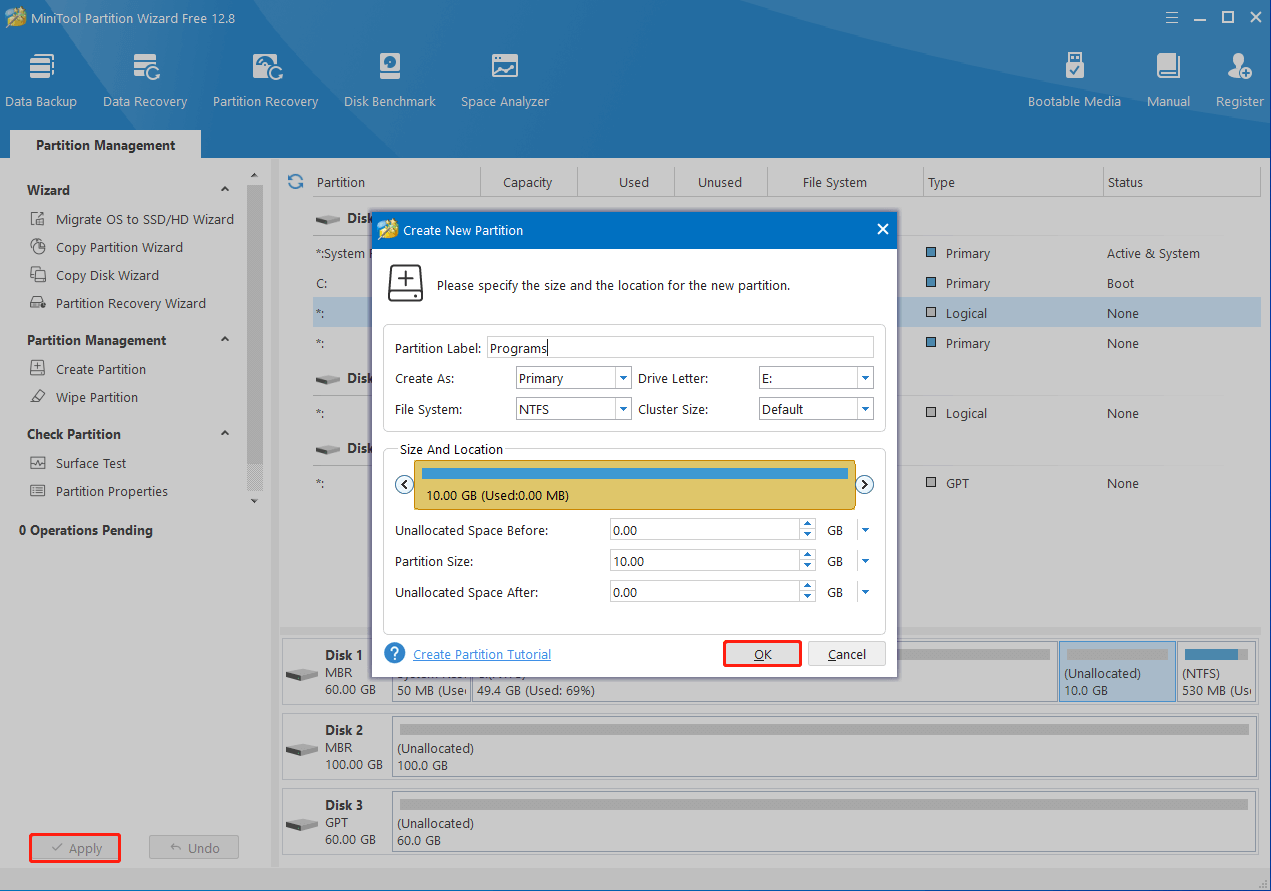
Step 4: Finally, don’t forget to click Apply to carry out the operation.
Case Two: There Is No Unallocated Space on the Disk
If your disk currently has no unallocated space, you may need to create a new partition from the free space of an existing partition. Here’s how to do this.
Way 1: Use Disk Management
With Disk Management, you can shrink the existing partition on your disk and then use the shrunk space to create a new partition. The following instructions will help you execute the operation.
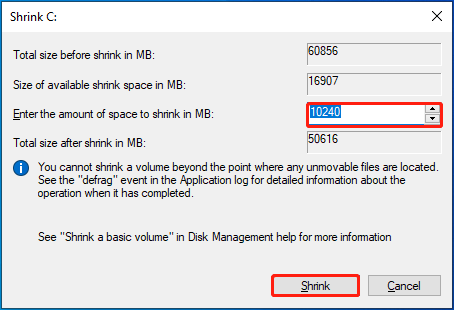
Step 1: Open Disk Management. Then right-click the target partition and select Shrink Volume.
Step 2: Wait for the utility to query volume for available free space to shrink. Then enter the amount of space in MB you want to shrink in the pop-up window and click the Shrink button.
Step 3: After that, you can see the shrunk space showing as unallocated space on your disk. Right-click the space and select New Simple Volume to create a new partition.
Way 2: Use MiniTool Partition Wizard
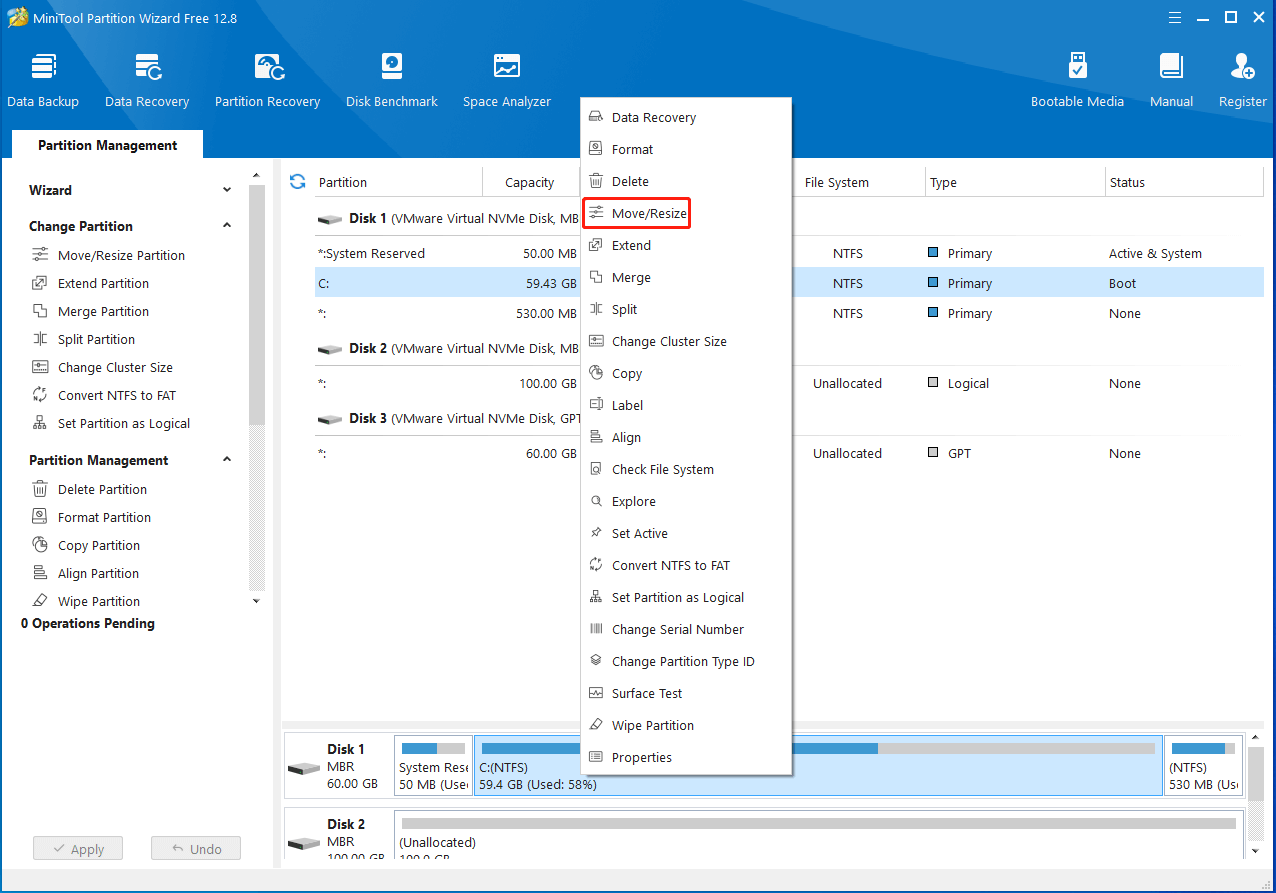
Like Disk Management, MiniTool Partition Wizard also allows you to get unallocated space by shrinking an existing partition with the steps below.
Step 1: Download, install, and launch MiniTool Partition Wizard on your PC.
MiniTool Partition Wizard FreeClick to Download100%Clean & Safe
Step 2: Right-click the target partition and select Move/Resize.
Step 3: In the next window, drag the sliding handle to resize the partition. Or, you can directly enter a specific number in GB to determine the partition size.
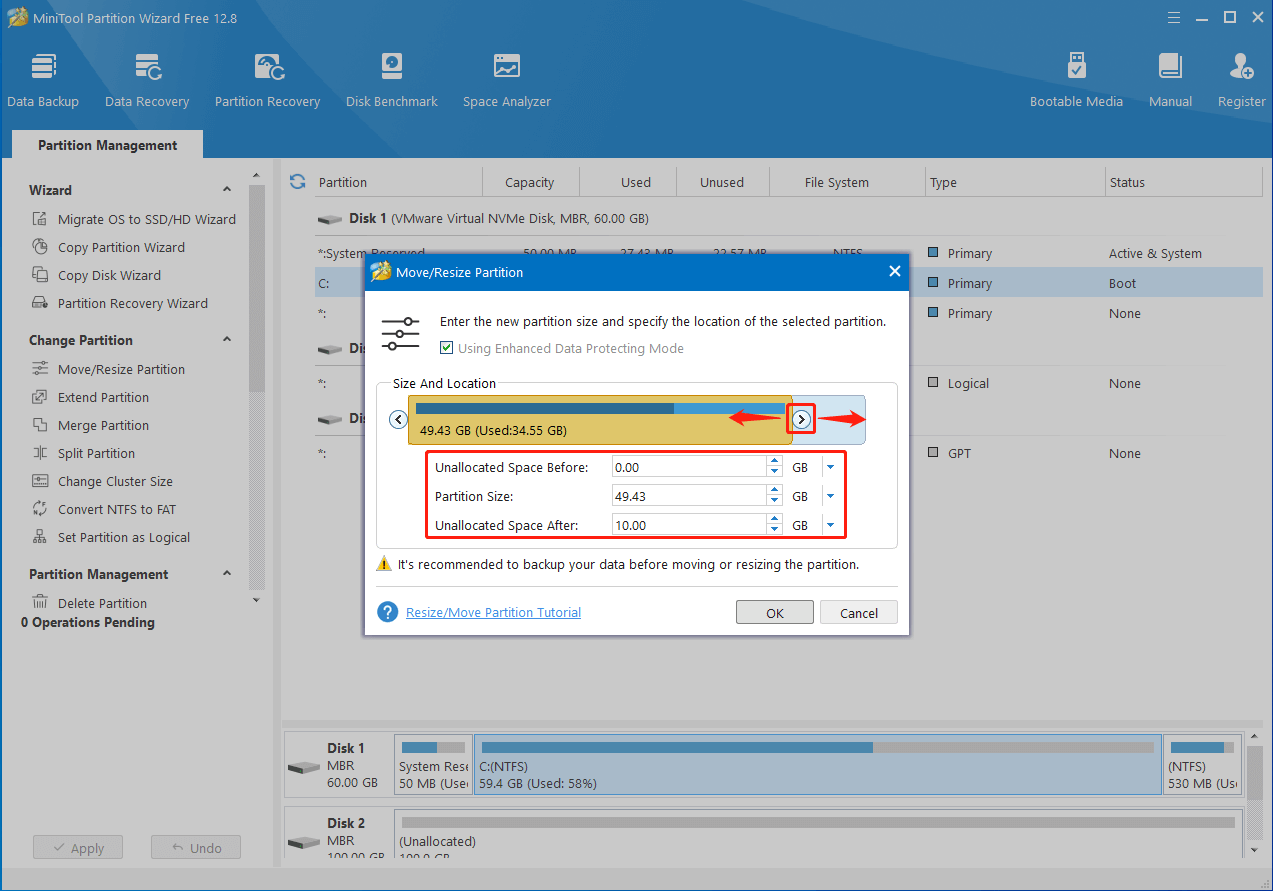
Step 4: Finally, click OK > Apply to save the changes. Then follow the guide in Case One to create a new partition with the new unallocated space.
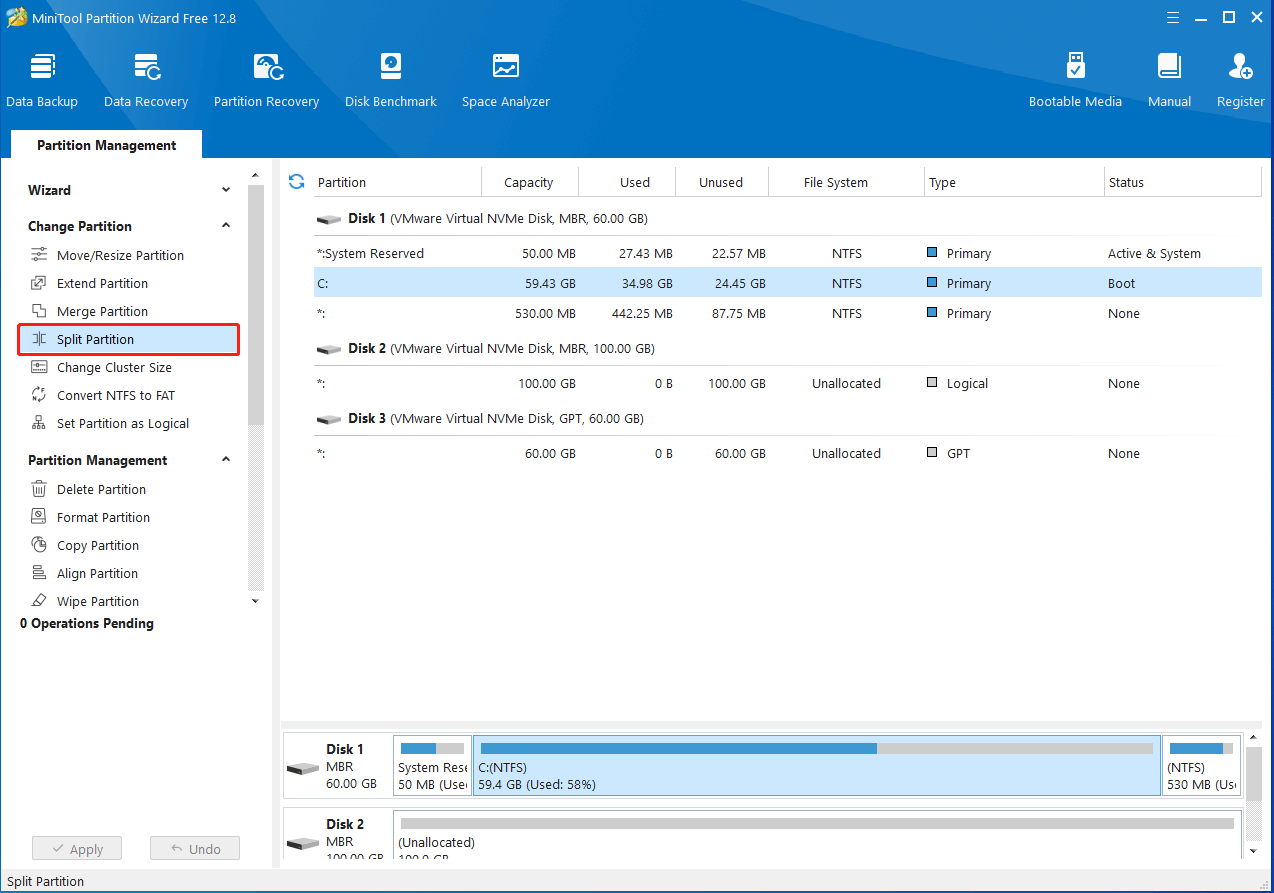
In addition to the Move/Resize Partition feature, MiniTool Partition Wizard also offers the Split Partition feature that allows you to get a new partition from the existing one more easily. You can use this feature to directly divide one partition into two.
For how to separate partition for OS and programs Windows 10 with this feature, you can get the answer from the content below.
Step 1: Launch MiniTool Partition Wizard. Then highlight the partition to split and select Split Partition from the left action panel.
Step 2: Drag the arrow icon leftward or rightward to decide the size of the two partitions. Also, you can input the desired size in the Partition Size section.
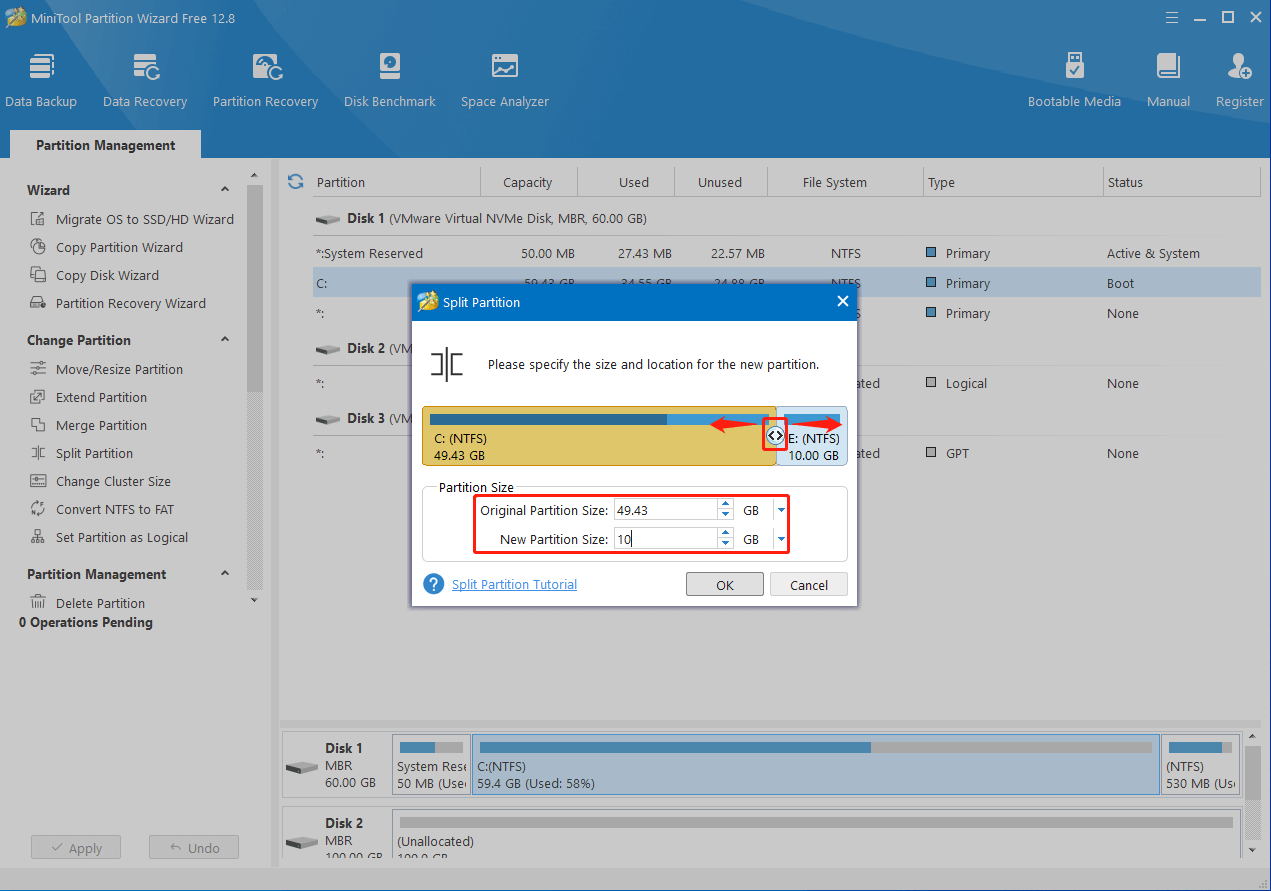
Step 3: Once done, click OK > Apply to execute the operation.
Part 2: Move Programs to the New Partition
After creating a new partition, let’s get down to how to separate OS from programs.
Step 1: Press Windows + E to open File Explorer.
Step 2: Go to the system drive. Then locate the folder that stores files for the program you want to separate from OS.
Step 3: Right-click the folder and select Copy from the context menu.
Step 4: Open the newly created partition. Then right-click empty place and select Paste to paste the copied folder.
Step 5: Delete the original folder in the system drive.
Step 6: Open Command Prompt as an administrator. Then type mklink /j “[OriginalPath]” “[NewPath]” and press Enter. E.g. mklink /j “C:\Program Files (x86)\MTPDFEditor” “E:\MTPDFEditor”.

Step 7: Right-click the shortcut icon for the specific program on the desktop and select Delete.
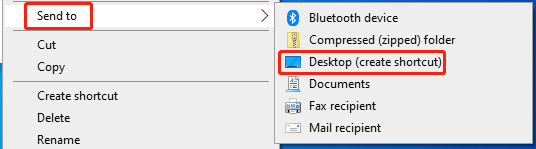
Step 8: Find and right-click the program icon in the new location. Then select Send to > Desktop (create shortcut).
Step 9: Repeat the above operations until you move all programs you can separate from OS.
![How to Move Files from SSD to HDD [Step-by Step Guide]](https://images.minitool.com/partitionwizard.com/images/uploads/2019/06/how-to-move-files-from-ssd-to-hdd-thumbnail.jpg)
Bottom Line
How to separate OS from programs? Hope you can what you want to know from this post. If you have something confused with separating OS from programs, you can leave a message in our comment part below.
If you run into certain issues while using the MiniTool Partition Wizard, please feel free to contact us via [email protected]. We’ll make a reply to help solve your problems as soon as possible.
User Comments :