
You may just want to keep you OS and some games on your SSD and want to move other files to HDD. However, you don't know how to do that. This article will give you step-by-step guides on it.
Solid State Drives (SSDs) offer excellent speed, making them ideal for installing Windows, applications, and frequently used programs.
However, SSDs often provide less storage capacity than traditional Hard Disk Drives (HDDs). As your SSD fills up, your computer may slow down, leaving you wondering how to move files from SSD to HDD.
Fortunately, transferring files between drives is simple. This guide explains the best methods to move files from SSD to HDD while keeping your data safe.
Why Move Files from SSD to HDD?
Moving files from an SSD to an HDD can provide several benefits:
- Free up valuable SSD space.
- Improve overall system performance.
- Store large files more economically.
- Keep Windows and applications running efficiently.
- Better organize personal and work files.
Generally, your SSD should contain:
- Windows operating system
- Frequently used applications
- Games you play often
Your HDD is better suited for:
- Videos
- Photos
- Music
- Documents
- Downloads
- Archived projects
- Large backup files
What should stay on the SSD? For the best performance, keep these items on your SSD:
Keep on SSD | Move to HDD |
Windows OS | Movies |
Frequently used programs | Photos |
Browser | Music |
Productivity software | Archives |
Frequently played games | Old projects |
Drivers | Large downloads |
Overall, an SSD is ideal for speed, and an HDD is ideal for capacity.
When Should You Move Files? Moving files is recommended if:
- Your SSD has less than 15–20% free space.
- Most of the storage is occupied by media files.
- You have a secondary HDD with plenty of free capacity.
If the SSD is nearly empty, moving files provides little benefit.
Further reading:
Why does SSD become full? It is primarily due to accumulated temporary system files, background recordings, and, on smaller drives, the limited capacity available for the operating system and user data.
SSDs require roughly 10–20% of their total capacity to remain free for optimal performance and to allow the controller to manage data efficiently.
Method 1. Move Files Using Copy and Paste
This is the easiest method if you’re moving personal files. Here is the guide:
- Open File Explorer and go to your SSD (usually the C: drive) to find the files you want to transfer.
- Highlight the files or folders you want to move.
- Right-click the selected files and click Cut (or press Ctrl + X) to completely remove them from the SSD, or Copy (or press Ctrl + C) if you want to keep a backup on the SSD.
- Navigate to your HDD (usually the D: or E: drive), right-click an empty area in the folder, and select Paste. Then wait until Windows finishes transferring the files.
Method 2. Move User Folders to the HDD
Windows allows you to permanently relocate your default user folders to your HDD.
Advantages:
- Future files automatically save to the HDD.
- No need to manually transfer files again.
- Helps prevent SSD storage from filling up.
Supported folders:
- Desktop
- Documents
- Downloads
- Music
- Pictures
- Videos
To move user folders to the HDD, the steps are as follows:
- Open File Explorer and go to C:\Users\[Your Username].
- Right-click on a default library folder (e.g., Documents, Downloads, Pictures) and select Properties.
- Click on the Location
- Click Move.., navigate to a folder on your HDD, and click Select Folder.
- Click Apply and OK. Windows will ask if you want to move all existing files from the SSD to the HDD; select Yes.
Method 3. Move Installed Apps and Games to HDD
You should generally leave Windows system files on your SSD, but you can safely move games or large programs to free up space.
- For Steam Games: Open Steam, go to Settings > Storage, click the Add Drive button to create a library folder on the HDD, and use the built-in transfer tool to move installed games.
- For Microsoft Store Apps: Open your Windows Settings > Apps > Installed apps, click the three dots next to the app, click Move, and select your HDD.
Method 4. Move Files from SSD to HDD with MiniTool Partition Wizard
If you need to organize storage, resize partitions, or migrate data more efficiently, MiniTool Partition Wizard is a useful disk management utility.
It allows you to:
- Analyze disk space usage
- Copy partitions
- Clone an entire disk
- Extend or resize partitions
- Convert disks between MBR and GPT without data loss
- Check file system errors
- Perform data recovery
- Remove duplicate files
For example, if your SSD is nearly full because one partition occupies most of the available space, you can use Space Analyzer to identify large files before moving them to the HDD. You can also resize partitions if needed to allocate available storage better.
MiniTool Partition Wizard FreeClick to Download100%Clean & Safe
How to identify large files
- Install and launch MiniTool Partition Wizard.
- Select Space Analyzer.
- Choose your partition on the SSD and click Scan.
- Once the scan finishes, switch to File View, and click on the Size column header. This will sort the list so that the largest files appear at the very top.
- Right-click directly on any large, unnecessary file in the list. You can choose to preview, delete, or copy the file to free up disk space.
- Move unnecessary large files to your HDD using File Explorer.
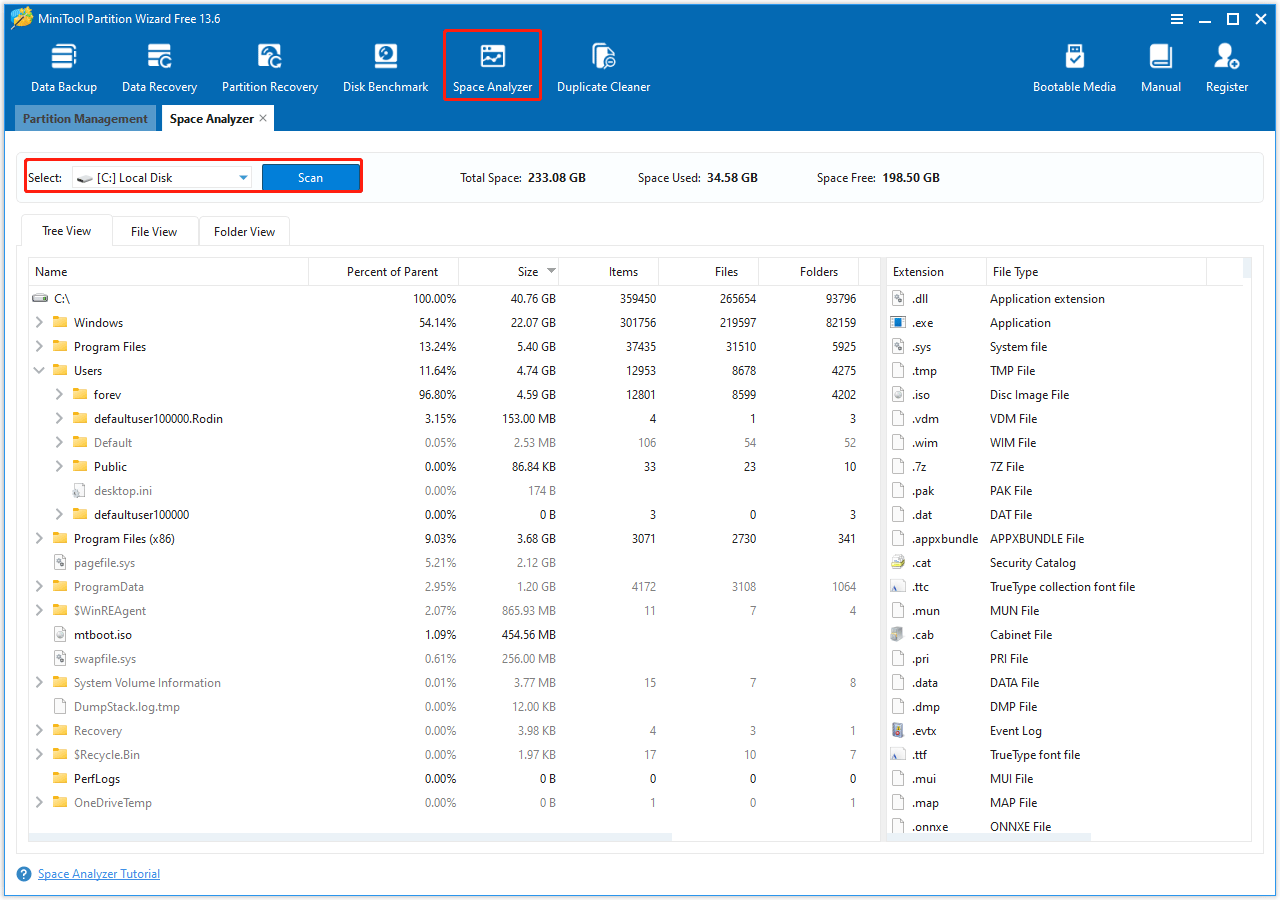
This helps you quickly locate storage-hungry files instead of searching manually.
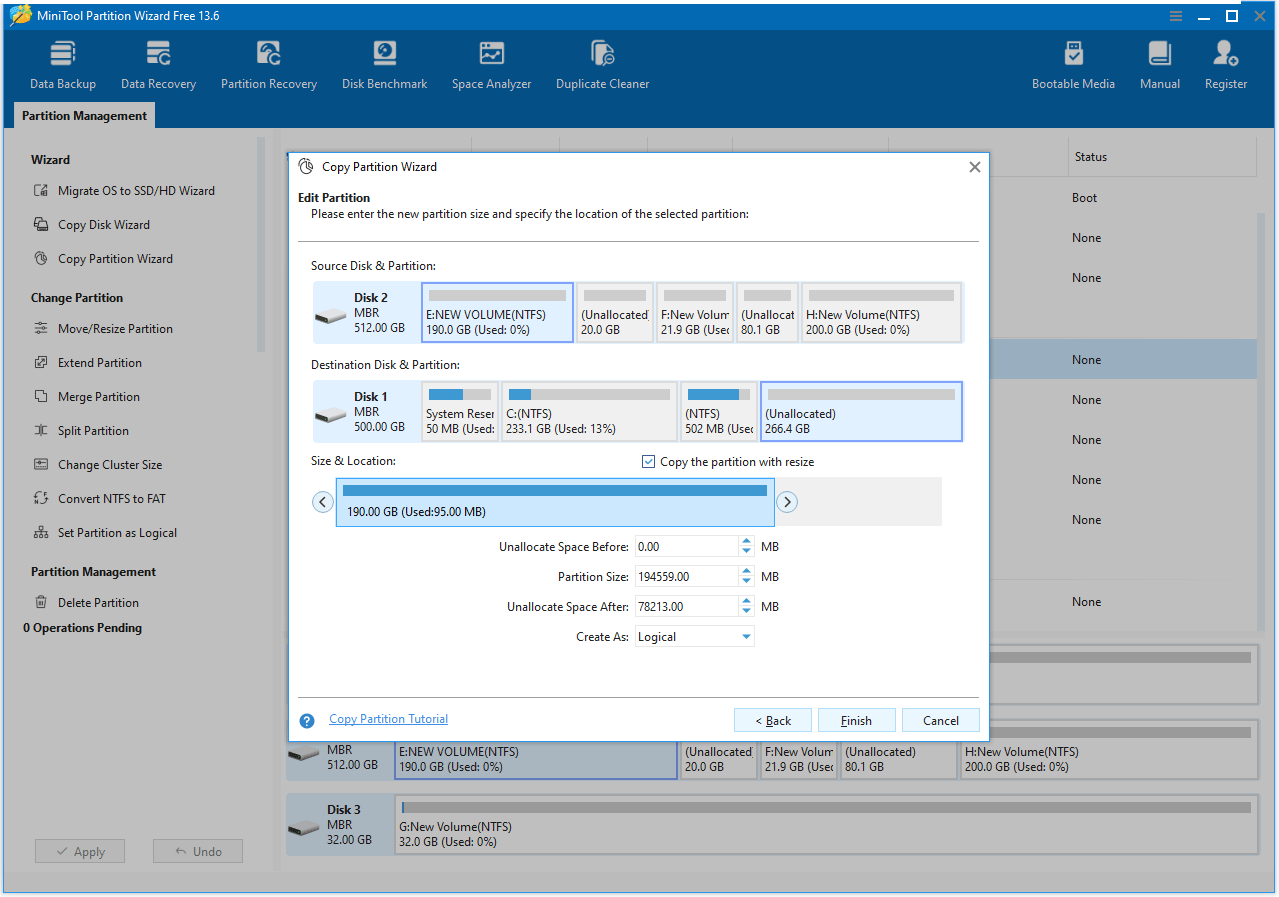
In addition, its Copy Partition feature is more convenient when you move a lot of files to the HDD. Just a few clicks.
- Right-click a partition on the SSD and choose Copy.
- Choose a target location where the partition is copied to and click the Next
- Adjust the size and location of the new partition by dragging it and click Finish.
- Preview the new partition and click the Apply button if it’s OK.
Method 5. Move Files by Creating a Junction Link
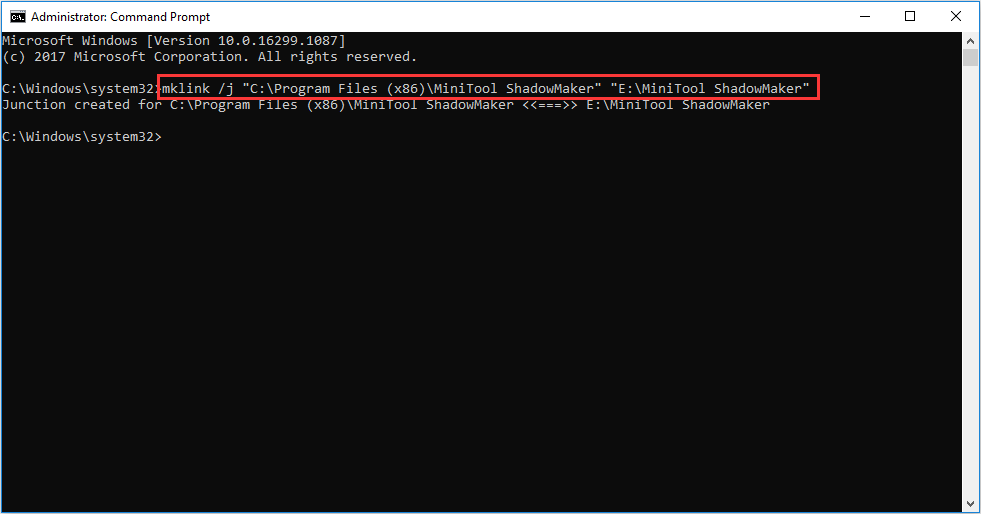
Advanced users who understand Windows file paths can relocate certain application folders and create a directory junction using the mklink /J command.
This technique preserves the original path while storing the files on the HDD, but it should only be used when the software supports this approach and after creating a backup.
To move files from an SSD to an HDD using mklink, physically cut and paste the folder to the HDD, then create a symbolic link back to the original SSD location. This tricks Windows into thinking the data remains on the SSD, saving space.
Here is the guide:
- Move the files: Copy or cut your folder from your SSD (e.g., C:\OriginalFolder) and paste it to your HDD (e.g., D:\MovedFolder).
- Delete the original: Ensure the folder is entirely deleted from its original location on the SSD.
- Open Command Prompt as Administrator: Press the Windows Key, type cmd, right-click Command Prompt, and select Run as Administrator.
- Run the mklink command: Use the following syntax, ensuring you include the /d flag for folders and wrap your paths in quotation marks:
mklink /d “C:\OriginalFolder” “D:\MovedFolder”
After that, create a new shortcut of the program on the desktop.
- Delete the original shortcut of the program.
- Open the file folder and find the program icon.
- Right-click on it and select Send to Desktop.
Further reading: To set the default drive or folder for new apps, documents, and pictures across your PC:
- Right-click the Start menu and select Settings.
- Click on System and then select Storage.
- Click on Advanced storage settings and select Where new content is saved.
- Use the drop-down menus to select the drive or location you prefer for each file category (e.g., your D: drive), then click Apply.
This can ensure new files are stored on the HDD, preventing the SSD from filling up again.
How to Move Files from SSD to HDD FAQ
Maintaining free space helps reduce write amplification, improve garbage collection efficiency, sustain write performance, and extend SSD lifespan.
Bottom Line
If your SSD is running out of space, moving files to an HDD is one of the easiest ways to reclaim storage while maintaining system performance.
Personal files such as videos, photos, downloads, and archived documents are excellent candidates for relocation, while Windows and frequently used applications should remain on the SSD for the best speed.
For users who need more than simple file transfers, MiniTool Partition Wizard can help analyze disk usage, identify large files, manage partitions, and optimize storage layouts, making it much easier to keep your SSD organized and your system running efficiently.
For any problems or suggestions when using MiniTool Partition Wizard, you can also email to [email protected] for help. We will reply you as soon as possible.
About The Author

Position: Columnist
Vega enjoys helping people with computer problems, including disk management, data recovery, data backup, and more. She is constantly expanding her knowledge in related fields. And she will continue to bring more easy-to-understand professional articles to help people solve various problems on the PC.
User Comments :