BitLocker is a powerful disk encryption feature that protects your data against unauthorized access. This guide covers everything about BitLocker drive encryption, including its key features, and how to enable or disable it. It also explains how to use MiniTool Partition Wizard to manage encrypted drives, such as resizing, formatting, deleting, recovering, copying, and wiping.
In today’s digital environment, whether you store personal files or business documents, keeping them safe from unauthorized access is essential.
BitLocker drive encryption provides a reliable solution to secure your drives and files. To better understand how BitLocker works, start with its definition and features.
Part 1. What Is BitLocker Drive Encryption
BitLocker is a disk encryption feature built into Windows Pro, Enterprise, and Education editions. It protects your files from unverified access by encrypting the entire drive.
Specifically, with BitLocker enabled, anyone attempting to access your drive must provide a decryption password or recovery key to unlock the files.
BitLocker provides powerful protection for your sensitive information with the following benefits:
Benefits of Using BitLocker
- Integrated with Windows. BitLocker is built into Windows and works smoothly with the operating system, especially on devices equipped with a Trusted Platform Module (TPM) chip. Therefore, you do not need to install any third-party software.
- Strong file protection algorithm. BitLocker uses the Advanced Encryption Standard. It is an internationally accepted encryption protocol that ensures robust protection for your data.
- Works with multiple types of storage media. BitLocker can encrypt not only internal hard drives but also USB flash drives, external hard drives, and some SD cards (via BitLocker To Go).
- Enhances system protection. In addition to protecting files, BitLocker also helps secure the system. It monitors boot files, firmware, and TPM measurements. If changes are detected, it prompts for the recovery key to prevent unauthorized access.
Having understood the benefits of BitLocker, it is time to recognize the different encryption statuses.
Part 2. Understanding the 3 BitLocker Drive Encryption Statuses
Understanding the encryption status helps you determine whether BitLocker is currently applied to a drive. Typically, there are three statuses: Not Enabled, Enabled but Unlocked, and Enabled and Locked.
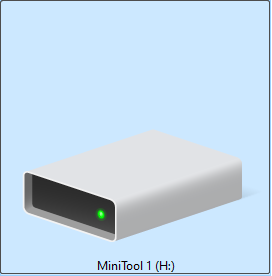
1. BitLocker Drive Encryption Is Not Enabled
Appearance: The drive icon shows no lock symbol.
This indicates that BitLocker has not been enabled on the drive, and the data inside is not encrypted. All files are fully accessible without requiring a password.
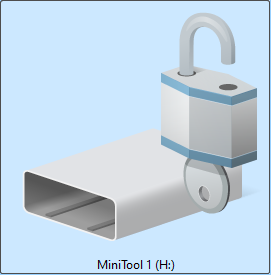
2. BitLocker Drive Encryption Is Enabled but the Drive Is Unlocked
Appearance: The drive icon shows an open lock symbol.
BitLocker is enabled and the drive is encrypted in the background, but it is currently unlocked. You can read and write files as usual.
After reconnecting the drive or restarting the computer, the drive will be locked, and a password or recovery key will be required to access it.
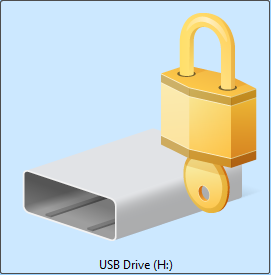
3. BitLocker Drive Encryption Is Enabled and the Drive Is Locked
Appearance: The drive icon shows a closed lock symbol.
BitLocker encryption is active and the disk is currently locked. When double-clicking the drive, the system prompts you to enter a password or recovery key to access your files.
Now that you understand the three BitLocker encryption statuses in File Explorer, the next step is to learn how to enable or disable BitLocker drive encryption.

Part 3. How to Enable/Disable BitLocker Drive Encryption
BitLocker offers flexible options for enabling and disabling drive encryption, including through File Explorer, Control Panel, and Command Prompt.
For computers without a TPM chip, BitLocker can still be enabled on system drives by modifying group policy settings.
In addition, you will also learn how to change a BitLocker password and how to disable BitLocker drive encryption when it is no longer needed.
Enable BitLocker in File Explorer/Control Panel
File Explorer and Control Panel provide graphical interfaces to turn on BitLocker. Here are the steps.
Step 1. Access the BitLocker Drive Encryption window.
Open File Explorer or Control Panel.
- In File Explorer, right-click the drive you want to encrypt and select Turn on BitLocker.
- In Control Panel, change the view to Large icons or Small icons, and then click BitLocker Drive Encryption. Expand the menu next to the target drive and click Turn on BitLocker.
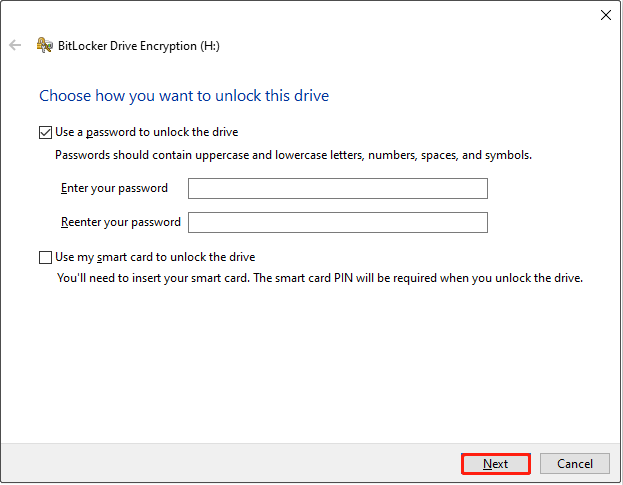
Step 2. Choose how you want to unlock the drive.
Choose a method to unlock the drive, such as using a password or a smart card. Then click Next.
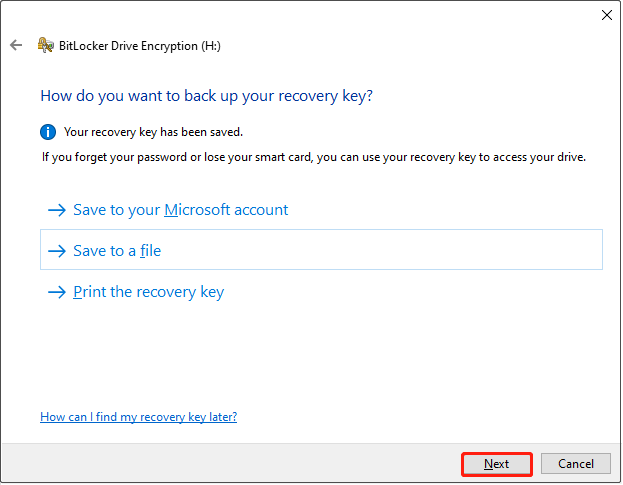
Step 3. Choose how you want to back up the recovery key.
Choose to back up your recovery key to your Microsoft account, a file, or by printing it.
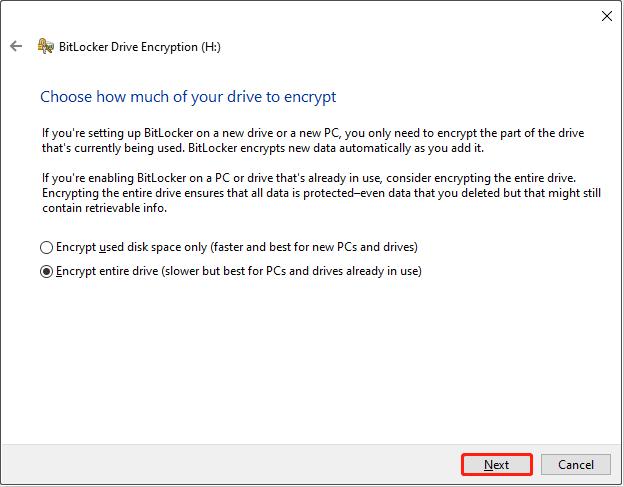
Step 4. Choose how much of your drive to encrypt.
Decide how much of the drive you want to encrypt and click Next.
- For older drives, it is recommended to encrypt the entire disk. This ensures that all existing data is protected, but the encryption process takes longer.
- For new drives, encrypt only the used space. New files will be automatically encrypted as they are added, and the encryption runs faster.
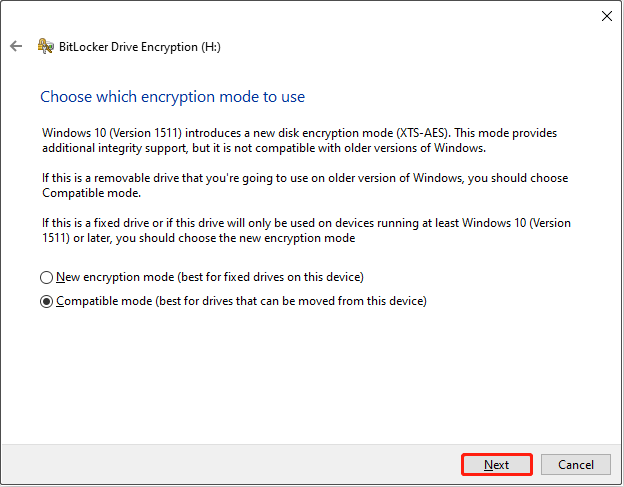
Step 5. Choose which encryption mode to use.
Select which encryption mode to use and click Next.
- Choose the new encryption mode if you are using a fixed drive on Windows 10 or later.
- Choose the compatible mode if you are using a removable drive.
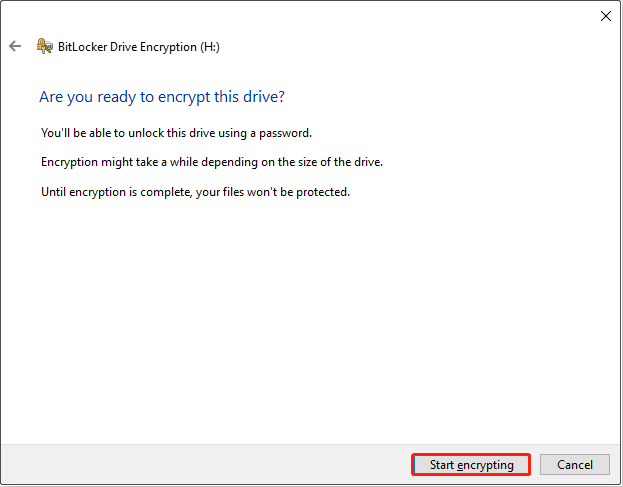
Step 6. Start the encrypting process.
When everything is ready, click Start encrypting, and wait for the process to complete.
Step 7. Lock the drive.
After the encryption is completed, your drive is encrypted but currently unlocked. Restart your computer or reconnect the removable drive to lock the drive.
Enable BitLocker Using CMD
In addition to File Explorer and Control Panel, Command Prompt is also available for enabling BitLocker. Follow the steps below to turn on BitLocker with the command line.
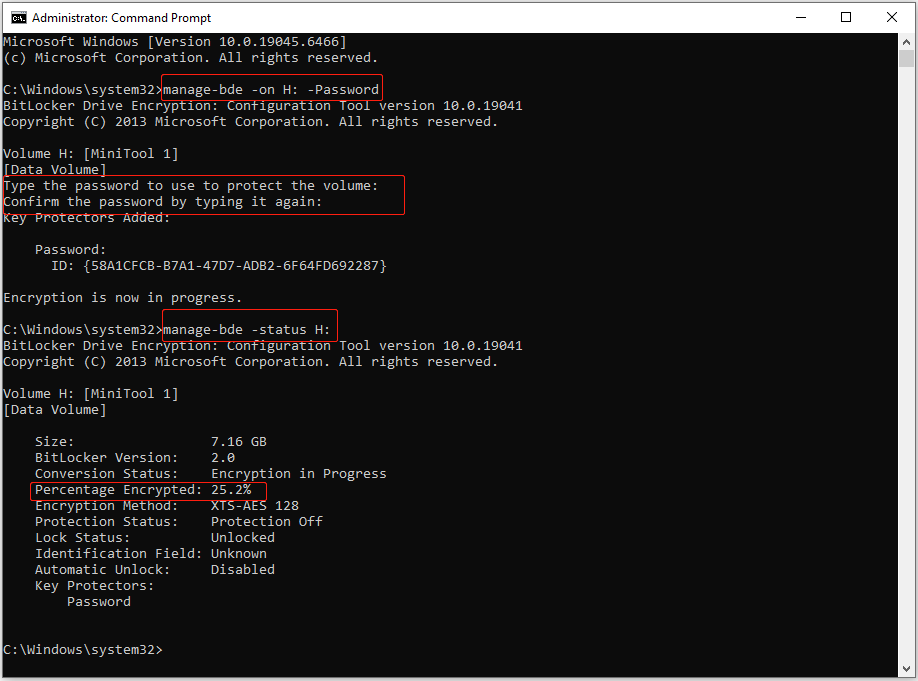
Step 1. Open Command Prompt as an administrator.
Type cmd in the Windows search box, right-click Command Prompt, and choose Run as administrator.
Step 2. Execute the command.
Type manage-bde -on drive letter: -Password and press Enter.
Replace the drive letter with the actual drive letter of the partition you want to encrypt. For example, to encrypt the H: drive, type manage-bde -on H: -Password.
Step 3. Set a password.
When prompted to set a password for the volume, type your chosen password and press Enter.
Re‑enter the password to confirm, then press Enter again. The Command Prompt will begin encrypting your drive.
Command Prompt does not provide a processing icon. To check the encryption percentage, type manage-bde -status drive letter: (replace the drive letter with the real one) and press Enter.
Step 4. Lock the drive.
Restart your computer or reconnect the removable drive to apply the encryption.
To learn more about available parameters for BitLocker, see Microsoft’s manage-bde documentation.
Enable BitLocker Without TPM
BitLocker provides maximum protection for system drives when used in conjunction with a TPM.
Windows requires TPM 1.2 or later for system-drive BitLocker by default. If no TPM is available, BitLocker cannot start unless you adjust the group policy settings.
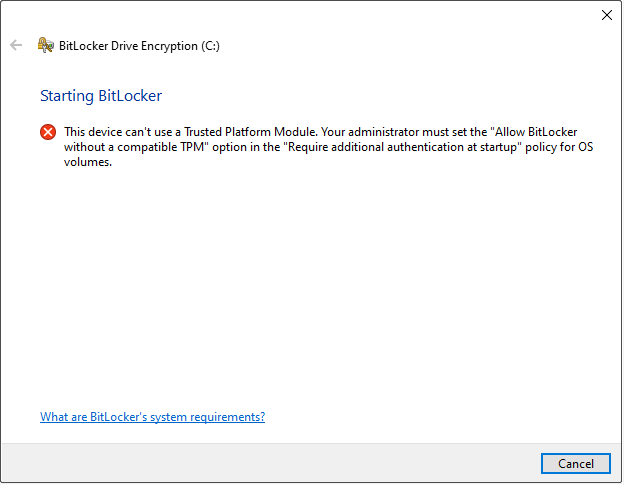
If your computer does not have a TPM, follow the steps below to adjust the group policy settings.
Step 1. Open Group Policy Editor.
Type Edit group policy in the Windows search box and click it to open the Local Group Policy Editor.
Step 2. Navigate to BitLocker settings.
Navigate to the following location:
Computer Configuration > Administrative Templates > Windows Components > BitLocker Drive Encryption
In the right panel, double-click Operating System Drives > Require additional authentication at startup.
Step 3. Configure BitLocker policies.
In the new window, select the Enabled option. Then, make sure to check the box for “Allow BitLocker without a compatible TPM (requires a password or a startup key on a USB flash drive)”.
Finally, click OK to apply this change.
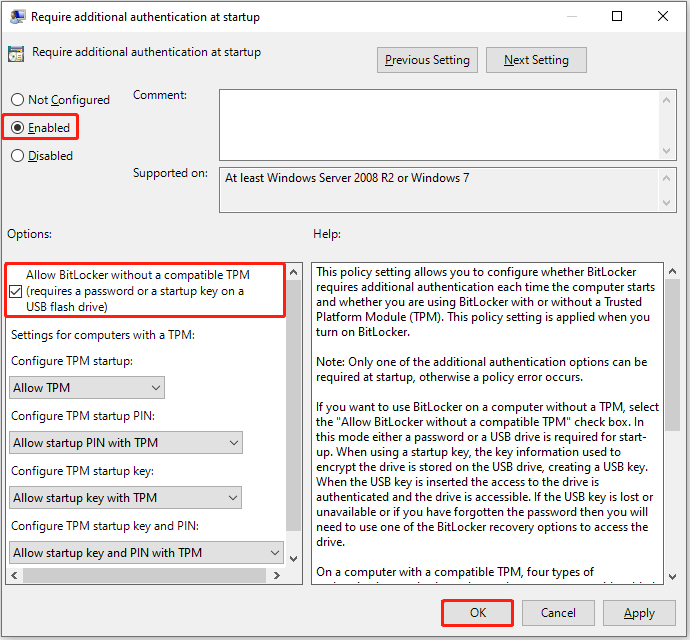
When the policy has been modified, you can encrypt your system drive with a password or a recovery USB drive.

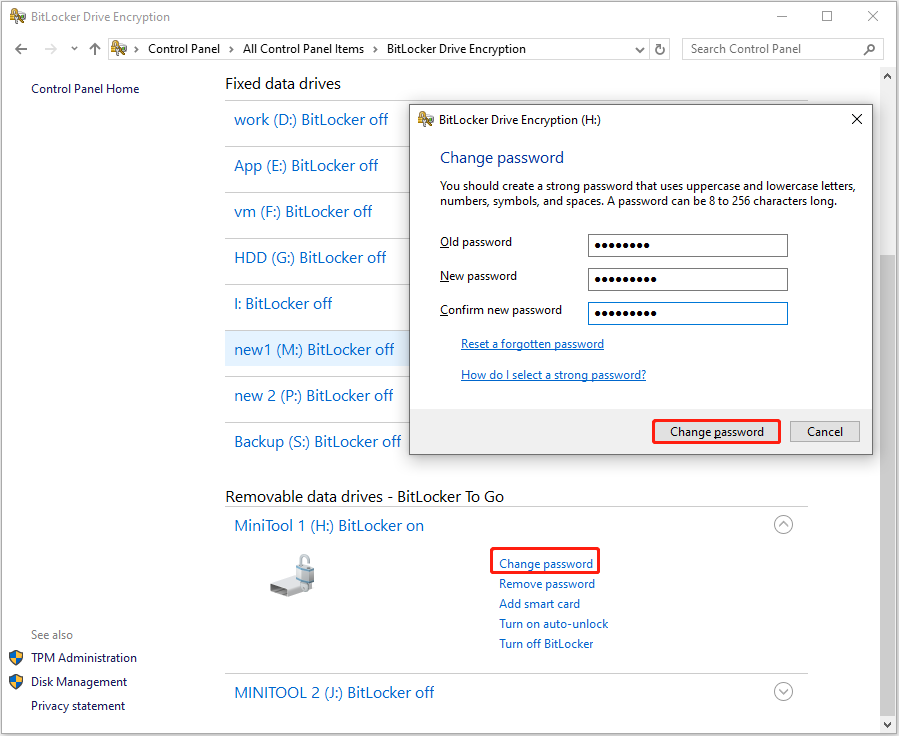
Change BitLocker Password
BitLocker allows you to change the password used to unlock your encrypted drive at any time to maintain security. Follow the steps below to change the BitLocker password.
Step 1. Open the Control Panel and select BitLocker Drive Encryption.
Step 2. Click Unlock drive next to the encrypted partition, type the password, and click Unlock.
Step 3. Click Change password, type the old and new passwords, and click Change password.
Disable BitLocker
If drive encryption is no longer required, you can decrypt the drive and turn off BitLocker to restore normal access. Here are the steps.
Step 1. Open the Control Panel and decrypt the drive.
Step 2. Click Turn off BitLocker next to the drive.
Step 3. Click Turn off BitLocker again and wait for the process to complete.
This section has introduced how to enable and disable BitLocker on a drive. In the next section, you will learn how to resize, format, delete, recover, or copy an encrypted partition using tools like Disk Management and MiniTool Partition Wizard.
Part 4. How to Manage a BitLocker-Encrypted Drive
To manage an encrypted partition, Windows’ built‑in Disk Management tool provides basic features such as formatting, deleting, or checking partition properties.
For more advanced operations, such as resizing, recovering, or copying partitions, use a free partition manager like MiniTool Partition Wizard. This software is fully compatible with Windows 11/10/8/7.
MiniTool Partition Wizard FreeClick to Download100%Clean & Safe
Resize a BitLocker-Encrypted Drive
During disk usage, you may need to extend or shrink a partition to store more files or free up space. However, in many cases, the Extend Volume and Shrink Volume buttons in Windows Disk Management are grayed out.
If you cannot resize your partition in Disk Management, use MiniTool Partition Wizard. It provides two key features to help reorganize partition size:
Move/Resize Partition:
- Extend a partition into contiguous unallocated or free space.
- Move unallocated or free space so it becomes adjacent to the partition you want to extend.
- Shrink a partition to the desired size.
- Reposition a partition to a preferred location.
Extend Partition:
- Extend a partition into adjacent or non‑adjacent unallocated/free space on either side.
- Extend a partition using free space from another existing partition.
Both features are available for NTFS, FAT32, FAT12, and FAT16 file systems.
Here is how to resize a partition without losing data:
Step 1. Select the partition and click Move/Resize Partition from the left navigation panel.
Step 2. In the dialog box, drag the blue handle to shrink or extend the partition. Additionally, you may type the value of the partition or unallocated space into the input boxes manually.
You can also move the entire partition to adjust the location of adjacent unallocated space.
Once the size and location are set, click OK to confirm.
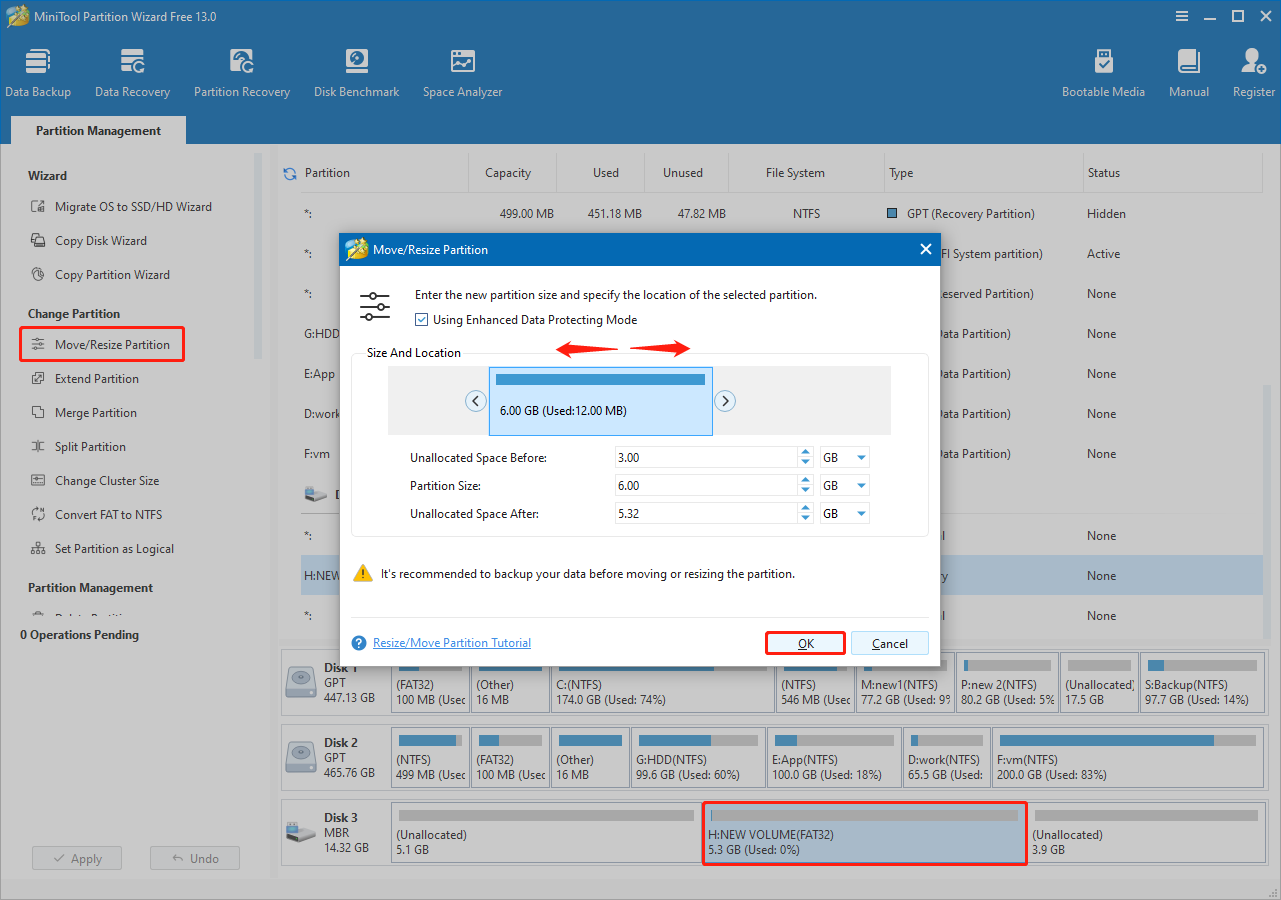
Step 3. Click Apply to confirm the settings.
Here is how to extend a partition:
Step 1. Select the partition and click Extend Partition from the left sidebar.
Step 2. Expand the drop-down menu of Take Free Space from, and choose a partition or unallocated space on the same disk to take free space.
Next, drag the slider left or right to allocate the desired space, and then click OK.
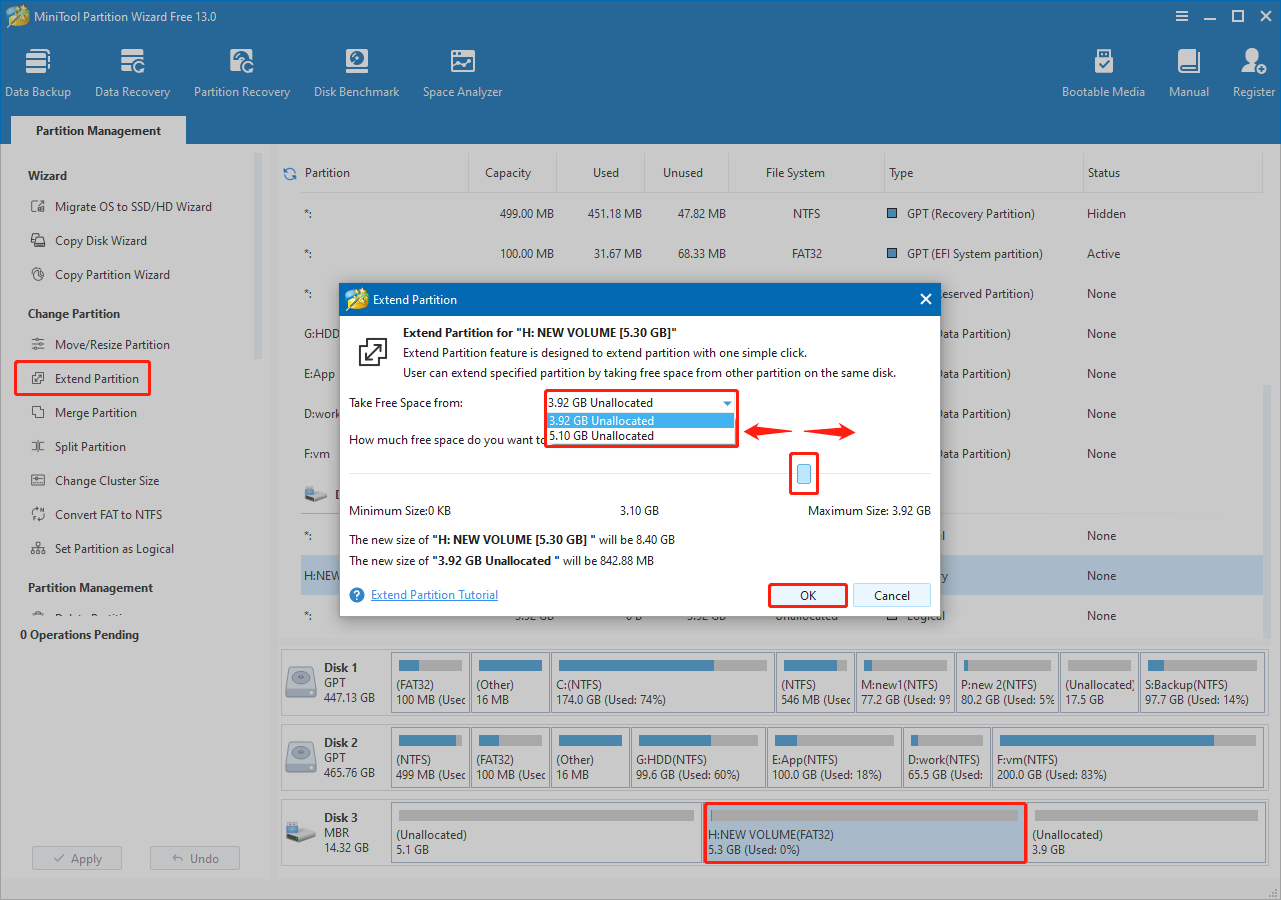
Step 3. Click Apply to execute.
After resizing the partition, re‑enable BitLocker in File Explorer or Control Panel to protect your data.
Format a BitLocker-Encrypted Drive
Disk Management and MiniTool Partition Wizard both support formatting BitLocker-encrypted drives for free. Here are the operation steps.
In Disk Management:
Step 1. Right-click the encrypted partition and choose Format.
Step 2. Set up the volume label and file system, and click OK.
Step 3. Click OK again to confirm. The drive will be formatted and ready for new data.
In MiniTool Partition Wizard:
Step 1. On the main interface of this partition manager, select the encrypted drive and click Format Partition from the left menu.
Step 2. Specify the partition label and file system, and then click OK.
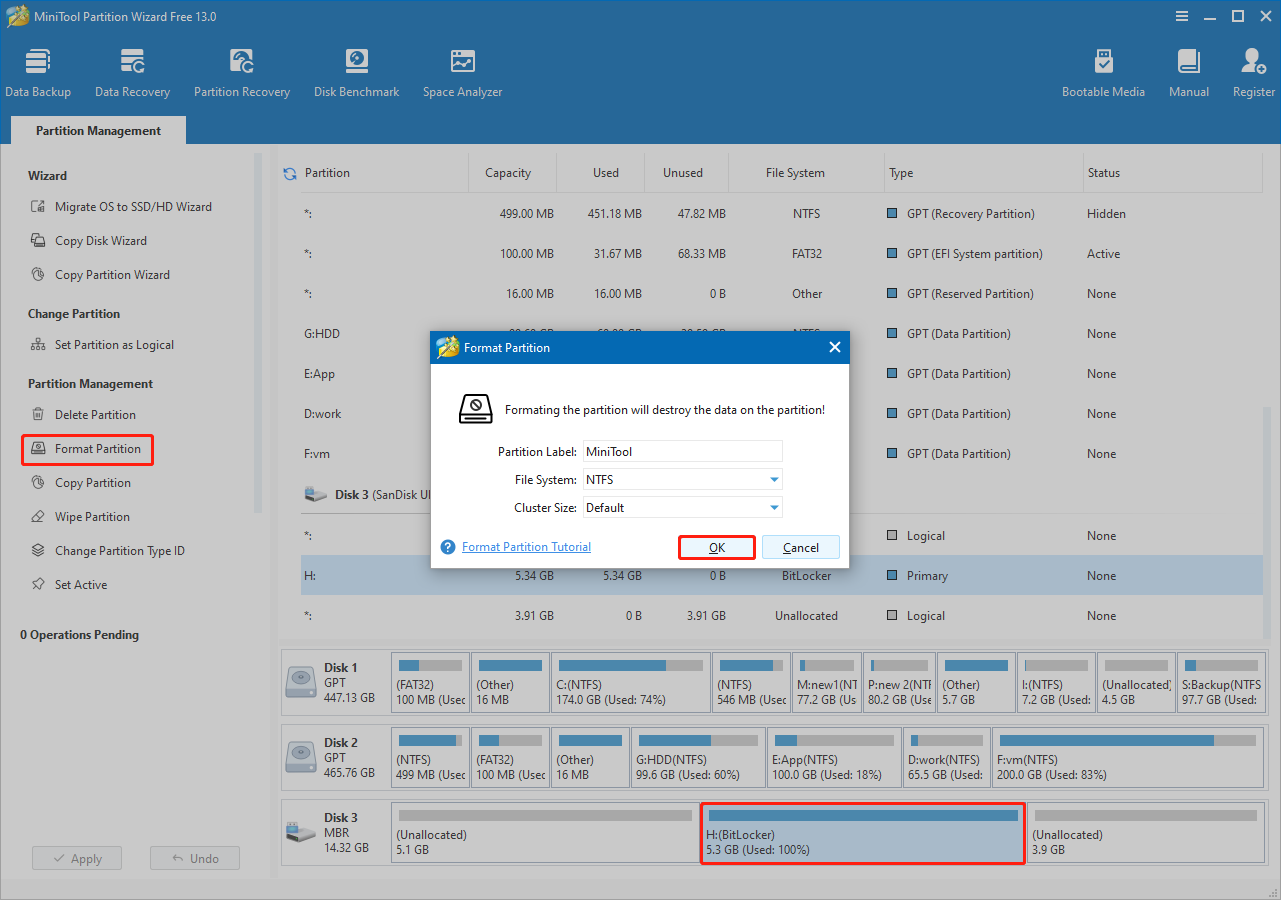
Step 3. Click Apply in the lower left corner to confirm.
After formatting the drive, you may need to restart your computer or reconnect the removable drive to ensure it is accessible without encryption.

Delete a BitLocker-Encrypted Drive
You can delete BitLocker-encrypted partitions using either Windows Disk Management or MiniTool Partition Wizard.
In Disk Management:
Step 1. Right-click the encrypted drive and choose Delete Volume.
Step 2. Click Yes to confirm. After the process is completed, the drive will become unallocated, and you can partition the hard drive for reuse.
In MiniTool Partition Wizard:
Step 1. Select the encrypted partition and click Delete Partition from the left panel.

Step 2. Click Apply.
Recover a Deleted BitLocker-Encrypted Drive
MiniTool Partition Wizard offers a Partition Recovery feature that can restore lost or deleted partitions along with the files stored on them.
Whether the partitions were lost due to accidental deletion, sudden power outage, or other reasons, MiniTool can help recover them.
Follow the steps below to recover a deleted BitLocker-encrypted drive.
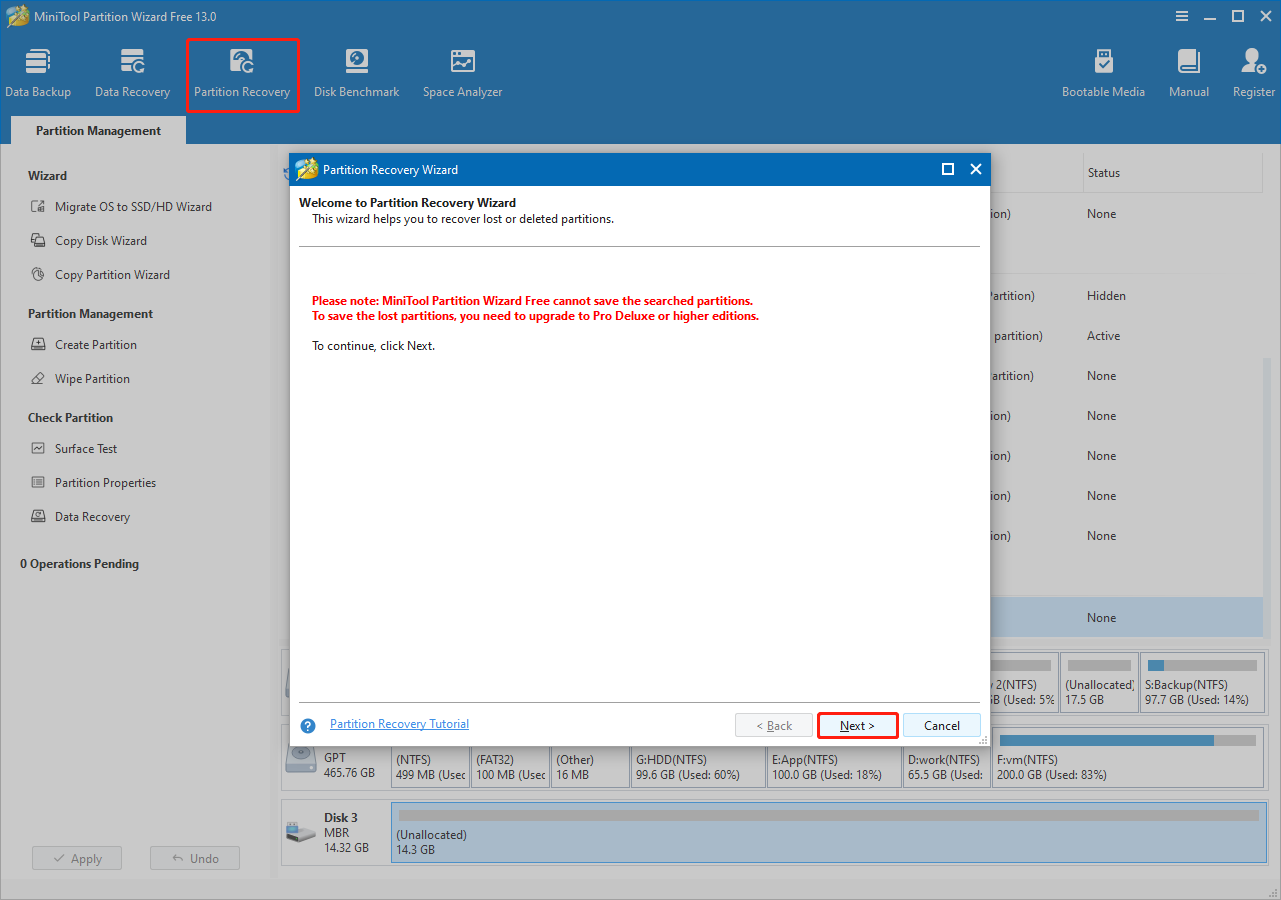
Step 1. Access Partition Recovery Wizard.
Launch MiniTool Partition Wizard to enter its main interface, and then click Partition Recovery. In the new window, review the prompts and click Next.
Step 2. Select a disk for recovery.
Select the disk from which you need to recover partitions and click Next.
Step 3. Choose a scanning range.
Choose a scanning range and click Next.
- Full Disk: Scan the entire disk.
- Unallocated Space: Scan the free space only.
- Specific Range: Scan specified sectors.

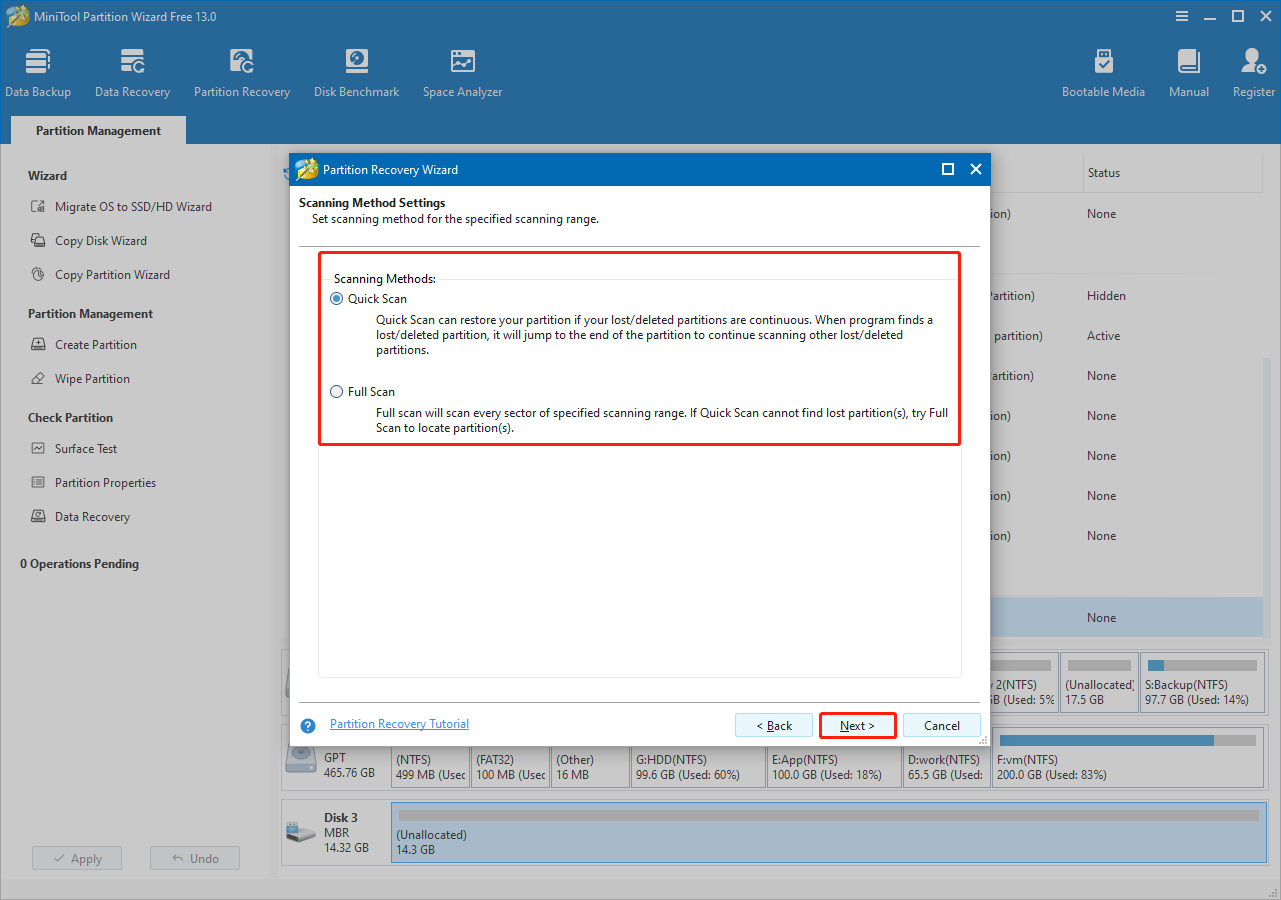
Step 4. Choose a scanning method.
Choose a scanning method and click Next.
- Quick Scan: Suitable for recovering continuous lost or deleted partitions. When the software detects a lost or deleted partition, it will skip to the end of that partition and scan for others.
- Full Scan: Scans every sector of the specified range. Recommended if Quick Scan cannot locate the lost or deleted partitions.
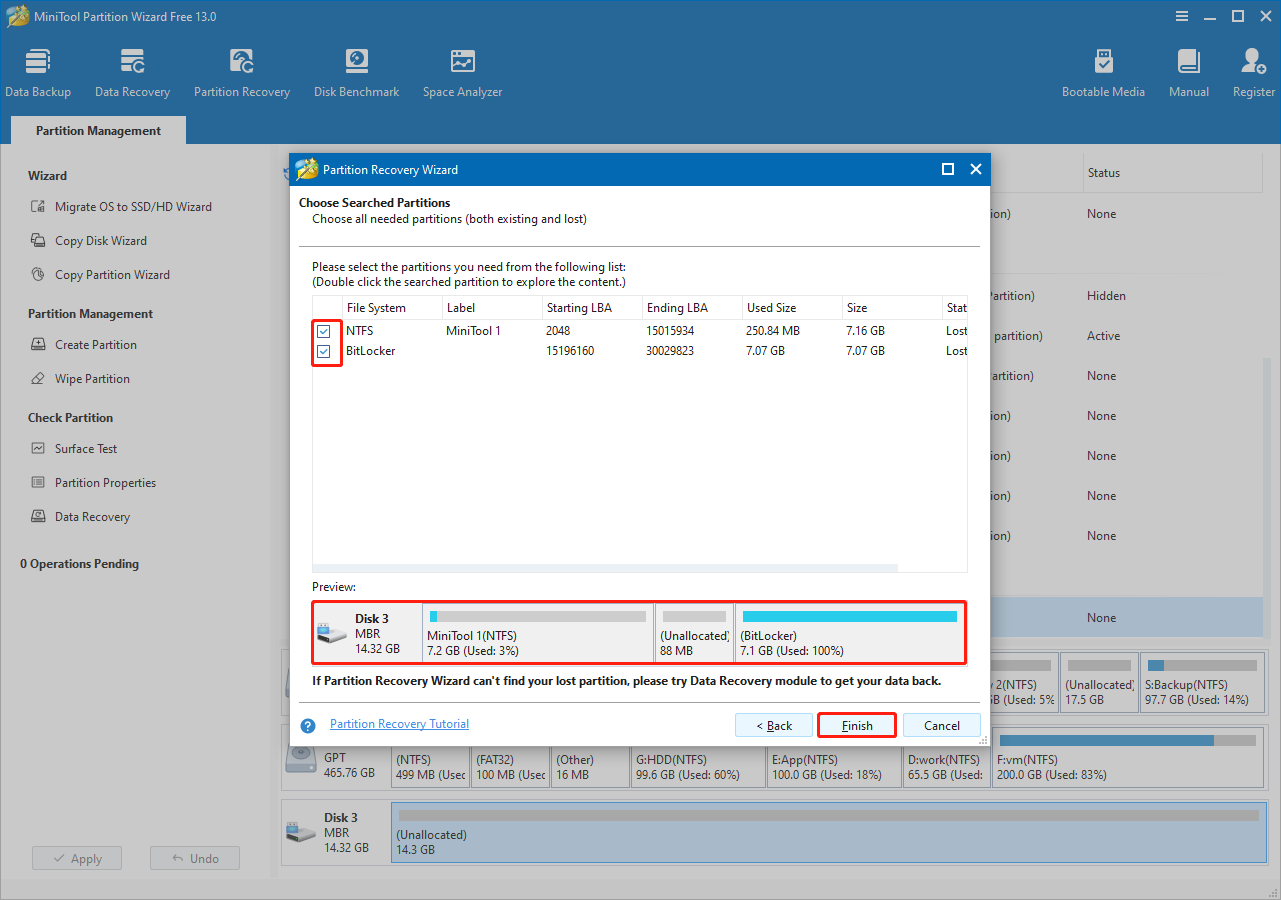
Step 5. Save recovered partitions.
All partitions found on the disk will be listed, including both lost and existing ones. Existing partitions are selected by default.
Ensure all required partitions are selected and preview the result. After confirming, click Finish to recover them.
If you are using the Free edition, follow the on-screen instructions to upgrade to Pro Platinum or a more advanced edition.
Finally, click Apply to complete the partition recovery process.
2. Recovered partitions (except BitLocker) have no drive letter. Right‑click the partition and choose Change Letter to assign an available drive letter to make it usable.
Recover Files From a Formatted BitLocker-Encrypted Drive
If your BitLocker-encrypted drive was accidentally formatted, MiniTool Partition Wizard can help recover files from it.
The software includes a built‑in Data Recovery feature that supports recovering documents, pictures, videos, audio, emails, and other file types.
The software is compatible with all major storage media, including hard drives, USB flash drives, SD cards, and more.
Follow the steps below to recover files from a formatted BitLocker-encrypted partition.
Step 1. Scan the formatted drive.
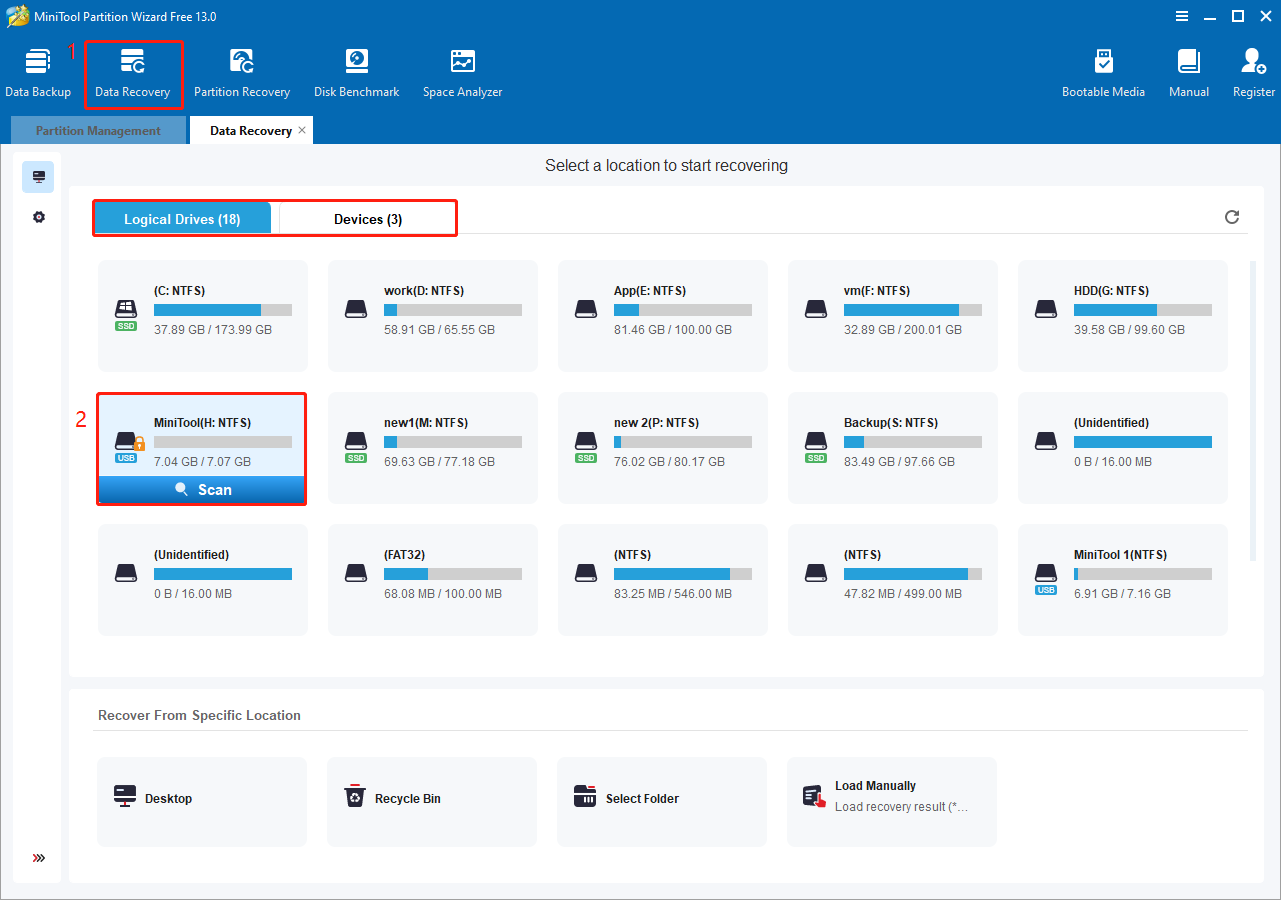
Run MiniTool Partition Wizard to enter its home page, and then click the Data Recovery button.
In the embedded window, you will see two options:
- Logical Drives: Displays all existing, deleted, and lost partitions on your disk.
- Devices: Displays all physical disks connected to your computer.
Select your formatted partition or disk and click Scan to start scanning for files.
Step 2. Find and preview files.
After the scan is completed, browse the results to locate and select the files you want to recover. You can view files by file path under Path or by file type under Type.
The Filter feature is available to narrow results by file type, modification date, file size, or file category.
If you remember the file name, enter its keywords in the search box and press Enter to display matching items. Note that some files may have lost their original names.
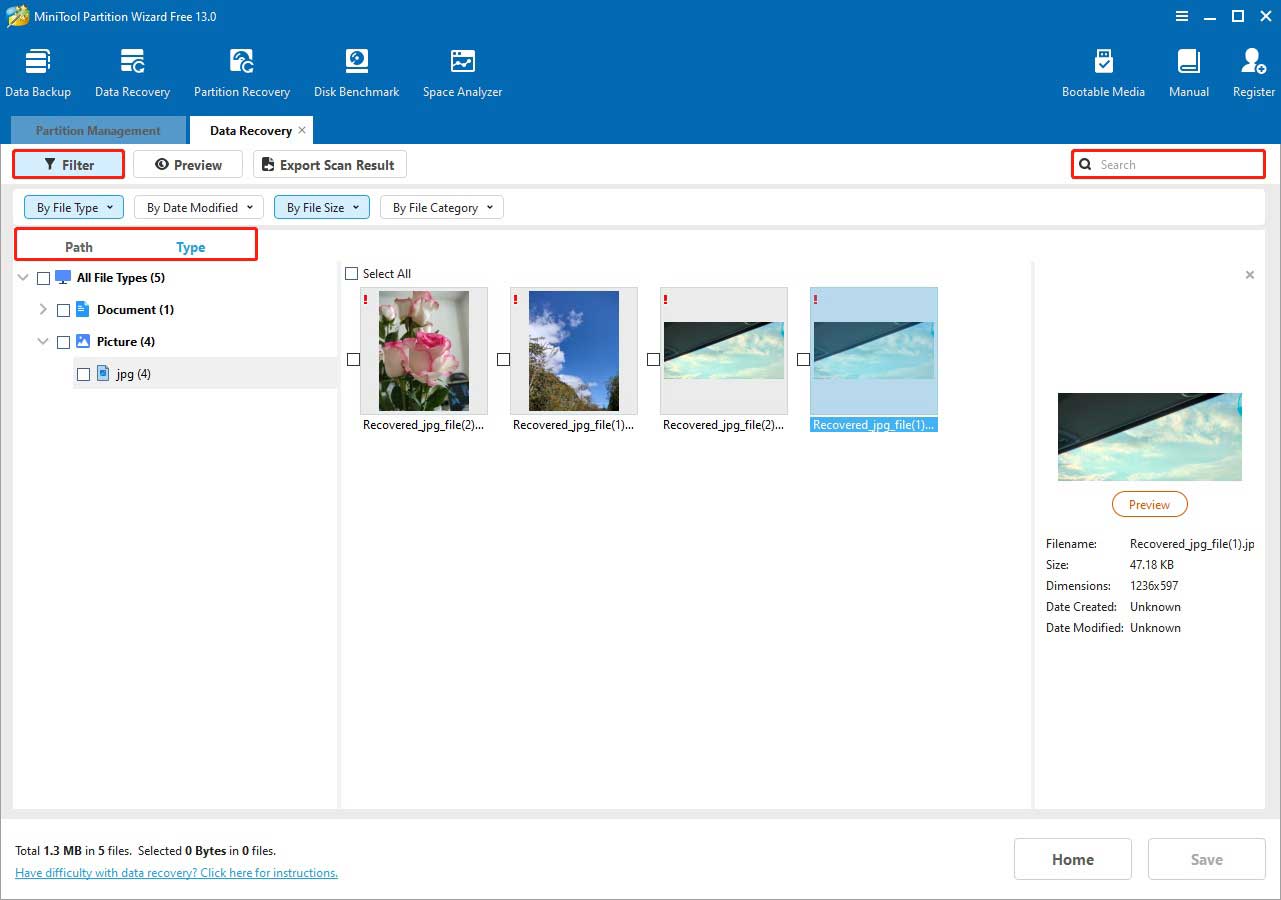
Double‑click each file you want to recover to preview its content. This helps ensure recovery accuracy.
Step 3. Recover required files.
Finally, make sure all files you want to recover are checked and click Save.
In the new window, select a safe location and click OK to recover files. Make sure to select a location separate from the original formatted partition in case of data overwriting.
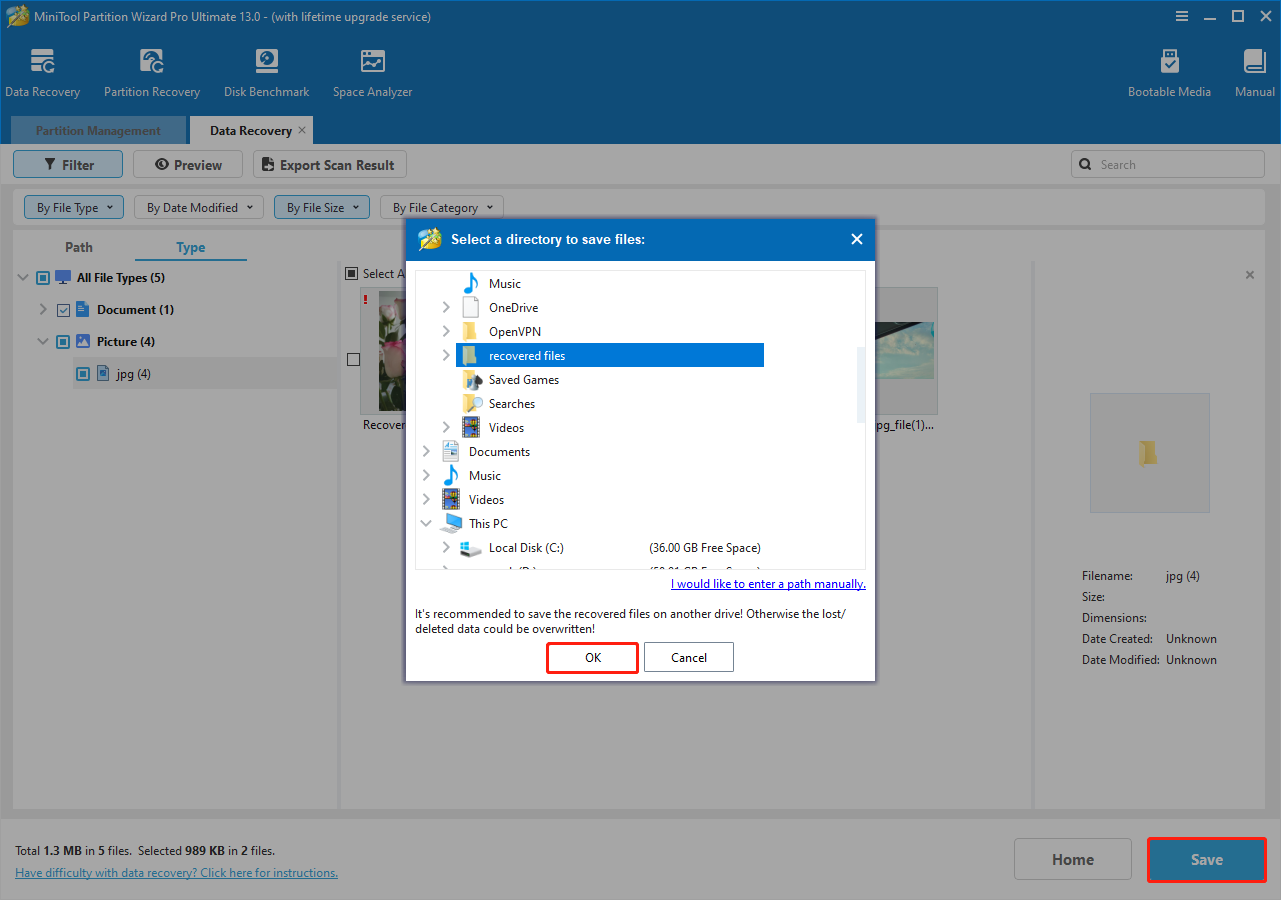
After the recovery process finishes, access the specified location to view your files.
Copy a BitLocker-Encrypted Drive
There are situations where you may need to copy a BitLocker-encrypted disk for data backup or migration. MiniTool Partition Wizard offers a reliable way to copy BitLocker drives, ensuring both the encryption and the data remain intact.
Refer to the following instructions to copy a BitLocker-encrypted partition.
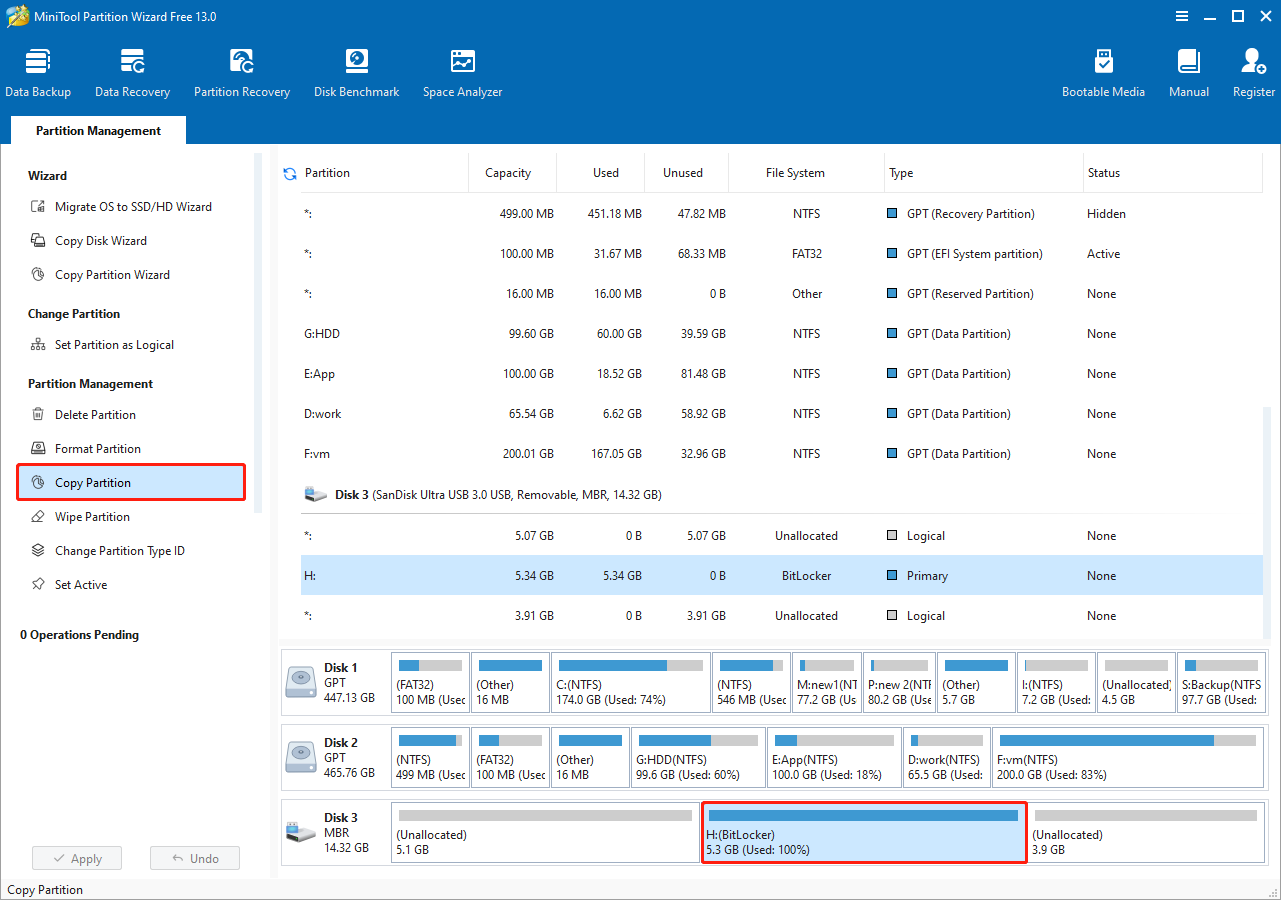
Step 1. Access Copy Partition Wizard.
On the home page of MiniTool Partition Wizard, select the BitLocker partition you want to copy and click Copy Partition.
Step 2. Specify the location to copy the partition.
Select the disk and its unallocated space as the destination area to copy the BitLocker drive. The unallocated space must be large enough to hold the original partition. Once it is confirmed, click Next.
Step 3. Specify the partition location.
Drag the slider to specify the location of the copied partition. You can also manually enter the amount of unallocated space before or after the copied partition.
After configuring the location, click Finish.
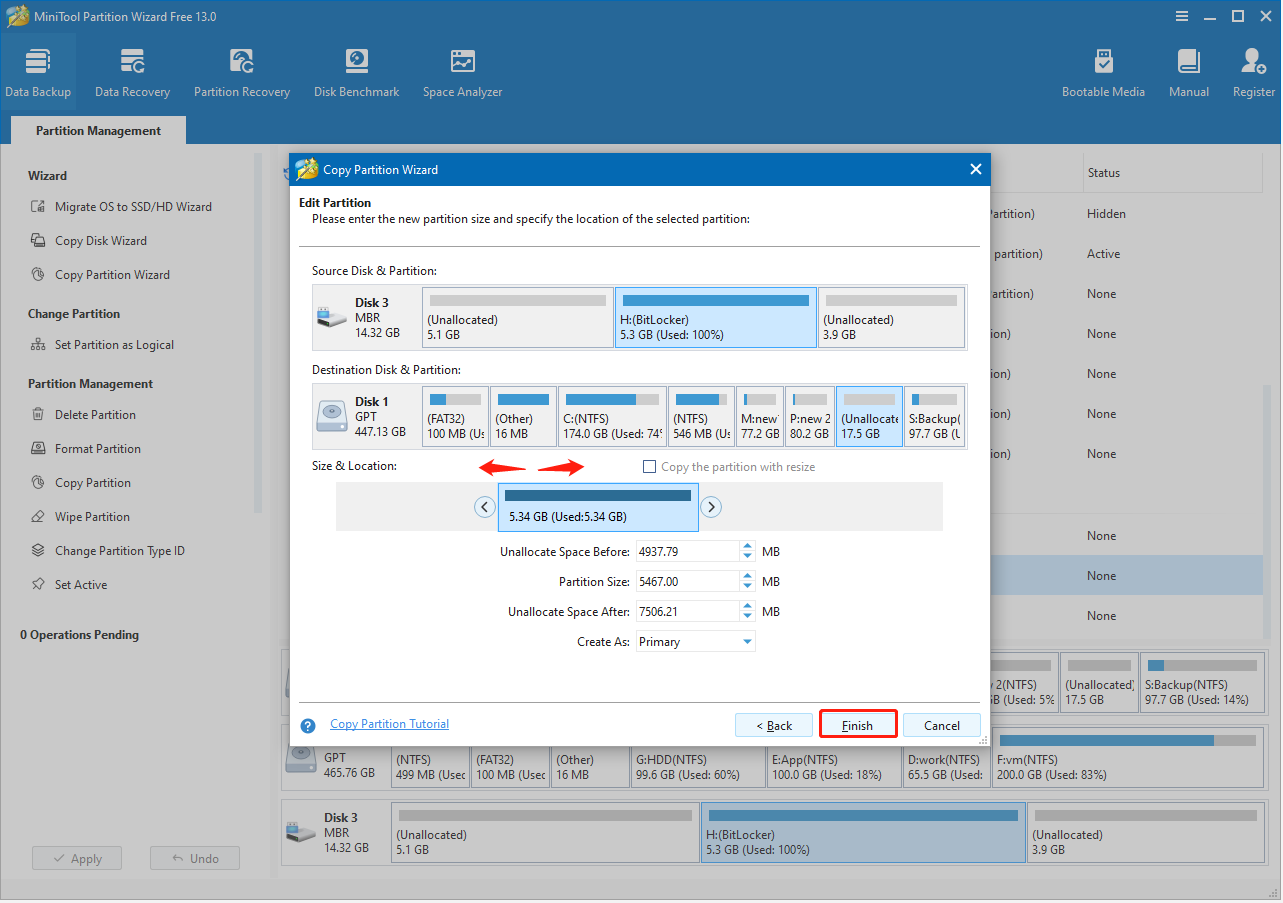
Finally, click Apply and wait for the copy process to complete.
The copied partition is identical to the original BitLocker-encrypted partition. It remains locked by BitLocker, ensuring data security.
Wipe a BitLocker-Encrypted Drive
Whether for a disk proposal or resale, wiping the encrypted partition is a good choice to erase all files on the drive.
MiniTool Partition Wizard’s Wipe Partition feature erases all files from a drive and prevents them from being recovered by any data recovery software.
Follow these steps to wipe a partition.
Step 1. Access the partition wiping wizard.
Select the BitLocker-encrypted partition you want to wipe and click Wipe Partition from the left menu.
Step 2. Choose a wiping method.
In the new window, select a wiping method and click OK.
Wiping the drive by filling sectors with zero, one, or a mix of both prevents data recovery software from retrieving any information. The method you choose depends on how thoroughly you want the disk to be erased.
If you use the DoD 5220.22-M or DoD 5220.38-STD fill options, all forms of data recovery become impossible.
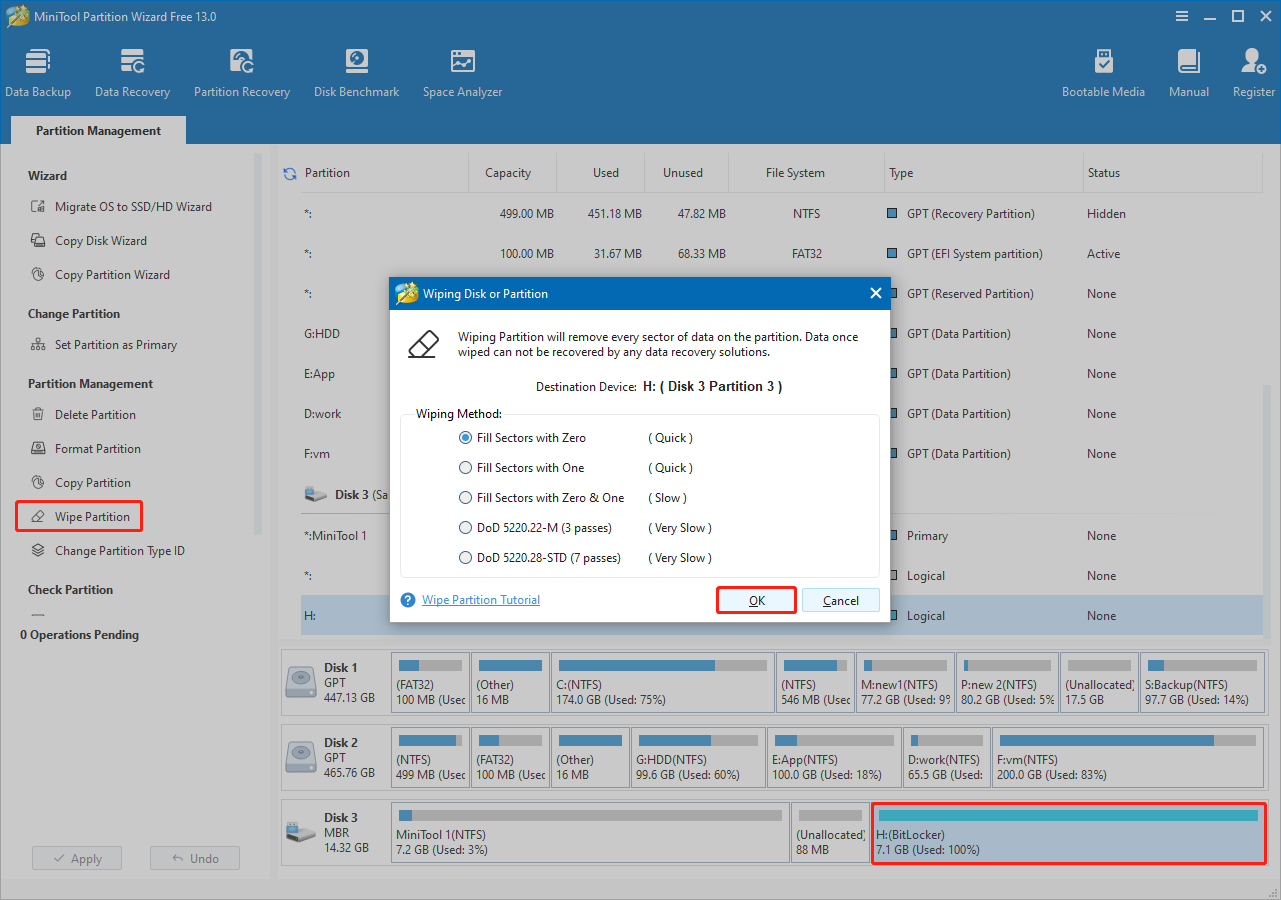
Next, click Apply to start wiping the drive.
Step 3. Format the partition.
After the wiping process is complete, the BitLocker‑encrypted drive will appear as Unformatted. To format the drive, select it and click Format Partition from the left-hand action panel.
In the new window, specify the partition label and file system, and then click OK.
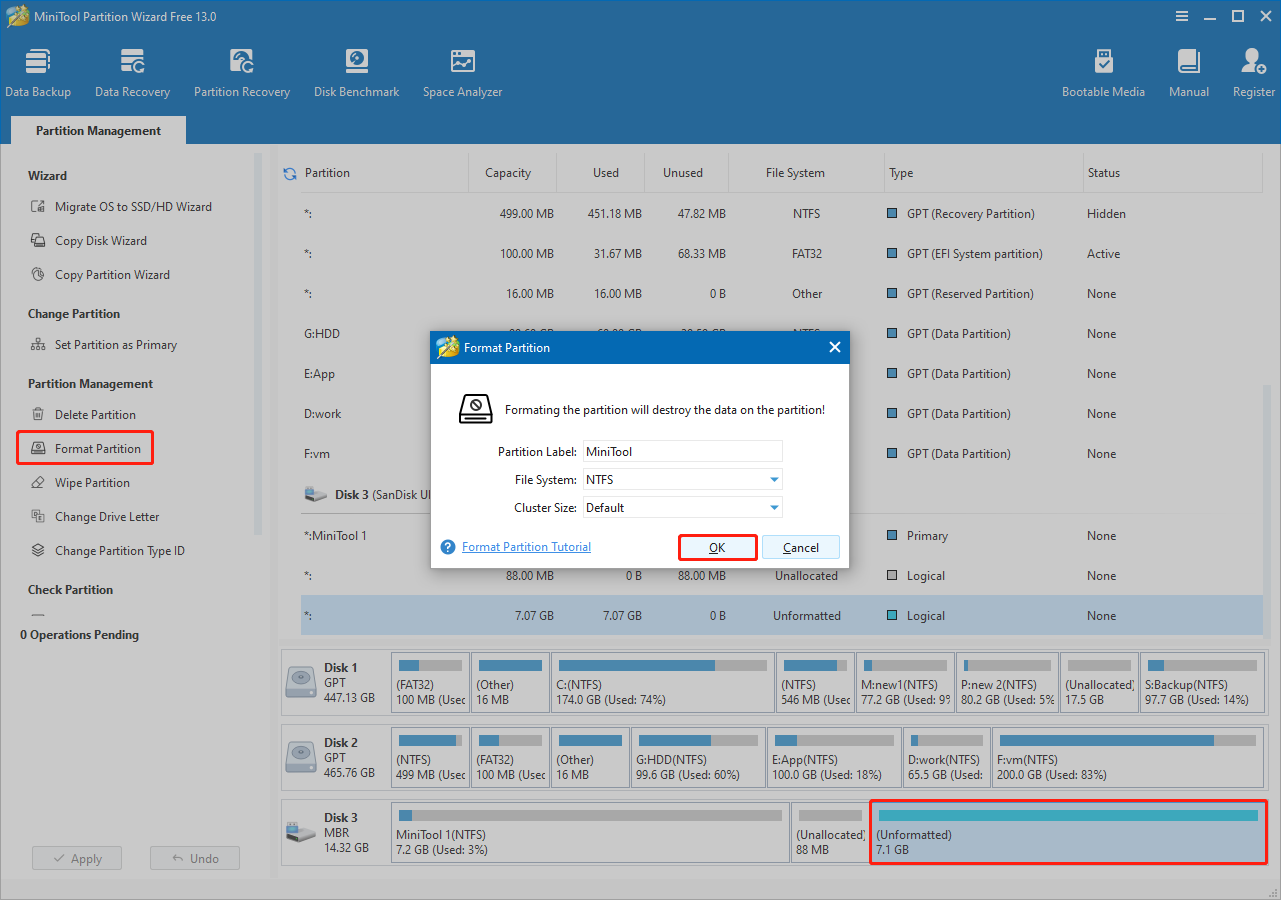
Click Apply to confirm.
Step 4. Add a drive letter.
Without a drive letter, the partition will not appear in File Explorer and cannot be used to store data. To assign a drive letter, select the partition and click Change Drive Letter from the left‑hand menu.
Choose an available drive letter from the drop-down menu and click OK > Apply.
Your drive should appear in File Explorer and be ready for use.
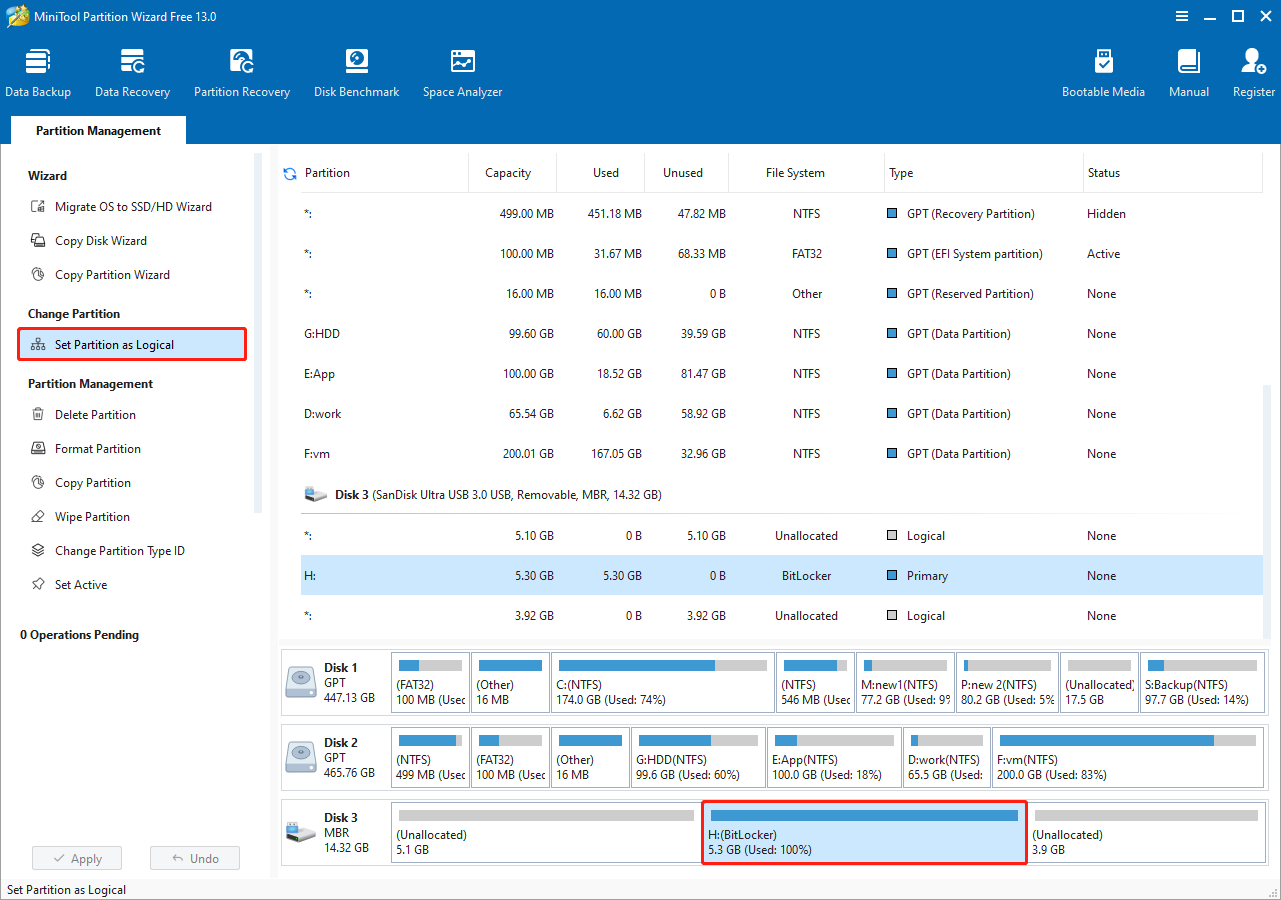
Set a BitLocker-Encrypted Drive as Logical/Primary
On MBR disks, there are two types of partitions: primary partitions and extended partitions. An extended partition can be divided into several logical partitions.
- Primary partitions are usually essential for installing the operating system and booting the computer.
- Logical partitions are typically used for storing personal data and applications.
MBR drives allow a maximum of four primary partitions. To have more, one primary partition must be turned into an extended partition, and within it, you can add logical partitions.
To achieve flexible management of primary and logical partitions, you can use MiniTool Partition Wizard’s features: Set Partition as Primary or Set Partition as Logical.
To change the primary partition to logical:
Select the BitLocker partition and click Set Partition as Logical from the left menu.
Next, click Apply.
To change the logical partition to primary:
Select the BitLocker partition and click Set Partition as Primary from the left menu.
Then, click Apply.
Run a Surface Test on a BitLocker-Encrypted Drive
BitLocker is an excellent option for preventing unauthorized data access, but it cannot protect your disk from logical or physical damage. Bad sectors on the disk may lead to severe disk errors and even permanent data loss.
To minimize this risk, use the Surface Test feature in MiniTool Partition Wizard. This function scans the status of each sector by reading data from it and then displays the results.
If bad sectors or read errors are detected, you will have time to back up your data to a safe location.
Step 1. Within the software interface, select your BitLocker-encrypted drive and click Surface Test.
Step 2. In the dialog box, click Start Now.
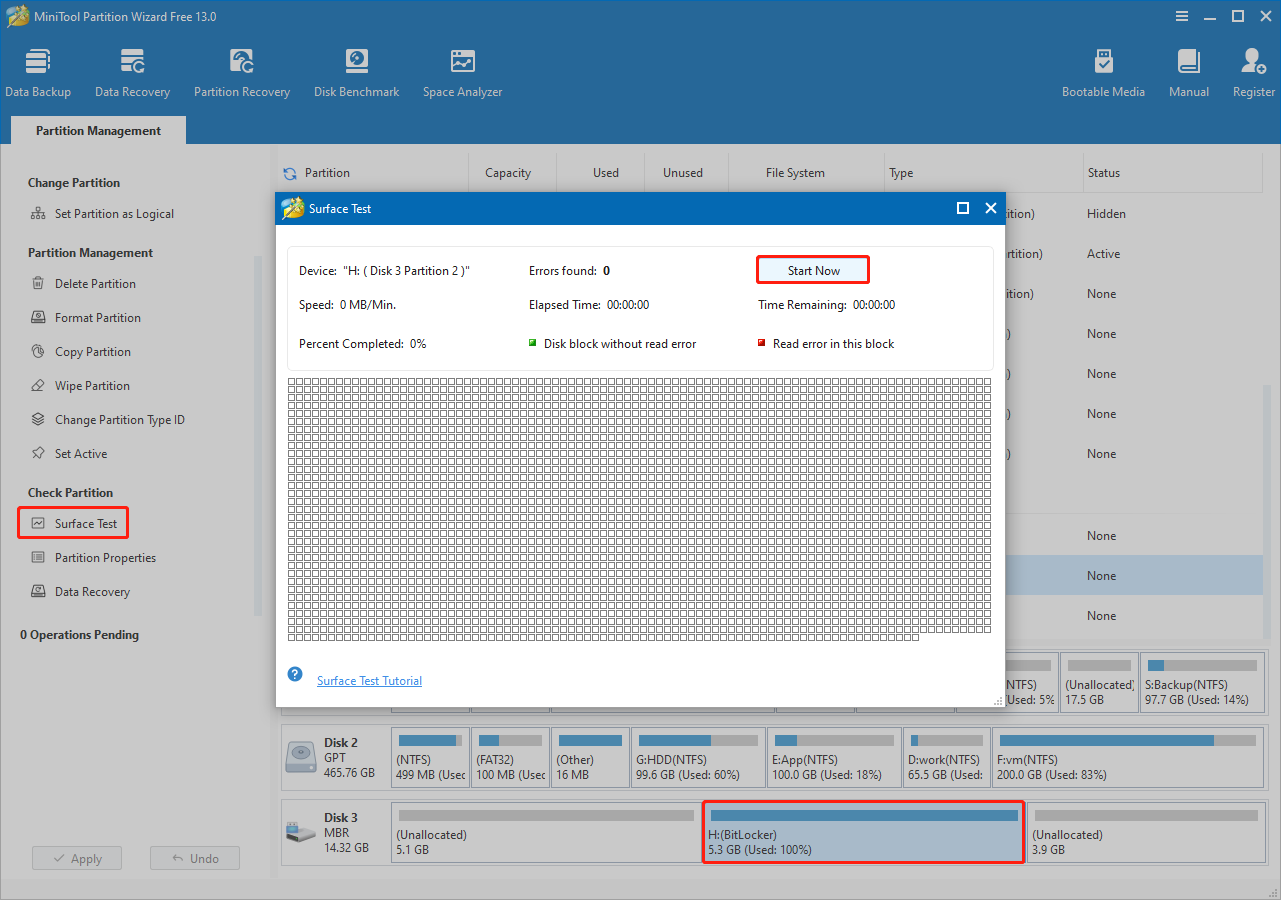
The software will automatically test the disk surface and check for read errors. After the scan, blocks without errors are marked in green, while blocks with read errors are shown in red.
If red blocks appear, back up data immediately and use a disk repair tool to isolate the bad sectors. If the damage is severe, seek professional assistance.
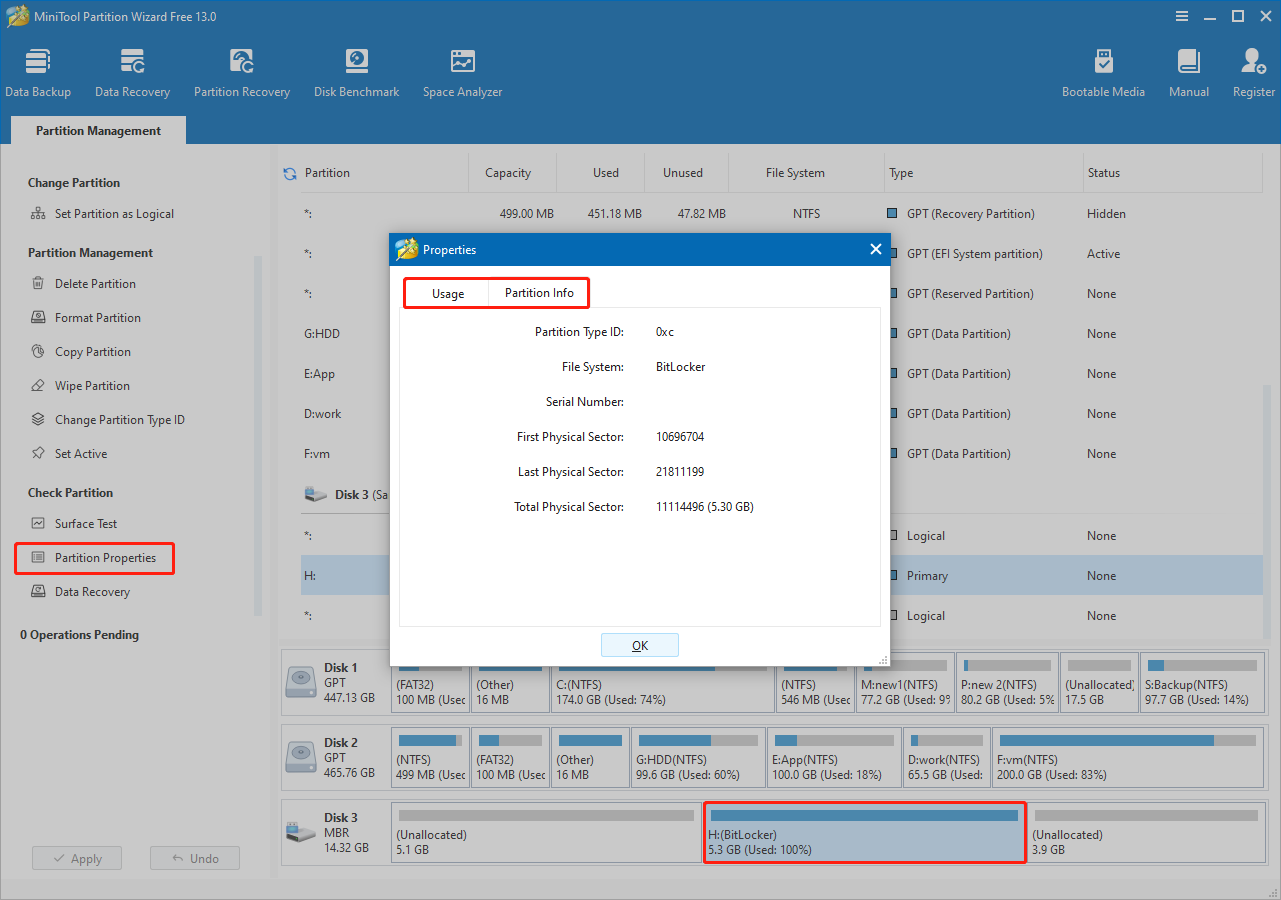
Check the Properties of a BitLocker-Encrypted Drive
When working with BitLocker-encrypted drives, you cannot view file system contents or detailed file system metadata with tools like MiniTool Partition Wizard.
However, you can still review basic disk information such as volume capacity, partition type, and physical sector details.
In MiniTool Partition Wizard:
Select the partition and click Partition Properties on the left panel.
Under Usage, you can see the total capacity of the partition. Under Partition Info, the following parameters are listed:
- Partition Type ID
- First Physical Sector
- Last Physical Sector
- Total Physical Sector
In Disk Management:
Right‑click the partition and choose Properties.
Under the General tab, you can see the disk type, such as a USB drive or a local disk. Under the Hardware tab, you can find the disk name, location, and device status.
Part 5. How to Fix Windows BitLocker Recovery Blue Screen
In recent years, the Windows BitLocker recovery blue screen may unexpectedly appear. This issue often occurs unexpectedly and prevents normal access to the operating system and personal files.
To restore system functionality, sign in to your Microsoft account from another device to locate the recovery key.
If you remember the BitLocker password, unlock the drive through Command Prompt.
If neither the password nor the recovery key is available, you have to reinstall Windows, which will result in the loss of existing files.
Fix 1. Check Your Microsoft Account
BitLocker recovery keys are often stored in the Microsoft account linked to Windows. To recover the key, you need to sign in to your Microsoft account.
For a personal account:
Step 1. Open a web browser on another device, and then visit the Microsoft account login page: https://aka.ms/myrecoverykey.
Step 2. Sign in to your Microsoft account and locate the key ID shown on the BitLocker recovery screen. The recovery key corresponding to that ID is required.
Finally, type the recovery key in the BitLocker screen and press Enter to boot Windows.
For a work a school account:
Step 1. From another device, open a web browser and visit this page: https://aka.ms/aadrecoverykey.
Step 2. Log in with your work or school account.
Step 3. Select Devices, and expand the device for which you need to recover the key.
Step 4. Click View BitLocker Keys.
Step 5. Find the recovery key corresponding to the key ID, and use it to unlock your device.
Fix 2. Use Command Prompt (Requires BitLocker Password)
If you manually enabled BitLocker with a password but the system now requests a recovery key, use Command Prompt to unlock the drive.
Note that this method requires you to remember your BitLocker password.
Step 1. On the BitLocker recovery window, click on Skip this drive.
Step 2. Click Troubleshoot > Advanced options > Command Prompt. Next, click Skip this drive again.
Step 3. In the Command Prompt window, type diskpart and press Enter.
Step 4. Type list volume and press Enter to display all partitions on your computer. The partition with the file system marked as Unknown is the one that is encrypted.
Step 5. Type exit and press Enter to exit DiskPart.
Step 6. Input manage-bde -unlock drive letter: -Password and press Enter (replace drive letter with the actual letter of the encrypted partition).
Step 7. When prompted, type your password and press Enter.
Step 8. After unlocking the drive, type manage-bde -off drive letter: (replace drive letter with the real one) and press Enter to turn off BitLocker.
Step 9. Execute manage-bde -status drive letter: (replace drive letter with the real one) to check the decryption percentage.
Once it is completed, restart your computer and check if you can enter your desktop normally.
Fix 3. Reinstall Windows
If you cannot remember your password or locate the recovery key, reinstalling Windows may be the only option. BitLocker uses strong encryption and cannot be bypassed without the recovery key or password.
Note that a fresh installation will erase all personal files on the system drive, installed apps, and configured system settings.
If you choose to reinstall Windows, refer to the steps below.
Step 1. On a functioning Windows computer, insert a blank USB drive and use it to create a Windows installation media.
Step 2. Connect the installation media to the problematic computer and restart the computer. During startup, press the specific key, such as F2, F12, F8, or Esc, to boot into BIOS.
In BIOS, change the boot order to boot from the USB drive.
Step 3. In the Windows Setup screen, specify the language and localization settings, and then click Next.
Step 4. Follow the on-screen instructions to delete all partitions on Disk 0 and complete the installation.
Part 6. Conclusion
To sum up, BitLocker provides a reliable solution for protecting data on Windows devices. This guide introduces its three encryption statuses to help recognize whether a drive is protected, unlocked, or fully secured.
It walks through how to enable BitLocker via File Explorer, Control Panel, and Command Prompt, even on systems without TPM. It also explains how to change your BitLocker password or disable encryption when needed.
For BitLocker drive management, it shows how to resize, format, delete, recover, copy, and wipe an encrypted drive. Additional tasks such as changing partition types, running surface tests, and checking drive properties are also included.
Finally, it provides solutions to fix the BitLocker blue screen, including checking your Microsoft account, using CMD, or reinstalling Windows.
With the instructions above, you should know how to handle BitLocker encryption in common situations.
If you encounter any issues while managing encrypted drives with MiniTool Partition Wizard, contact the support team at [email protected].
User Comments :