Oops, Wsappx is taking a lot of disk space. Have you ever encountered this issue? Don’t worry, this article contributes 4 solutions to help you solve it. Please select the appropriate solutions according to your own situation.
About Wsappx
What is wsappx? Have you learned about it? Wsappx is a process that runs in two different background services (Windows 8 and Windows 10 computer) as a part of the Windows Store and the Universal app platform of Microsoft.
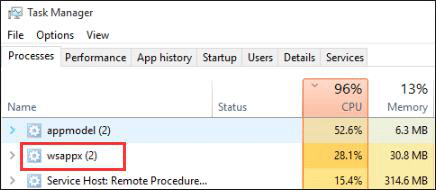
What’s the function of wsappx? It is used for installing, removing, as well as updating Store apps. In other words, the wsappx service generally uses a noticeable amount of CPU when your PC is installing, uninstalling, or updating Store apps.
Sometimes you might run into this issue — Sometimes you may face the issue — ”wsappx high disk or wsappx high CPU”. How to deal with this? Take it easy. There are 4 solutions displayed in the following content to help you. Please follow these steps in the contents below, and you may never have this issue hijacking your system resources again.
4 Solutions to Fix “Wsappx High Disk or High CPU”
There are 4 solutions in the following content. Let’s adopt the appropriate one to troubleshoot the issue related with “wsappx disk usage”.
Solution 1: Disable Windows Store
Windows Store (also known as Microsoft Store) is a digital distribution platform sponsored by Microsoft. It started as an app store for Windows 8 and Windows Server 2012 as the primary means of distributing Universal Windows Platform (UWP) apps.

The following content displays two ways to help you disable Windows Store. One way is using Group Policy Editor option, and the other way is using Registry Editor. Pick either one of them.
Method 1: Using Group Policy Editor
The Group Policy Editor is a Windows administration tool that allows you to configure many important settings on your computer or networks. You can find this tool in Windows 7, 8, 10 and Windows Server 2003 and later.
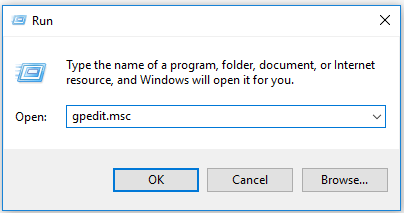
Step 1: Press Windows and R on your keyboard simultaneously.
Step 2: Type gpedit.msc in the new pop-up window, and then click OK to open the Local Group Policy Editor.
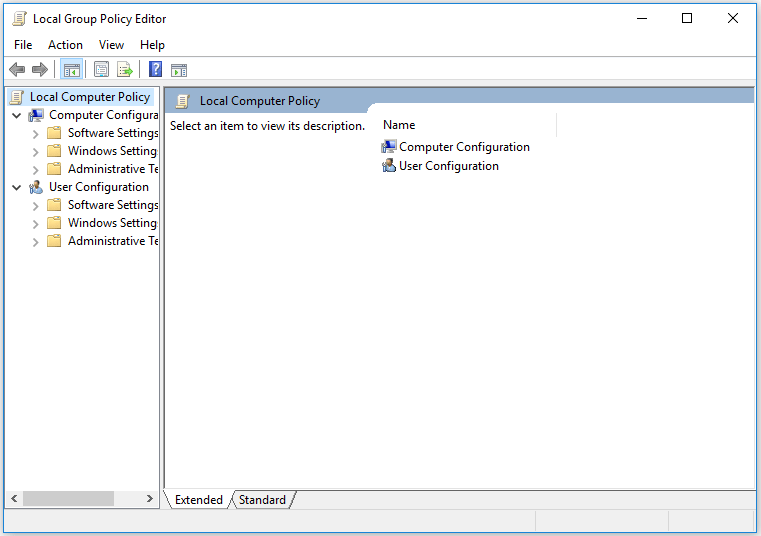
Step 3: After accessing the window of Local Group Policy Editor, click Local Computer Policy, Computer Configuration, Administrative Templates, Windows Components and Store in order.

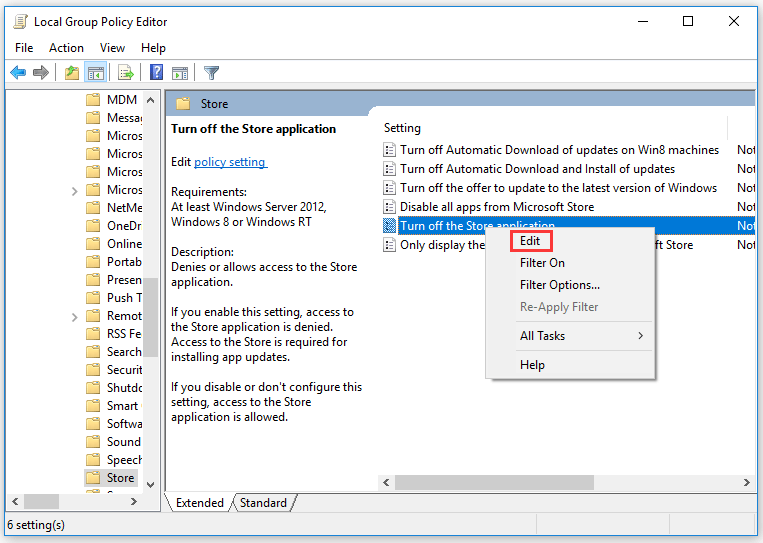
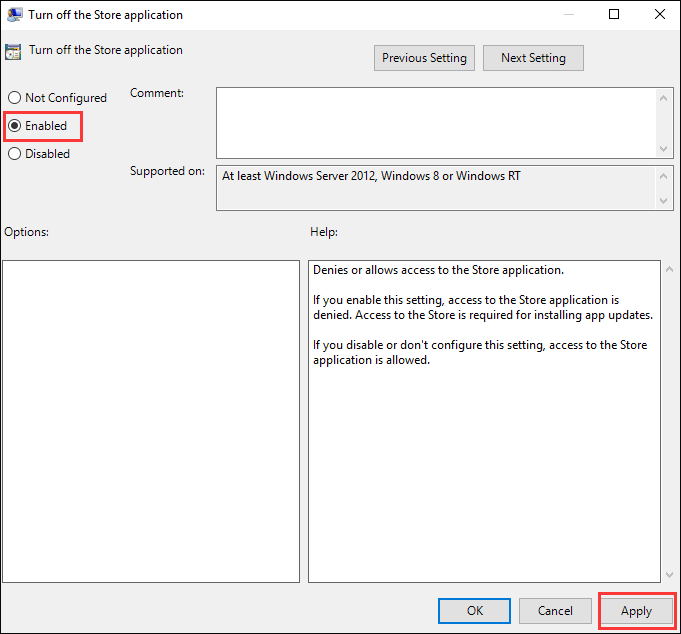
Step 4: Find Turn off the Store application among the listed options and then right-click it. Click Edit.
Step 5: Change the status to Enabled in the new “Turn off the Store application” pop-up window. Click Apply and OK to save and exit.
Step 6: After finishing the steps above, please restart your computer to check whether this effect has taken effect.
Method 2: Using Registry Editor
Almost all versions of Microsoft Windows (Windows 10/8/7/Vista/XP, etc) provide Windows Registry and the Microsoft Registry Editor programs.
If your operating system supports Registry Editor, let’s try the following method.
Here is a tutorial to access Registry Editor.
Step 1: Press Windows and R on the keyboard simultaneously in advance.
Step 2: Type regedit in the pop-up window, and then click OK to open Registry Editor.
Step 3: Double click HKEY_LOCAL_MACHINE, SOFTWARE, Policies, and Microsoft in order in the Registry Editor window.
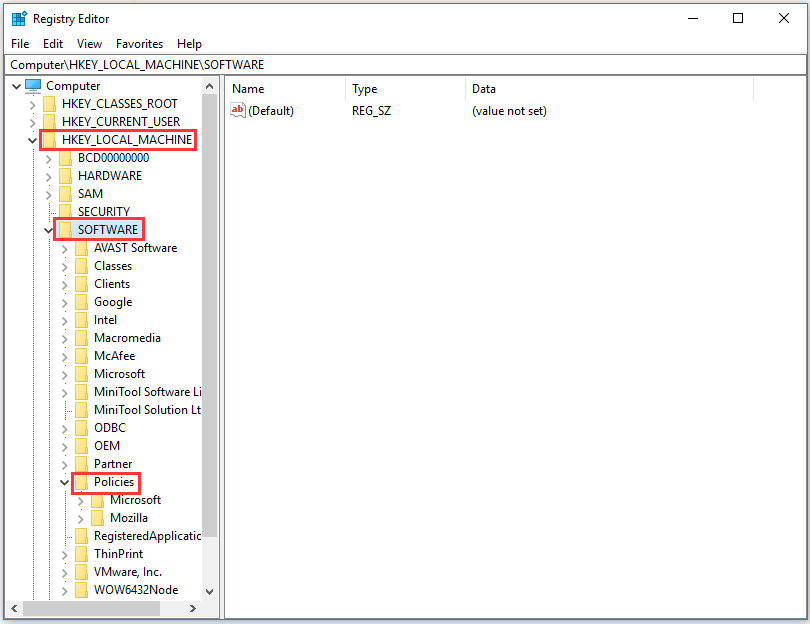
Step 4: Choose WindowsStore and right click on the right panel. Then select New and DWord (32-bit) Value.
Step 5: Create a new DWORD value within the Windows Store key and name it RemovableWindowsStore and give it the value of 1.
Step 6: Log out and then log in for the change to take effect.
When you disable Windows Store, apps installed from the third-party Windows Store cannot be installed or updated. If you try to open the Windows Store app now, the screen will show the following message:
Windows Store is not available on this PC. Contact your system administrator for more information.
If Solution 1 fails to solve the issue, there are still 3 solutions available. Therefore, do not worry, and please try the following solutions.
Solution 2: Increase Virtual Memory
There is a possibility that it could be an issue with the virtual memory of your operating system.
Virtual memory is a memory management technique implemented using both hardware and software. Although Windows 8 and 10 automatically manages it, you can still increase it easily.
When you increase the virtual memory of your operating system, running processes in the background will be easier.
Let’s increase the virtual memory for your operating system to avoid the issue of wsappx using high CPU.
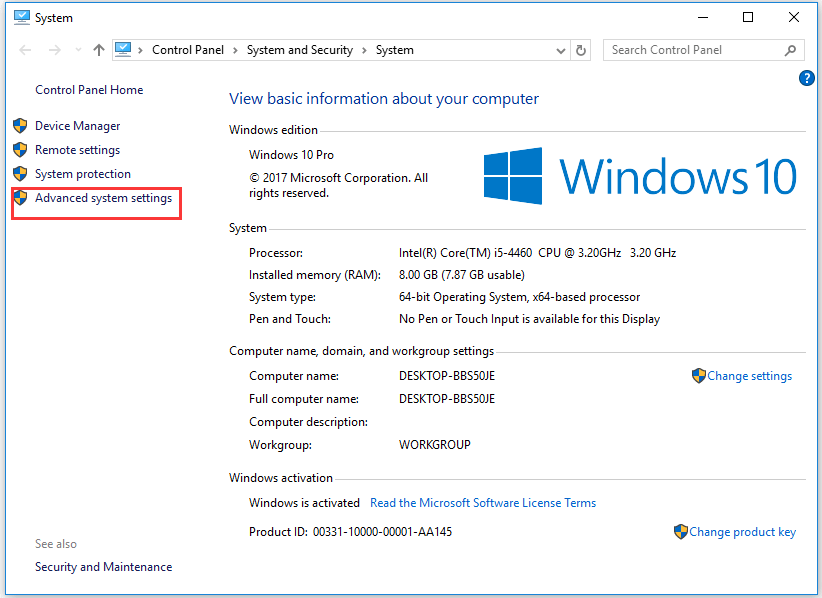
Step 1: Right click This PC on desktop and then select Properties option at the bottom.
Step 2: Click Advanced system setting among the four options in the left position of the pop-up window.
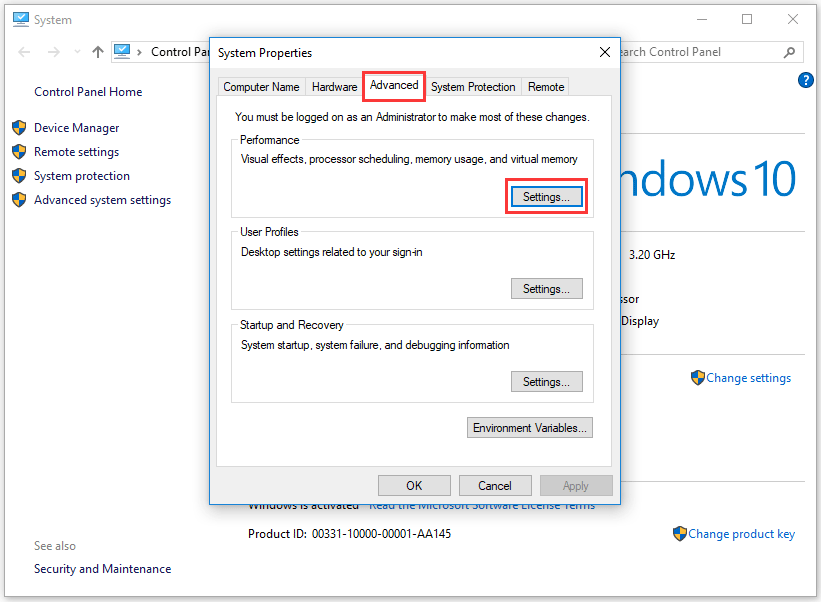
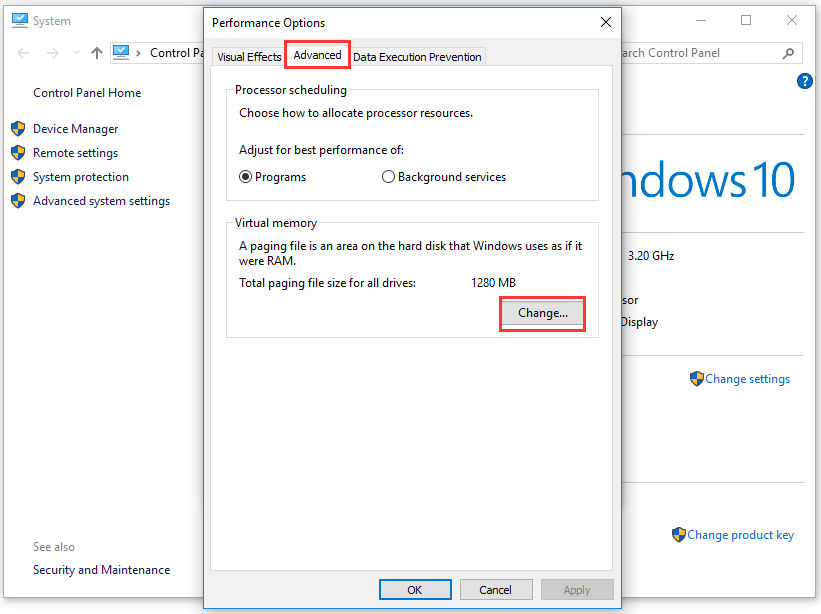
Step 3: Select Advanced option and then click Settings button belonging to Performance.
Step 4: Click Advanced option and then click the change button in the new pop-up window to resize the virtual memory.
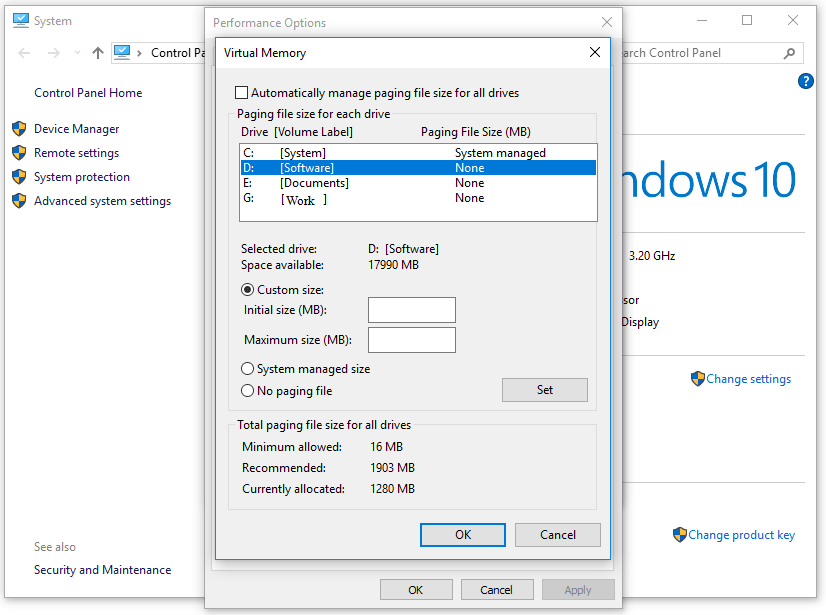
Step 5: Select the partition in advance. Then change the radio button from System Managed Size to Custom Size. Click Set after accessing Initial size (MB) and Maximum size (MB). Please make sure the unit of the number you type is MB. Finally click OK.
Step 6: After finishing the above steps, please reboot your computer again.
If this method also fails to fix the problem, please try the following solutions.
Solution 3: Check Disk and Clean up Unnecessary Files
If you always run into the issue “wsappx high CPU”, you can consider this solution. Here you can download a tool named MiniTool Partition Wizard by clicking the following button to help you solve the issue.
MiniTool Partition Wizard FreeClick to Download100%Clean & Safe
Moreover, it is highly advised that you adopt the Check File System feature embraced by MiniTool Partition Wizard. The feature aims to check and repair any mistakes or defects to ensure file integrity.
Step 1: Download MiniTool Partition Wizard Free, and then launch it to access its main interface. You will see many functions listed in the left panel and many unique functions listed at the top of the main interface.
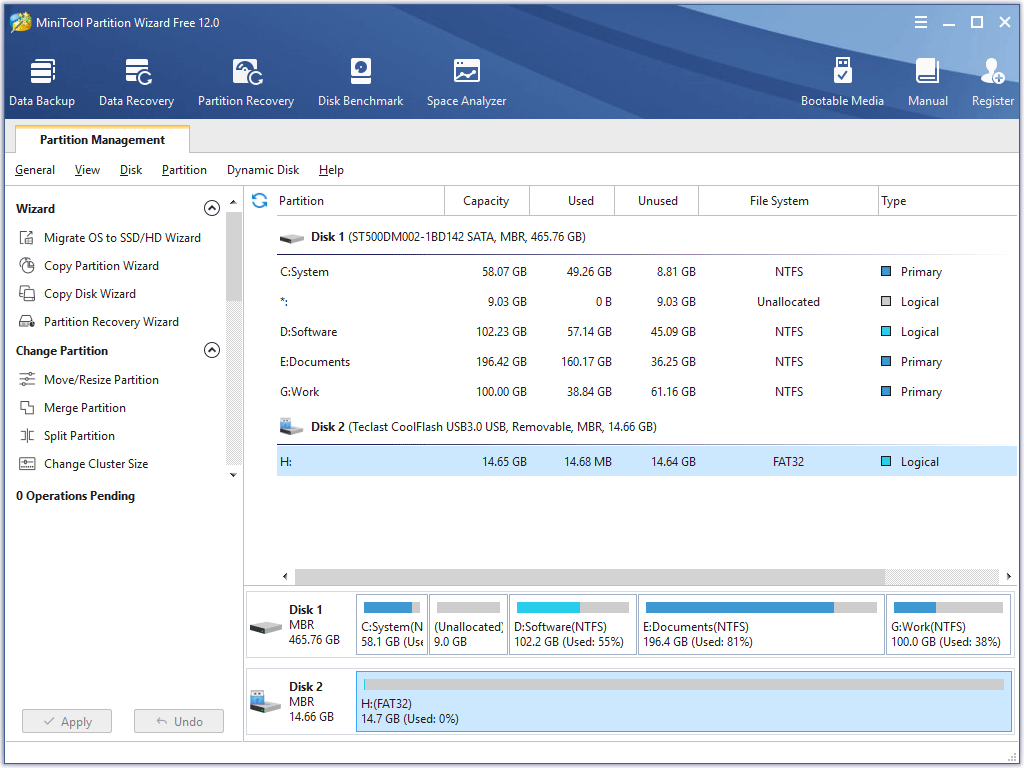
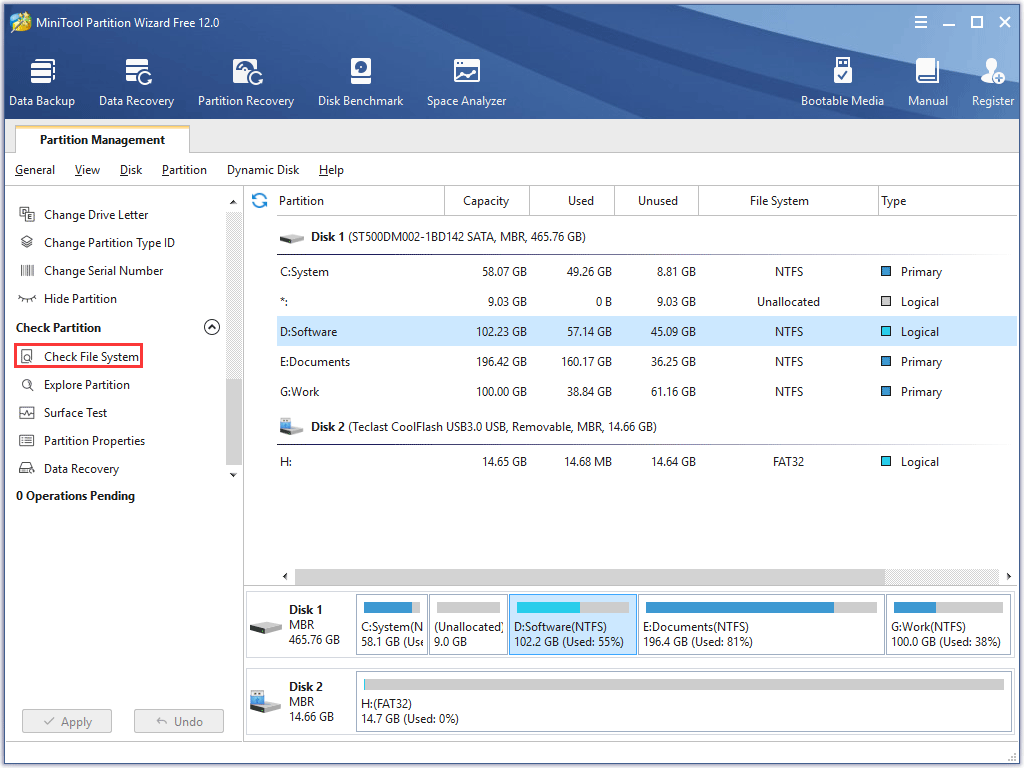
Step 2: Select the partition you want to check from Disk Map. Click Check File System from the left panel. Or right click the partition and then choose Check File System among the features.
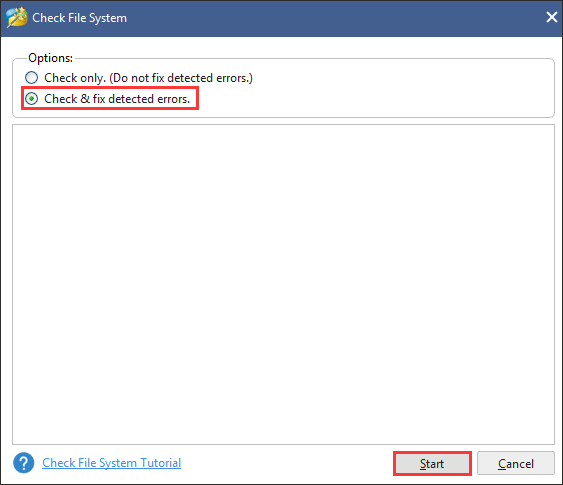
Step 3: Check the small circle next to the phrase Check & fix detected errors and then click Start button in the new pop-up window.
Step 4: Wait for the feature finishing its operation. During the working process, this feature can help you check the errors and fix them in the specified partition to ensure the integrity of the files.
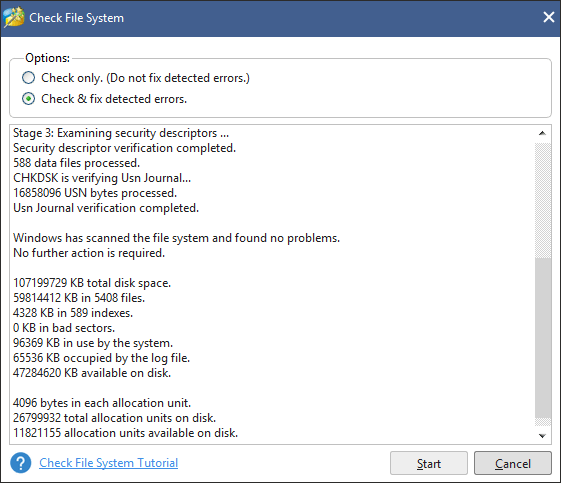
Step 5: After the checking and fixing process come to an end, exit this function.
After checking the file system, you can clean up the unnecessary files now. How to clean up the unnecessary files?
Cleaning up the unnecessary files is one way to free up space. This way you can store more data in one partition. Another way is to expand your partition.
When you complete all the steps, reboot your Windows 10. Go to Task Manager to see if the disk usage of wsappx is normal.
Solution 4: Check Virus for Your Computer
Lots of people often neglect the situation that “wsappx high disk usage” can be caused by virus or malware infection.
In the above situation, you should fully scan your system that might have antivirus. Please do it now.
When the full scan comes to an end, remove any suspicious programs from your PC. Then restart your computer to see if there is any change.
We Want Your Voice
Various situations may cause the issue “wsappx high disk”. This article offers you 4 solutions, and you can adopt them according to your own situation. Hope you can troubleshoot this issue quickly and successfully.
Now, it is your turn. If you have any question or advice, don’t hesitate to contact us via [email protected] or leave a message below this article. Thanks in advance.
User Comments :