The Microsoft Teams camera not working issue is extremely annoying. How to get rid of the issue? This post from MiniTool Partition Wizard might help you—it offers 5 solutions to the issue. So, try them one by one until the issue gets solved.
Microsoft Teams Camera Not Working
Can’t start a video conference in Microsoft Teams due to the Teams camera not working? Don’t be panic if you are facing the issue. 5 solutions are displayed below. Try them one by one until the camera works well.
Fix 1: Check If the Teams Camera Is Enabled in Windows Settings
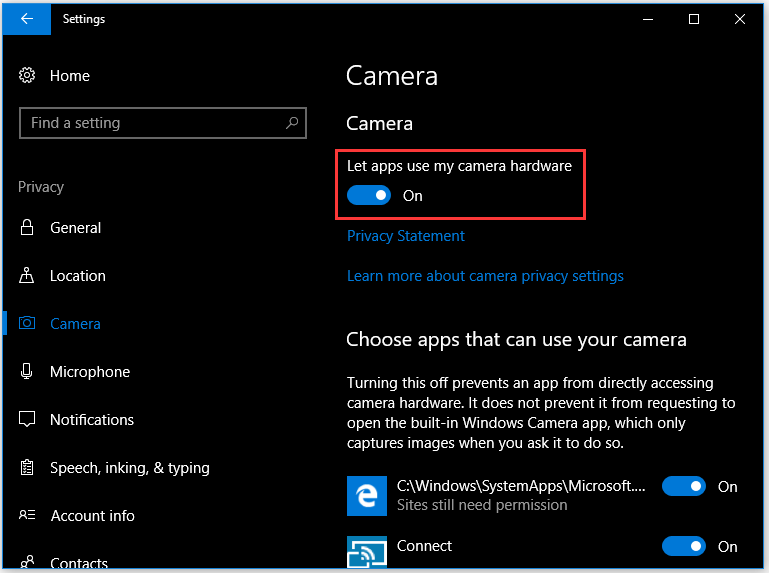
When you find Microsoft Camera greyed out or not working, you should first check if Microsoft Teams has permission for the camera. How to check? Follow the tutorial below.
Step 1: Click the Windows icon on the taskbar and then click the Settings icon.
Step 2: Click the Privacy setting on the Settings window.
Step 3: Switch to the Camera tab on the left pane of the current window and make sure the Allow apps to access your camera option or the option like Let apps use my camera hardware is enabled.
When these steps are completed, please go to Microsoft Teams and try making a video call to see if the “Microsoft Teams camera not working” issue gets troubleshoot. If the camera is still not working, try the solutions below.
Fix 2: Check If the Camera Settings Are Set Correctly
Check the camera settings are set correctly in Microsoft Teams when the Microsoft Teams camera is not working or greyed out.
Step 1: Open Microsoft Teams and then click the Profile menu.
Step 2: Choose the Settings option from the menu.
Step 3: Click the Devices option on the left side of the current window.
Step 4: On the right side of the current window, find the Camera section, and select a camera from the drop-down menu.
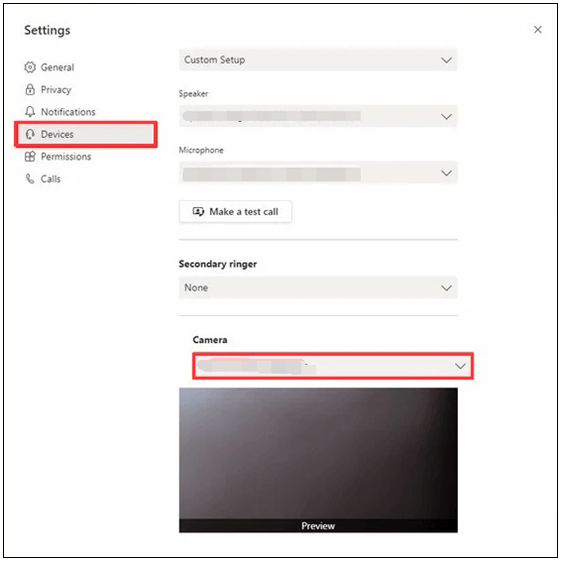
Step 5: Confirm with the preview that the selected camera is working.
Now you can try starting a video call to see if the camera works again on Microsoft Teams.
Fix 3: Update Camera Drivers
Outdated camera drivers can also lead to the “Microsoft Teams camera not working”. They can hinder the proper detection and usage of a camera in an application. So, to let Microsoft Teams can detect your camera, you can try updating your camera drivers to fix this issue.
Step 1: Click the Windows search icon, input Device Manager, and hit the Enter key.
Step 2: On the Device Manager window, expand the category like Cameras, Imaging devices, Sound, video, and game controllers.
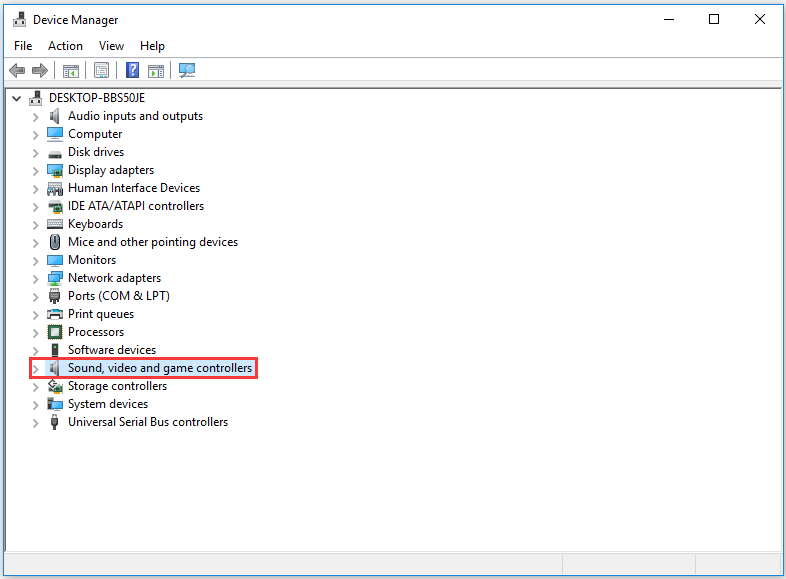
Step 3: Right-click your camera and select the Update driver option.
Step 4: Select the Search automatically for updated driver software option. Device Manager will search a new version of the driver for your camera and install it if it is available.

Fix 4: Run Hardware and Devices Troubleshooter
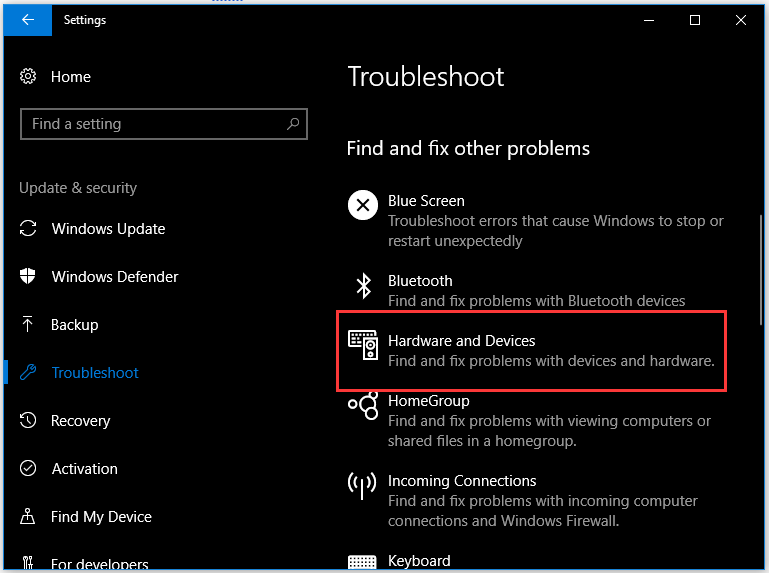
If the “Teams camera not working” issue persists, try running the Hardware and Devices troubleshooter.
Step 1: Open your Windows Settings and then choose the Update & security setting.
Step 2: Choose the Troubleshoot option on the left pane.
Step 3: Find the Hardware and Devices troubleshooter on the right pane, click it, and click the Run the troubleshooter button.
When the troubleshooter completes its task, see if the issue persists.
Fix 5: Re-register Your Camera
This solution is to initiate the system to first discard the camera device completely and then re-register it by completing all processes required to install the camera device.
So, try re-registering your camera to fix the “Microsoft Teams camera greyed out” issue. To re-register a camera, you need to run Windows PowerShell. For more details, refer to the following tutorial.
Step 1: Press Windows + X and choose Windows PowerShell (Admin) from the menu.
Step 2: Copy and paste the following command on the Windows PowerShell window and then hit the Enter key to run this command.
Get-AppxPackage -allusers Microsoft.WindowsCamera | Foreach {Add-AppxPackage -DisableDevelopmentMode -Register “$($_.InstallLocation)AppXManifest.xml”}
Step 3: When the command finishes its task, close Windows PowerShell and open Microsoft PowerShell to see if the camera works.
If all the above solutions can’t help you get rid of the issue, please try reinstalling Microsoft Teams.

User Comments :