Samsung TV Plus is a particular app that can only be applied to your Samsung TV. It delivers more than 200 channels and allows you to access various news, sports and entertainment. You can easily find desired TV shows through it. However, sometimes you may meet the “Samsung TV Plus not working” issue and cannot watch your favorite videos.
This issue is likely to appear due to the following reasons:
- Poor or unstable Internet connection
- The outdated software
- The corrupted cache data
- Incorrect device data and time
- …
What if Samsung TV Plus not working? Follow the methods offered in this tutorial.
Method 1: Check Your Internet Connection
Samsung TV Plus is an online streaming service, which means a stable and fast Internet connection is important to run it normally. Therefore, you are supposed to check your Internet connection when you see the “Samsung TV Plus Not Working” error. To learn clearly about your network situation, you can make a speed test. Usually, for streaming a video, your Internet speed should be at least 5 Mbps.
If the Internet connection is actually poor, you can try to reboot the router to improve your Internet. If the Internet connection is running perfectly, you should move on to the next solution.
Method 2: Power Cycle Your Samsung TV
Some small bugs and glitches during your starting the Samsung Smart TV may lead to the “Samsung TV Plus app not working” issue. To fix it, you can try to power cycle your Samsung TV.
Step 1: Turn off your Samsung TV and then remove its power cord from the socket.
Step 2: Wait for about 5 minutes to drain out the power of the TV. Then plug its power cord back in.
Step 3: Turn on your TV and check if the issue is fixed. If not, press and hold the Power button on your TV remote until the Samsung logo appears on the TV screen.
After that, the “Samsung TV Plus not working” issue might be resolved.
Method 3: Correct the Date and Time On TV
If the date and time shown on your Samsung TV are incorrect, the “Samsung TV Plus not working” issue might also occur. In this case, you need to modify the date and time.
Step 1: Press the Settings button on your remote and then select General on the TV screen.
Step 2: Go to System manager > Time > Clock > Clock Mode > Manual. Now you can set the correct date and time.
After you change the date and time successfully, go to check if the error is removed. If not, continue with the next way.
Method 4: Clear the TV Cache Data
Sometimes the “Samsung TV Plus not showing” issue is likely to show up if the cache data on Samsung TV get corrupted. You can try to clear the TV cache to repair the issue.
Step 1: Press the Home button on your remote and select Settings on the Samsung TV screen.
Step 2: Go to Support > Self Diagnosis > TV Device Manager.
Step 3: On this screen, you will see three sections – Memory Boost, Clean Running Apps, and Manage Storage. You can try to perform them one by one to clear the TV cache completely.
Once you finish clearing the cache, the “Samsung TV Plus app not working” issue might have been fixed and you can watch the TV shows you like normally.
Method 5: Update the Samsung TV Plus App
An outdated version of the Samsung TV Plus application is a possible reason for the “Samsung TV Plus Not Working” issue. On this occasion, you need to update Samsung TV Plus to the latest version.
Step 1: Press the Smart Hub button on your remote.
Step 2: Go to Featured > Samsung TV Plus. If there are any updates available, you will see a small white arrow indicating on the application.
Step 3: Press and hold the Enter button until a submenu appears on the TV screen. You are supposed to select Update apps.
Step 4: In the next screen, click Select All and then Update to start the updates.
Step 5: Wait until the updates are completed. Then restart your Smart TV to check if the “Samsung TV Plus not showing” issue is resolved.
Method 6: Update Samsung TV Software
If the “Samsung TV Plus app not working” issue persists after you update the application, the problem might happen due to outdated Samsung TV firmware. Therefore, you should update the Samsung TV software as well.
Tip: If your Samsung TV has been updated to the latest version already, you should skip to the next solution.
Usually, the Samsung TV software will update automatically if the TV is connected to the Internet or you have agreed to Smart Hub Terms and Conditions in the initial setup. However, sometimes, the automatic update may not run properly and you must seek other ways.
There are two methods for you to update the TV software manually.
Update Samsung TV Software in Settings
When your Samsung TV is connected to a stable Internet, you can update the TV through Settings in your smart TV.
Step 1: Press the Home button on your remote and then hit the Settings icon on your TV screen.
Step 2: Navigate to Support > Software Update.
Step 3: Finally, select the Update Now option. The updates will be downloaded and installed automatically if there are any available.
Note: Remember not to turn off your Samsung TV unless the process finishes.
Update Samsung TV Software with a USB Flash Drive
If your Samsung TV cannot be connected to the Internet, you are supposed to update the TV with a USB flash drive. To execute the process, follow the three stages below.
Stage 1: Prepare a USB Drive Formatted to FAT32
To update Samsung TV software, you have to prepare a compatible USB drive so that the Samsung TV can recognize it. Generally, the QLED and SUHD TV support a USB flash drive whose file system is FAT, exFAT, or NTFS; while the HD TV supports USB flash drives with FAT16 and FAT32 file systems.
As we can see, FAT32 is supported by almost all kinds of Samsung smart TV. So, you’d better use a USB drive formatted to FAT32.
Here, to format the USB drive without any unexpected errors, you are recommended to use MiniTool Partition Wizard. It is a comprehensive third-party partition manager that can help you manage your disks better in many ways such as extending partition, coping disk, migrating OS to SSD/HD, and so on.
Step 1: Connect the USB flash drive to a Windows PC.
Step 2: Download and install MiniTool Partition Wizard. Then launch it to enter its main interface.
MiniTool Partition Wizard FreeClick to Download100%Clean & Safe
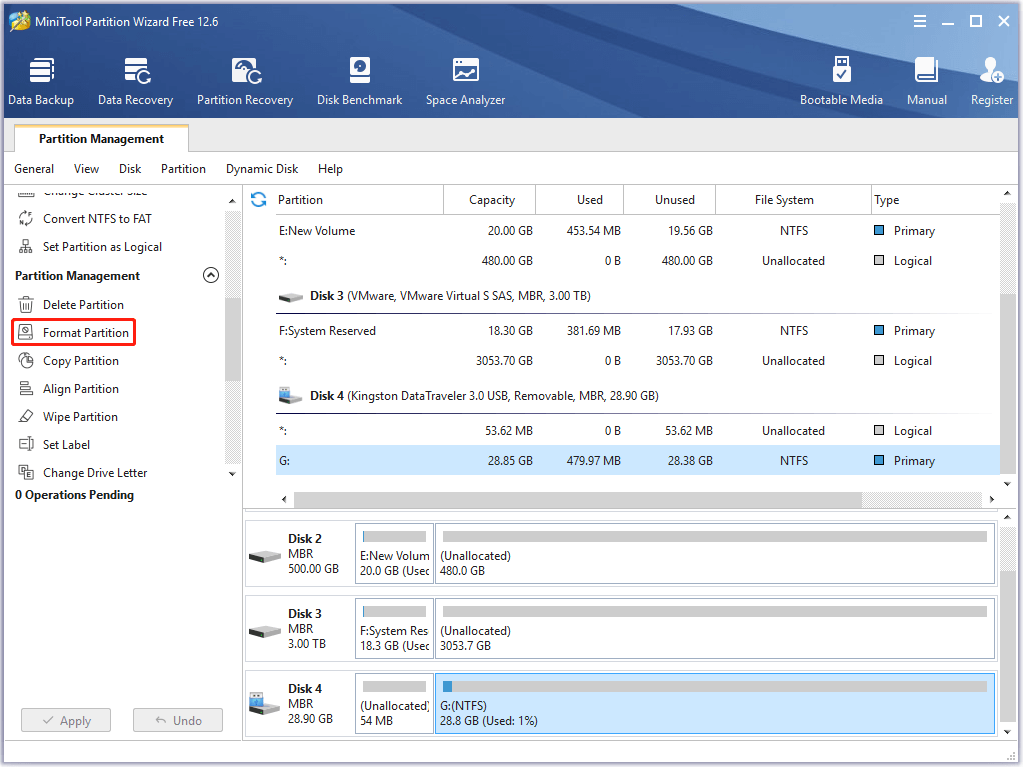
Step 3: Select the partition on the USB disk you prepared and then choose Format Partition from the left action panel.
Note: This operation will delete all the data on the USB drive. Therefore, you should make a backup first to avoid data loss.
Step 4: In the pop-up window, select FAT32 as its file system type and then click OK.
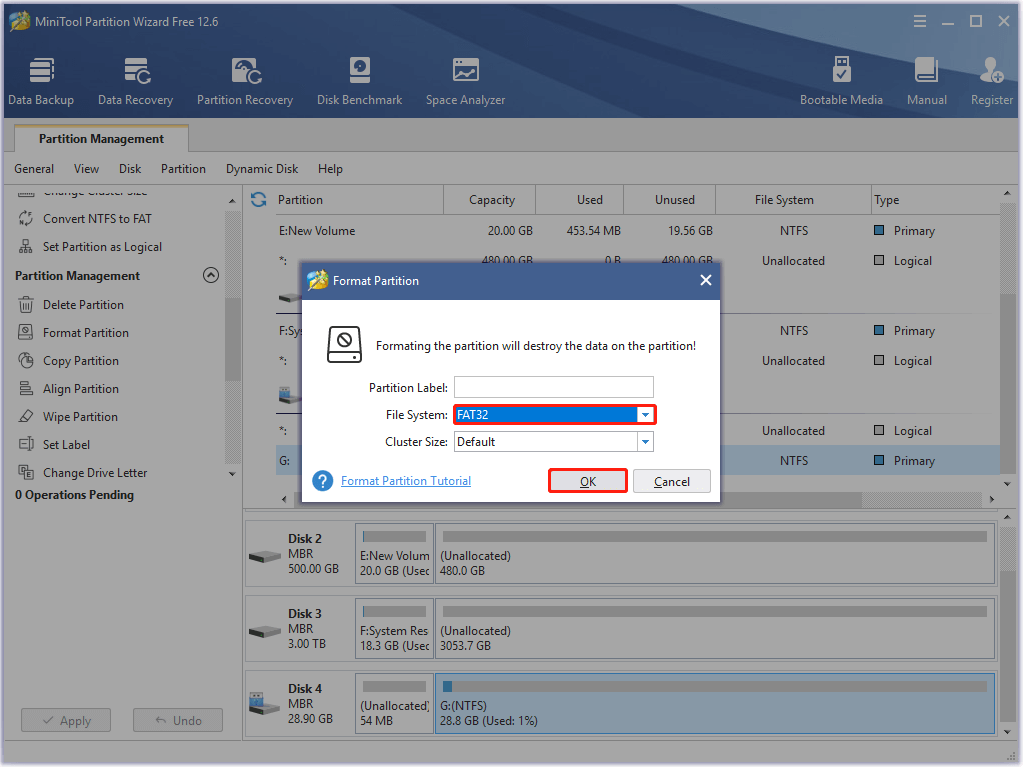
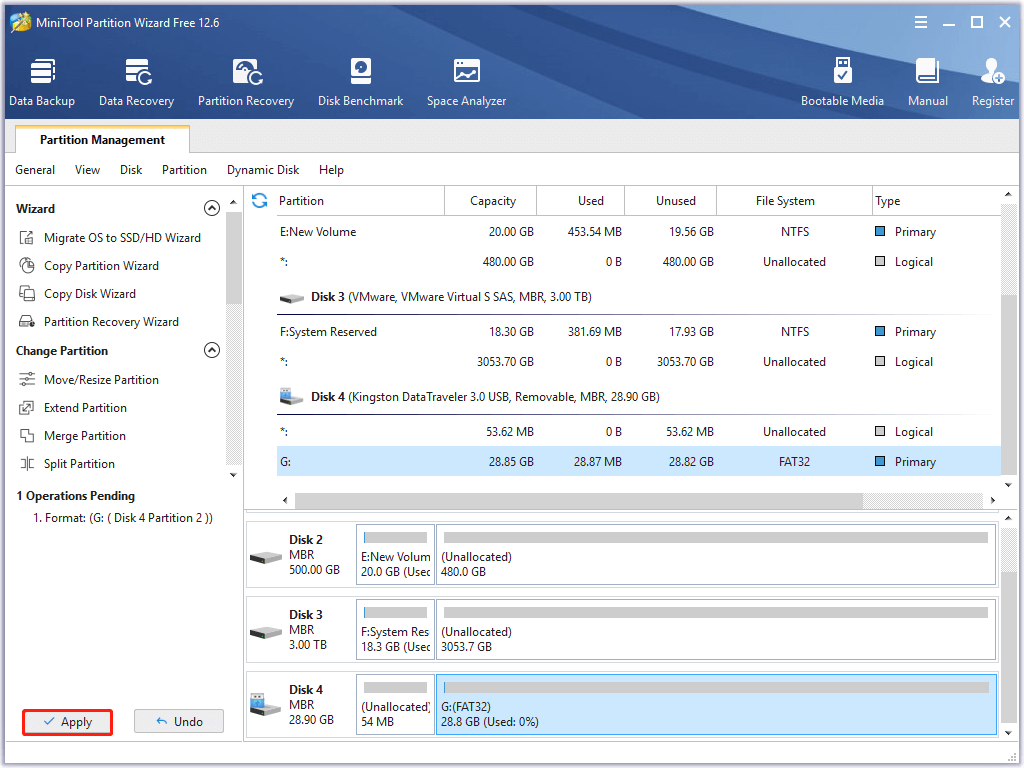
Step 5: Finally, click Apply to execute the operation.
Stage 2: Download the Latest Update Files and Unzip Them
After you format the USB flash drive to FAT32, you can start to download the software updates.
Step 1: To download the correct update files, you need to visit the Samsung Download Center.
Step 2: Type your TV’s model number in the search bar and press Enter to access the specific support page for your TV.
Tip: To find the model number of your TV, you can have a look at the back of your TV or go to Settings > Support > About TV/Contact Samsung on your TV screen.
Step 3: Under the Firmware section, find the latest update for your TV, and then click Download beside the update to begin the process.
Step 4: After the files are downloaded successfully, you need to unzip them and copy the folder that includes the unzipped firmware files to the USB drive.
Note: Do not place the folder inside any other folders, or the Samsung TV can’t find it.
Step 5: Remove the USB disk from your computer.
Stage 3: Install the Firmware Files on Your TV
Once you save the update files on the USB drive, you can continue to install the latest firmware on your Samsung TV.
Step 1: Connect the USB drive with firmware files to your smart TV.
Step 2: Press the Home button on your remote and then select Settings.
Step 3: Go to Support > Software Update > Update Now. Then select Yes.
Step 4: Finally, select the USB option. Your TV will search the USB drive for the firmware files. Just follow the on-screen instructions to install the updated software. Wait patiently and do not turn off your TV until the process is completed.
Step 5: Once the update is finished, your Samsung TV will restart automatically. You can see if the “Samsung TV Plus not working” issue disappears.
Method 7: Factory Reset Your Samsung TV
If all of the above methods don’t resolve the “Samsung TV Plus not working” issue, then you may need to perform a factory reset on your Samsung TV.
Step 1: Press the Home button on your remote and select Settings on the TV screen.
Step 2: Navigate to Support > Device Care > Self Diagnosis.
Step 3: In this menu, select Reset and enter the default reset PIN 0000. Then click Yes to carry out the reset.
Step 4: Your TV will restart after the reset. You need to set up your Smart Hub and go to check if the Samsung TV Plus app can run normally.
Bottom Line
The “Samsung TV Plus not working” issue probably appears from time to time. But you don’t need to worry about it. You can try these methods offered in this post to solve the issue. If you have any other problems with the issue, please leave a message in our comment part below.
In addition, if you have difficulty using MiniTool Partition Wizard, you can contact us via [email protected].
User Comments :