Roku TVs feature a large screen on which watching movies or playing games could be more fun and enjoyable. This post shows you how to complete “Roku screen mirroring Windows 10” step by step. By the way, if you need a professional disk manager, you can try MiniTool Partition Wizard.
How to complete “Roku screen mirroring Windows 10”? Generally, there are two steps: 1). Check if your devices support Miracast; 2). Cast your Windows 10 PC screen to Roku using Miracast. Scroll know to learn more details.
Step 1: Check If Your Devices Support Miracast
Screen mirroring from Windows 10 to Roku is done by Miracast.
What is Miracast? Miracast is a standard technology for wireless connections. This technology has been adopted by many device manufacturers including Microsoft and Roku.
Microsoft applied this technology to Windows 8.1 and Windows 10. Most current generation Roku TVs support this technology but Roku Express and Roku Express+ are not included.
So, to ensure the casting process goes smoothly, you need to check whether your Windows 10 PC and Roku TV support Miracast.
Check If Your Roku TV Supports Miracast
Go to the path Settings > System > About to check your Roku TV version.
If your Roku TV supports screen mirroring and is running Roku OS 7.7 or later, the Miracast is enabled automatically and you do not need to enable it.
If your Roku TV is running an earlier system, you should manually enable this feature:
- Go into your Roku’s Settings.
- Select the System option on the Settings screen.
- Select the Screen mirroring option and then select the Enable screen mirroring option on the right side of the TV screen.
Check If Your Windows 10 PC Supports Miracast
There are three ways to check if your Windows 10 supports Miracast. Each of them is easy.
Way 1: using the Windows + P shortcut key
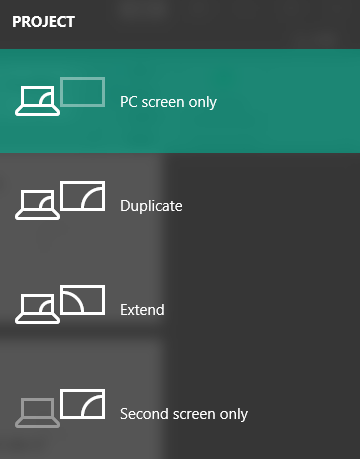
Press Windows + P simultaneously. You will see a pop-up window appearing on the right side of your computer screen.
If you see a window like the following screen, it means your computer does support Miracast.
If you see the message “Your PC can’t project to another screen. Try reinstalling the driver or using a different video card”, it means the Miracast feature is unavailable.
Way 2: checking display settings
- Press Windows + X and choose the Settings option from the menu.
- Select the System option on the Settings window.
- Select the Display option from the left.
- Scroll down the right side and see if there is an option named Connect to a wireless display under the Multiple displays section.
If you see the option, it means Miracast is available on your Windows 10 computer.
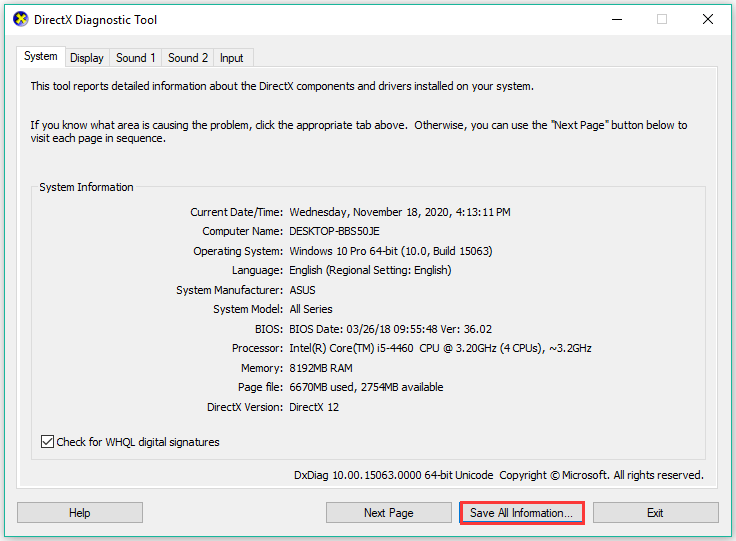
Way 3: using DxDiag
Step 1: Press Windows + R to call out the Run window.
Step 2: Input dxdiag in the Run windows and then click OK.
Step 3: The DirectX Diagnostic Tool window will open. Click the Save All Information… button on the window and then save it file on your desktop or other location.
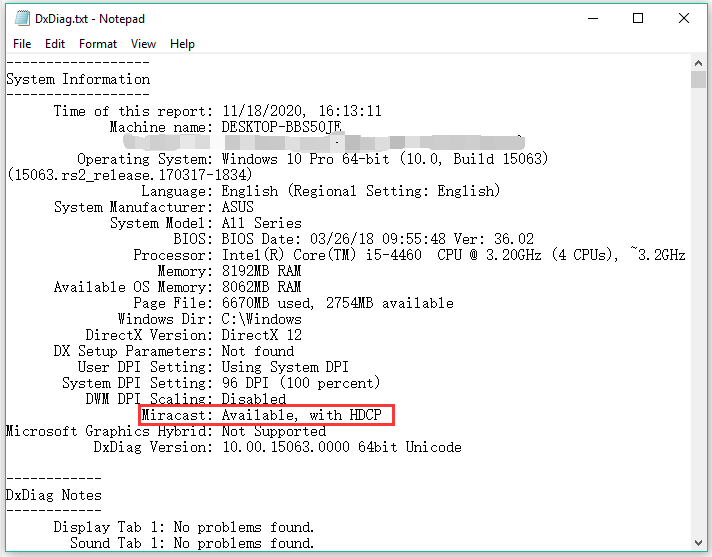
Step 4: Open the DxDiag text file and see if Miracast is available.

Step 2: Cast Your Windows 10 Screen to Roku
Steps to complete “Roku screen mirroring Windows 10”:
- Click the Action Center on your computer taskbar.
- Click the Project section.
- Select Connect to a wireless display.
- Select your Roku.
Once connected, your Windows 10 computer should be cast to your Roku TV.
User Comments :