Have you ever encountered the “Premiere Pro not exporting” issue on your PC when you try exporting video from Premiere Pro? You don’t need to worry if you are encountering this issue. This post from MiniTool Partition Wizard provides some useful solutions to this issue.
What Causes the Premiere Pro Not Exporting Issue?
Adobe Premiere Pro is a popular video editing application developed by Adobe Inc. People can use it to edit and export videos. However, some of the users encounter the Premiere Pro not exporting issue when they want to export a video.
The Premiere Pro not exporting issue can be caused by multiple factors. Here are some of the most common reasons:
- There isn’t enough storage on your PC.
- Adobe Premiere Pro is outdated.
- There are some temporary errors in your operating system or software.
- There is a problem with the format of the video codec.
- There are some permission issues.
- The Premiere Pro project file name may be occupied by other programs on your PC.
- Your source files are incompatible with Adobe Premiere Pro.
- The video you want to export is too big.
- There may be some corrupted files in Premiere Pro’s cache.
![[Full Guide] How to Fix Windows Update Error 8024400E?](https://images.minitool.com/partitionwizard.com/images/uploads/2022/11/windows-update-error-8024400e-thumbnail.png)
How to Fix the Premiere Pro Not Exporting Issue?
After searching for this error on the Internet, we found these potential methods that may help you fix the “Premiere Pro not exporting” error successfully. You can try these methods to fix the error on your own.
Method 1. Close All Programs or Restart Your PC
When you use Premier Pro to export your video, you need to make sure there are sufficient system resources available. Otherwise, the exporting process may be interrupted by another program. Therefore, closing all other programs may solve the issue. Here is the guide:
- Press the Esc + Shift + Ctrl keys simultaneously to open the Task Manager window.
- Select the programs that you want to close, and then click the End task button on the right-bottom.
- Close other programs as described above. Once all other programs have closed, check if the issue has been fixed.
If you don’t know which programs are supposed to be closed, you can try restarting your PC to fix this Premiere Pro not exporting issue. When you restart the device, the temporary memory is cleared and all the running applications are closed. Once done, many errors may be cleared, and you can check if the issue is fixed. If not, try other ways below.
Method 2. Update Premiere Pro to the Latest Version
If Adobe Premiere Pro is outdated on your PC, you may encounter the Premiere Pro not exporting issue easily. In this case, you can try updating Adobe Premiere Pro to the latest version to fix this error. To do that, you can follow this guide:
- Launch Premiere Pro on your PC.
- Go to Help > Update, and then you can check for and install any available updates for Premiere Pro.
- If there are available updates, click the Update button.
- Once the update is installed, the system may remind you to relaunch Adobe Premiere Pro.
Method 3. Check the Format of Your Source Files
If your source files are not incompatible with Adobe Premiere Pro, you may encounter issues when exporting the video, such as the Adobe Premiere Pro not exporting issue.
If your source file format is incompatible with Adobe Premiere Pro, you can try using a video converter to convert it to a format that is supported by Adobe Premiere Pro, such as .MP4 or .MOV.

Method 4. Check Media for File Corruption
Please make sure there is not any corruption in your media. If there are any corrupted frames or tracks in the entire project, you may also encounter the Adobe Premiere not exporting issue. In this case, you can do these steps to fix this issue:
- Disable all tracks but one and try to export the video.
- Do this for all the tracks until you encounter the exporting issue again.
- Once the corrupted frame is found, delete the problematic frame or track, and use a different name to save your project.
- Create a new project and open the problematic frame or track here, and then save it with a new name.
- Next, open the exported video and insert the newly saved file that includes the corrupted frame or track into it.
- Try exporting the whole video again, and then the issue may be fixed.
Method 5. Check Your Export Settings
If the export setting doesn’t suit the format of the video that you try to export, you may encounter exporting issues, too. In this situation, you need to double-check your export settings again and make sure they are in accordance with your video’s format.
For example, if you try to export a 4K video, please make sure to set the export settings not as a 1080 video but as exporting a 4K video.

Method 6. Check for Folder Permissions
Some folders may don’t allow you to store data in them. If the folder that you want to export videos to is in such case, you may also encounter the Adobe Premiere not exporting issue. Then, you can solve the issue by adding your account to the folder permission. Here is the guide:
- Go to the folder location where the exports are saved.
- Right-click the folder and select Properties.
- Go to the Security tab and click the Edit button.
- Under the “Group or user names” section, look for your username. If you don’t find it, click the Add button.
- Enter your username, and click Check Names. Then click OK to add it.
- Then select your user name, and then check all the Allow boxes under the Permissions for Users section.
- Click Apply and then click OK to save the changes.
If you want to get a more detailed guide about this, you can also read this post: How To Take Ownership Of Folder In Windows 10 By Yourself.
Method 7. Change the Rendering Optimization Preferences
In Adobe Premiere Pro, many settings may affect the video exporting process, like the render optimization preferences. So, you can also try changing the rendering optimization preferences option to fix the Adobe Premiere Pro not exporting issue. Here’s the tutorial:
- Open Adobe Premiere Pro on your PC.
- Go to the Edit tab, and then select the Preferences option from the menu.
- Select Memory from the context menu.
- Next, click OK, and then restart the project.
- Once done, check if this method works.

Method 8. Copy Timeline into the New Sequence
Some users who encountered the Premiere Pro not exporting issue reported that they fixed this issue successfully by copying the timeline into the new sequence. You can also have a try. Here’s how to do it:
- Create a new sequence in the same project.
- Then copy the timeline from the previous sequence and paste it into the new sequence.
- Next, save it. Then check if the Premiere Pro not exporting issue is fixed.
Method 9. Change Codec Format
If there is a problem with the format of the video codec, you may also encounter different errors. It is also one of the main reasons why the “Premiere Pro not export” issue occurs. So, you can try changing the format of the video codec to fix the issue. To do that, you can follow this guide:
- Launch Adobe Premiere Pro.
- Go to File > Export.
- Click the Menu button, and select Quick Time or None from the format menu.
- Under Video Codec, select Photo and JPEG from the drop-down menu.
- Try to export again and check if the error is fixed.
Method 10. Clear Cache
The corrupted files in the Premiere Pro cache can also cause the Premiere Pro not exporting issue. In this situation, you can try clearing the cache to remove any old junk files and potentially corrupted data. Here’s the guide:
- Launch Adobe Premiere Pro.
- Then go to Edit > Preferences > Media Cache.
- Click the Delete button under the Media Cache Files section.
- Confirm to execute the operation and restart your PC.
Method 11. Split File
If the video that you want to export is too big, you may encounter various issues, like the Premiere Pro not exporting issue. In this situation, you can try splitting your file into smaller sections and trying exporting again. This may avoid some of the exporting issues.

Method 12. Add Storage Space
If the storage space of the drive on which you install Adobe Premiere Pro is not sufficient, the “Premiere Pro not exporting” error may also occur.
So, you can try getting more free space on your disk to fix this error. To do that, you can use MiniTool Partition Wizard’s Space Analyzer or Extend Partition feature. Here’s the tutorial:
Use Space Analyzer
Step 1. Download and launch the MiniTool Partition Wizard on your computer.
MiniTool Partition Wizard FreeClick to Download100%Clean & Safe
Step 2. Select the Space Analyzer feature on the top toolbar.
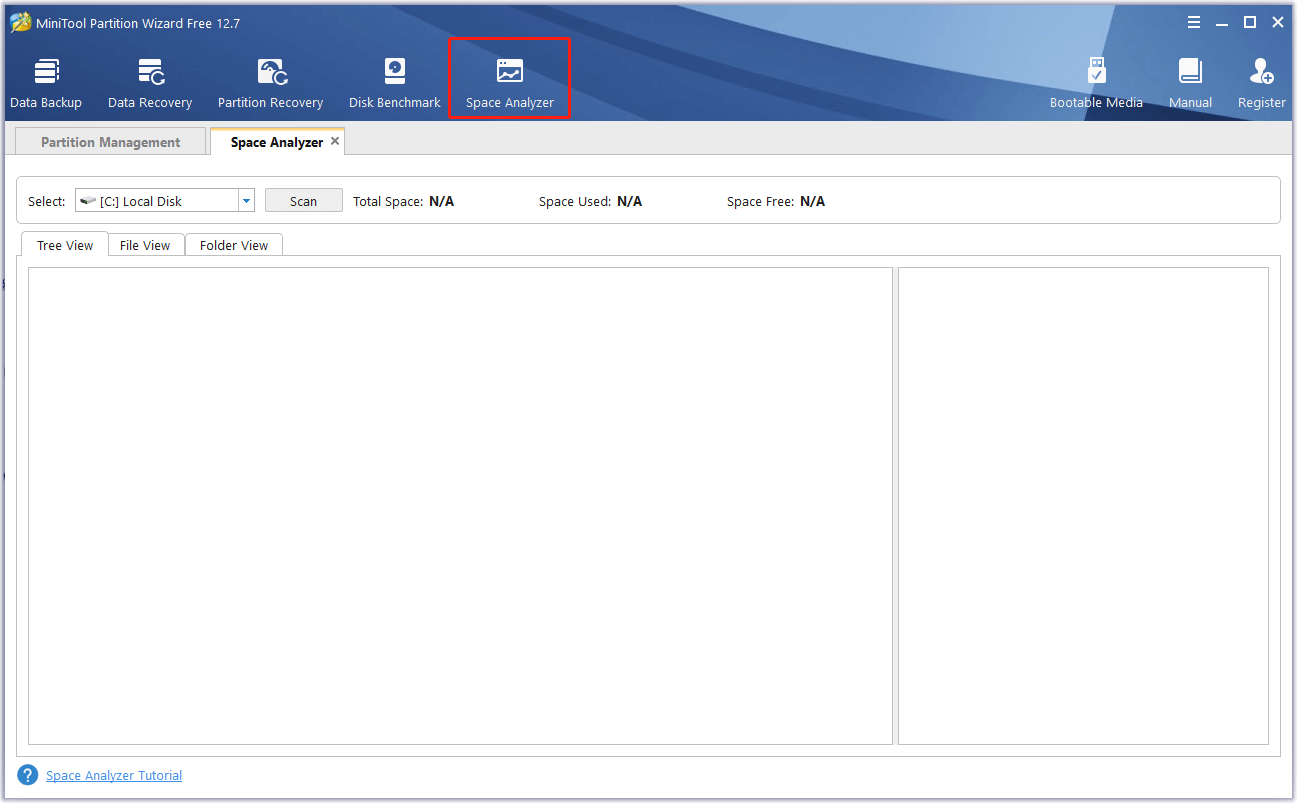
Step 3. Choose a partition or a folder from the drop-down menu, and then click Scan. Once completed, the page will display all files on the selected partition. You can check them in three ways: Tree View, File View, and Folder View.

Step 4. Right-click the file that you don’t want to keep, and then select either Delete (to Recycle Bin) or Delete (Permanently) according to your needs.
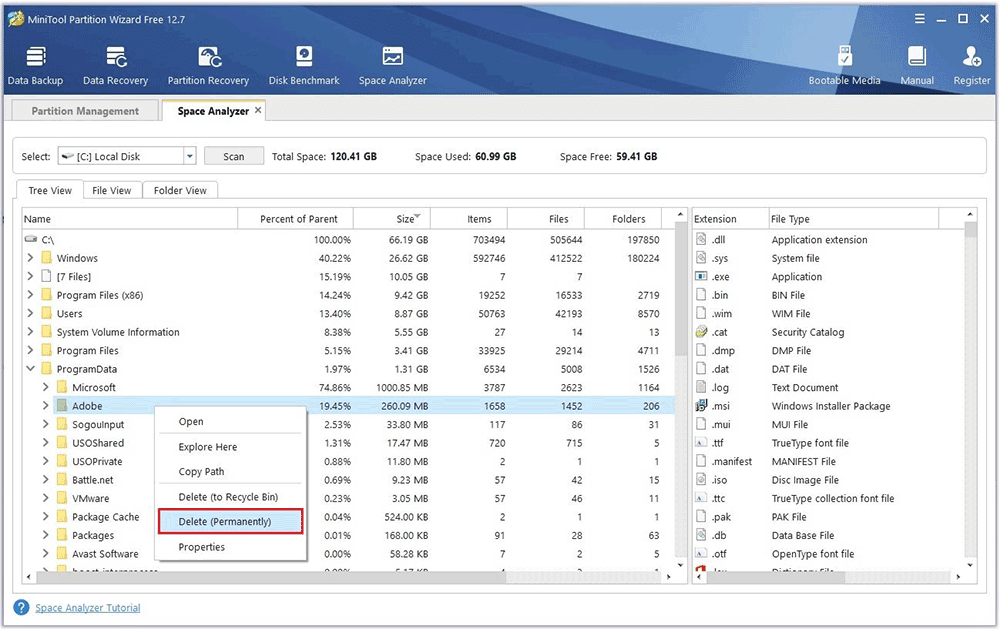
Step 5. Once you delete all the files you don’t want, you can get more free space on your drive.
Use Extend Partition
Step 1. Launch MiniTool Partition Wizard on your computer.
MiniTool Partition Wizard FreeClick to Download100%Clean & Safe
Step 2. Select the partition you want to enlarge, and then click Extend Partition from the left panel.
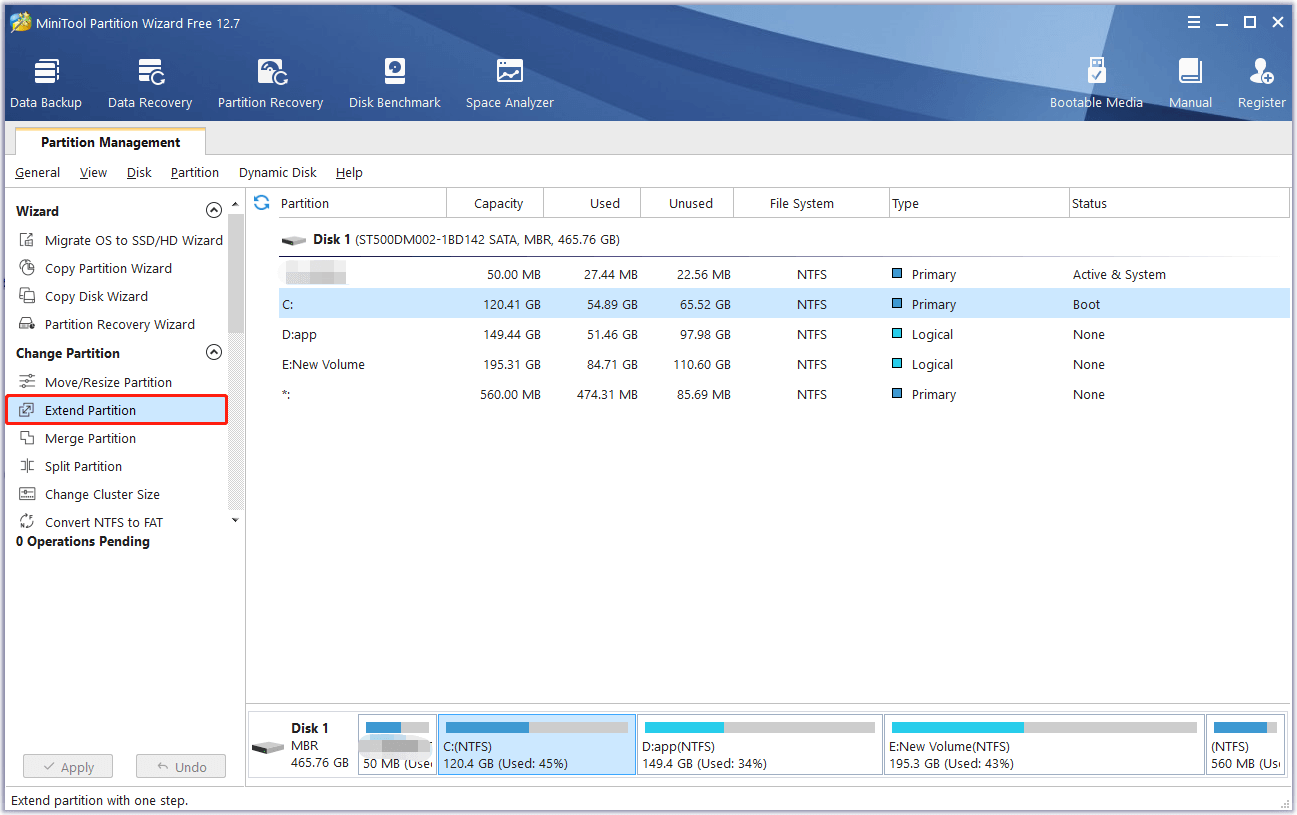
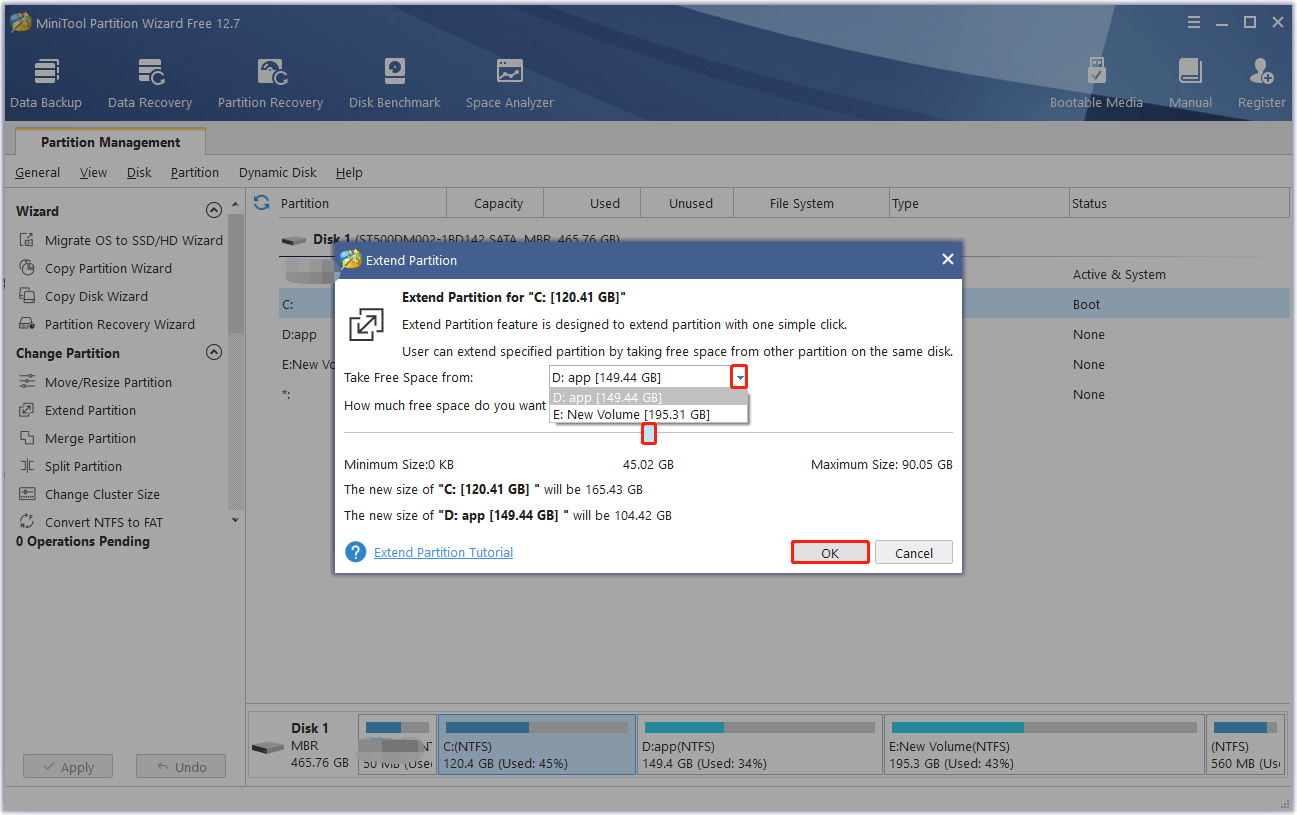
Step 3. In the Extend Partition window, click the down arrow icon, and then select the partition from which you want to take free space. Next, drag the blue block to decide how much space you want to take. Once done, click the OK button.
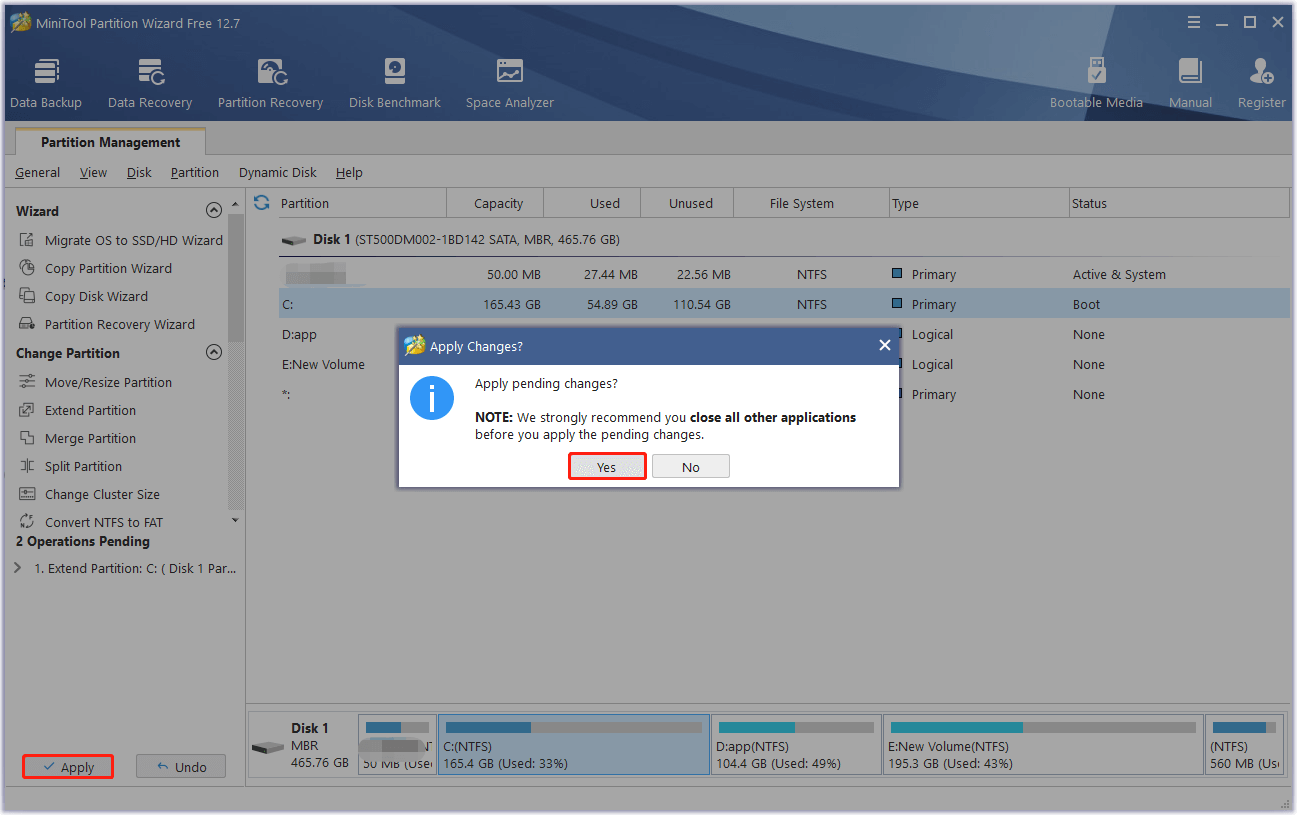
Step 4. Then click the Apply button and then click the Yes button to apply the pending changes.
Step 5. Once done, you can increase the drive’s free space successfully.
If the disk on which you install Premiere Pro and save its caches doesn’t have sufficient storage space for you to extend, you can choose to move Premiere Pro and its files to a bigger drive on another disk. This may help you fix the “Premiere not exporting” issue.
Bottom Line
After reading this post, you can know how to fix the “Premiere Pro not exporting” issue. You can try these methods to fix it on your own.
Do you know other methods to solve this issue? Please share your ideas or experiences with us in the following comment zone. In addition, if you encounter problems while using MiniTool Partition Wizard, please contact us via [email protected]. We will get back to you as soon as possible.
About The Author

Position: Columnist
Charlotte is a technology columnist with a strong focus on the Windows operating system, specializing in disk management, backup, and data recovery. She is passionate about analyzing computer errors, identifying root causes, and delivering practical solutions. In her free time, she stays updated on the latest developments in computer systems and hardware while continuously learning new technologies to broaden her expertise. Her writing style is clear and easy to understand, making complex technical topics accessible even to users with limited computer knowledge.
User Comments :