Like the motherboard, Power Supply Unit (PSU) is also a component connecting to almost all other PC parts. This post from MiniTool Partition Wizard shows you how to install a power supply step by step.
Learn to Distinguish the PSU Connectors/Cables
Before you install a power supply, you need to know what PSU your need. If the PSU is not suitable, your PC won’t boot even if the PSU is installed correctly. After getting the proper PSU, you can then install it.
In general, a PSU will use the following connectors/cables to connect the PC parts.
#1. The ATX 20/20+4 Pin Connector/Cable Motherboard is used for connecting power supply to motherboard.
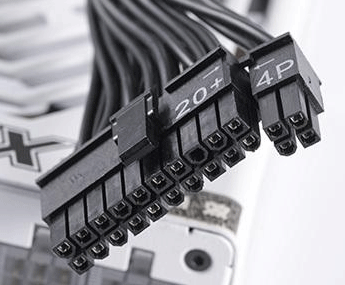
#2. The ATX 12V 4 Pin or the EPS/ATX 12V 4+4 Pin Connector/Cable is used to connect the CPU.

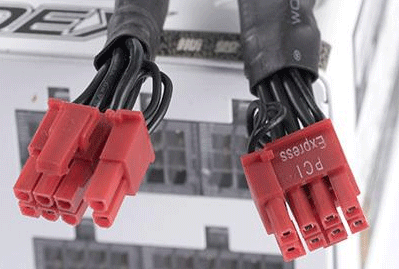
#3. The PCIe 6/6+2/6+6/12+4 Pin Connector/Cable is used to connect the GPU.
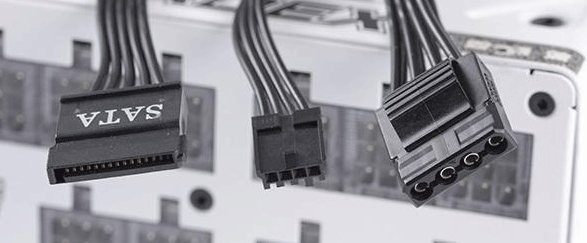
#4. The SATA connector (left) is used to connect the SATA hard drive. The floppy connector (middle) is used to connect the floppy drive, but many PSUs have removed this connector. The Molex/D4Pin connector (right) is used to connect PC fans and other peripheral devices.
![How to Check What Power Supply I Have [2 Ways]](https://images.minitool.com/partitionwizard.com/images/uploads/2022/12/how-to-check-what-power-supply-i-have-thumbnail.png)
How to Install a Power Supply
Now that you have learned what cable is used to connect what PC parts, you can install the PSU easily. Follow the guide below:
- Straighten out all the power cords first to avoid any tangles and knots.
- Connect the needed cables to the PSU. The CPU and GPU cables are necessary. You may also need one or more SATA power cables. The CPU radiator and RGB usually don’t need to be connected to PSU. Other PC fans may need the D4Pin cables.
- Fasten the PSU to the PSU bay, which is usually at the back, at the top (for cheap or old cases), or on the floor of the case. You just need to slide it into the case’s PSU bay with the PSU fan facing downwards and then secure the PSU in place with the case’s included screws. Sometimes, you may need to remove a plate at the rear to slide in the PSU.
- Connect the other end of the cables to other PC parts. You need to avoid crisscrossing the cables with the help of routing holes around the motherboard tray. This will help you organize them later. The motherboard connector should be on the board’s right edge, the CPU connector should be at the top-left of the mobo. The SATA connector is plugged into SATA drives directly.
- Tidy up the PSU cables. You can usually stuff most of the cable bulk next to the PSU, or use the cable ties or even the cases’ built-in straps to keep the rest of the cables tight and compact. This can make it easier to clean and easier to manage when you choose to change components around in the future.
![How to Install/Replace Motherboard [With Pictures]](https://images.minitool.com/partitionwizard.com/images/uploads/2023/02/install-motherboard-thumbnail.png)
Bottom Line
Is this post useful to you? Do you have other ideas about how to install a power supply? Leave comments in the following zone. zone. In addition, MiniTool Partition Wizard can help you clone the system, manage disks better, and recover data. If you have this need, you can download it from the official website.
About The Author

Position: Columnist
Linda has been an editor at MiniTool for seven years. She continuously learns about computers and puts her knowledge into practice. Moreover, she is particularly knowledgeable in disk management, data recovery, system installation, and PDF editing. Her articles typically reference multiple examples or are based on her own experience, providing users with the most suitable solutions.
User Comments :