
Your hard drive stores your PC’s files, photos, and programs, so failure can cause sudden data loss. Corruption, bad sectors, and mechanical faults are common, and every hard drive dies eventually.
A hard drive test scans a disk for file system errors, bad sectors, and S.M.A.R.T. warning signs. Regular tests can detect problems early and help protect your data.
How can you check HDD health? Here are four free Windows tools to test and diagnose hard drive issues.
Quick Comparison of the 4 Hard Drive Test Tools
Not sure which hard drive test tool to use? The table below compares the 4 free options in this guide.
| Tool | Best for | Needs to install? |
| CHKDSK | Checking and fixing file system errors | No (built into Windows) |
| MiniTool Partition Wizard Free | File system check and bad sector scan | Yes |
| PowerShell | Quick drive health status | No (built into Windows) |
| Manufacturer tools | Brand-specific deep diagnostics | Yes |
The Windows Built-in Hard Drive Test Tool: CHKDSK
CHKDSK is a Windows built-in hard drive test tool that can check and fix file system errors. You can run it from Disk Management or Command Prompt. Below are the steps for both methods.
Run CHKDSK from Disk Management
Follow the steps as below to run Windows 10 CHKDSK utility from Windows desktop. The hard drive test utility CHKDSK will check your drive and fix any disk errors scanned out.
Step 1. Open Disk Management in Windows 10.
Here are two ways for you to open Disk Management.
- Right-click Windows Start menu and choose Disk Management.
- Right-click Windows Start menu and choose Run. Input msc in the box and hit Enter.
Step 2. Start the error checking.
1. Right-click the partition you want to check and choose Properties.

2. Locate the Toolstab and click Check.

3. If the hard drive test tool finds hard drive errors, it will check and fix hard drive errors for you. If it says no errors found, you still can click on Scan drive on the pop-up window to test HDD.

After it completed, you can check if your hard drive works as normal. And here’s another method for you to perform hard drive test in Windows.
Run CHKDSK from Command Prompt
Step 1. Launch the Command Prompt in Windows.
- Input cmd in the Windows 10 Cortana search box.
- Right-click the best match then select Run as administrator.
Step 2. Check and fix hard drive errors in Command Prompt.
1. Type CHKDSK *: /f(* represents the drive letter of the partition to be scanned) and hit Enter.

2. After that, type exit and hit Enter to close Command Prompt.
Here are some commonly used parameters to solve hard drive issues.
- /f – scan the drive and fix hard drive errors automatically.
- /r – Locate bad sectors on the drive and try to recover readable information from them
- /x – force the volume to dismount. Also invalidates all open file handles. This should be avoided in Desktop Editions of Windows, because it may cause data loss/corruption.
Apart from Windows built-in hard drive test tool, you can also use some fabulous third-party hard disk test tools.
Test a Hard Drive with MiniTool Partition Wizard
Besides the Windows built-in tools, you can also use a third-party hard drive test tool to check file system errors and bad sectors. MiniTool Partition Wizard Free Edition provides two features for these tasks: Check File System and Surface Test.
The following sections show how to use these two features to test a hard drive, with detailed steps and screenshots for each method.
Check File System – Fix File System Errors
The feature Check File System can help you check and fix file system errors. When file system is damaged, you are unable to access the data stored on hard drive. And you receive some error messages like you need to format the disk before you can use it. So it is necessary to utilize this hard drive test tool to repair file system errors on hard disk.
You can download and install MiniTool Partition Wizard Free Edition to perform the test.
MiniTool Partition Wizard FreeClick to Download100%Clean & Safe
Step 1. Choose the target partition.
- Launch MiniTool Partition Wizard Free Edition.
- Select the target partition on the main interface.
- Choose Check File System from the left action panel.

Step 2. Check and fix file system error.
1. On the pop-up window, choose Check & fix detected errors.
- Check only: The hard disk test tool will only scan the drive for errors but will not repair the hard drive errors.
- Check & fix detected errors: The hard disk test tool will scan and fix any detected hard drive errors automatically.
2. Click Start button to check and fix file system immediately.

3. Exit the hard drive tool and check if the file system error has been removed.
Surface Test – Check Bad Sectors on Your Hard Drive
When you perform some specific operations or open some files, you may find that the computer is running very slow or the disk is ticking. In this case, you need to perform disk surface test to check if there are bad sectors on your hard disk.
MiniTool Partition Wizard Free Edition is the perfect hard drive test tool for you to test bad sectors on your hard drive. It can scan each sector status by reading data from the sector. After scanning, disk block without reading error will be marked with green color, while disk block with reading error will be marked with red.
If you haven’t got the free disk test tool, please click the button as below to download one. Then you can perform hard drive test with MiniTool Partition Wizard Free.
MiniTool Partition Wizard FreeClick to Download100%Clean & Safe
Step 1. Choose a disk to test in MiniTool Partition Wizard Free Edition.
- Launch the hard drive test tool to get the main interface.
- Select the target disk you would like to check.
- Click Surface Test from the left action panel.

Step 2. Start the Disk Surface Test.
1. Click Start Now button to start disk surface test.

Then hard drive test tool will automatically test the disk surface and demonstrate you a result.
2. After it is done, click OK and exit the application.

How to read the result: A disk that shows only green blocks has no read errors. Red blocks mean the tool could not read those sectors. A few red blocks may be manageable, but a growing number usually means the drive is degrading.
- If there are bad sectors on your hard drive, you’d better transfer all the data to another disk, as too many bad sectors indicate that your hard drive is failing.
- To check a specific partition, you can also select the specific partition and then choose Surface Test to go on.
If there are some bad sectors, you can use software to shield bad tracks. If there are still red disk blocks after shielding, you have to send the disk to professionals to repair the physical bad sectors.
Check Hard Drive Health with PowerShell
Microsoft has removed WMIC, the old command for this check, from currently supported versions of Windows 11, so use PowerShell instead.
It reads the drive health status reported through S.M.A.R.T. (Self-Monitoring, Analysis and Reporting Technology), which is built into HDDs, SSDs, and eMMC drives.
Here is how to use PowerShell to test your hard drive.
Step 1. Open PowerShell as administrator.
Right-click the Windows Start menu and choose Terminal (Admin) or Windows PowerShell (Admin).
Step 2. Get the disk status.
Type the following command and press Enter:
Get-CimInstance Win32_DiskDrive | Select-Object Model, Status
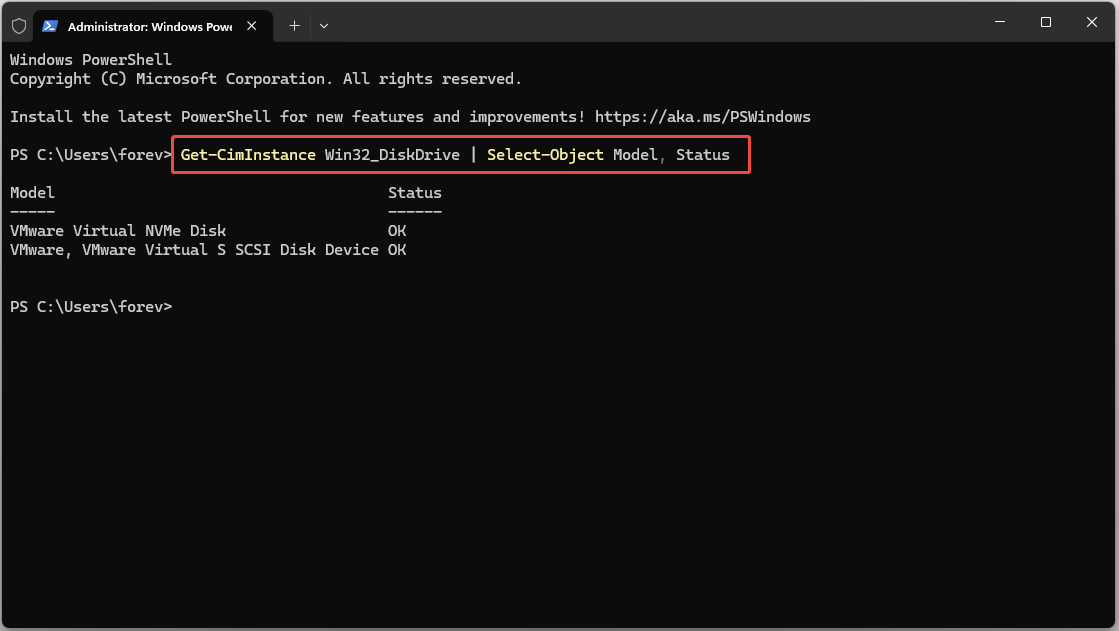
This is the direct replacement for the old wmic diskdrive get status command. If your hard disk is healthy, the status shows OK.
Step 3 (optional). Check the health status with Get-PhysicalDisk.
Type the following command and press Enter:
Get-PhysicalDisk | Select-Object FriendlyName, MediaType, HealthStatus, OperationalStatus
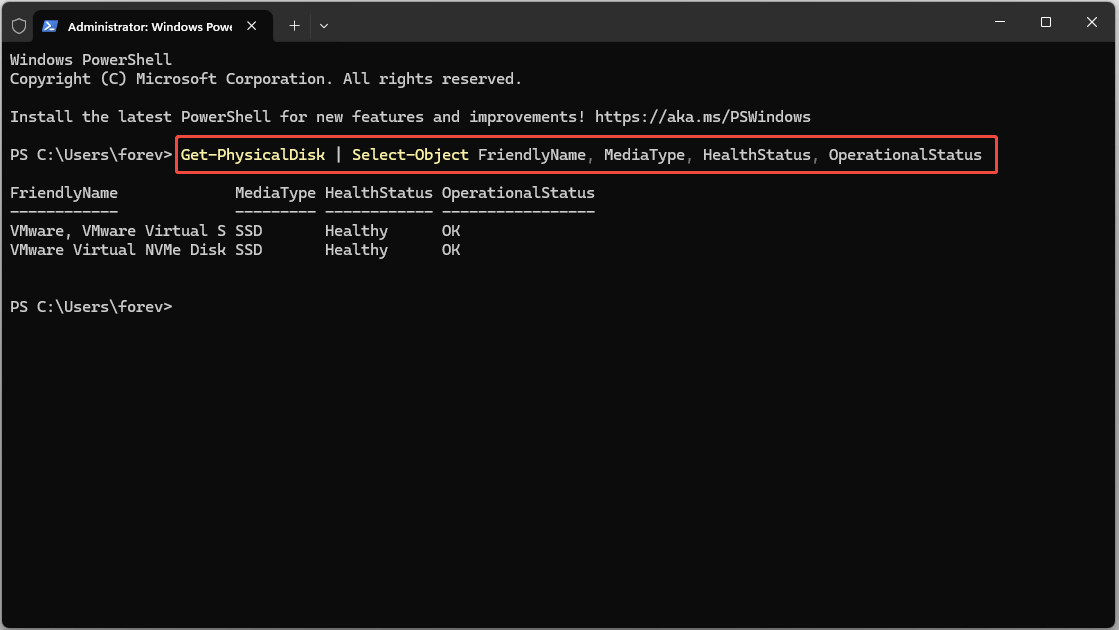
A healthy drive shows Healthy.
| Result | Meaning |
| OK / Healthy | The drive is healthy |
| Pred Fail / Warning | The drive predicts a failure; back up your data now |
| Degraded / Error / Unhealthy | The drive has a problem; replace it as soon as possible |
| Unknown | The status cannot be read; run another hard drive test to confirm |
Run the Hard Drive Manufacturer’s Diagnostic Tool
Most well-known hard drive manufacturers have developed their own HDD test tool. Just check which brand you are using and download the corresponding hard drive test tool.
Here is the guide to tell you how to check which kind of HDD you are using.
Step 1. Launch Device Manager in Windows 10.
You can follow one of the two methods as below to launch Device manager.
- Right-click Windows start menu and choose Device Manager.
- Input Device Manager in the Windows search box and click the best match.
Step 2. Check the brand of your HDD.
- Locate the Disk drives on the interface.
- Double-click it and then you will see the brand of your disk.

After knowing the brand of your hard disk, you can go to the manufacturer’s support page and search for their hard drive test tools.
There are many other hard drive test tools for Windows users to test your hard drive health, but the four HDD test methods I introduced are all reliable and highly recommended by many people. If you are looking for a HDD health check tool, you can try the four kinds of hard drive test tools at ease.
Conclusion
A regular hard drive test helps you catch errors early and protect your data. Use CHKDSK or PowerShell for a quick check, MiniTool Partition Wizard Free to scan for bad sectors, and your manufacturer’s tool for in-depth diagnostics.
If a test shows many bad sectors, back up your data first and replace the drive. If you need help with MiniTool software, contact us via [email protected].
Hard Drive Test FAQ
For a more complete diagnosis, you may need both logical disk checks and hardware-specific diagnostics.
About The Author

Position: Columnist
Charlotte is a technology columnist with a strong focus on the Windows operating system, specializing in disk management, backup, and data recovery. She is passionate about analyzing computer errors, identifying root causes, and delivering practical solutions. In her free time, she stays updated on the latest developments in computer systems and hardware while continuously learning new technologies to broaden her expertise. Her writing style is clear and easy to understand, making complex technical topics accessible even to users with limited computer knowledge.
User Comments :