You may encounter the Windows update error 0x80070001 on your computer. Are you looking for some methods to solve this issue? In this post, MiniTool Partition Wizard will share you with some reasons and fixes for this error.
Here is a user that suffering from Windows update 0x80070001 report from the Microsoft forum:
I have a problem with updating Windows from 21H2 to 22H2. I saw this update in "Windows Update" but whenever I tried to install I saw the installation error message 0x80070001. I made all "Windows update" reset and procedures available over the web and nothing helped.https://answers.microsoft.com/en-us/windows/forum/all/failed-update-from-windows-11-21h2-to-22h2/9324f72c-307d-4700-9405-88ca45999938
About Windows Update Error 0x80070001
Windows update error code 0x80070001 usually appears during the installation or update of the operating system, applications, or drivers and displays the message “Windows cannot install a required file. The file may be corrupted or missing. Please ensure that all files required for the installation are available, and restart the installation.”
This error indicates that the Windows Installer failed to copy the required files from the installation media to the hard drive during the installation process. Why does this error occur? Here, we summarize some possible causes below:
- Corrupted system files: Corruption of important system files can be the main cause of error code 0x80070001.
- Network issues: Fluctuating or unreliable network connectivity may prevent the seamless downloading of updates, resulting in Windows update 0x80070001.
- Registry issues: Windows registry plays a key role in the update process. Any issues in the registry keys can cause Windows installation error 0x80070001.
- Lack of disk space: The update process requires a lot of disk space. Error code 0x80070001 may appear if your system is running out of storage space.
- Third-party software interference: Some third-party antivirus or security software may inadvertently interfere with the update process, causing Windows update 0x80070001.
How to fix the Windows update error 0x80070001? When you encounter this problem, the first thing you can do is to restart your PC and check the network connection. Then if the issue is not fixed, you can try the following fixes one after another.
How to Fix Windows Update Error 0x80070001
There are 7 applicable solutions to the Windows update error 0x80070001. You can try them until the error gets solved.
Solution 1. Run Windows Update Troubleshooter
Windows comes with built-in troubleshooting tools designed to identify and resolve update issues. You can try to fix the Windows update 0x80070001 by running the Windows Update troubleshooter with the following steps.
Step 1: Press the Win + I key to open Settings, and navigate to the System > Troubleshoot option. Then click on Other troubleshooters and you will see a list of troubleshooter tools.
Step 2: Click on Run next to Windows Update. The Windows Update Troubleshooter will run automatically to detect and fix problems.
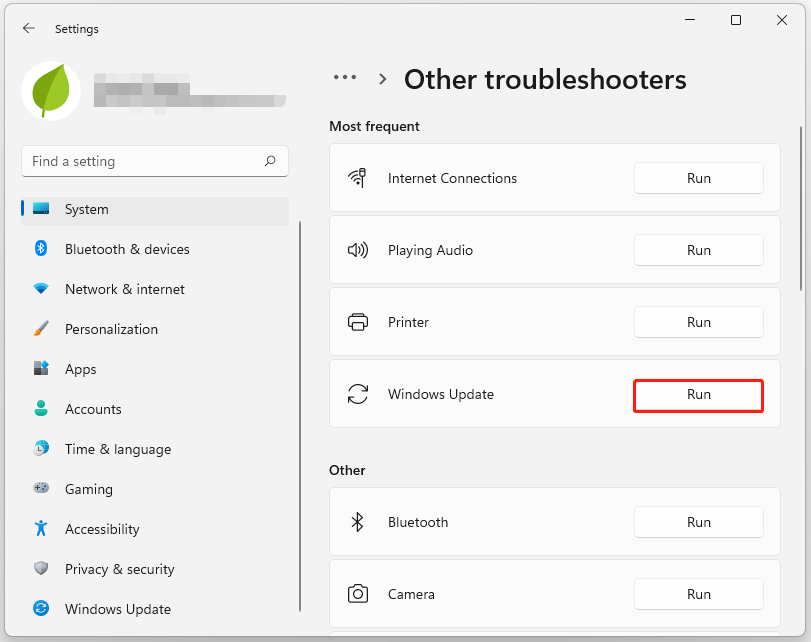
Step 3: Follow the on-screen instructions. And when you see the Apply this fix option in the window, click it to fix this error.
Once done, restart your computer and see if the error is solved.
Solution 2. Check and Repair Corrupted System Files
The corrupted system files or Windows images can trigger Windows updates error 0x80070001. To fix this problem, you can run SFC and DISM commands to scan your PC and repair corrupted files. Here’s how to do that.
Step 1: Type cmd in the Search box and right-click Command Prompt to select Run as administrator to open the Command Prompts as administrator.
Step 2: In the Command Prompt window, type the following command: sfc /scannow and press Enter.
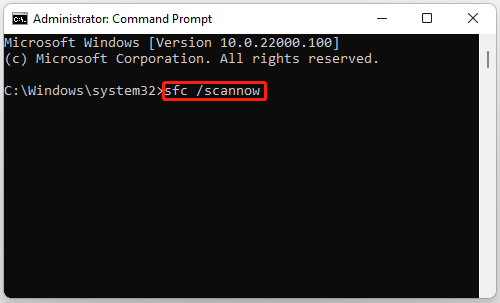
Step 3: After the scanning process is complete, if it describes that the corruption is resolved, close the Command Prompt and restart your PC.
If the SFC tool fails to repair corrupted files, you can use the DISM tool.
Step 1: Open the Command Prompt as administrator. Then type the following commands and press Enter after each.
DISM /Online /Cleanup-Image /CheckHealth
DISM /Online /Cleanup-Image /ScanHealth
DISM /Online /Cleanup-Image /RestoreHealth
Step 2: After the scanning process is complete, restart your computer to check if the error has been solved.
Solution 3. Disk Conversion
If you encounter the Windows update 0x80070001 error when trying to install Windows on a system that has a dynamic disk configured for the operating system partition, the disk type may be the cause of the problem.
Dynamic disks allow the creation of volumes that span multiple physical disks. It is often used for advanced storage configurations such as fault tolerance, software RAID, and multi-boot setups. However, not all versions of Windows support dynamic disks.
To avoid installation problems when installing Windows, it is recommended to use basic disks instead of dynamic disks. To resolve this issue, follow these steps to convert the disk type:
To finish this conversion, you can use the Disk Management utility or a third-party tool called MiniTool Partition Wizard.
#1. Convert Dynamic to Basic Using Disk Management
Here is the tutorial on converting dynamic to basic using Disk Management.
Note: Please note that this process may result in data loss, so you’d better back up the data on the dynamic disk.
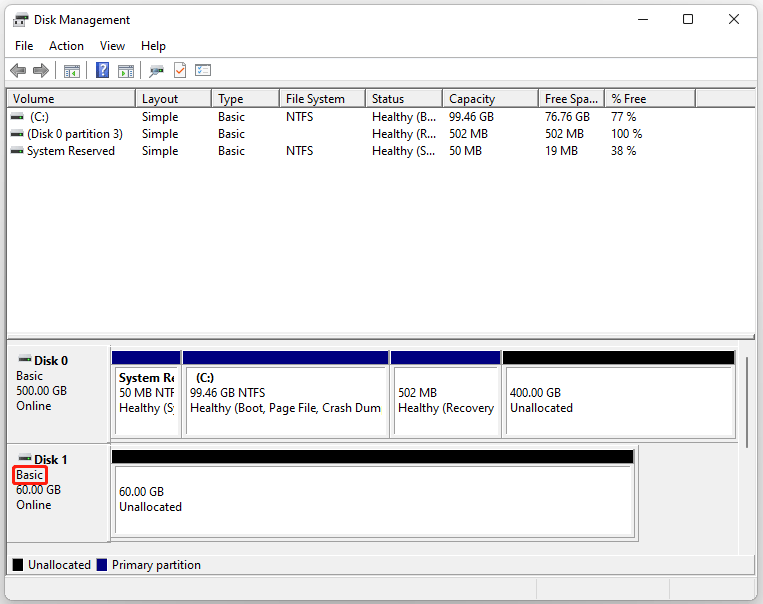
Step 1: Press the Win + R key to open the Run dialog box. In the Run box, type diskmgmt and click Enter.
Step 2: In the Disk Management window, right-click the volume on the dynamic disk and select Delete Volume. Then confirm that you want to delete the simple volume.
Step 3: The dynamic disk will turn into a basic disk automatically if you are converting dynamic disk to basic disk on Windows 10. (For the older operating systems, right-click the dynamic disk and choose Convert to Basic Disk which is now available.)
Once the conversion process is complete, you can add a new volume to the basic disk by right-clicking on the unallocated space and selecting New Simple Volume.
As you see, this method can help you convert the disk from dynamic to basic with a few steps. But it can also clean your data stored in the selected disk. If you don’t want to lose any data, you can move to the following method.
#2. Convert Dynamic to Basic Using MiniTool Partition Wizard
As you can see, if you convert dynamic to basic using Disk Management, you need to delete all volumes on the dynamic disk first. This will destroy the data on the disk. Is there a way to convert dynamic to basic without data loss? Right here. MiniTool Partition Wizard can help you do this.
What’s more, MiniTool Partition Wizard offers lots of helpful features for partition/disk management such as partition hard drive, clone a hard drive, recover data from hard drive, and more.
MiniTool Partition Wizard DemoClick to Download100%Clean & Safe
How to convert dynamic to basic by MiniTool Partition Wizard? Here’s the guide.
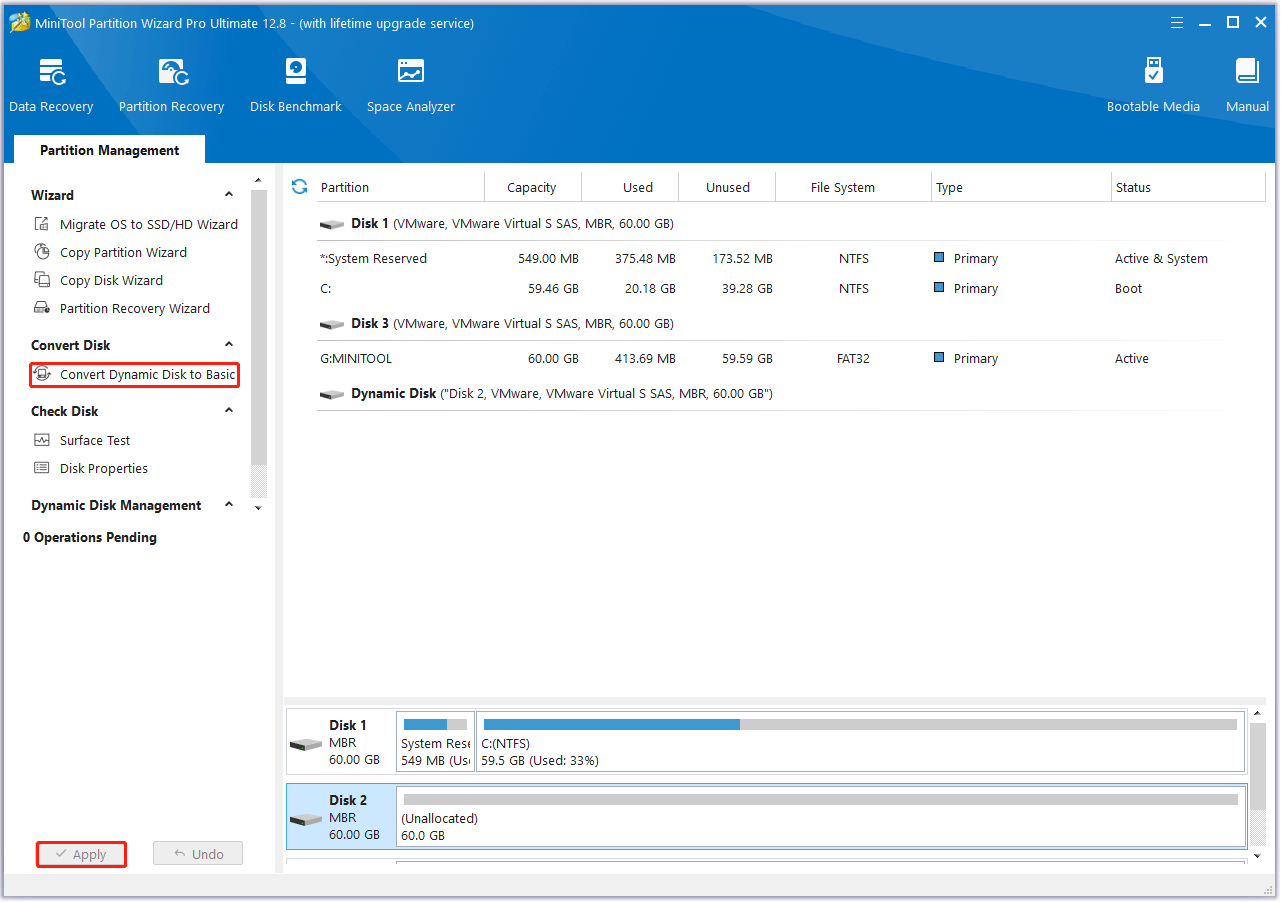
Step 1: Download and install MiniTool Partition Wizard on your PC. Then launch it to get its main interface.
Step 2: Click on the target dynamic disk, and then select Convert Dynamic Disk to Basic from the left action panel.
Step 3: Click on Apply to confirm executing pending operations. Tap Yes to carry out dynamic disk conversion pending operations.
Solution 4. Free Up Disk Space
This error may also pop up if there is insufficient disk space. This happens if there is not enough free space on the hard drive to accommodate the installation files. So, you should try to free up disk space with the methods below.
Way 1. Run Disk Cleanup
You can use Windows Disk Cleanup – a hard drive cleaner to delete temporary and unnecessary files.
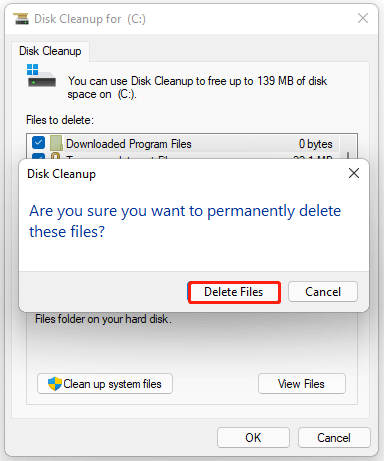
Step 1: Open Disk Cleanup by searching it in the Windows Search tool.
Step 2: In the pop-up window, select the drive (C: by default) you want to clean up and click OK.
Step 3: In the next window, select files to delete (e.g., Temporary files and Recycle Bin) and click OK. In the prompted confirmation window, click Delete Files.
Way 2. Use Space Analyzer
Sometimes, some issues may happen while using the Disk Cleanup tool, such as Disk Cleanup won’t open and Disk Cleanup stuck on Windows Update cleanup. Thus, we recommend you use MiniTool Partition Wizard – a professional space analyzer to analyze what’s taking up space on your PC and delete unnecessary files.
MiniTool Partition Wizard FreeClick to Download100%Clean & Safe
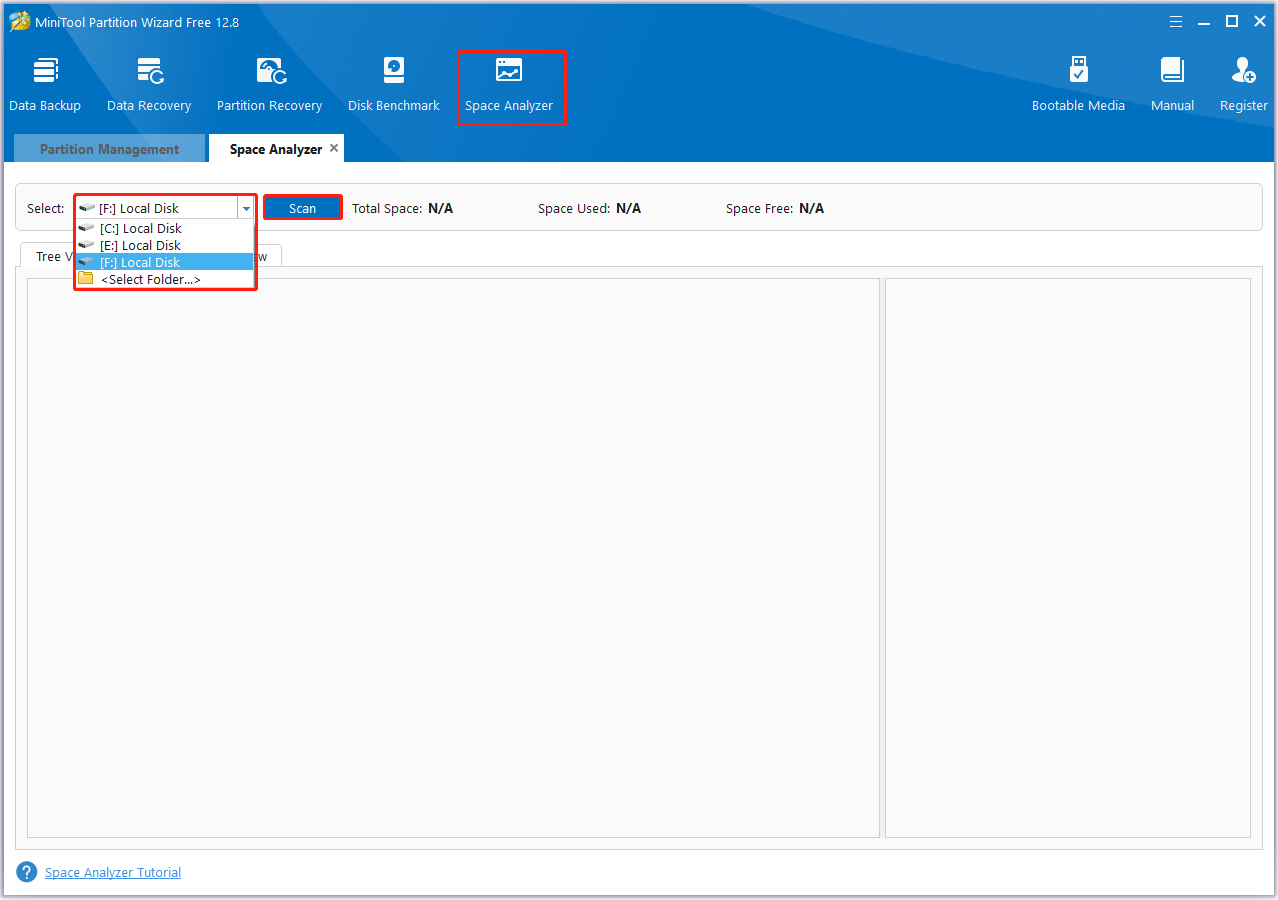
Step 1: Launch MiniTool Partition Wizard to enter its main interface.
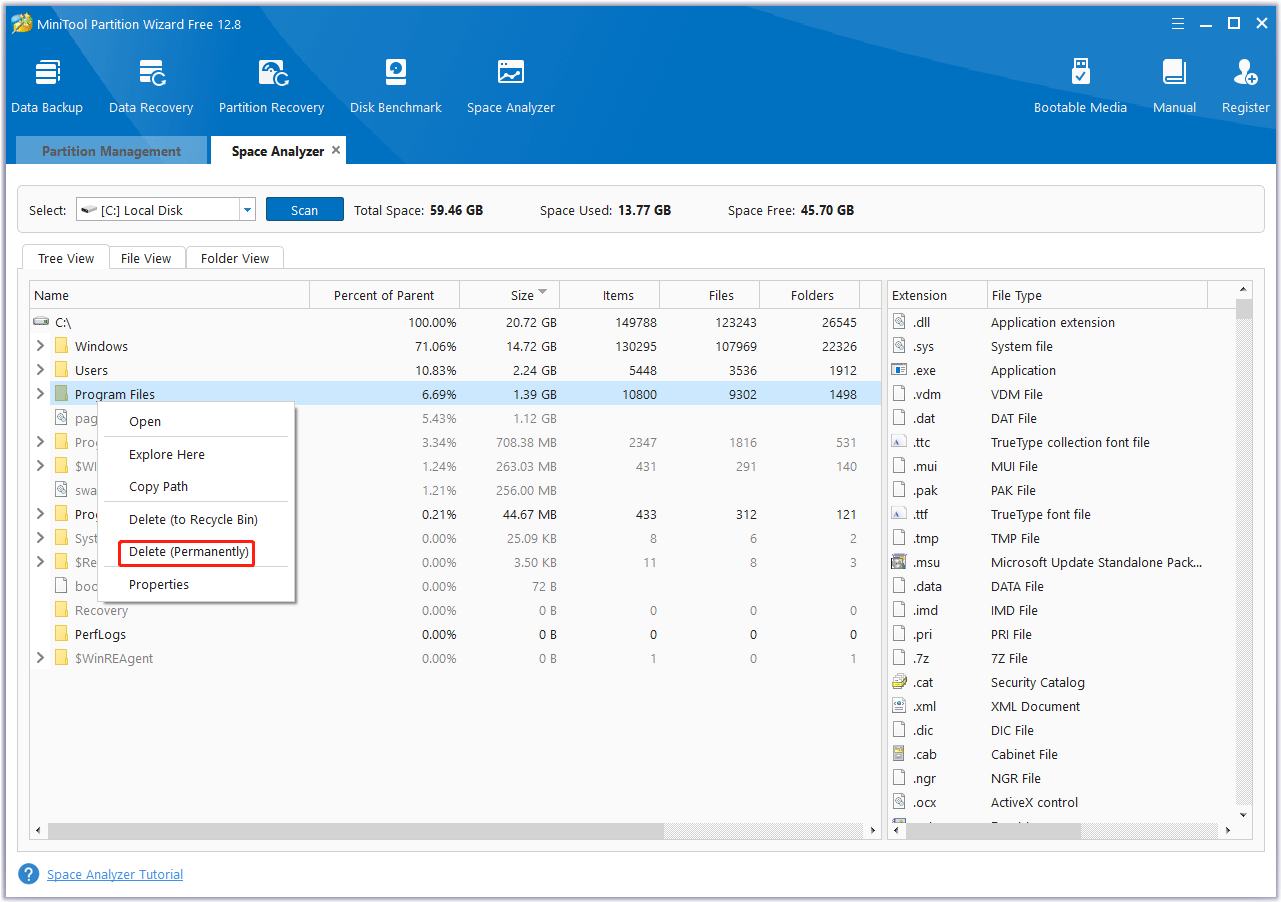
Step 2: Select the Space Analyzer feature on the top toolbar to launch the disk usage analyzer.
Step 3: In the next window, select the target disk from the drop-down menu. Then click on the Scan button.
Step 4: Wait until the scanning completes. Right-click on the space-consuming and useless files/folders. Then select Delete (Permanently) to remove them.
Solution 5. Modify Registry Editor
When trying to install the same version of the operating system on your computer, you may encounter the error code 0x80070001 due to conflicts caused by old registry files. To resolve this issue, you can verify and repair these files.
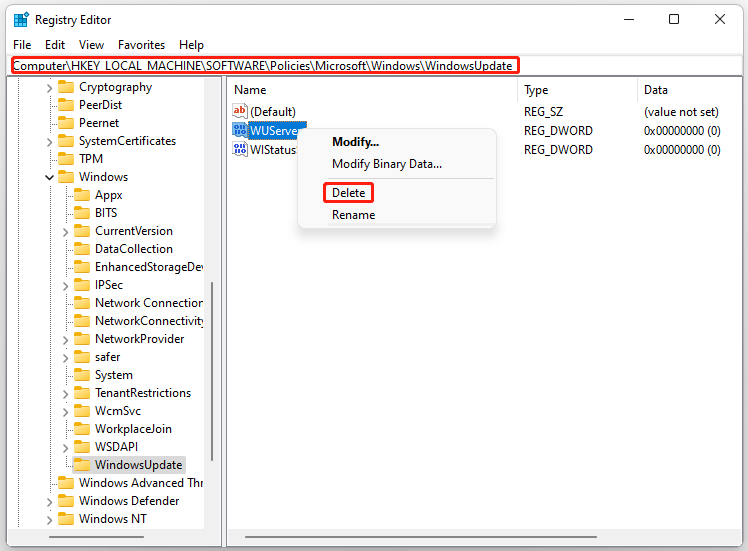
Step 1: Open the Run dialog box. Then type regedit and press Enter to open Registry Editor.
Step 2: In the Registry Editor window, navigate to the following path:
Computer\HKEY_LOCAL_MACHINE\SOFTWARE\Policies\Microsoft\Windows\WindowsUpdate
Step 3: In the right panel, find and right-click on WUServer to select Delete. Then delete the WIStatusServer value.
Once done, close Registry Editor and restart your computer. Then try proceeding with the installation again and check if the Windows installation error 0x80070001 is resolved.
Solution 6. Unplug Peripherals
This error sometimes occurs when there is a conflict or compatibility issue between the peripheral device and the installation process.
You can resolve this issue by unplugging all external peripherals before trying to install or update Windows. After completing the installation or update process, you can reconnect your peripherals.
Solution 7. Install Windows Using Media Creation Tool
Since this error can be caused by corrupted or incomplete installation files, using the Media Creation Tool can help ensure that you have a fresh, uncorrupted set of installation files. This tool allows you to create a bootable USB drive or DVD with the latest version of Windows, which can be used to perform a clean installation or upgrade.
Apart from the above methods, you can also try to fix Windows update error 0x80070001 by temporarily disabling your antivirus program, running Windows Update in a Clean Boot state, and resetting BIOS.
Bottom Line
Does this post solve your issue successfully? Do you have any ideas on how to solve the Windows update 0x80070001? You can share them with us in the following comment zone. Certainly, if you have any questions about or suggestions for MiniTool Partition Wizard, please do not hesitate to contact us via [email protected].
About The Author

Position: Columnist
Vega enjoys helping people with computer problems, including disk management, data recovery, data backup, and more. She is constantly expanding her knowledge in related fields. And she will continue to bring more easy-to-understand professional articles to help people solve various problems on the PC.
User Comments :