To resolve Windows 10 freezing randomly, try to disconnect all USB devices, repair corrupted system files, scan for malware, update Windows and drivers, extend the system partition with MiniTool Partition Wizard, and check hardware health.
Why Windows 10 Freezes Randomly?
Windows 10 random freezing can occur during startup, web browsing, running resource-intensive applications, or when the system is idle.
At this time, the screen may suddenly become unresponsive, the mouse cursor may freeze, or keyboard input may cease to function.
This not only causes data loss but also severely impacts work efficiency. Besides direct interference, frequent freezes may indicate underlying problems that, if left unresolved, could lead to more serious issues.
Windows 10 freezes randomly due to a range of issues. Here are some common causes:
- Outdated drivers: Old or incompatible device drivers can disrupt communication between hardware and the operating system, leading to system instability and crashes.
- Corrupted system files: Due to power outages or other errors, important Windows files may become corrupted, causing system instability.
- Malware or virus infection: Malware runs silently in the background, consuming excessive resources, corrupting system files, and causing the system to freeze.
- Overheating: Computers generate heat. If the cooling system is obstructed due to dust buildup or component failure, the system may slow down or crash to prevent damage.
- Hard drive failure: Problems with storage drives can cause the system to have difficulty reading or writing data correctly, resulting in severe delays or complete freezes.
- Peripheral device failure: Connecting faulty external devices such as USB drives, keyboards, or mice can sometimes cause system instability or crashes.
In the following part, this post offers several approaches to help you fix the issue “computer freezes randomly Windows 10”. Start with basic checks, then move to deeper system checks and hardware fixes.

Method 1. Perform Immediate Steps
When the PC is frozen, you need to try the following immediate steps:
- Wait and observe: Your computer may be temporarily overloaded. Please wait a few minutes to see if it recovers on its own.
- Open Task Manager: Press Ctrl + Shift + Esc simultaneously to open Task Manager. Then find and disable unresponsive applications or processes consuming excessive CPU or memory resources.
- Disconnect all USB devices: Disconnect all non-essential USB devices (external drives, printers, etc.) to see if a faulty peripheral device is causing the problem.
- Force restart: If the keyboard and mouse are unresponsive, press and hold the power button for 5-10 seconds until the computer completely shuts down. Wait a few seconds, then restart the computer.
Once you have gotten control of your PC, try the following solutions to get rid of future “Windows 10 randomly freezes” issue.
Method 2. Update Windows and Drivers
Outdated graphics drivers or missing Windows updates are common causes of instability. So, you should update your Windows and drivers. The steps are as follows:
Update Windows
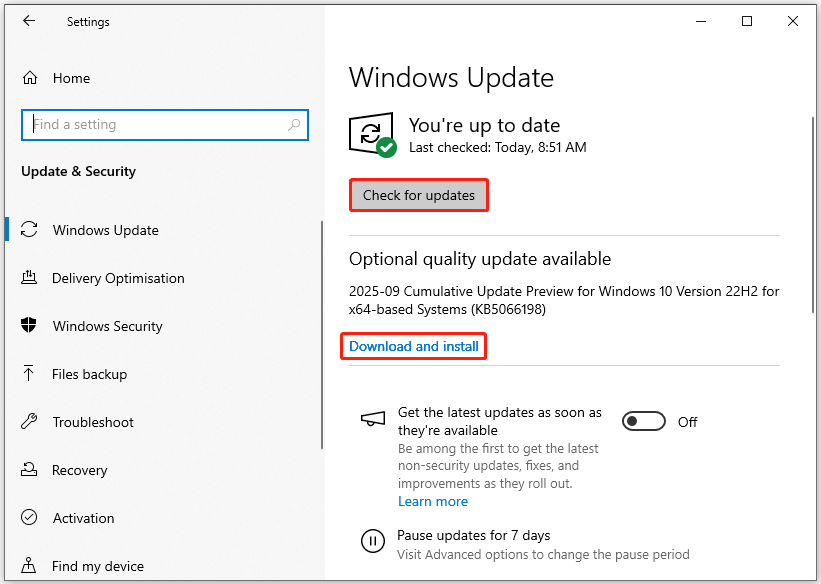
- Press Win + I to open Settings, and then click Update & Security > Windows Update.
- Click Check for updates. If updates are available, click Download & install.
- After installation, restart your PC to apply the updates fully.
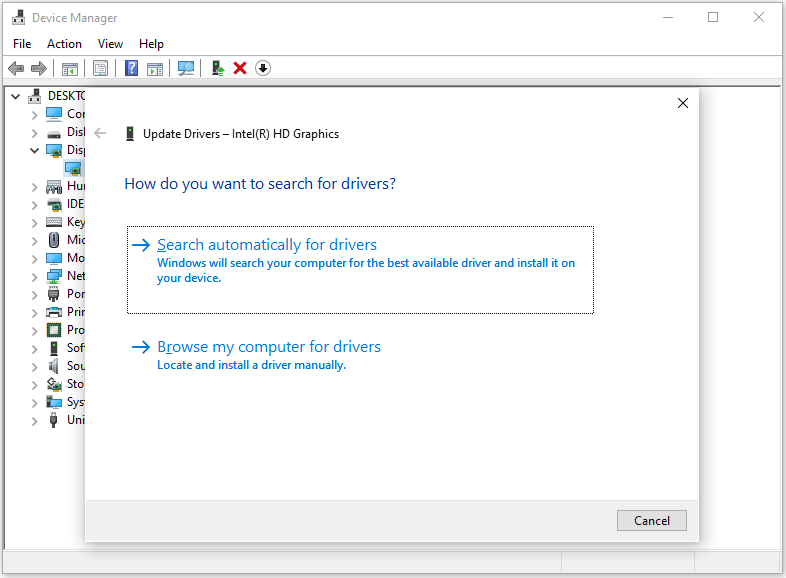
Update graphics drivers
- Press Win + X, and then select Device Manager.
- Expand the Display adapters category, right-click the graphics card, and select Update driver.
- Choose Search automatically for drivers and follow the on-screen instructions.
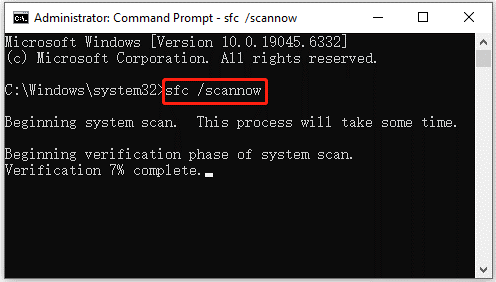
Method 3. Run SFC and DISM Scans
Corrupted system files can lead to the issue of “PC freezes randomly Windows 10”. To scan and repair the system files, run DISM (Deployment Image Servicing and Management) and SFC (System File Checker).
- Type cmd in the search bar, right-click Command Prompt, and then select Run as administrator.
- Type DISM /Online /Cleanup-Image /RestoreHealth and press Enter. This command will scan and repair corrupted Windows system files by replacing them with healthy ones.
- After DISM finishes running, type sfc /scannow and press Enter. This command will scan all protected system files and automatically repair any corrupted ones.
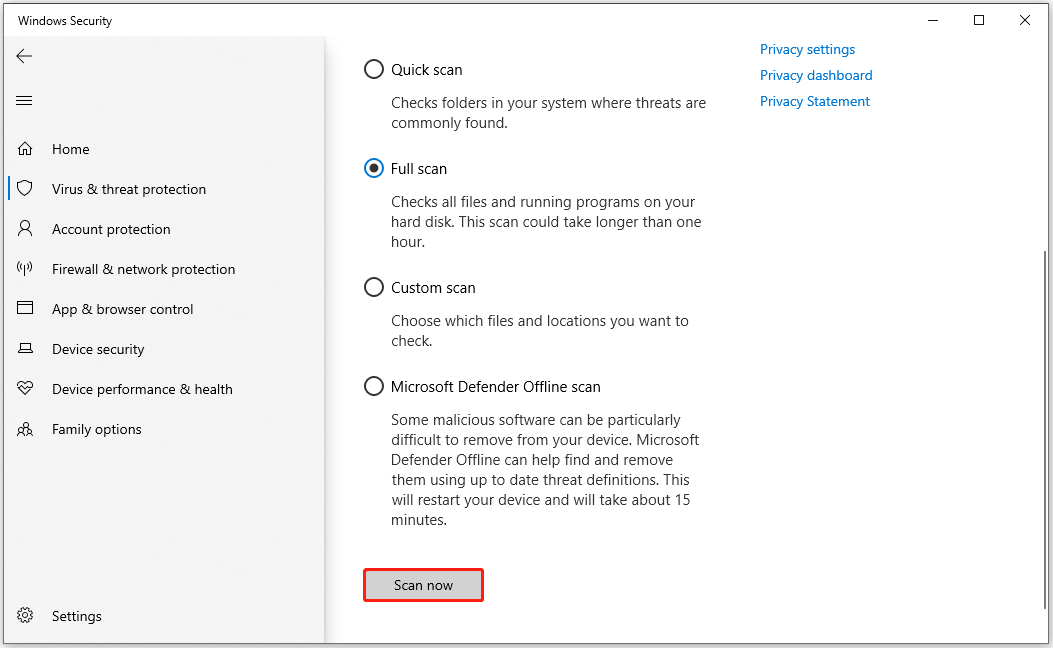
Method 4. Scan for Malware
Using a trusted antivirus program like Windows Defender to perform a full system scan can solve the Windows 10 freezing issue caused by malicious software.
Here are the steps:
- Open Settings > Update & Security > Windows Security > Virus & threat protection.
- Click Scan options and select Full scan. It scans all files and programs.
- Click Scan now and follow prompts to remove detected threats.
Method 5. Increase Virtual Memory
Insufficient RAM can cause performance issues. Increasing virtual memory (which uses hard disk space as RAM) can help to relieve the issue.
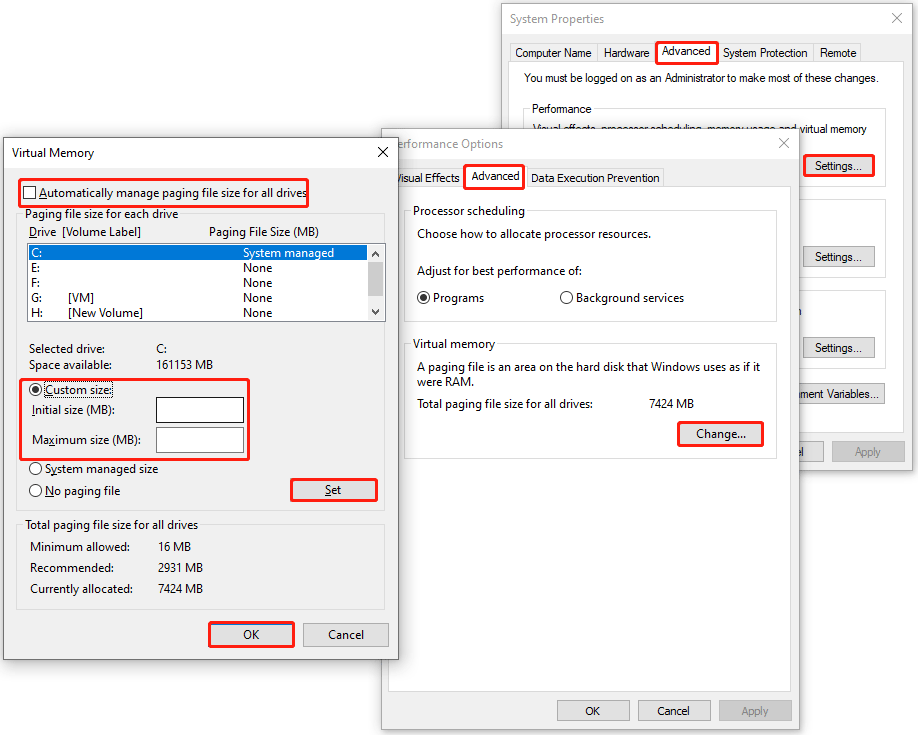
- Press Win + R, type sysdm.cpl, and press Enter.
- In the pop-up window, go to Advanced > Settings under Performance > Advanced > Change.
- Uncheck Automatically manage paging file size for all drives and select Custom size.
- Set the Initial size to 1000 and the Maximum size to 8192.
- Click OK and restart your PC to apply the changes.
Method 6. Adjust Power Management Settings
Adjusting power management settings can help fix Windows 10 freezing randomly, especially those that occur when the PC is idle, goes to sleep, or wakes from sleep mode.
You can access these settings via the Power Options in the Control Panel.
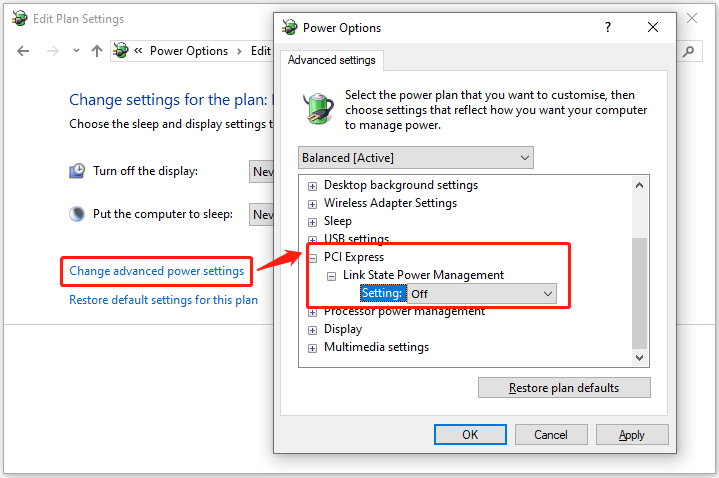
Step 1. Disable PCI Express Link State Power Management. This feature can cause freezes when PCIe devices (e.g., GPU, network adapter) switch to low-power modes.
- Press Win + R, type powercfg, and press Enter.
- Click Change plan settings for your active plan, then click Change advanced power settings.
- Expand PCI Express > Link State Power Management and select Off, then click Apply.
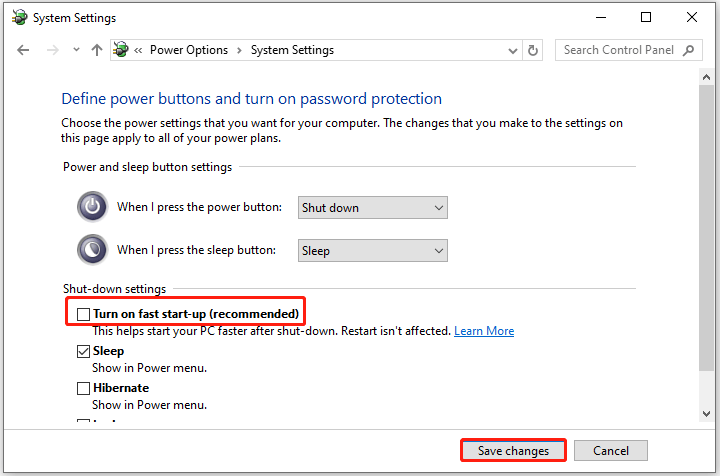
Step 2. Turn off Fast Startup. Fast Startup reduces boot time but can cause compatibility issues and freezes, especially on older hardware.
- On the Power Options window of Control Panel, go to Choose what the power buttons do > Change settings that are currently unavailable.
- Uncheck Turn on fast startup (recommended) and click Save changes.
Step 3. Disable C-State in BIOS. C-State is a power-saving feature that shuts down unused CPU cores during idle periods, but it can cause instability on some systems.
- Restart your computer and press the BIOS key (usually Del, F2, or F10) during boot.
- Go to Advanced and choose CPU Configurations.
- Turn off C1E Function and Intel(R) C-STATE tech.
- Save changes and exit BIOS.
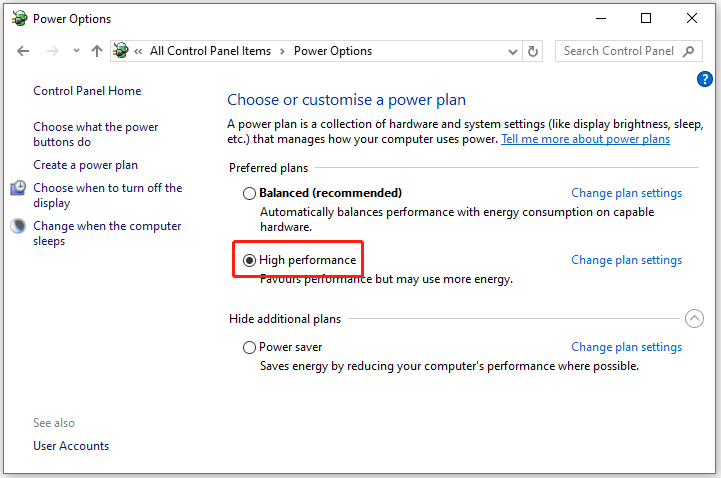
Step 4. Set the Power Plan to High performance.
On the Power Options window of Control Panel, select High performance, and then restart your computer.
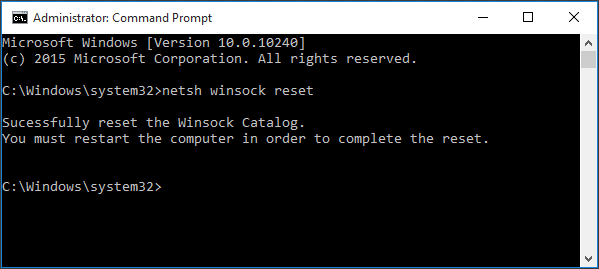
Method 7. Reset the Winsock Catalog
Winsock (Windows Sockets API) is a core component for managing computer network communications. If its configuration is corrupted by malware, faulty VPN software, or firewall programs, it can lead to system instability, including crashes.
Here are the steps to reset the Winsock catalog.
- Type cmd in the search bar, right-click Command Prompt, and select Run as administrator.
- Type netsh winsock reset and press Enter.
- Restart your computer and check.
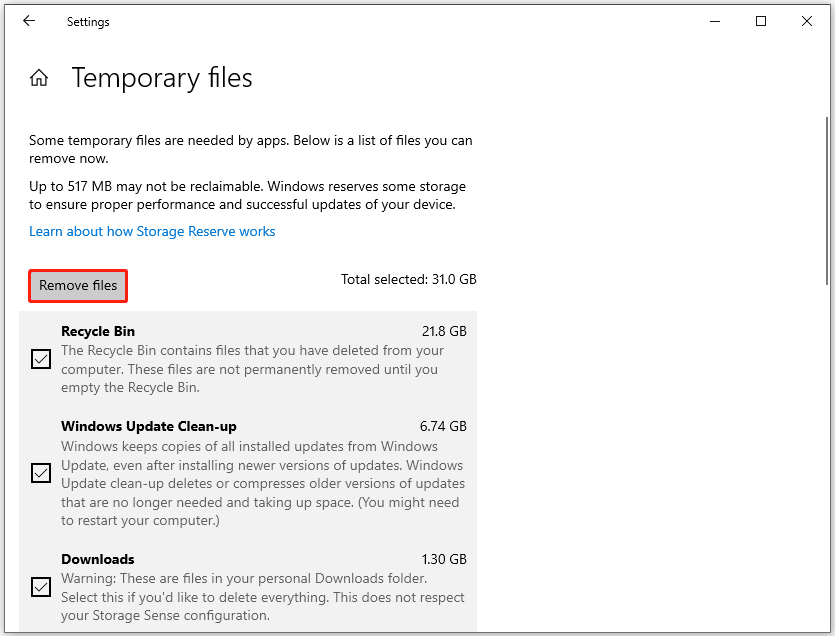
Method 8. Free up Disk Space
A full hard drive can slow down your system and cause freezes. You need to delete temporary files to free up disk space or extend the system partition to increase its space.
Option 1. Delete Temporary Files
To clear temporary files in Windows Settings, the steps are as follows:
- Go to Settings > System > Storage.
- In the right panel of Storage, click the Temporary files category.
- Check boxes to select files to remove, like the Recycle Bin and Downloads.
- Click Remove files.
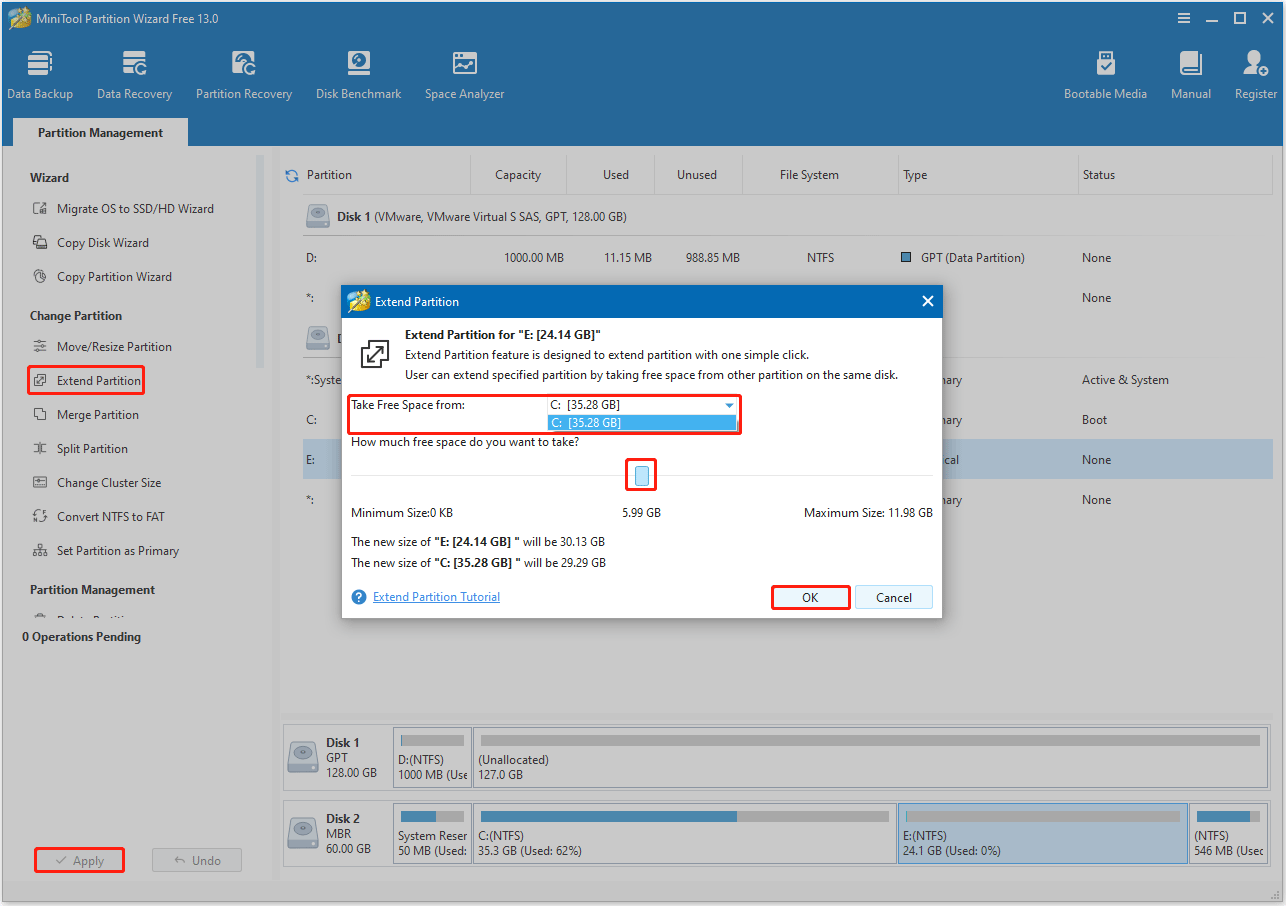
Option 2. Extend the System Partition
MiniTool Partition Wizard’s Extend Partition feature can help you take free space from any other existing partitions or unallocated space to enlarge a partition on the same disk.
MiniTool Partition Wizard FreeClick to Download100%Clean & Safe
- On its main interface, highlight the system partition and select Extend Partition from the left action panel.
- In the pop-up window, choose a partition or unallocated space from the drop-down list of Take Free Space from. Then drag the blue block to decide how much space to occupy. After that, click OK.
- Click Apply to perform the pending operation.
- Select Restart Now to allow the computer to restart. When your computer successfully restarts, you will find that the system drive has been extended.
Method 9. Perform a Clean Boot
This helps identify if a third-party application or service is causing the conflict by starting Windows with only essential drivers and programs.
Method 10. Check for Overheat
When internal components such as the CPU or GPU overheat (typically above 85-90°C), the system will usually slow down (overheating throttling) or freeze and automatically shut down to prevent permanent hardware damage.
Try the following tips to prevent your computer from overheating:
- Monitor temperature: Touch alone cannot determine if a computer is overheating. Use third-party software (HWMonitor or Core Temp) to monitor CPU and GPU temperatures.
- Clean system: Dust buildup is a major cause of poor heat dissipation. Turn off the computer and then use a can of compressed air to clean all fans, heatsinks, and vents.
- Ensure good airflow: Ensure good ventilation in the computer case and avoid placing it in a confined space. For laptops, ensure they are placed on a flat, hard surface with unobstructed air vents.
- Check fans: Verify that all system fans, CPU fan, and GPU fan are spinning normally when the computer is running.
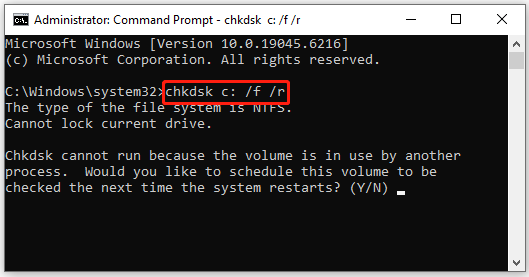
Method 11. Check Hard Drive Health
A failing hard drive can lead to data errors and system instability. You can use the Windows CHKDSK utility to scan and repair disk errors. Here are the steps:
- Open Command Prompt as administrator again.
- In the Command Prompt window, type chkdsk *: /f /r and press Enter. Replace “*” with the letter of your system drive.
- If the drive is in use (the C: drive is usually in this state), you will be asked if you want to schedule the check for the next time you restart your computer. Type Y and press Enter.
Method 12. Test RAM
Faulty RAM modules can cause system crashes and freezes. In this case, use the Windows built-in tool, Windows Memory Diagnostic, to find and fix memory issues.
- Search for Windows Memory Diagnostic and launch the tool.
- Click Restart now and check for problems (recommended).
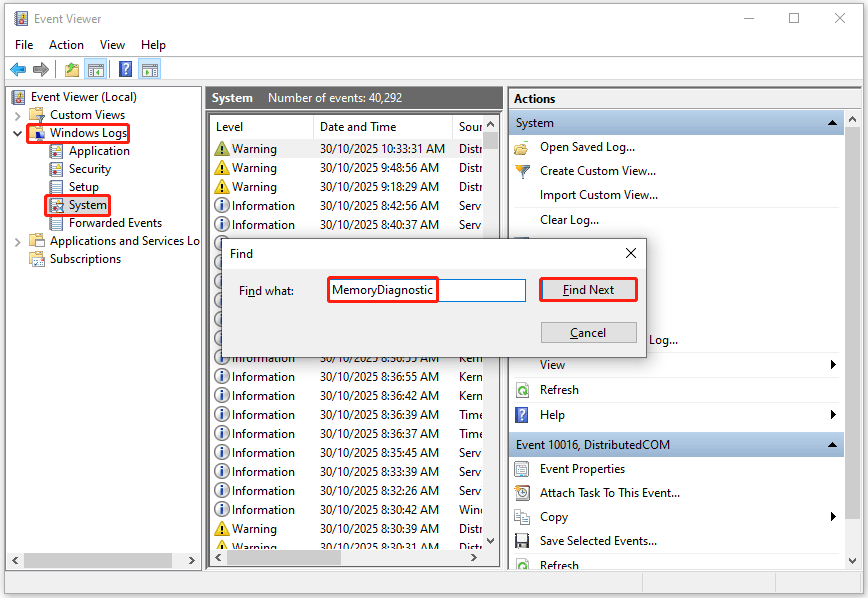
- After the memory test is complete, your computer will automatically restart. To view the test results, right-click the Windows icon and then select Event Viewer.
- Go to Windows Logs > System, right-click System, search for MemoryDiagnostic in the box, and then click Find Next to see the results at the bottom of the window.
If the diagnostic tool detects an error, it usually indicates a physical problem with the memory. You need to:
- Reinstall the memory module: Turn off the computer, open the case, and then firmly reinsert the memory module.
- Replace the memory: If the error persists after reinstalling, replace the faulty memory module.
![[Solved] Windows Memory Diagnostic Tool Stuck at 1%, 21%, or 99%](https://images.minitool.com/partitionwizard.com/images/uploads/2021/08/windows-memory-diagnostic-tool-stuck-thumbnail.png)
Method 13. Replace Hard Drive
If the above methods don’t work, you should try to replace the hard drive. As is well known, SSDs are much faster than HDDs. Therefore, using an SSD as the system drive is a good choice. In this case, MiniTool Partition Wizard may be useful because it can migrate the OS.
How to migrate the OS with this software? Here is the guide:
MiniTool Partition Wizard DemoClick to Download100%Clean & Safe
Step 1. Connect the SSD to your computer and start the migration.
- Connect the SSD to your computer with an NVMe/SATA to USB adapter.
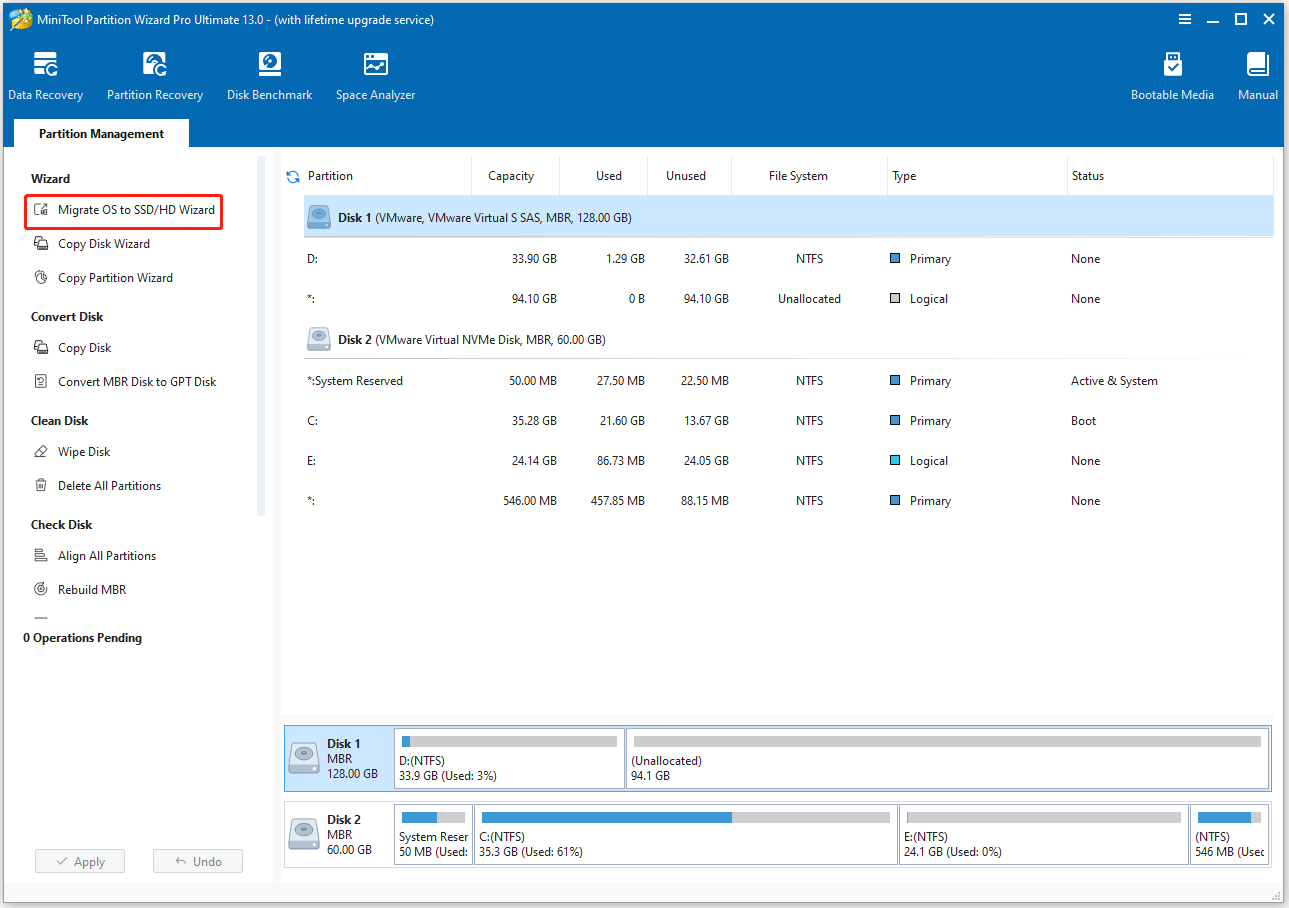
- Launch MiniTool Partition Wizard to its main interface.
- Select the Migrate OS to SSD/HD Wizard feature from the left action panel.
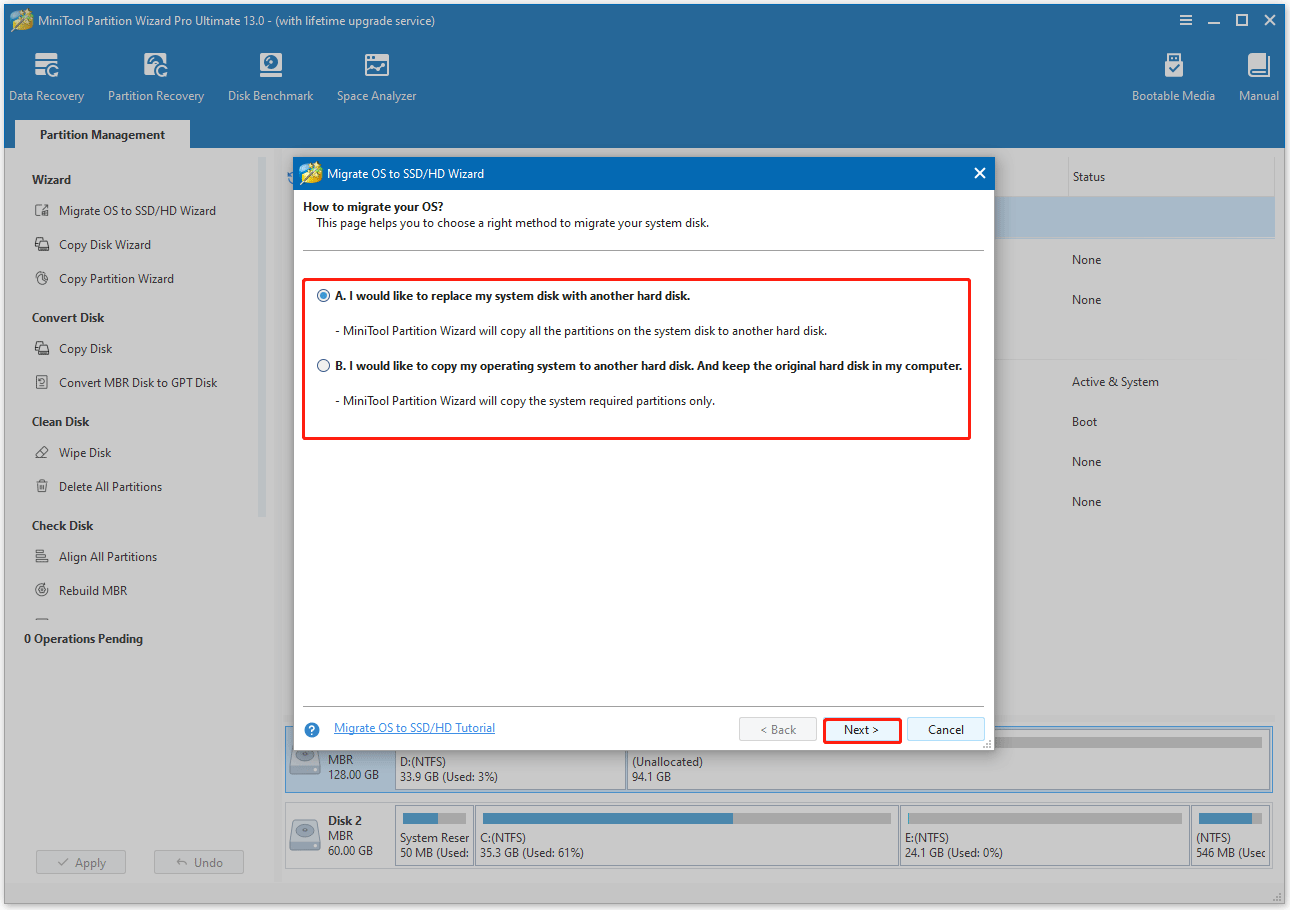
Step 2. Choose the migration method, and then click Next.
- Choose Option A to transfer all the data to the SSD.
- Choose Option B to migrate the operating system only.
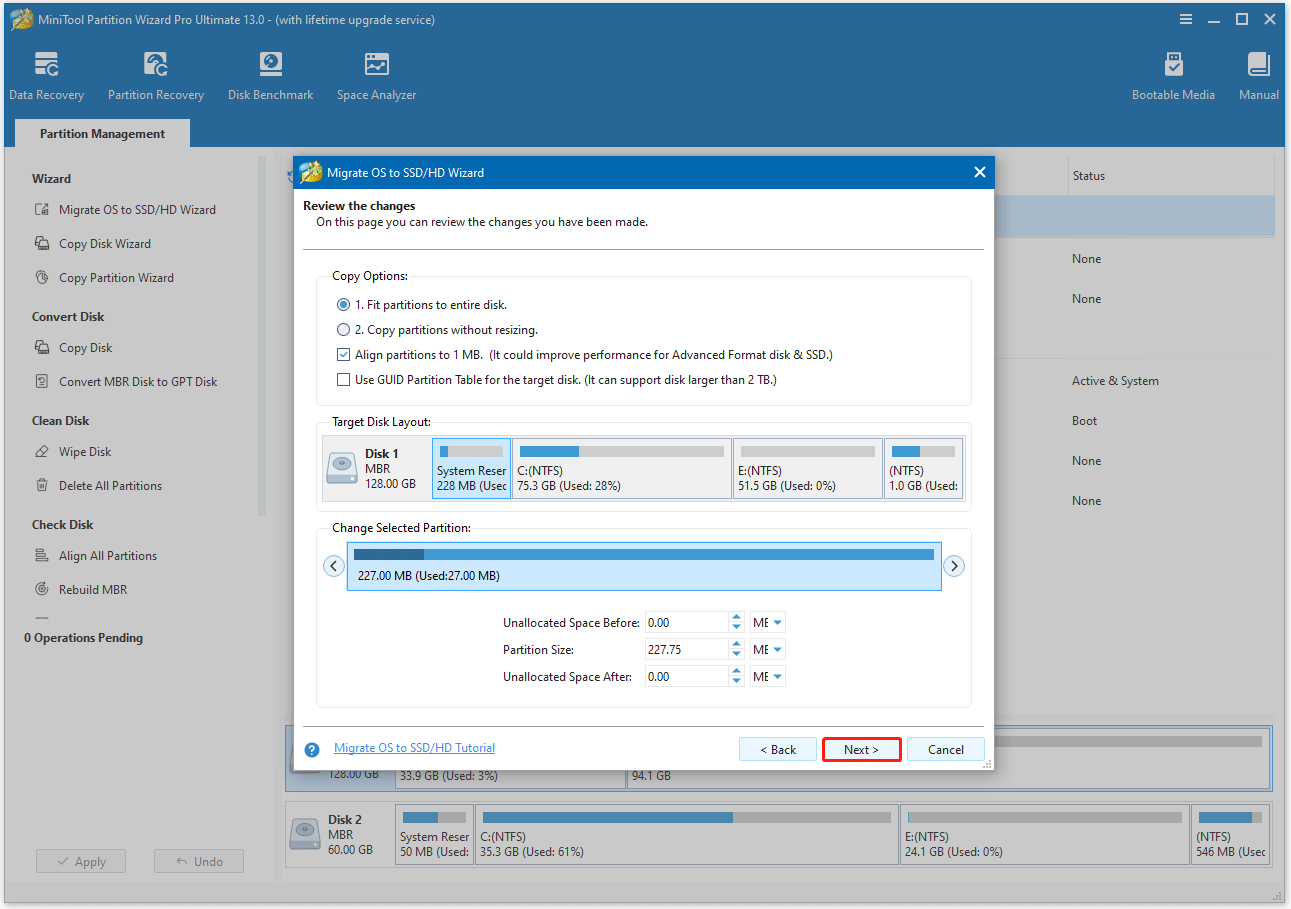
Step 3. Select the target disk and adjust copy options.
- Select the SSD as the target disk and then click Next. You will be warned that all data on the target disk will be erased.
- Review the copy options and disk layout. Keeping the default option is recommended. Then, click Next.
Step 4. Apply the migrating changes.
- Read the NOTE information and click Finish.
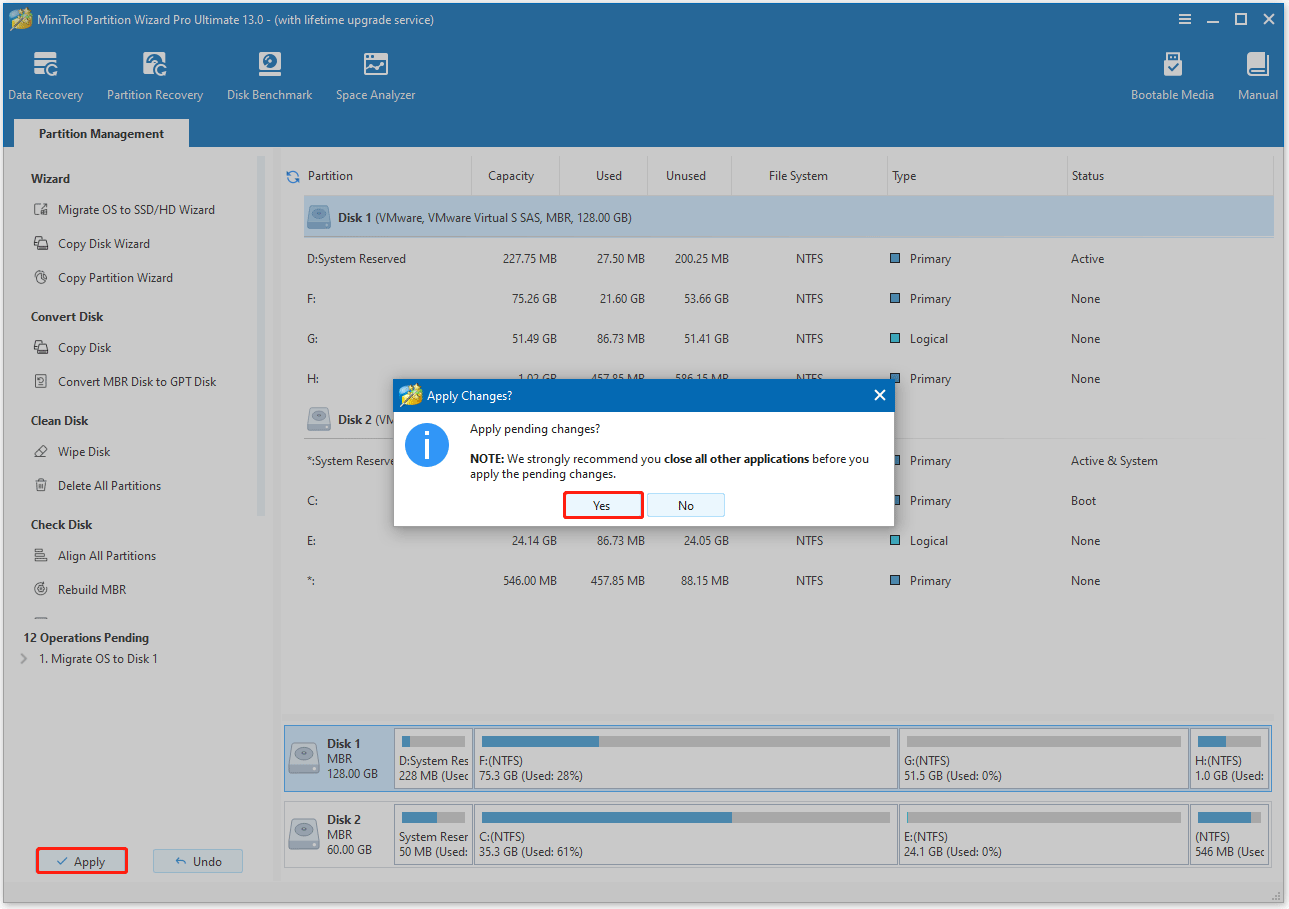
- Click Apply to start the cloning process.
- Click Yes to confirm.
Once done, shut down your computer and install the SSD. Then, boot your computer and press the BIOS key (F2, Del, etc.) to enter the BIOS/UEFI setup, where you can set the SSD as the first boot device.
Windows 10 Freezes Randomly FAQ
2. Optimize your startup programs.
3. Increase your RAM.
4. Regularly clean your computer.
5. Regularly check system files and disk drive health.
Bottom Line
Windows 10 freezing randomly can be an annoying problem. With the methods described in this article, you should be able to resolve it quickly.
If you have any questions or suggestions on how to use MiniTool Partition Wizard, do not hesitate to contact us via [email protected].
About The Author

Position: Columnist
Vega enjoys helping people with computer problems, including disk management, data recovery, data backup, and more. She is constantly expanding her knowledge in related fields. And she will continue to bring more easy-to-understand professional articles to help people solve various problems on the PC.
User Comments :