You may get the “we couldn't update the system reserved partition” error when updating or upgrading Windows 11/10. This post tells you the reason and offers several practical solutions, in which MiniTool Partition Wizard is the most commonly used tool.
The Cause of the “We Couldn’t Update the System Reserved Partition” Error
The “We Couldn’t Update the System Reserved Partition” error may occur on Windows 11/10 when you update the system in Settings, or perform an in-place upgrade using either Windows installation media or Windows installation assistant.

This error may come with error code 0xc1900201, 0x8007007f, among others on Windows 11, and 0xc1900104, 0x800f0922, etc. on Windows 10.
The main cause of the issue is insufficient space on the Windows system partition, either the EFI System Partition (GPT) or the System Reserved Partition (MBR). You can check whether your system disk uses an EFI or System Reserved Partition in Disk Management.
Here is the guide:
- Press the Windows logo key + X and then select Disk Management from the menu.
- Once Disk Management opens, check the system partition’s name: System Reserved or EFI System Partition.

Free Up Space to Solve the Issue
To solve the “we couldn’t update the system reserved partition Windows 11/10” issue, Microsoft suggests deleting the font files to free up about 15MB of space on the system partition.
To delete files from the system partition, you can try the following 2 methods.
Method 1. Use Command Prompt
#1. For Windows 11/10 using the GPT style (with an EFI System Partition), follow these steps to delete font files via Command Prompt:
Step 1: Run Command Prompt as administrator.
- On the Windows search bar, type “cmd”.
- From the result list, right-click Command Prompt and choose Run as administrator.
- Click Yes to confirm.
Step 2: In the Command Prompt window, type the following commands one by one, and each of them is followed by pressing Enter:
- mountvol y: /s (This command assigns drive letter y: to the EFI system partition, and you can use a different letter if y: has been assigned to another partition)
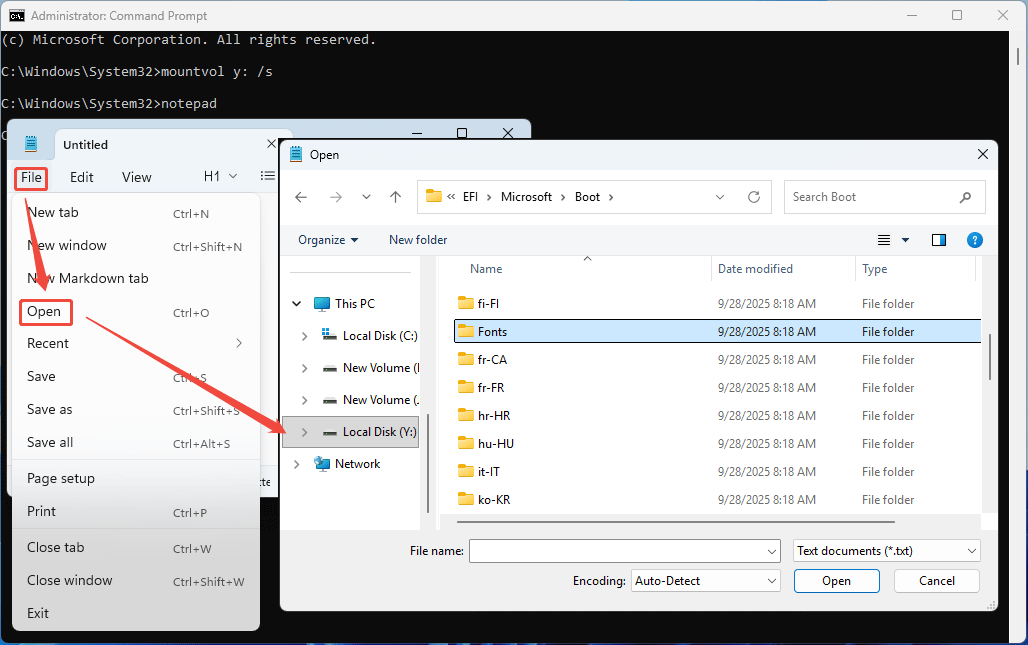
- notepad (This will open Notepad)

Step 3: Use Notepad to delete the Fonts folder.
- On the notepad window, click File > Open.
- On the Open window, under This PC, click Local Disk (Y:).
- Navigate to the EFI\Microsoft\Boot\Fonts folder.
- Right-click this folder and choose Delete.
Step 4 (Optional): In addition to deleting files, you can also move files from the EFI System Partition to the C: drive. For example, the Y:\EFI\HP\DEVFW or Y:\EFI\HP\BIOS files on HP PCs, the Y:\EFI\Lenovo\Insyde files on Lenovo PCs, and the Y:\EFI\Dell\Bios\Recovery files on Dell PCs. Taking Dell as an example, the command is as follows:
- md C:\Dell\BIOS (This command creates a folder whose path is C:\Dell\BIOS)
- move Y:\EFI\Dell\Bios\Recovery\* C:\Dell\BIOS\ (This command moves all files of the Y:\EFI\Dell\Bios\Recovery folder to C:\Dell\BIOS)
Step 5: Type the command “mountvol y: /d” and press Enter to remove the Y: drive letter from the system partition.
#2. For Windows 10 that uses the MBR style (namely, there is a System Reserved partition on your system disk), the guide to deleting font files via commands is as follows:
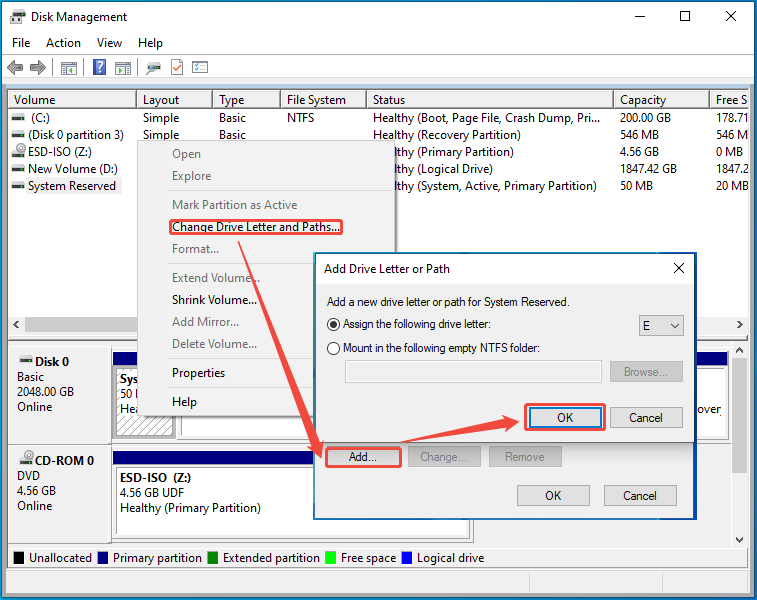
Step 1: Add a drive letter to the System Reserved partition.
- Open Disk Management.
- Right-click on the System Reserved partition and choose Change Drive Letter and Paths.
- In the pop-up window, click Add.
- Then, verify the drive letter (taking E: as an example) and click OK.
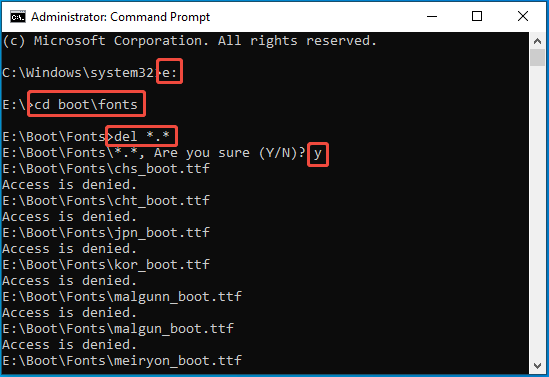
Step 2: Similarly, run Command Prompt as administrator. Type the following commands one by one and press Enter after each command:
- E: (This command will change the drive to E:\)
- cd boot\fonts (This command will change the directory to boot\fonts)
- del *.* (This command will delete all files in the folder)
- y (type this letter when it asks you whether you are sure to delete these files)
Step 3: Remove the drive letter from the system partition, preventing you from mishandling or messing up it.
- Open Disk Management.
- Right-click on the System Reserved partition and choose Change Drive Letter and Paths.
- In the pop-up window, click Remove to delete the drive letter.
- You may need to click Yes twice to confirm this operation.
Method 2. Use MiniTool Partition Wizard
This method works no matter whether you are using Windows 11 or Windows 10, and GPT or MBR style. Here is the guide:
MiniTool Partition Wizard FreeClick to Download100%Clean & Safe
Step 1: Add a drive letter to the system partition.
- Download and install MiniTool Partition Wizard.
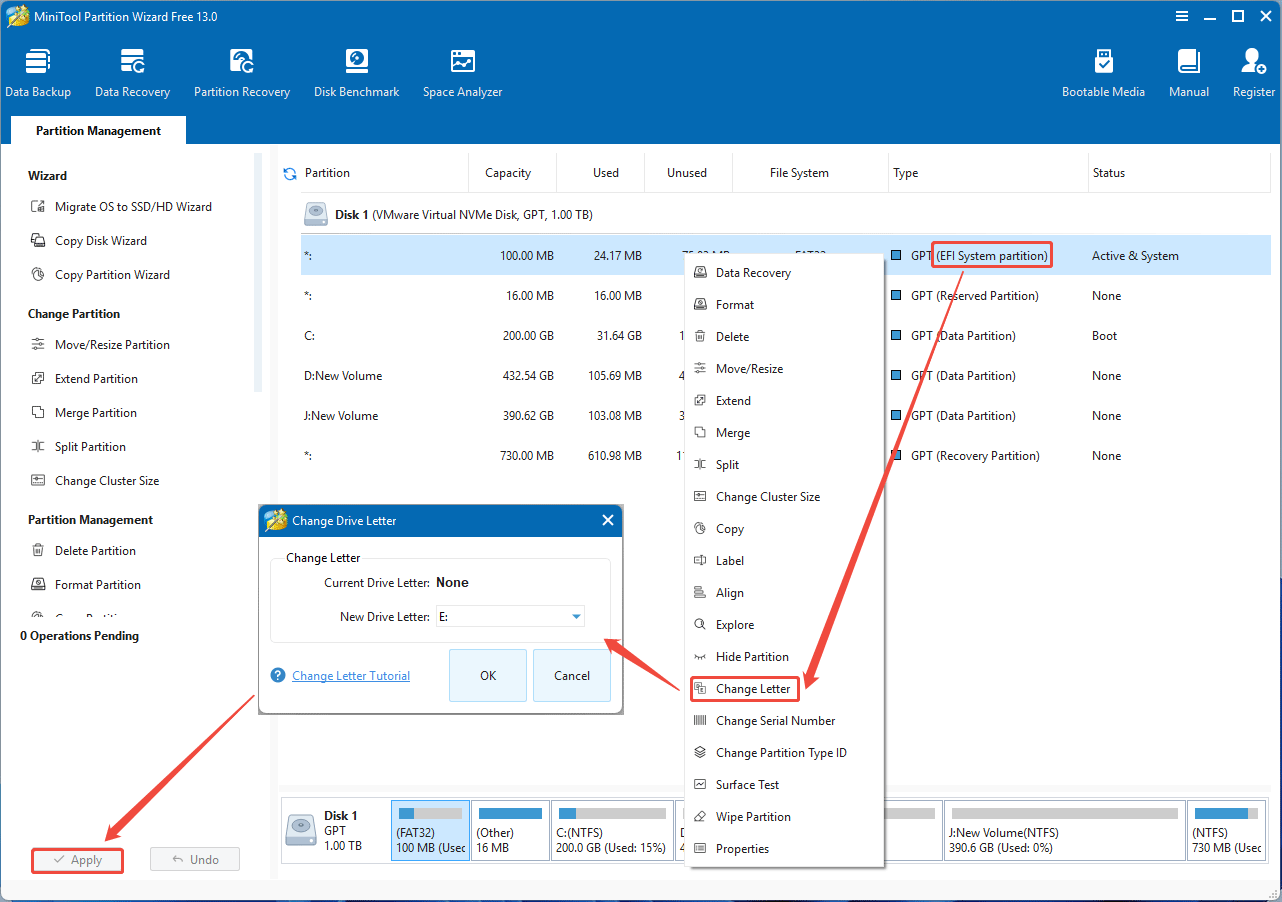
- Launch this software and right-click the Windows system partition (EFI System partition or System Reserved partition).
- Then, select Change Letter.
- In the pop-up window, verify the drive letter and then click OK.
- Click the Apply button in the bottom left corner to execute the operation.
Step 2: Delete the fonts folder.
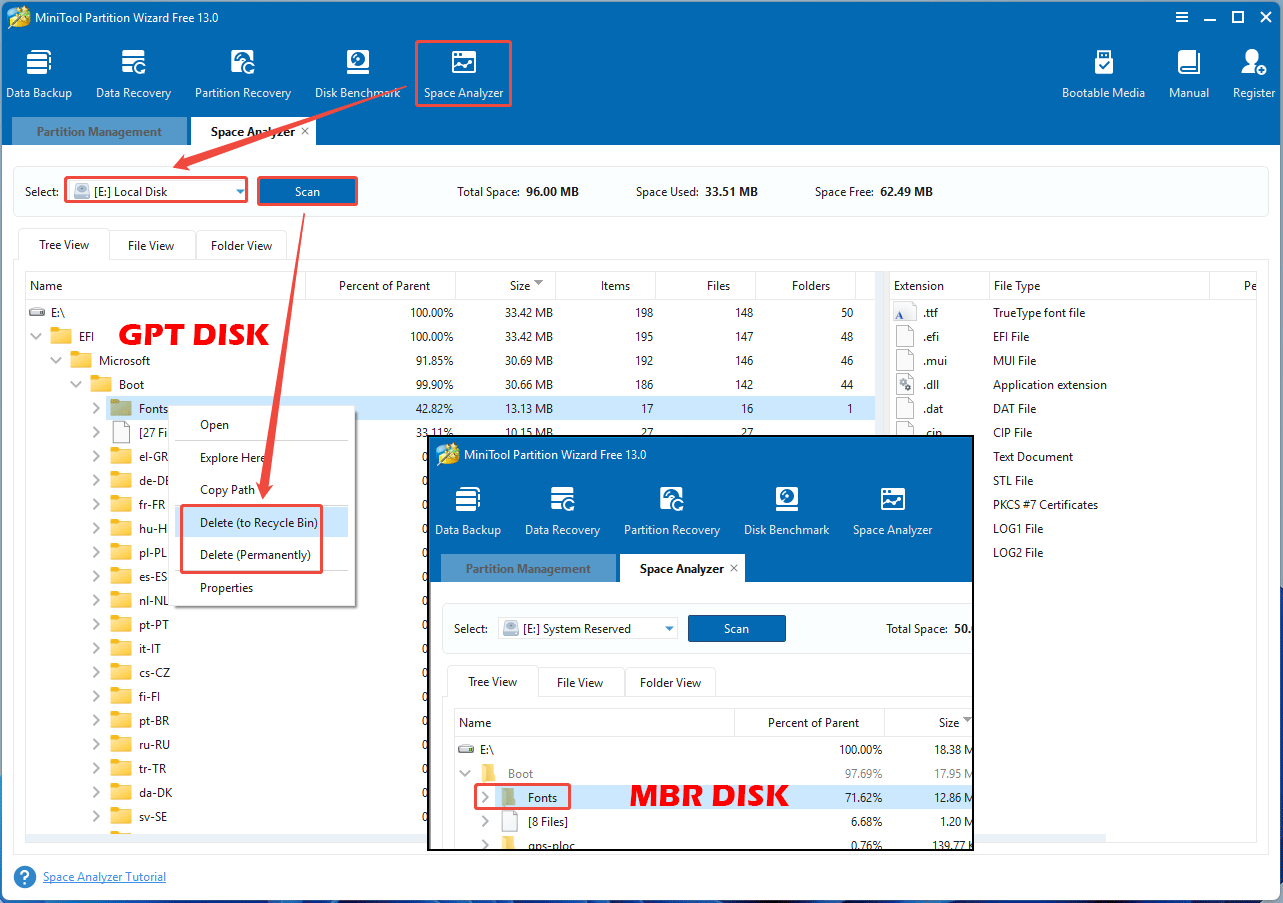
- Once the Windows system partition gets the drive letter, click Space Analyzer on the toolbar.
- Then, select the Windows system partition (E: for example) and click Scan.
- Once the scanning process is complete, navigate to the EFI\Microsoft\Boot\Fonts or Boot\Fonts folder.
- Right-click this folder and then choose the Delete option.
After deleting these files, you can update or upgrade Windows again to see if the issue is solved.
MiniTool Partition Wizard is not only a space analyzer, but also a professional disk and partition management tool. It can move/resize a partition, extend a partition, split/merge partitions, copy partitions or disks, recover lost partitions, etc. It’s worth trying.
Extend the Partition to Solve the Issue
In addition to the file deletion method, you can also extend the Windows system partition to solve the error. Then, MiniTool Partition Wizard is recommended, which can assist in extending a partition by taking free space from existing partitions on the same disk.
Here is the guide:
MiniTool Partition Wizard DemoClick to Download100%Clean & Safe
Step 1: Make a bootable USB drive with MiniTool Partition Wizard.
- Insert an 8GB or larger USB drive into your computer.
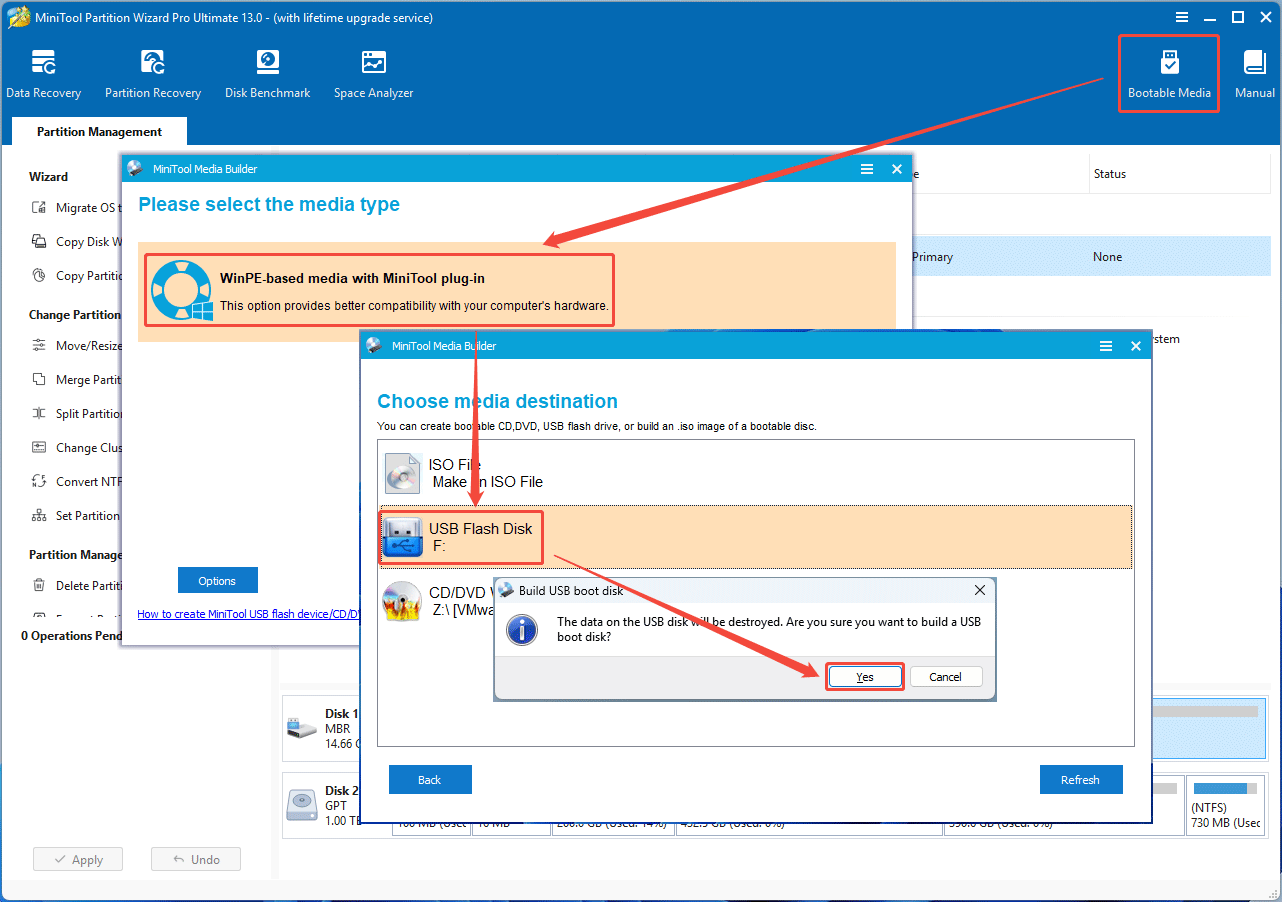
- Launch MiniTool Partition Wizard and click Bootable Media on the toolbar.
- In the pop-up window, click WinPE-based media with MiniTool plug-in.
- Select USB Flash Disk.
- Click Yes when it asks you whether to destroy the data to build a USB boot disk.
- Wait until the creation process is complete. Then, click Finish.
Step 2: Boot the PC from the bootable USB drive. You can refer to the following guide:
- Keep the bootable USB drive inserted into the PC.
- Shut down the computer.
- Power on the computer and then press the BIOS key (Esc, Del, F2, F8, etc.) immediately.
- Once the firmware opens, go to the Boot tab and change the boot device to the USB drive or place it at the top of the boot device list.
- Press F10 and save settings. Then, the PC should boot from the USB drive.
- You may need to press any key during the booting process.
- After booting into the bootable USB drive, MiniTool Partition Wizard will open automatically.
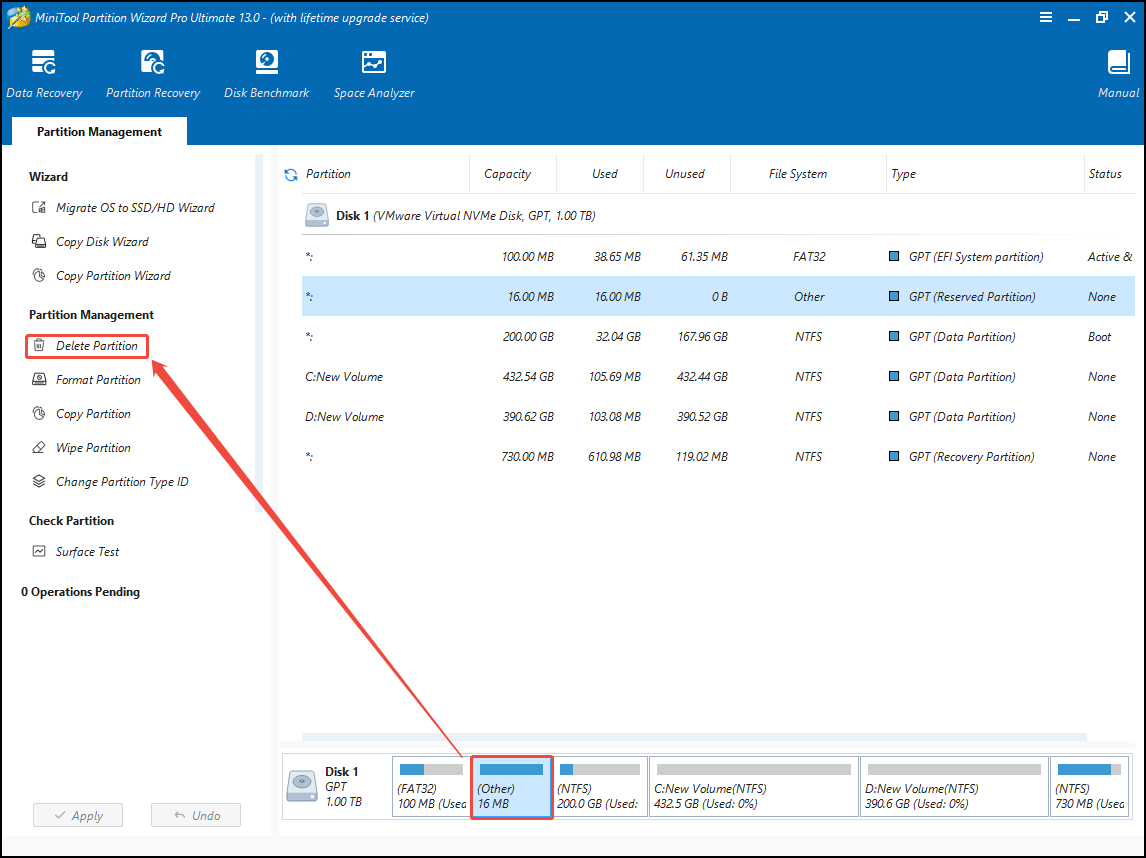
Step 3: If your system disk is a GPT disk, there may be a partition whose file system is Other. This partition is the Microsoft Reserved (MSR) partition. To extend the EFI System Partition, you need to delete it.
2. The MSR partition is used to prevent a GPT disk from being treated as an unformatted empty hard disk when connected to an old system, and to reserve space for other uses. For example, after a basic disk is converted to a dynamic disk, this partition will be used to create a new partition.
Step 4: Extend the Windows system partition.
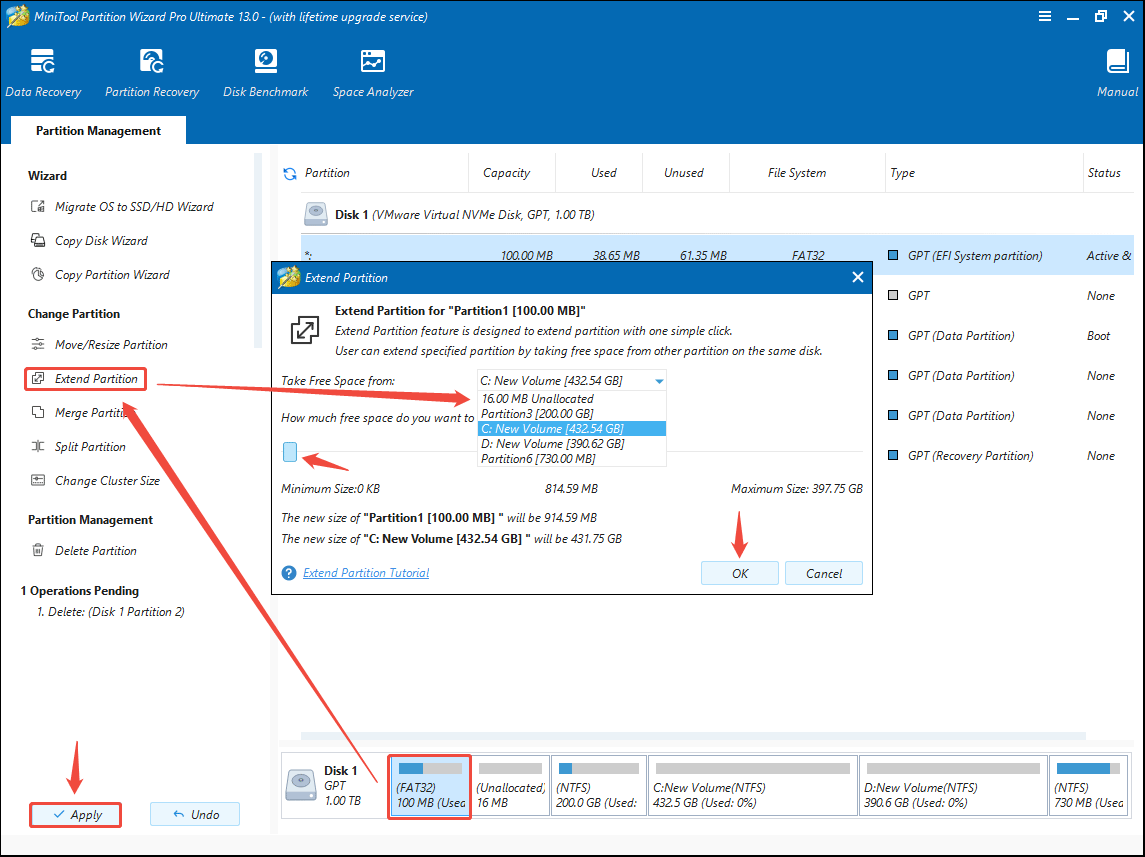
- Highlight the Windows system partition (EFI System Partition or System Reserved Partition).
- Click Extend Partition on the action panel.
- In the pop-up window, select a partition or unallocated space to take free space.
- Drag the blue block to determine how much space to take.
- Once done, click OK.
- Finally, click the Apply button to execute the operation.
Step 5: Once the system partition is extended, shut down the computer. Then, you can boot into Windows and check if the issue is solved.
FAQ
1. MSR partition: On GPT disks, the MSR partition will prevent the system partition from being extended. Deleting the MSR partition will solve the issue.
2. File system error: Use MiniTool Partition Wizard to add a drive letter to the system partition. Then, right-click this partition and choose Check File System. Select Check & fix detected errors and click Start. This may solve the issue.
3. Bad sector: Add a drive letter to the system partition. Then, run the CHKDSK command to find and fix bad sectors.
1. Make a Windows installation USB drive.
2. Boot the computer from the bootable USB.
3. Once you see the Windows setup interface, press Shift + F10 to open the Command Prompt window.
4. Type “diskpart” and press Enter.
5. Type “list disk” and press Enter.
6. Type “select disk *” and press Enter. * is the disk where the system partition is located.
7. Type “list partition” and press Enter.
8. Type “select partition *” and press Enter. * is the number of the system partition.
9. Type “delete partition override” and press Enter.
Bottom Line
The main cause of the error “we couldn’t update the system reserved partition” is the insufficient EFI System Partition or System Reserved Partition. This post offers you 2 approaches to solve the issue: deleting files from the system partition to free up space and extending the system partition.
When you process this issue, MiniTool Partition Wizard is recommended because it not only can help you delete files from the EFI System Partition or System Reserved Partition easily, but also help you extend them quickly.
If you encounter issues when using this software, contact us via [email protected] for help.
About The Author

Position: Columnist
Linda has been an editor at MiniTool for seven years. She continuously learns about computers and puts her knowledge into practice. Moreover, she is particularly knowledgeable in disk management, data recovery, system installation, and PDF editing. Her articles typically reference multiple examples or are based on her own experience, providing users with the most suitable solutions.
User Comments :