What is Toshiba boot menu and how to enter it smoothly? Since the entry of Toshiba satellite boot menu varies in different situations, things become complicated. With this post of MiniTool, you don’t have to worry about it because you can get all details from here.
What Is Toshiba Boot Menu
You will be prompted with a splash screen when you first turn on your computer. It tells you that you can enter the BIOS setup by pressing F2, F12 or other keys or key shortcuts. However, it will only display for a few seconds.
You are required to press different keys on different computer brands. For example, you should press F2 on Asus computers, F2 or F12 on Dell PCs, F10 for HP laptops. Similarly, the boot menu varies on different computer brands. For instance, you can see Lenovo boot menu, HP boot menu, Dell boot menu, Toshiba boot menu discussed in this post and other boot menus.
What is Toshiba satellite boot menu? As its name indicates, it refers to the boot menu appearing on the Toshiba satellite laptop. What does the Toshiba satellite boot menu Windows 10 do? You can find answers from here.
As you know, your computer will boot the operating system installed on the hard drive when you turn on it. However, when your computer is stuck on a blue screen due to error 0xc0000221 or black screen resulting in unbootable error, you need to boot your Toshiba satellite laptop from devices like system installation CD, USB flash drive, U disk, or other items.
To do that, you have to change boot order of your computer after entering the boot menu in BIOS setup. For that, move to the next section.
Related article: Quickly Switch Between Graphical and Text-Based Boot Menu
How to Enter Toshiba Satellite Boot Menu
There are 2 cases for entering Toshiba satellite boot menu. This first one is that your Toshiba laptop can boot normally, while another one is that the laptop cannot boot properly. How to enter boot menu Toshiba satellite under these 2 situations?
To get the details, read the following content of this post now!
Case 1: Enter Toshiba Boot Menu When PC Is Bootable
You are able to enter the Toshiba laptop boot menu easily when your computer boots smoothly. However, things will be different in the case of being locked out of Windows and failing to enter system. At this time, you need the help of a Windows password key.
The Windows password key allows you to remove the missing password and boot the PC smoothly. After that, you can use the following steps to enter Toshiba boot menu.
Step 1: Turn off your Toshiba laptop.
Step 2: Restart the PC again and then keep pressing the prompted keys on the screen until you enter the Toshiba boot menu. The key that you are pressing is also called the Toshiba boot menu key.
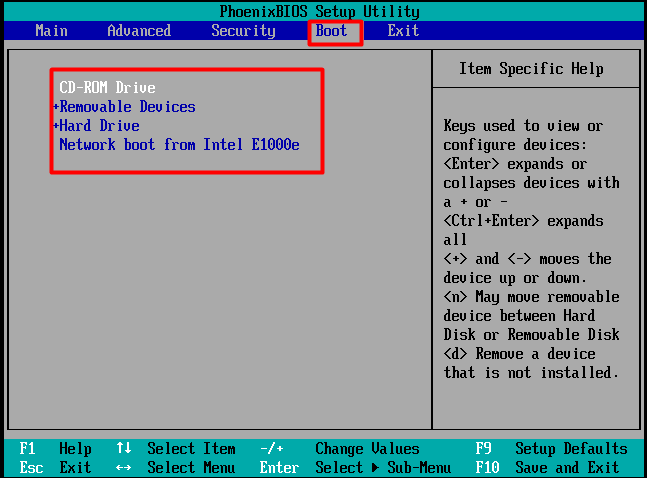
Step 3: You can also enter the BIOS setup to find the boot menu Toshiba satellite. To do that, you can repeat the above steps to get the PhoenixBIOS Setup Utility window and then move to the Boot tab by pressing the certain keys.
Top recommendation: Can I Run Rainbow Six Siege? You Can Get Answers from Here
Case 2: Enter Toshiba Satellite Boot Menu When PC is Unbootable
How to enter Toshiba satellite boot menu when your computer is unbootable? Based on the fact that your computer cannot boot normally, you need to prepare a bootable USB for your Toshiba satellite.
Now, follow these steps to enter Toshiba satellite boot menu Windows 10.
Step 1: Connect the bootable USB to your computer, and then press the Power button of your Toshiba satellite laptop until your computer boots.
Step 2: Keep pressing the Toshiba satellite boot menu key (the key prompted after you turn on the computer) until the BIOS setup window pops up.
Step 3: At this time, navigate to the Boot tab by using the arrow keys. Then, press the up or down arrow keys and +/- keys to change the boot order.
Step 4: Then press F10 to save the changes and hit the Enter key to execute the operation.
Also read: Make a Multi-bootable USB Drive with 4 Multiboot USB Tools
What Can You Do When You Cannot Enter Toshiba Boot Menu
What measures can you take when your Toshiba computer neither access BIOS nor enter the Toshiba boot menu? While if your laptop fails to access BIOS, you can read this article for answers: What If Your Computer Can’t Access BIOS? A Guide for You!
As for Toshiba boot menu entry failure, you should pay attention to this section. In fact, the phenomenon – unable to enter Toshiba satellite boot menu is common to see. You can find plenty of users complain this issue when you look through forums associated with Windows.
Here is a true example from tenforums.com.
I have an issue with not being able to boot my Toshiba Laptop to a repair DVD or a USB recovery drive. I have recently created both from the laptop and am trying to test them. I am unable to get the laptop to boot into the BIOS menu. Any help greatly appreciated.–tenforums.com
How to boot your Toshiba satellite laptop properly when PC neither enter the boot menu nor boot as usual? There are 2 available methods for you. The first method is to boot your Toshiba satellite laptop via MiniTool bootable media. The second is to boot the laptop with a USB recovery drive.
Method 1: Boot the Toshiba Satellite Laptop under the Help of MiniTool Bootable Media
Since your Toshiba satellite laptop can’t enter the boot menu or boot as usual, you have to boot the PC under the help of external tools like MiniTool bootable media. This media can be created by MiniTool Partition Wizard Pro or more advanced editions (like Pro Ultimate).
Download and install MiniTool Partition Wizard on a PC that runs normally by clicking the buttons below, and then connect a removable device such as USB flash drive, TF card and U disk to the PC.
Step 1: Launch MiniTool Partition Wizard to enter the main interface.
Step 2: Click Bootable Media to go on.

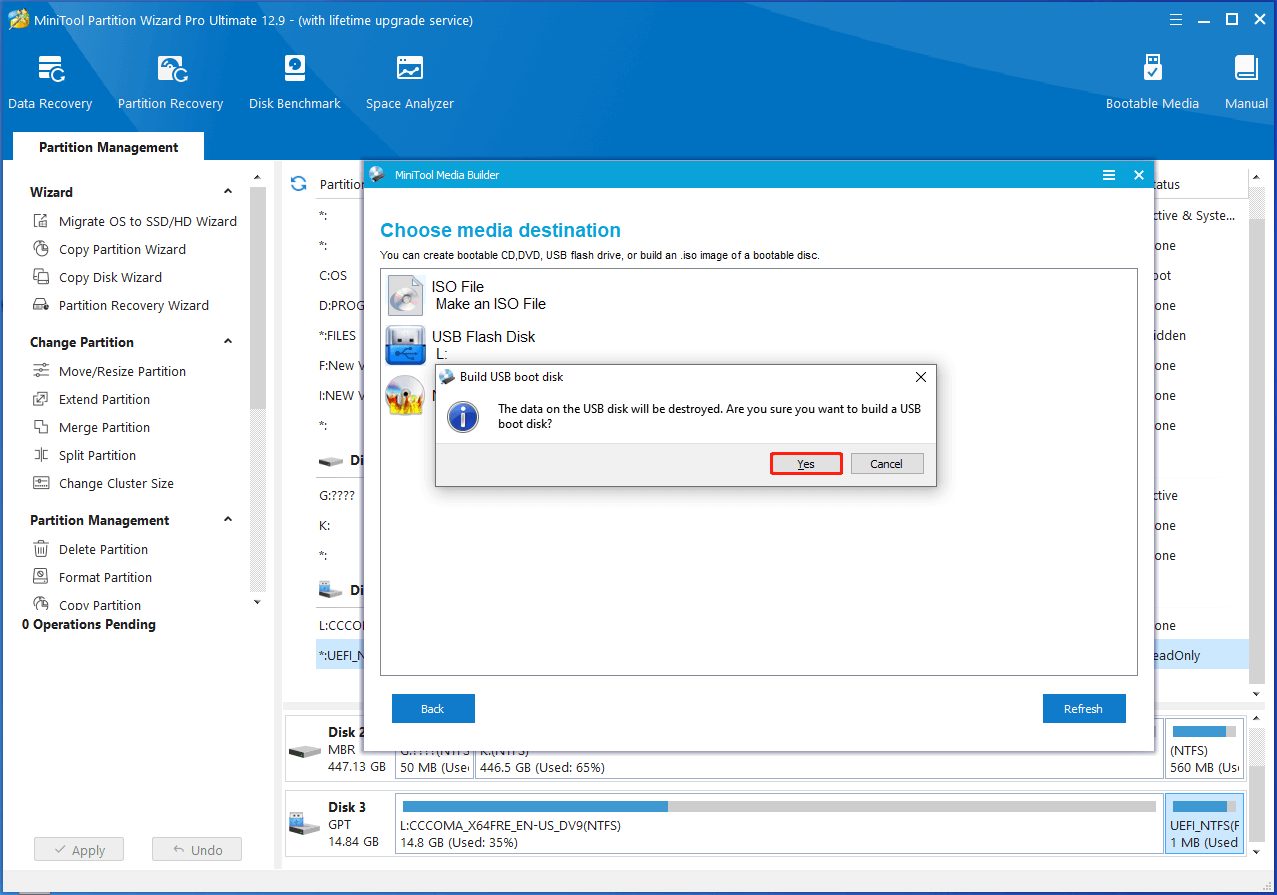
Step 3: Navigate to the window below by following on-screen instruction and then choose USB Flash Disk. Then, you will be prompted with a warning window informing you that the data on the USB disk will be destroyed during the process. After backing up the data, click Yes to continue.
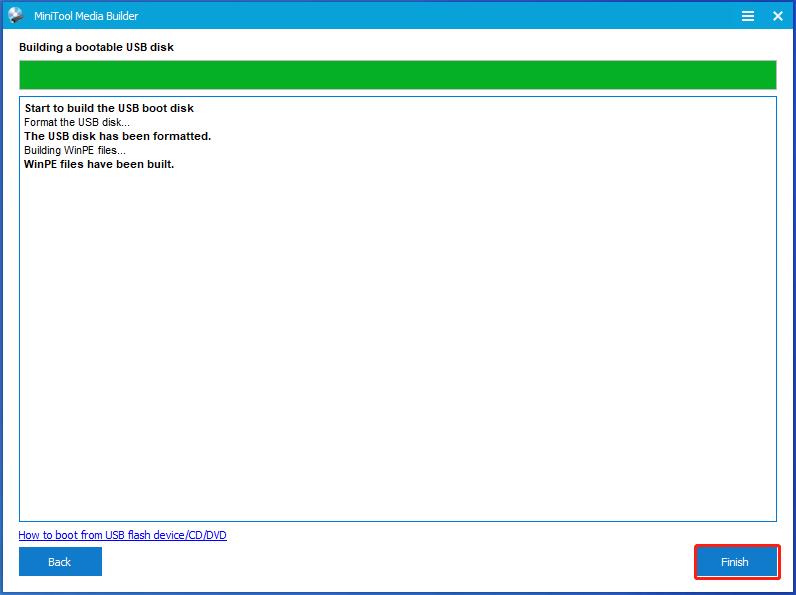
Step 4: After creating the bootable media, click the Finish button to exit the process.
Step 5: Unplug the USB and connect it to the faulty Toshiba satellite laptop. Now, restart it forcely to enter the BIOS setup. In this window, you can set the created bootable media as the top boot device and confirm and save the changes.
Step 6: Then you will get the following window. You just need to click OK to go on until navigate to the main interface of MiniTool Partition Wizard.

Step 7: After launching the MiniTool Partition Wizard, you can utilize features like Check File System, Surface Test, Rebuild MBR, Set Active and others to fix errors on your PC. Then, your computer may boot smoothly.
Top recommendation: [Fix Guide] Windows 10 Computer Activation Error Code 0xc004f025
Method 2: Boot the Toshiba Satellite Laptop under the Help of USB Recovery Drive
Another tool to boot your Toshiba laptop is USB recovery drive created by Windows built-in tool. This recovery drive contains some troubleshooting tools that can help you solve certain errors on the PC.
More importantly, some vital system reinstallation files can be copied by this drive, which benefits you a lot when reinstalling Windows. The flaw is that your operating system will back to the factory status. It indicates that you will lose data and some changes that you have made preciously will be cancelled.
Even so, the USB recovery drive is still welcomed by Windows users because the advantages are out-number than disadvantages. To create one, you can follow these steps.
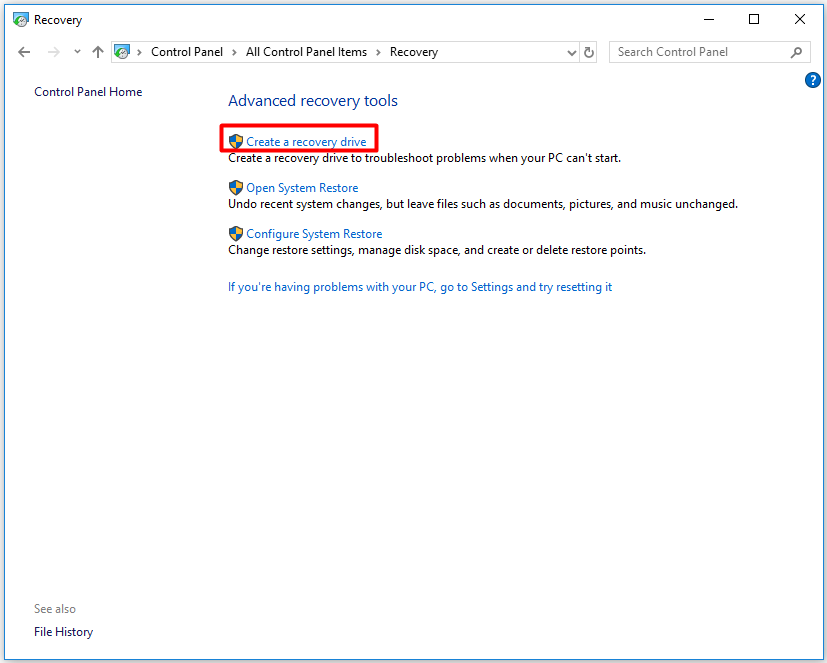
Step 1: Likewise, connect an USB device to a proper running computer and then open the Control Panel. Then click Recovery in the next window.

Step 2: In the next window, click the Create a recovery drive option from the listed Advanced recovery tools.
Step 3: Check the Back up system files to the recovery drive checkbox and then click on the Next button.

Step 4: Choose the drive letter of the connected USB flash drive and click Next. The requirement for USB flash drive capacity varies on different computer models. To be specific, some Toshiba laptops require the USB flash drive should have a minimum capacity of 8GB, while others require 16GB at least.
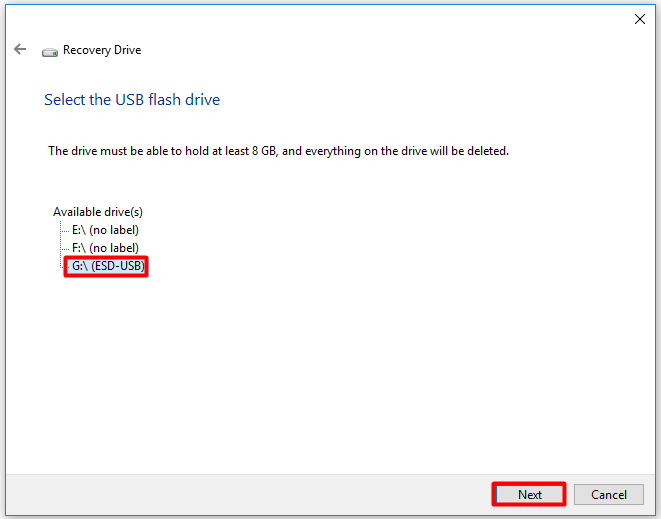
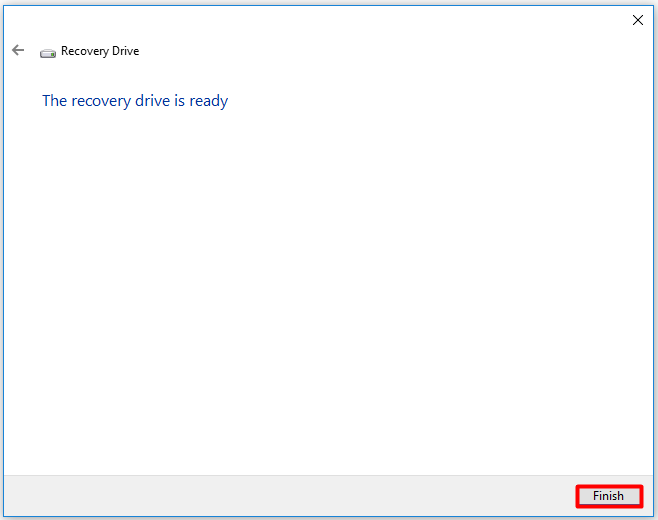
Step 5: The recovery drive will be created automatically. You need to wait for some time since it may take a long time. When the creation process finishes, click Finish.
Step 6: Now, unplug the USB drive and connect it to the unbootable Toshiba computer.
Step 7: Restart the computer repeatedly until it starts up. Once it boots, keep pressing the Toshiba satellite boot menu key to enter the BIOS setup.
Step 8: Move to the Boot tab and then set the USB recovery drive as the first boot device. Then choose a language or country from the pop-up keyboard layout screen and hit Enter.
Step 9: In the next window, click Recover from a drive and then choose Just remove my files option. After that, follow the on-screen instruction to complete the whole operation.
Bottom Line
Read here, you can know what Toshiba boot menu is and how to access it. If your Toshiba satellite laptop can’t boot as usual, you can utilize auxiliary tools such as MiniTool bootable media, USB recovery drive to boot and fix errors with your PC.
If you have some new ideas about this topic, you can leave your words in the comment area below. You can tell us your questions about MiniTool software by sending an email via [email protected].
User Comments :