You may have some ideas about NFS and NFS server. This article shows how to set up a free NFS server on Windows 10. As a Windows 10 user, you may need a free program to help you manage your hard drive with ease, and MiniTool Partition Wizard is a good choice.
What Is NFS?
Before learning about how to set up a free NFS server on Windows 10, let’s learn something about NFS.
Wikipedia records that NFS (short for Network File System) is a distributed file system protocol originally developed by Sun Microsystems in 1984. This protocol allows a user on a client computer to access files over a computer network just as local storage is accessed.
NFS, like many other protocols, is based on the Open Network Computing Remote Procedure Call system. Furthermore, this protocol is an open standard defined in a Request for Comments, allowing anyone to carry out it.
After seeing the shine of Network File System, you may be eager to know how to set up an NFS server on your Windows 10 computer.
However, the fact is that mounting an NFS share on a Unix-like OS is an easy task, while doing that on Windows 10 PC seems more complicated. But take it easy, as the operation can be completed with the right guidance.
Therefore, please follow the steps below carefully to avoid any issues, since modifying any registry data incorrectly can influence the overall health and performance of your computer.
The following shows how to set up a free NSF server from a UNIX system to a Windows 10 running computer.
Step 1: Install the NFS Client
1.Type Control Panel in the Cortana search box and choose the first option from the top.
2.After accessing the Control Panel window, please click the Programs option.
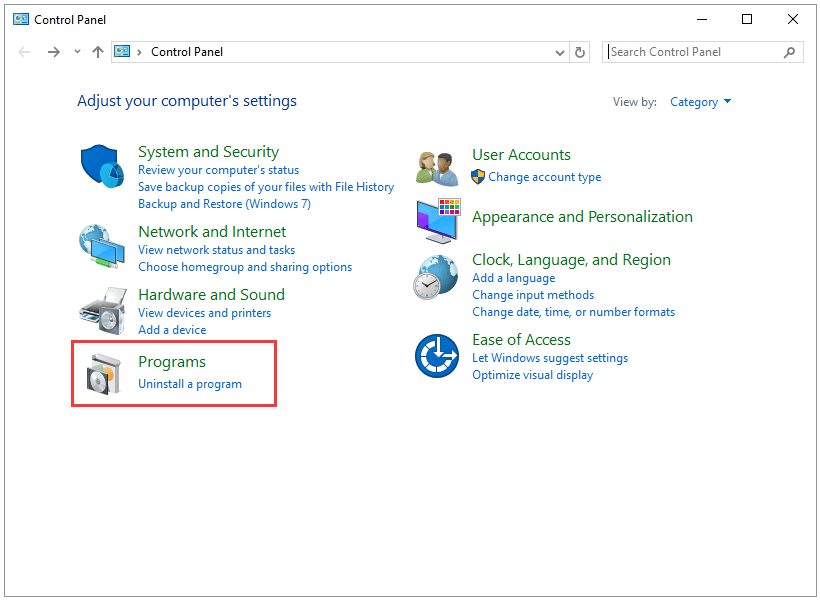
3. Click the Programs and Features option, and the Turn Windows features on or off option in order.
4. On the Windows Features window, please scroll down and check the Service for NFS option and click the OK button.
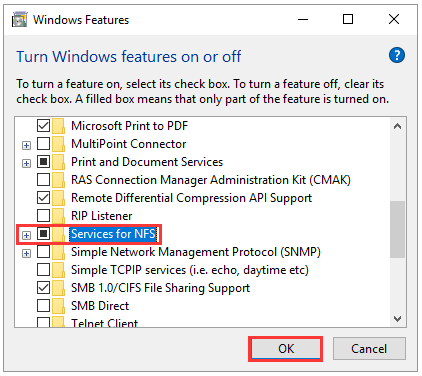
The installation process will be started. After the process comes to an end, you should exit the Windows Features window and take the following step.
Step 2: Enable Write Permission for the Anonymous User
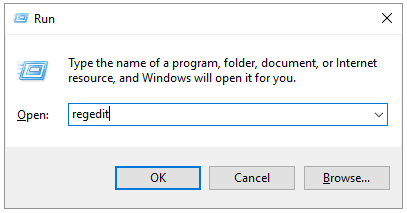
1. Run Registry Editorby pressing Windows + R keys on the keywords simultaneously, typing regedit, and clicking the OK button.
2. Find the following folders in order: HKEY_LOCAL_MACHINE> SOFTWARE > Microsoft > ClientForNFS > CurrentVersion > Default.
3. Double-click the Default folder to open it.
4. Right-click the Default folder, select the Newoption, and select DWORD (32-bit) Valueto create AnonymousUid and AnonymousGid
- Name a file AnonymousUid, and assign the UID found on the UNIX directory (shared by the NFS system).
- Name another file AnonymousGid, and assign GID found on the UNIX directory (shared by the NFS system).
5. Restart the NFS client or reboot the machine to apply the changes.
Step 3: Mount a Free NFS Share Server on Windows 10
To make you understand the operations listed below, here I assume that your NAS device is located on the same network as your Windows 10 PC and the IP address is aa.a.a.aaa.
Now, let’s mount the NFS share server on Windows 10.
1. Launch Windows PowerShell by hitting the Windows key and the X key on the keyboard.
2. Then type C:Userswindows >mount -o anon aa.a.a.aaamntvms Z: and hit the Enter
After the mentioned operations, your NFS share server is ready to be accessed by visiting the Z: Drive. But please note that the installation takes a long time, and please be patient.
User Comments :