How to set up a Raspberry Pi Plex server? What do you need to prepare? If you are trying to figure them out, you come to the right place. This post of MiniTool will guide you through detailed steps to set up the Raspberry Pi Plex server.
What You Need to Prepare for a Raspberry Pi Plex Server
Plex Media Server is a widely popular streaming service that can be used to organize the videos, audios, and photos from a user’s collections and online services. The Plex client can be used on different devices including Windows, Android, Chromecast, Xbox, PlayStation, and Linux. If you just want to set up a single client without the whole server setup, then Raspberry Pi is a good place is set up the Plex Media server.
To complete the setup of the Raspberry Pi Plex server successfully, you need to prepare the following equipment:
- A Raspberry Pi 4 computer with 4GB RAM or higher
- A microSD card with at least 32GB
- Power supply/Keyboard/Mouse/Monitor/HDMI cable for your Raspberry Pi
- Ethernet Cord or WiFi dongle
![How to Install Windows 10 on Raspberry Pi 4 [Full Guide]](https://images.minitool.com/partitionwizard.com/images/uploads/2021/08/windows-10-on-raspberry-pi-4-thumbnail.jpg)
How to Set up a Raspberry Pi Plex Server
How to set up a Plex Raspberry Pi server? This full guide contains 4 main parts. Let’s follow the steps below in order.
Part 1. Prepare Your Raspberry Pi for Plex
The first thing you need to do is to ensure that your Raspberry Pi system is up to date and do some other important preparations.
Step 1. Update the operating system of your Raspberry Pi.
- Start your Raspberry Pi computer and click on the Terminal icon at the top menu bar to access the Command Line. Also, you can select Menu > Accessories > Terminal or press Ctrl + Alt + F1 keys to open the Command-Line.
- In the pop-up command prompt window, run the following commands in order:
- sudo apt-get update
- sudo apt-get upgrade
Step 2. Install the Plex Media Server software to your Raspberry Pi. Here you need to add the official Plex package repository.
1. Click here to download the apt-transport-https package, which allows the apt package manager to retrieve packages over the https protocol used by the Plex repository.
2. Install the apt package by running the command below:
sudo apt-get install apt-transport-https
3. Add the Plex repositories to the apt package manager key list by running the command below:
curl https://downloads.plex.tv/plex-keys/PlexSign.key | sudo apt-key add –
4. Run the following command to finally add the official Plex repository to the sources list.
echo deb https://downloads.plex.tv/repo/deb public main | sudo tee /etc/apt/sources.list.d/plexmediaserver.list
5. Run the following update command again to refresh the package list.
sudo apt-get update
Part 2. Install Plex on Raspberry Pi
Next, you need to Plex server on Raspberry Pi. Here are detailed steps:
Step 1. Set up your Raspberry Pi that you can read from the Plex official package repositories. To install the plexmediaserver package, run the following command:
sudo apt install plexmediaserver
Step 2. The plexmediaserver installation for Plex will set up different things.
- The first thing is to create a user and group for Plex to run.
- It will set up 2 directories, one is to store files temporarily that Plex is transcoding, and the second directory is where Plex stores all the metadata it retrieves for your media.
- Since the Plex is running a different user/group to the default pi user of Raspberry Pi, ensure that you have set up the permissions correctly on your drive.
Part 3. Set up the Raspberry Pi Plex Server
Now, it’s time to set up the Plex server Raspberry Pi. For that:
Step 1. Get your current IP address on your Raspberry Pi by running the command below:
hostname -I
Step 2. Open the cmdline.txt file by the following command.
sudo nano /boot/cmdline.txt
Step 3. Add the following line to the bottom of the cmdline.txt file. Note that you need to replace your IP with the IP you got from the above command.
ip=YOUR IP
Step 4. Press Ctrl + X and then Y keys to save changes and exit.
Step 5. Restart your Raspberry Pi by the following command:
sudo reboot
After finishing all the above steps, the Plex server Raspberry Pi should start with the same IP, and the Raspberry Pi Plex server can scan your media and stream any client that you want to connect.
Part 4. Connect Your Clients to the Raspberry Pi Plex Server
At last, you can use a microSD card as storage media for connecting your clients to the Plex Raspberry Pi server.
Step 1. Open your default browser and enter the IP address followed by the port 32400 and /web/ such as 192.168.1.100:32400/web/. After that, you can sign in to your current Plex account.
Step 2. You can set up your movie, music, and TV shows from here.
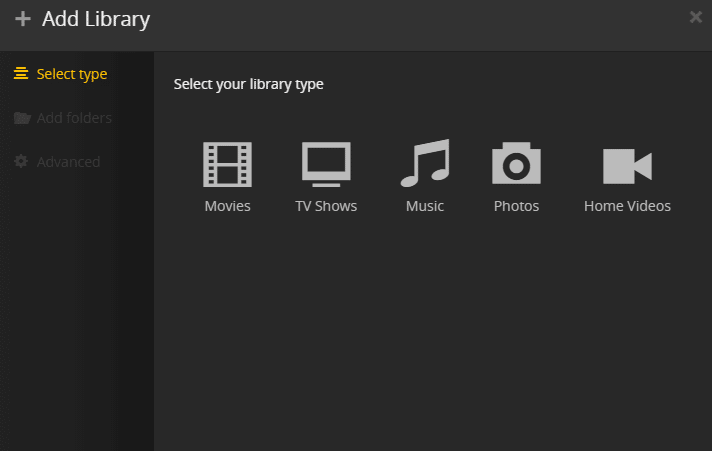
1. Select Add Library from the left pane and click on Select type. Then you can select the type of your media from the listed folders. If you have more than one type, add a new library for each type of media.
2. Select the folder that has all your media like USB or SD card. Then clicks on Add.
3. After the library is added, you can organize your clips.

User Comments :