Some users report that they are unable to launch their virtual machine and receive the error that hypervisor is not running. Focusing on this problem, MiniTool has developed a guide to help you.
Plenty of Windows users are using virtual machine, but some problems related to virtualization have been reported. Sometimes, when they are trying to launch their virtual machine, a window pops up with an error message “virtual machine could not be started because the hypervisor is not running”.
This error prevents users from using virtual machine and the reasons for this error should be related to the Hyper-V service and Hyper-V feature. Luckily, this error is easy to fix. Here are 5 solutions to this error and you can feel free to try them one by one.

Fix 1: Start Hyper-V Service
If you encounter hypervisor not running issue, you should make sure the Hyper-V service is running at first. Here’s how to do it.
Step 1: Press Windows + R to open Run dialog. Input services.msc and click OK to enter Services app.
Step 2: Locate the Hyper-V Virtual Machine Management service. Double-click it to open its Properties.
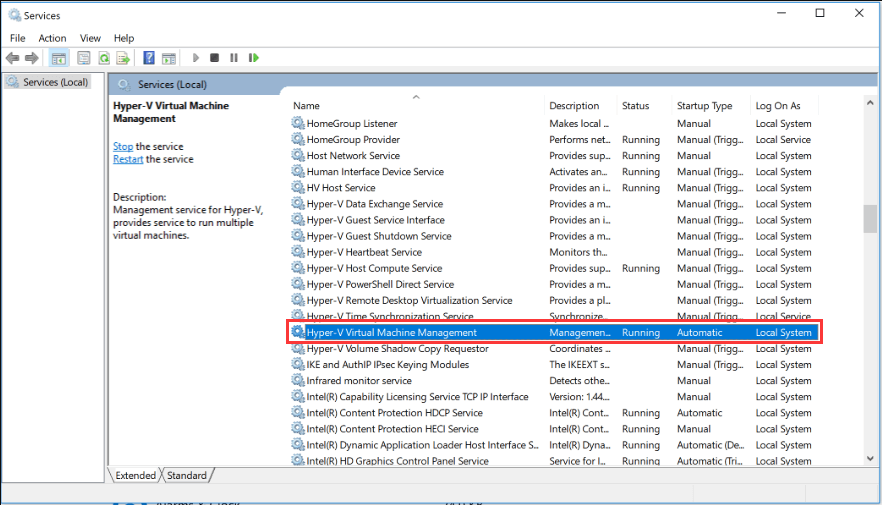
Step 3: Make sure the status of the service is Running and set its Startup type to Automatic.
Step 4: Click Apply and OK to save the change.
After that, restart your computer and check if your virtual machine can work properly.
Fix 2: Enable Hyper-V Feature
Besides, if the Hyper-V feature is disabled, the virtualization cannot be used definitely. So, you need to go to Control Panel to keep the feature enabled.
Step 1: Open your Control Panel and go to Programs > Programs and Features.
Step 2: Click Turn Windows features on or off on the left pane.
Step 3: When you get the following window, scroll down to locate and expand Hyper-V. Then, double-click Hyper-V Platform to expand the list, check Hyper-V Hypervisor item and click OK.

Step 4: Restart your system to check if the error is resolved.

Fix 3: Use Command Prompt
You can also fix the problem simply by executing bcdedit command. With this command, you can set the hypervisor to start automatically in your boot configuration data file. Just follow the steps below:
Step 1: After opening Run window, type cmd and press Ctrl + Shift + Enter to run Command Prompt as administrator.
Step 2: Input the following command and press Enter: bcdedit /set HypervisorLaunchType auto. (Also, you can use the command bcdedit /store c:BootBCD /set hypervisorlaunchtype Auto)
Step 3: Restart your computer and check if this virtualization problem is resolved.
Fix 4: Remove Problematic Updates
According to the reports from Windows users, they get the error message “virtual machine could not be started because the hypervisor is not running” after updating Windows. Thus, perhaps your Windows updates installed recently lead to this error. If you have updated Windows recently, try removing the problematic updates to fix hypervisor not running issue.
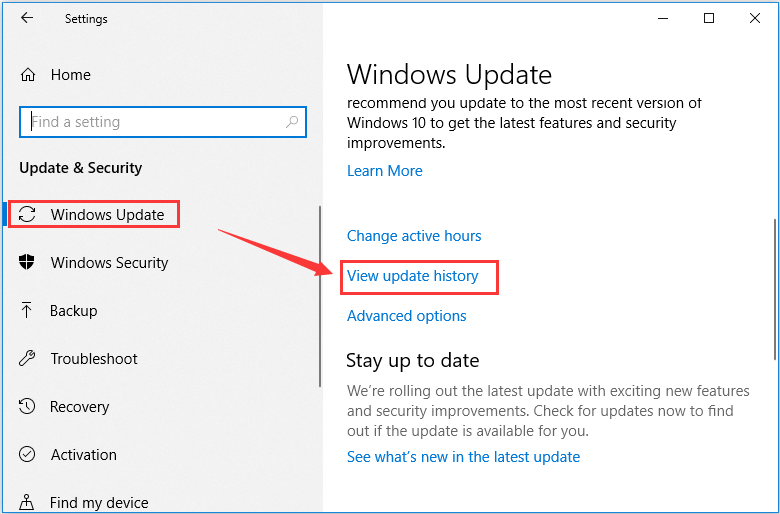
Step 1: Press Windows + I to open Settings.
Step 2: Go ahead to Update & Security > Windows Update.
Step 3: In the right pane, click View update history.
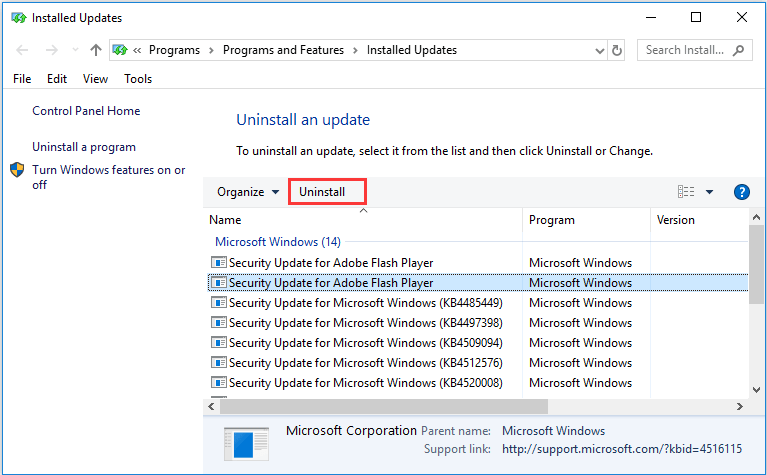
Step 4: In the pop-up window, click Uninstall updates to go to Control Panel.
Step 5: Among the listed Windows updates, select the problematic updates and click Uninstall.
After you uninstall the problematic updates, try opening your virtual machine again to see if the error is fixed. To avoid the error message appears again due to Windows update, you can disable Windows 10 Update.
Fix 5: Update Your Drivers
Finally, you can consider updating your drivers to fix this problem. In some cases, the hypervisor not running issue is caused by corrupted Bluetooth driver, and the issue disappears after updating the driver.
To update your drivers, you can either operate in Device Manager, or visit the manufacturer’s website to download the latest version of the driver.
User Comments :