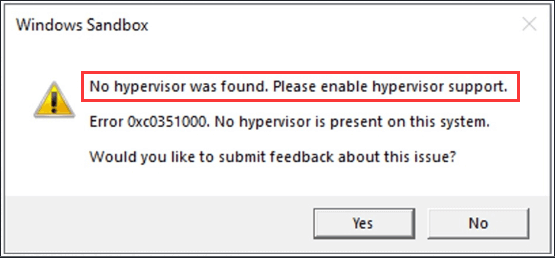
Sometimes, Windows users get an error prompting that “No hypervisor was found. Please enable hypervisor support” while opening Windows Sandbox. It can be fixed easily. Just keep reading this post to learn more about the detail.
Windows Sandbox is a phenomenal addition to Windows 10, which is susceptible to plenty of issues as well. No hypervisor was found is one of the common problems of Windows Sandbox. By the way, you can go ahead to MiniTool Partition Wizard to learn more information about Sandbox that make Windows 10 Pro the OS for PC enthusiasts.
About Windows Sandbox
Windows Sandbox is a built-in tool designed for users of Windows 10 Pro or Enterprise or later. It is used to safely running applications in isolation.
If you have downloaded an executable file but worry about whether it is safe to run in your computer, Windows Sandbox is a perfect tool for you.
Windows Sandbox is a part of Windows but is isolated from the host. You can run untrusted software in this isolated, temporary desktop environment without worrying about any impact to your host. Besides, any software installed in Windows Sandbox and its files will be deleted permanently when you close it.
However, certain issues could be found when using Windows Sandbox, including the internet connectivity problems and no hypervisor was found error.
In the next part of this post, I will tell you how to do if no hypervisor was found error appears when you run Windows Sandbox.
Fix 1: Make Sure Virtualization is Enabled
Just like any other virtual machine, Windows Sandbox is designed to use hardware-based virtualization for kernel isolation to isolate from the host. And this relies on Microsoft’s hypervisor.
Therefore, if no hypervisor was founder error appears, you need to check if CPU Virtualization is enabled.
To check CPU Virtualization, you need to open the Task Manager first by right-clicking the Start button and choosing Task Manager from the menu. In the pop-up window, click the Performance tab and you can see the status of Virtualization just as the following picture shows.
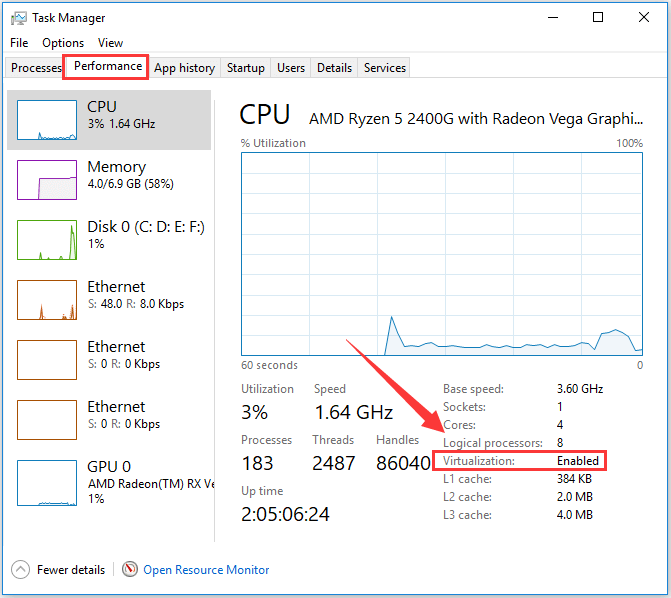
If Virtualization is shown as disabled here, go ahead to enable it in BIOS or UEFI setting.
Take BIOS as an example, you need to enter the BIOS after saving and closing all the current tasks. Then jump to the Advanced tab and enable Intel Virtualization Technology.
Fix 2: Turn on Windows Features
If “No hypervisor was found” error still shows up after enabling CPU Virtualization, it is wise for you to enable some Windows features. Windows Sandbox can run successfully with the help of some operating system-based features. Let’s see how to turn on these features.
Step 1: Type Windows Feature in the search box.
Step 2: Choose Turn Windows features on or off among the listed apps to open it.
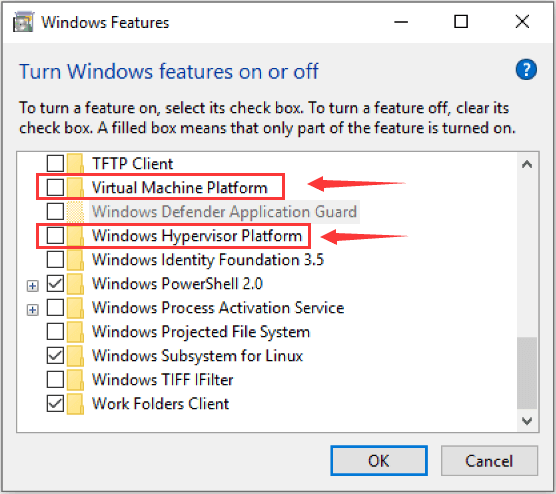
Step 3: Locate the features labeled Virtual Machine Platform and Windows Hypervisor Platform, and select the check boxes beside them.
Step 4: Click OK button to turn them on, then reboot your computer to see if the error has been resolved.
Fix 3: Add an Entry to BCD
The final operation you can do to remove the error is to ensure the hypervisor is configured to run automatically at computer startup. In order to make this configuration, you need to add an entry to the Boot Configuration Data (BCD) in Command Prompt.

Just do as the following steps.
Step 1: Run Command Prompt as Administrator.
Step 2: Type BCDEDIT /Set {current} hypervisorlaunchtype auto and press Enter key.
Step 3: Reboot your computer and run Command Prompt again as Step 1.
Step 4: Type bcdedit and press Enter.
Then, you will get some information as the following screenshot shows.

Please pay attention to the item hypervisorlaunchtype. The status showing beside this item should be Auto, which means that hypervisor has been set to run at computer startup.
Now, it’s your turn. Just do according to the instruction above to fix Windows Sandbox no hypervisor was found error by yourself.
User Comments :