Things You Must Know Before You Start Using Kali Linux
What Is Kali Linux?
Maintained and funded by Offensive Security Ltd., Kali Linux is a Linux distribution based on Debian and it is designed for digital forensics and penetration testing. Kali Linux is the industry’s leading Linux distribution in penetration testing and white hat. It is widely recognized all over the world.
Further Reading:
What is digital forensics?
Digital forensics is a branch of forensic science encompassing the recovery and investigation of material found in digital devices, often in relation to computer crime.
Digital forensics investigations have a variety of applications, for example, the digital forensics result can be used to support or refute a hypothesis before criminal or civil courts; of course, this technology can be also used in the private sector such as internal corporate investigations or intrusion investigation.
What is penetration testing?
Penetration testing is an assessment method that evaluates the security of computer network systems by simulating the attack methods of malicious hackers. This process includes active analysis of any weaknesses, technical defects or vulnerabilities of the system.
This technology can uncover system vulnerabilities and propose improvement methods for employers without affecting the normal operation of business systems.
What Is Kali Linux Commonly Used for?
By default, Kali Linux comes with a large number of intrusion and penetration tools and software (approximately more than 600), including Armitage, Nmap, Wireshark, John the Ripper password cracker, Aircrack-ng, Burp Suite, etc.
With these tools, Kali Linux is commonly used to do the following jobs:
- Information forensics (including disk recovery, memory analysis, PDF audit, registry audit, and so on).
- Penetration testing (most white hat hackers learn this technology and use it to assess network system security).
- Attack wireless network protected by WPA/WPA2 (to get Wi-Fi password or sniff network).
- Crack the password (cracking the hashed password offline or cracking the website login password online).
- Reverse engineering (decompiling programs written in android, Java, and C++ into code).
- Social engineering (black hat hacker’s favorite).
Tips on How to Use Kali Linux
If you want to install and use Kali Linux, there is some advice for you:
- Kali Linux is not suitable for beginners: If you just started using Linux a few months ago, or if you think your level of Linux knowledge is below average, then Kali Linux is not for you. Kali Linux is mainly for experts who want to run penetration test suites or those who want to learn to become white hats and digital forensics.
- Don’t use Kali Linux as your main system: Kali Linux uses the root account by default and does not provide ordinary user accounts. It is designed this way to avoid you being required to enter the root password every minute, because almost all security tools available in Kali require root privileges. But this design will also make your computer vulnerable to hackers.
- Hold the bottom line: Do not use Kali Linux system to invade other people’s equipment or network, otherwise you may face jail.
- Do not add any other third-party software repositories: Kali Linux is a rolling distro and depends on the Debian test branch. It is very likely to crash due to dependency conflicts and package hooks after you add a new repository source.

How to Install Kali Linux
In this part, I will tell you the requirements for installing Kali Linux, and shows you how to install Kali Linux on VirtualBox, VMware, USB, and Windows 10.
Kali Linux Installation Requirement
Installing Kali Linux needs your computer to meet the following requirements:
- At least 3.8 GB of hard disk space.
- At least 512 MB of memory if your computer is using i386 or AMD64 architectures.
- CD-DVD drive or U disk support.
The recommended configuration for installing Kali Linux is as follows:
- At least 10 GB of hard disk space, preferably SSD.
- At least 2048 MB RAM.
How to Install Kali Linux on a Virtual Machine
Installing Kali Linux on a virtual machine can protect your computer from being affected with virus or being attacked by hacker. If you are not familiar with Kali Linux, this Kali Linux install method is recommended. As for the virtualization software, you can use VitualBox or VMware.
But before you install Kali Linux, I recommend you to make a separate partition for the virtual machine and Kali Linux. You can do that by shrinking partition in Disk Management or using MiniTool Partition Wizard. Here I pick MiniTool Partition Wizard, because it’s more convenient.
MiniTool Partition Wizard FreeClick to Download100%Clean & Safe
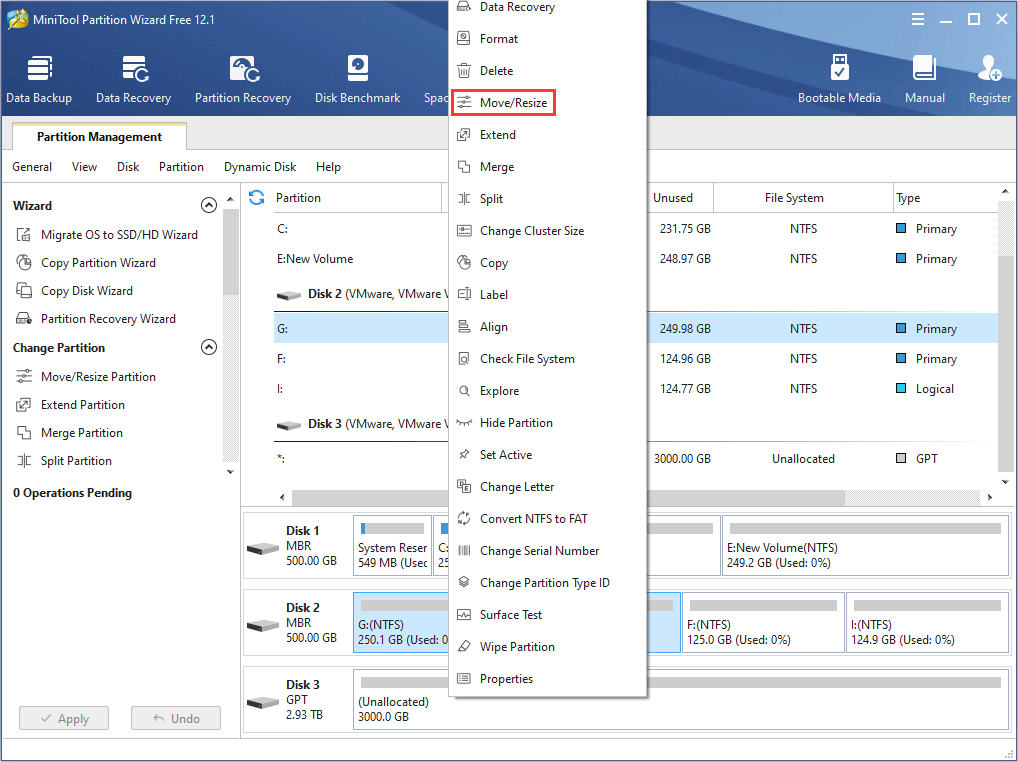
Step 1: Click the above button to download MiniTool Partition Wizard. Launch this software and go to its main interface. Then, right-click the partition you want to shrink and choose Move/Resize from the context menu.
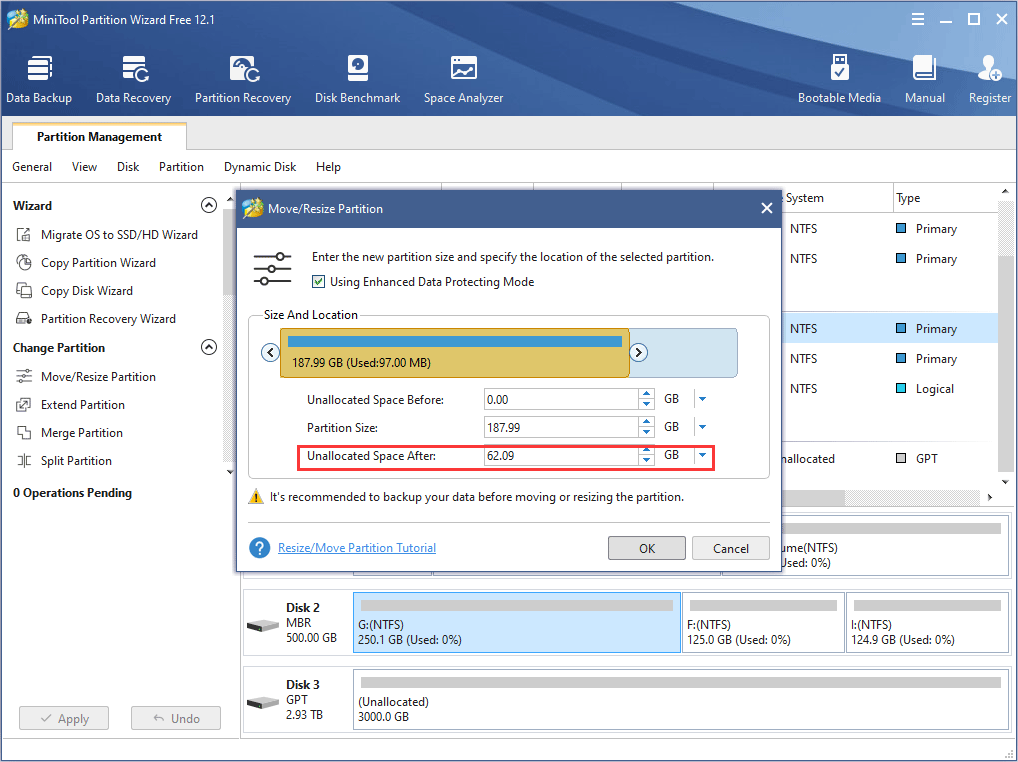
Step 2: In the popup window, drag the slider to choose how much size you want to shrink and click OK to continue. The number in the box following Unallocated Space After is the space size you reserve for the new partition. Please note that the larger the space for the virtual machine, the better.
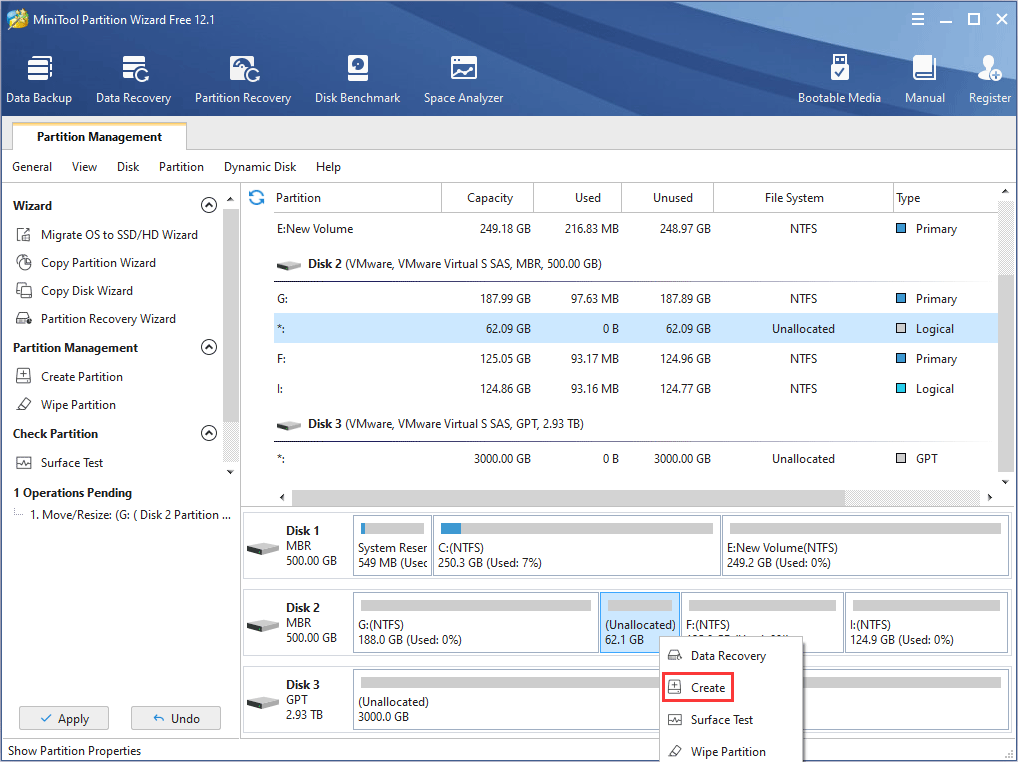
Step 3: Right-click the gray unallocated space and choose Create from the context menu.
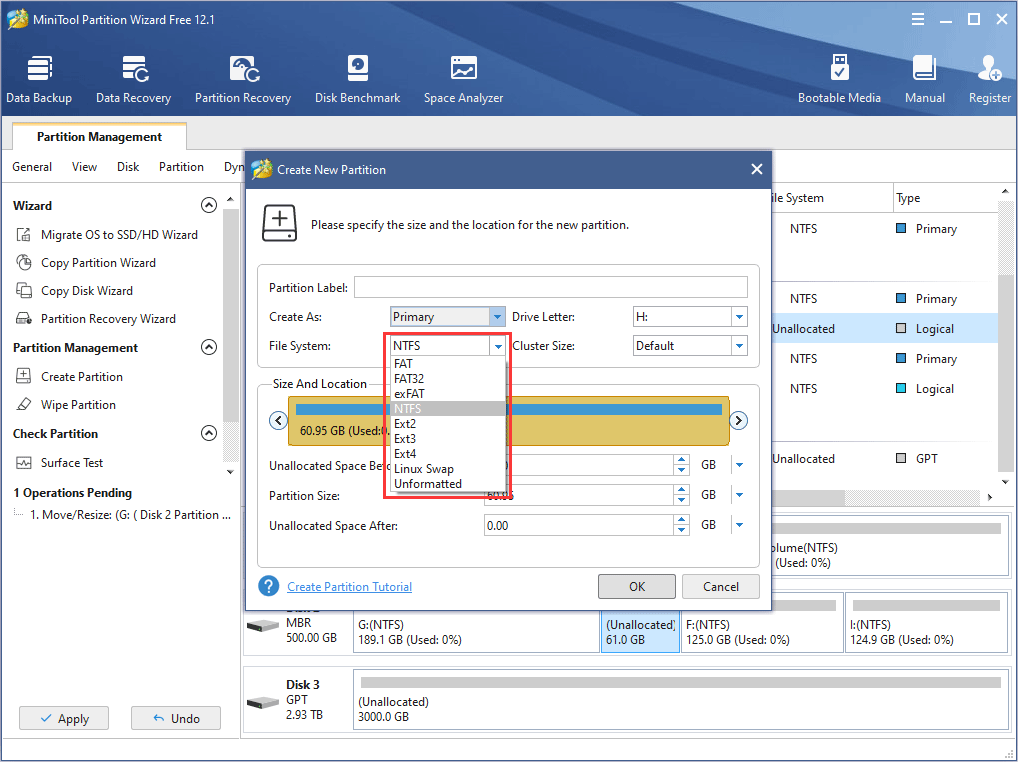
Step 4: In the popup window, keep the default settings or make your own choices on partition properties like file system, partition label, drive letter and so on. Then, click OK to continue.
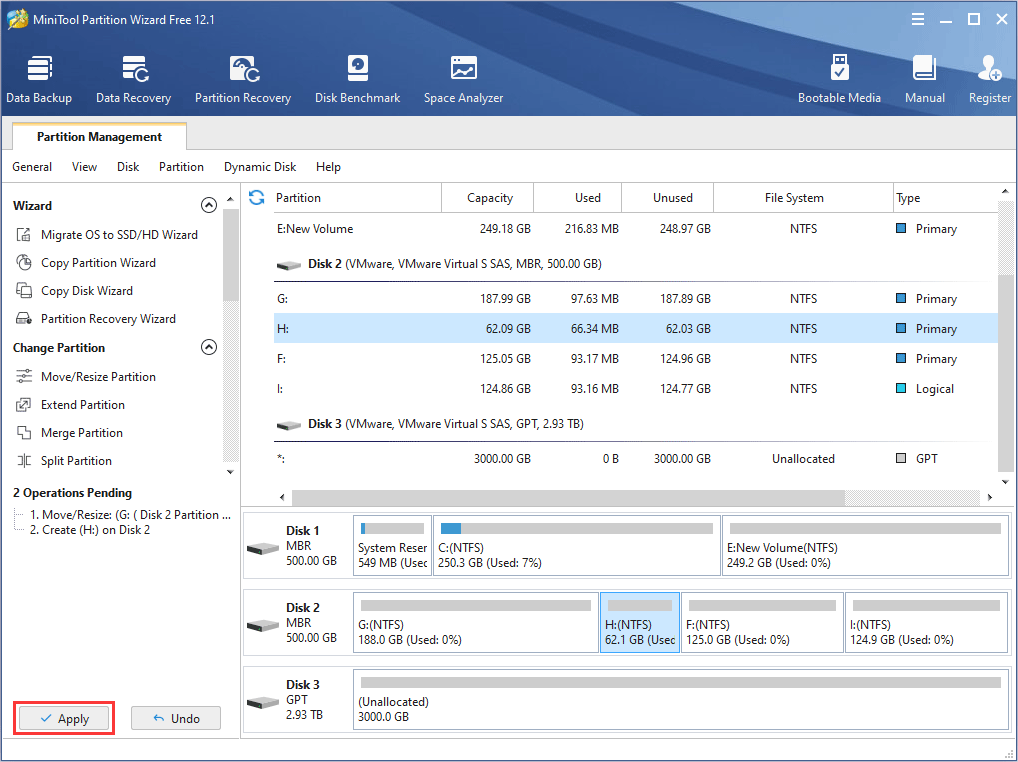
Step 5: Preview the changes and click Apply to confirm the changes.
After making a separate partition, you can start install Kali Linux on virtual machines.
How to Use VirtualBox and VMware to Create a Windows 10 VM
Here is the on how to install Kali Linux on VirtualBox:
Step 1: Download VirtualBox from its official website and install it on your computer. As for the install location, you can choose the partition you created just now.
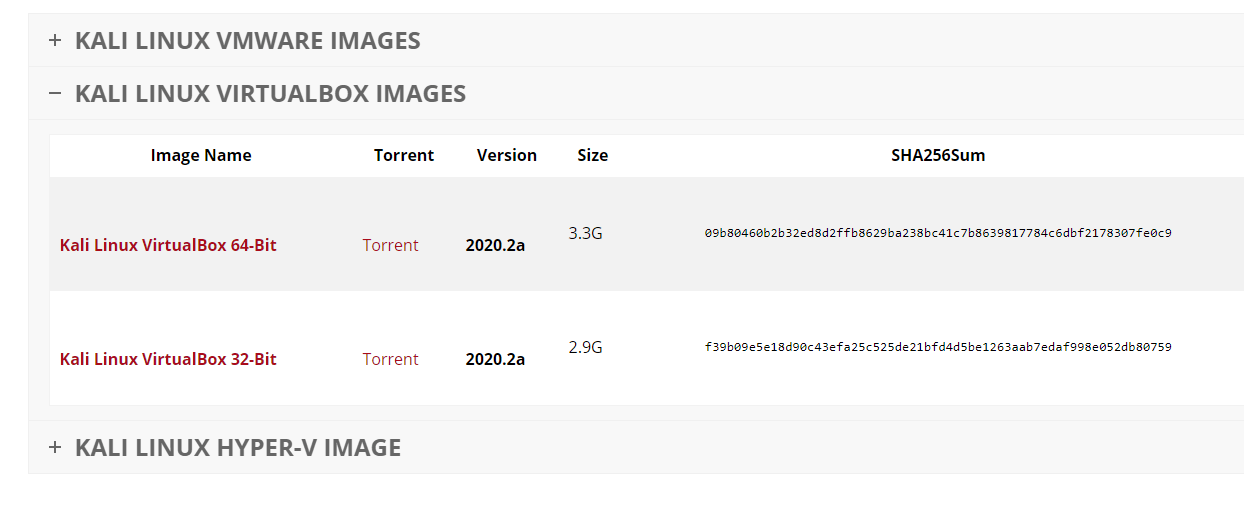
Step 2: Download Kali Linux from Offensive Security official website. From this page, choose a proper Kali Linux VirtualBox image to download. Then, extract the file.
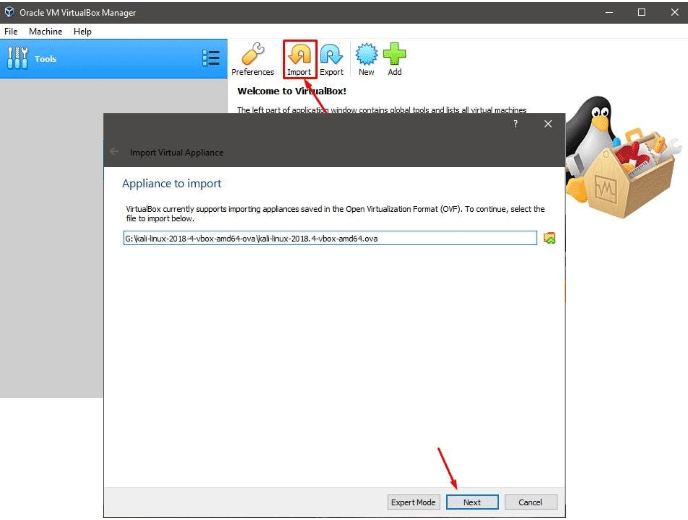
Step 3: Start VirtualBox and you will notice that there is an “Import” button. Click on this button to open Import Virtual Appliance window. On this window, browse to find the Kali Linux VirtualBox image you just downloaded and select it to import (The file name should start with “kali linux” and end with the extension “.ova“). Then, click Next.
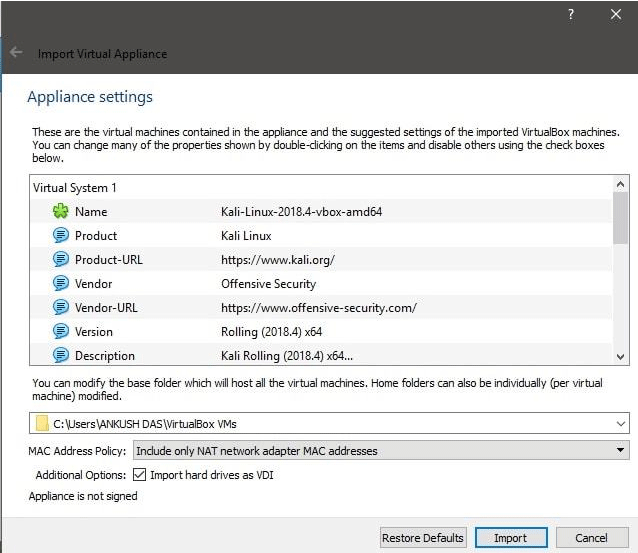
Step 4: Now, you will see the settings of this virtual machine to be imported. You can customize them or use the default settings. Then, choose a path to host the virtual machine. The partition you created just now may be suitable. Then, check Import hard drives as VDI option and click Import.
Step 5: Kali Linux will be listed as a bootable virtual machine. You can now start it.
Here is the tutorial on how to install Kali Linux on VMware:
Step 1: Download VMware and install it. Then, download a proper Kali Linux VMware image from Offensive Security website and extract it.
Step 2: Open VMware Workstation and click File > Open at the upper left corner. Then, find the extracted folder. Under this folder, there is only one file, whose extension is “.vmx“. Choose this file to open.
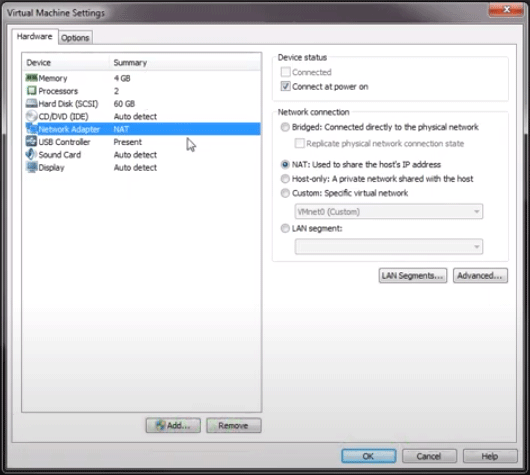
Step 3: Click Edit virtual machine settings to change the settings of Kali Linux. In this way, you can make sure the system sources Kali Linux requires can be met by the system sources you configured for the VMware. In addition, choose NAT network. After that, you can boot this virtual machine.
![How to Create a VM with Hyper-V [Virtual PC Windows 10]](https://images.minitool.com/partitionwizard.com/images/uploads/2020/02/virtual-pc-windows-10-thumbnail.jpg)
How to Install Kali Linux on USB
Some people may like to install Kali Linux on USB, because this Kali Linux install makes a portable Kali. Here is the tutorial on how to install Kali Linux on USB:
Step 1: Plug your USB drive into an available USB port on your Windows PC, note which drive designator (e.g. “F:“) it uses once it mounts.
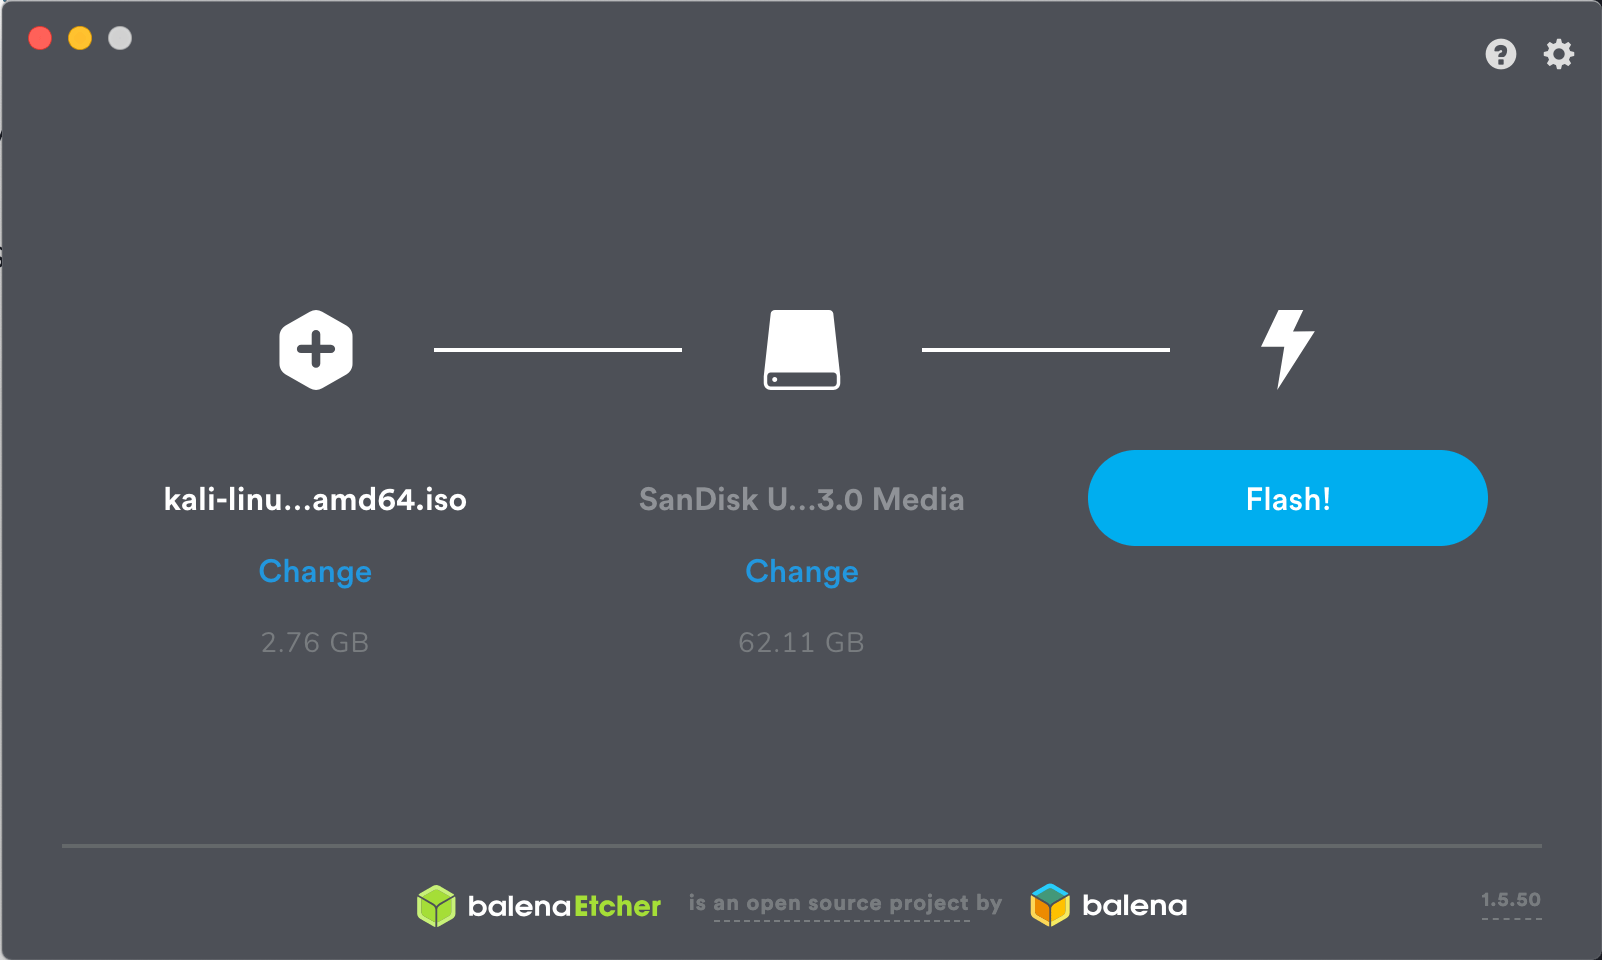
Step 2: Download a Kali Linux image file. Then, download USB burning software like Etcher, Universal USB Installer, UNetbootin, etc. Use this software to burn the image ISO file into the USB drive. Kali Linux official website recommends users to use Etcher. Launch Etcher, select Kali Linux image, verify USB drive, and then click the “Flash!” button.
Step 3: Once Etcher alerts you that the image has been flashed, you can safely remove the USB drive and proceed to boot into Kali with it. But this Kali Linux bootable USB is just a live USB (you can’t save any changes you made on this drive). If you want to have a persistent storage, you should follow the next steps.
Step 4: Download MiniTool Partition Wizard and use it to move/resize the USB drive. In this way, you can make an unallocated space. Then, use the unallocated space to create a partition, whose file system is Ext4, and partition label is persistence.
Step 5: Restart your computer to make it boot from the USB drive. Then, in Kali Linux Boot menu, choose Live USB Persistence boot option.
Step 6: After the installation process (I will show it later), enter Kali Linux desktop. You should first use fdisk -l command to check the current hard disk device to find the identifier (it equals to driver letter) of the U disk persistence partition. After that run the following command lines:

Step 7: Through the above operations, a Kali Linux bootable USB with persistence storage is completed. After that, restart your computer, boot it from USB, and choose Live USB Persistence again. Then, you can save all the changes you made on Kali forever.
How to Install Kali Linux on Windows 10
Some people would like to dual boot Kali Linux and Windows 10. If so, please refer to the following tutorial on how to install Kali Linux on Windows 10:
![How to Install Linux (Ubuntu) on Windows 10 [Ultimate Guide]](https://images.minitool.com/partitionwizard.com/images/uploads/2020/02/install-linux-on-windows-10-thumbnail.png)
Step 1: Back up important data to an external hard drive. If necessary, I recommend you to clone the whole disk to an external hard drive. This can help you recover your computer when something goes wrong.
Step 2: Use MiniTool Partition Wizard to make a separate unformatted partition for Kali Linux. Download Kali Linux and burn the ISO to a USB stick as the installation medium. Restart the computer and make it boot from the installation medium.
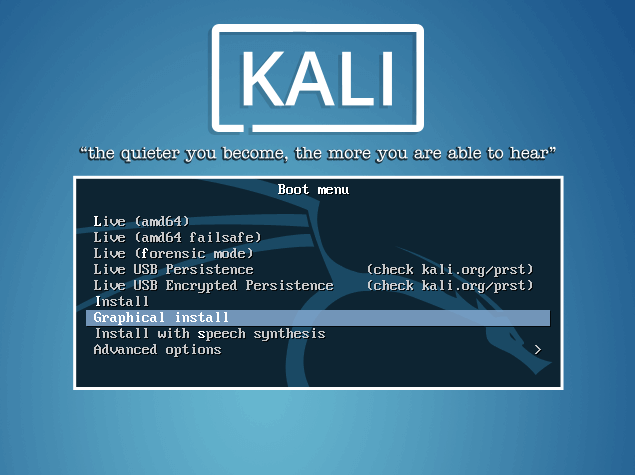
Step 3: Once the computer boots from USB, choose Graphical install under Kali Linux Boot menu. Then, select language, location, and keyboard, configure network, and set root user and password.
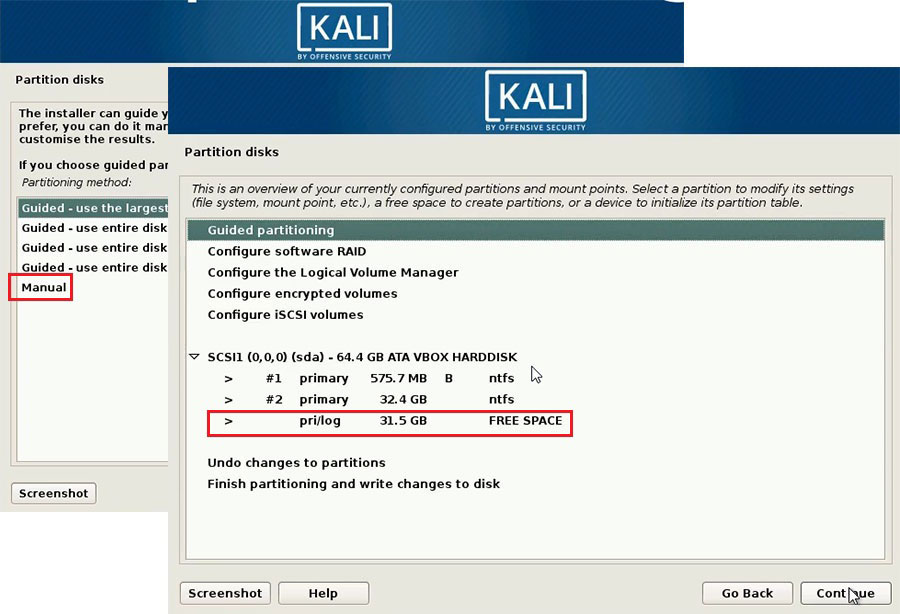
Step 4: Configure partitions for Kali Linux. In this step, you need to create 4 partitions: “/boot” partition for storing system boot loader, “/” partition for storing system files, “swap area” partition used as virtual memory, and “/home” partition for storing user files.
To create “swap area” partition, please follow the steps below:
Choose Manual as partitioning method and click Continue. Then, choose the free space you created before and click Continue.
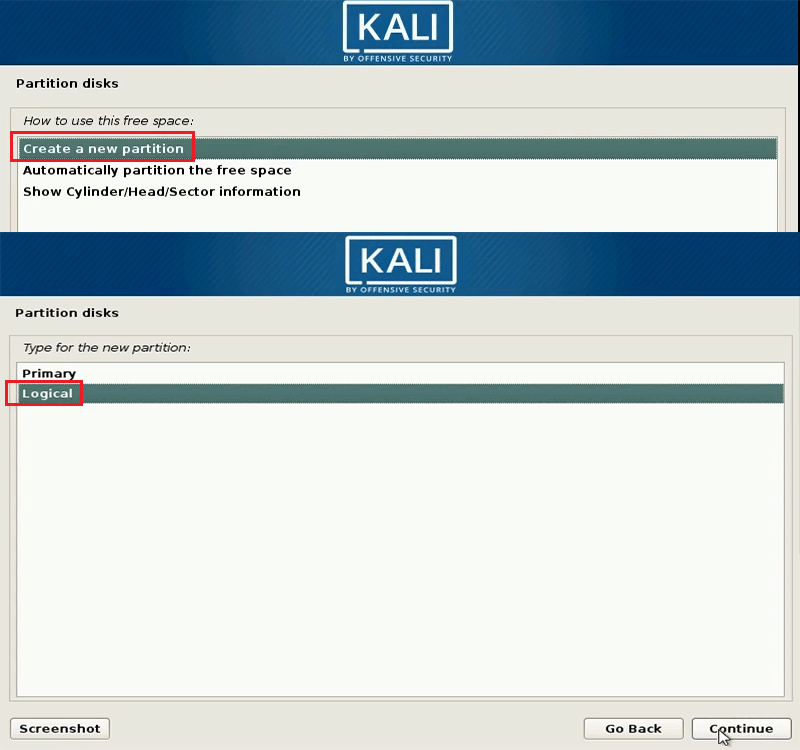
Choose Create a new partition and then click Continue. Then, set partition size and set this partition as primary or logical partition. You can set all of the 4 partitions as logical partition, but many people would like to set “/boot” partition as primary partition.
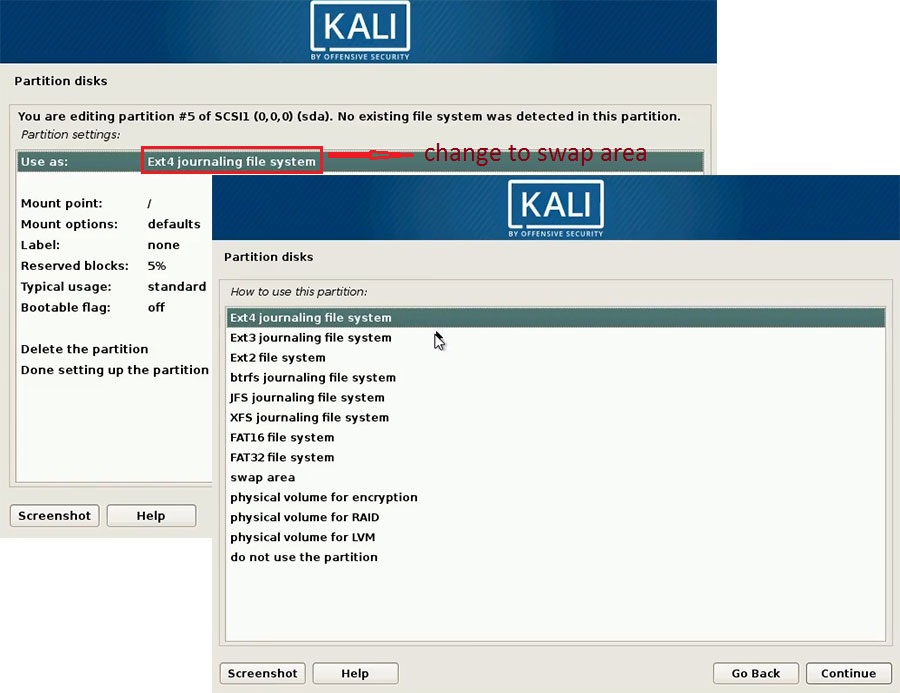
Then, choose location of this new partition and configure partition settings. Click Use as and change it from Ext4 journaling file system to swap area.
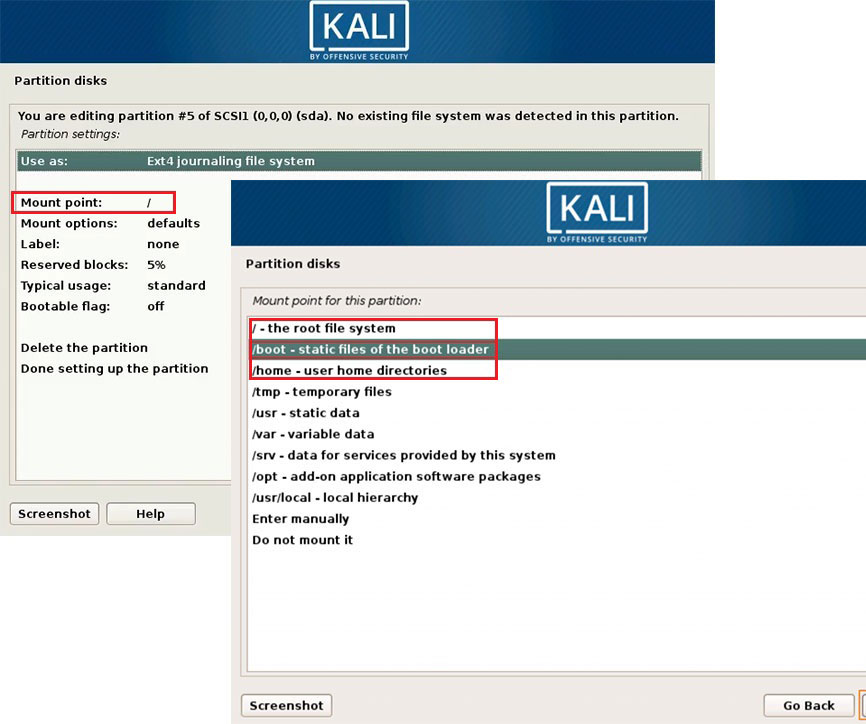
To create “/boot”, “/”, and “/home” partitions, follow the steps below:
Click the free space again and choose Create a new partition. Set partition size and set these partitions as primary or logical. Set the location of these partitions and then configure them. Please note that the 3 partitions use Ext4 journaling file system but their mount points are different.
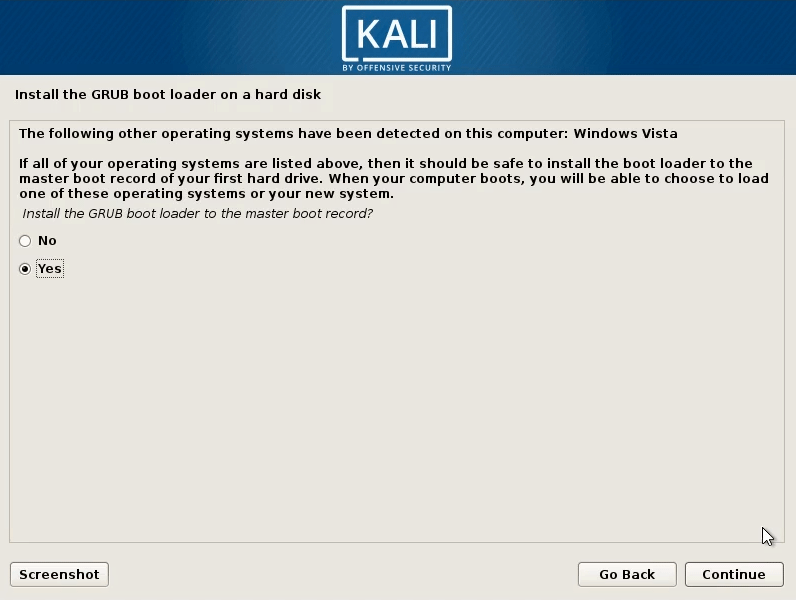
Step 5: After creating partitions for Kali Linux, click Finish partitioning and write changes to disk. Then, click Continue. Click Yes to accept changes. Then, you can choose whether to install GRUB boot loader. After that, you can boot into Kali Linux.
![[SOLVED] – Error No Such Partition Grub Rescue in Windows 10](https://images.minitool.com/partitionwizard.com/images/uploads/2019/01/error-no-such-partition-thumbnail.jpg)
Bottom Line
Is this post helpful? Have you encountered problems when following the tutorials mentioned in this post to install Kali Linux? Please leave a comment in the following zone. Besides, if you encounter problems when moving/resizing partition, or backing up computer, please contact us via [email protected]. We will get back to you as soon as possible.
About The Author

Position: Columnist
Linda has been an editor at MiniTool for seven years. She continuously learns about computers and puts her knowledge into practice. Moreover, she is particularly knowledgeable in disk management, data recovery, system installation, and PDF editing. Her articles typically reference multiple examples or are based on her own experience, providing users with the most suitable solutions.
User Comments :