Plenty of users has reported the former volume not mounted error and are seeking for feasible solutions on the forum. If you are one of them, don’t worry. In this article, MiniTool Partition Wizard lists 6 possible solutions from users and you can feel free to have a try.
About uTorrent Error Former Volume Not Mounted
The former volume not mounted is an error that may occur in uTorrent. The volume refers to a storage device like a disk drive or USB flash drive. A volume is mounted when it is assigned a place in the file system of the computer so that it can be referred to at that path.
The problem has been reported by a number of users, and it might also occur on other popular torrent clients like BitTorrent and Vuze. You may learn about the details of the uTorrent error former volume not mounted from the following post:
Normally I keep all my uTorrent downloads stored in an external hard drive. I plug the drive into my PC after my PC has booted up. Today I went through the usual procedure but also added a USB stick with a view to copying some files from the external disk to the stick. Before doing this, I opened uTorrent with a view to rename one or two files, but every file had turned from green to brown with the message “Error former volume not mounted”.
I’m convinced that the introduction of the USB stick had something to do with this, but the question is, is there a way to get the files seeding and downloading again? — From uTorrent forum
Commonly, the frustrating problem occurs when users are using an external storage device and it prevents them from reading or downloading torrents normally. There are several potential factors that may lead to the former volume not mounted error in your torrent client. Some of them are listed below:
- There are some issues with the drive letter. One of your torrents or download paths probably uses a drive letter that no longer exists, or the external drive is assigned with another drive letter different from that your torrent client expects.
- The torrent is partially corrupted. If the downloading process of the torrent is interrupted unexpectedly, the data might be corrupted and your torrent client may refuse to resume download, giving the former volume not mounted error message.
- The resume.dat file contains certain conflicting data. It is possible that the resume.dat file of uTorrent contains certain incorrect instance, and this may also trigger the problem under our discussion.
After learning about the error in detail, it’s time to fix it. In the following contents, you will learn about 6 possible methods to fix uTorrent former volume not mounted error. Let’s check them out one by one.
6 Methods to Fix Former Volume Not Mounted Error
- Reconnect the problematic drive
- Set another download location for the problematic torrent
- Match the drive letter to the one allocated by the computer
- Change drive letter
- Re-check your torrents
- Modify the resume.dat file
Fix 1: Reconnect the Problematic Drive
As mentioned before, the problem is typically caused by the external drive like a USB drive being used as the storage directory of your downloaded torrents.
If you are using such a drive and frequently disconnect it from your computer, it is possible that its drive letter allocated by the computer changes and thus your uTorrent cannot recognize the drive. Besides, if the drive is not properly connected, you could also encounter the former volume not mounted error.
Therefore, you had better disconnect the problematic drive and then properly reconnect it to your computer. This will force your operating system to reassign a drive letter to the external drive and may fix the problem automatically.
Fix 2: Set Another Download Location for the Problematic Torrent
In some cases, this problem just happens to one specific torrent which is referencing a download path that no longer exists. According to the reports, this commonly occurs when you perform downloads on a removable drive but then decide to remove it while the file is downloading or seeding.
If you are in the same situation, perhaps you can try setting another download location for the problematic torrent to fix the issue. Here’s a simple guide for you.
Step 1: If the torrent is still under download, the first thing you need to do is stopping the current download to prevent your uTorrent from accessing or updating the file. Just right-click the torrent and choose Stop.
Step 2: Right-click the problematic torrent again and choose Advanced > Set Download Location.
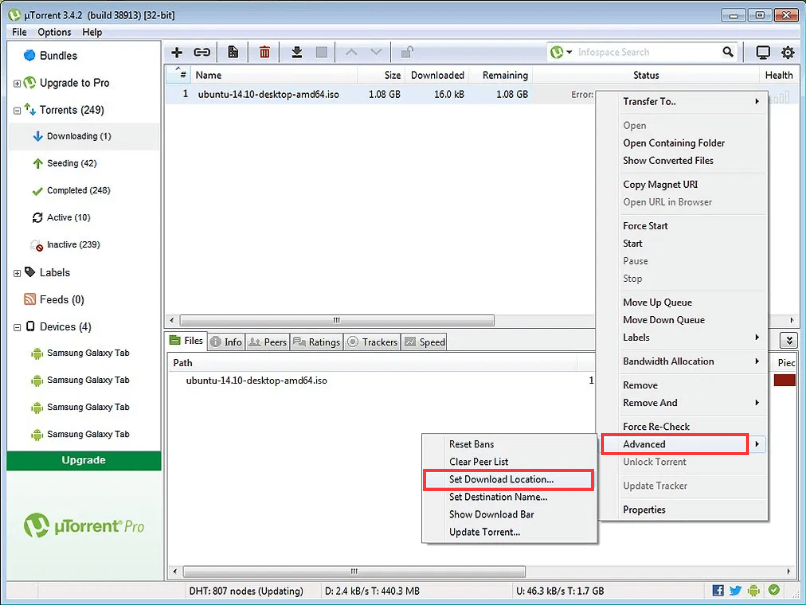
Step 3: In the pop-up dialog, choose a new valid location you want to store the torrent file and click the Select Folder button.
After that, restart your torrent client and check if you can download the torrent without the former volume not mounted error.
Fix 3: Match the Drive Letter to the One Allocated by the Computer
When you reconnect the external hard drive to your computer, the operating system can still recognize it by allotting a drive letter which might be different from the one previously allotted. However, the uTorrent might remember the previous drive letter (or the path) and it gets confused once the drive letter or mount point alters, which might lead to former volume not mounted error message.
In this case, you can change the directories for your torrents to match the drive letter to the one allocated by your computer. To do that, you should:
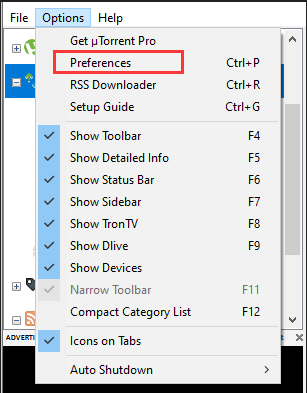
Step 1: Keep your uTorrent open and click Options from the upper ribbon bar.
Step 2: Click Preferences from the drop-down menu. You can also press Ctrl + P keys in the main interface to directly open the desired window.
Step 3: In the left side of the Preferences window, click Directories, and then check Put new downloads in from the right pane. Here, check if the drive letter matches the current configuration. You should also make sure the drive letters of other involved locations are matched correctly.
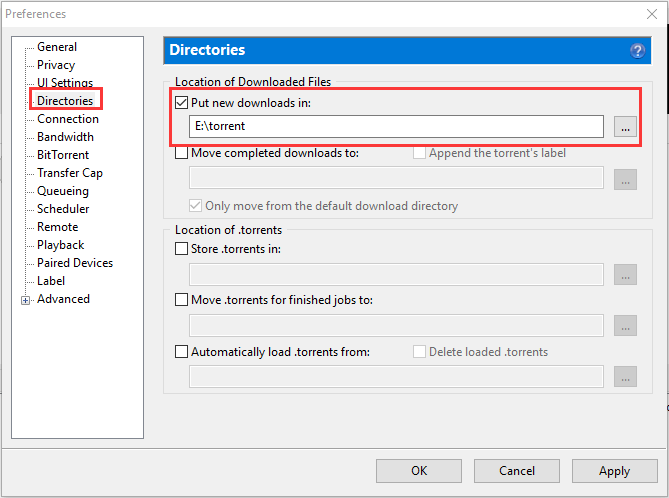
Step 4: Click Apply and OK to save the changes you have made.
Now, you can restart your uTorrent and check if the problem is resolved. If you are still stuck with the former volume not mounted error, just move on to the next solution.
Fix 4: Change Drive Letter
If you find it troublesome to change the download location for each of affected torrents or you don’t want to make any changes for your torrent client, you can directly change the drive letter of the external drive to the one your uTorrent expects.
Here are 3 ways for you to change drive letter, and you can choose any one to complete the operation. But before that, you need to check the error message and hover your mouse over the error to see the drive letter that your uTorrent expects.
#1. Via Disk Management
Disk Management is a built-in utility in Windows computer which can help users to manage the connected disks and partitions with ease. To change the drive letter for your external storage device, just follow the steps below.
Step 1: Press Windows + R to bring up the Run window.
Step 2: Input diskmgmt.msc in the empty box and click OK to open Disk Management.
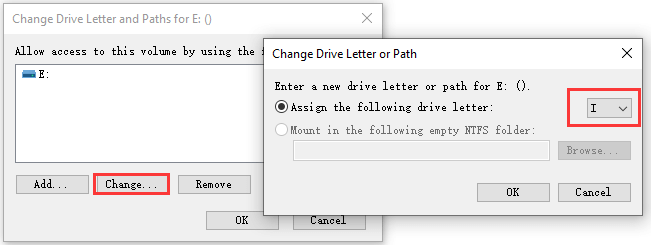
Step 3: Right-click the target drive and choose Change Drive Letter and Paths from the context menu.
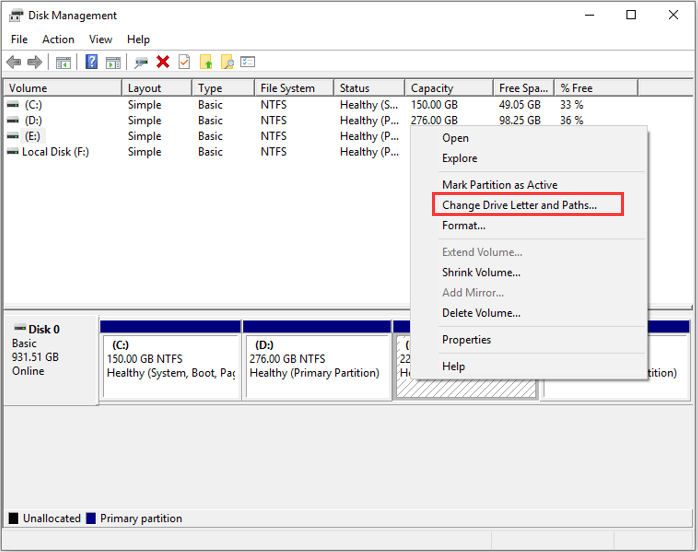
Step 4: In the pop-up window, click Change button. Then, check Assign the following drive letter options, choose the drive letter that your torrent client expects from the drop-down menu, and click OK button to save changes.
#2. Via Diskpart
If Disk Management is not loading or runs into certain problems on your computer, you can use the diskpart tool alternatively. Diskpart is a separate suite of commands that runs in the Command Prompt and helps you manage your computer’s drives. Here’s how to change drive letter via diskpart.
Step 1: Invoke Run window, input cmd, and click OK to open Command Prompt.
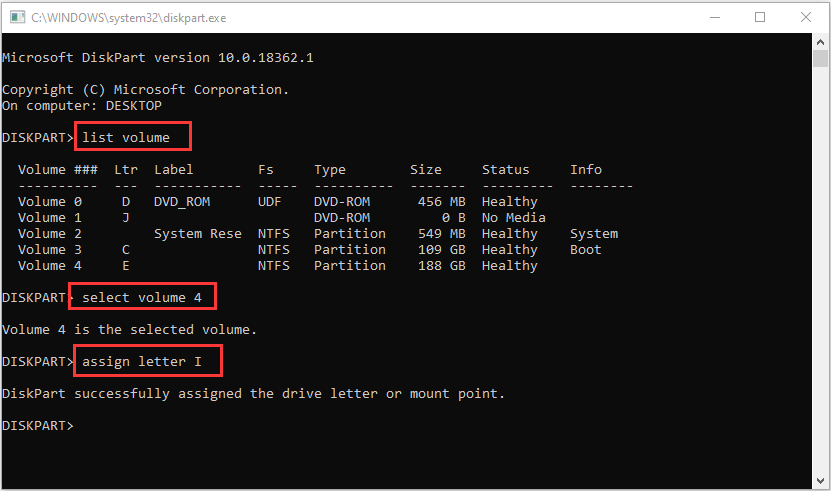
Step 2: Type diskpart in the command console and press Enter.
Step 3: Input the following commands one by one and press Enter key after each.
- list volume
- select volume * (* refers to the volume number of the target partition which can be figured out by the drive letter)
- assign letter I (replace I with the desired drive letter of your torrent client)
#3. Via Third-party Software
For users who are not so familiar with Windows built-in tools, using a professional third-party program is always a great choice. Here, MiniTool Partition Wizard is recommended for you. It can help you manage partitions and disks, restore lost data, and back up your computer easily. Here’s a simple guide on how to change drive letter using this assistant.
Step 1: Click the following button to download MiniTool Partition Wizard and install it on your computer.
MiniTool Partition Wizard FreeClick to Download100%Clean & Safe
Step 2: When you get the main interface, right-click the target drive and choose Change Letter from the pop-up menu. You can also choose Change Drive Letter from the left pane after selecting the drive.
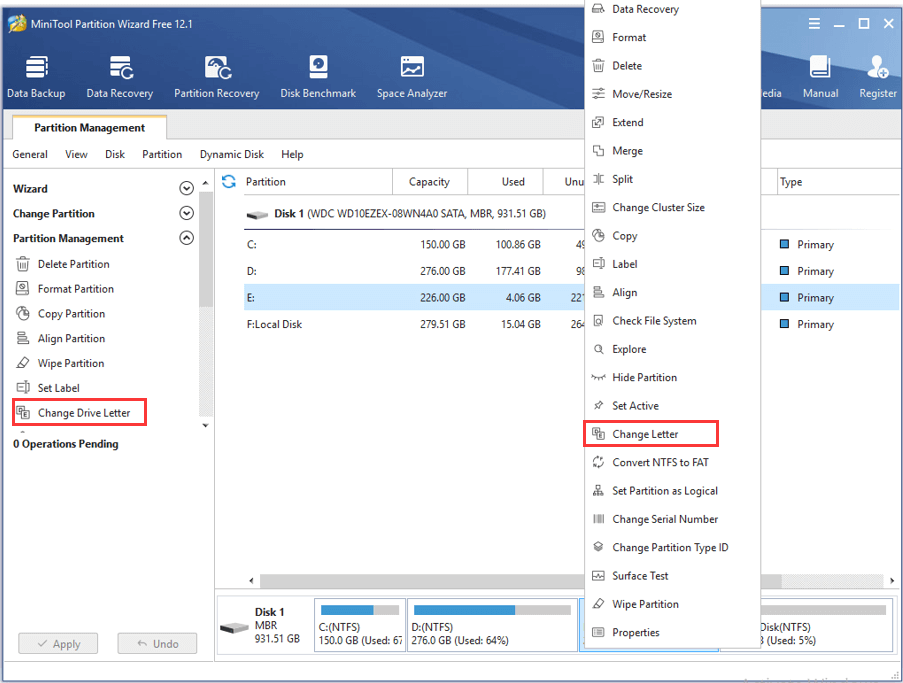
Step 3: Choose the desired drive letter from the list of New Drive Letter and click OK button.
Step 4: Click Apply button to execute the pending operation.
Fix 5: Re-Check Your Torrents
Almost all the torrent clients provide a force re-check feature that helps to troubleshoot the potential problems with the torrents. If the above methods fail to fix the problem for you, you can try this feature.
Just right-click the problematic torrent and choose Force Re-Check from the drop-down menu. After the re-check process is completed, restart your computer and see if the uTorrent former volume not mounted error is resolved.
Fix 6: Modify the Resume.dat File
Finally, you can choose to modify the resume.dat file of your uTorrent to replace the previous path that has changed due to the reconnection of the external drive. This is more complicated than the above solutions, but you can make use of a powerful text editor like Notepad++. Here’s what you need to do.
Step 1: Invoke Run window, input %AppData%uTorrent and click OK to open the uTorrent folder in File Explorer.
Step 2: Find the resume.dat file and make a backup for it in another location. Open your downloaded Notepad++ and drag the resume.dat file into the console to open it.
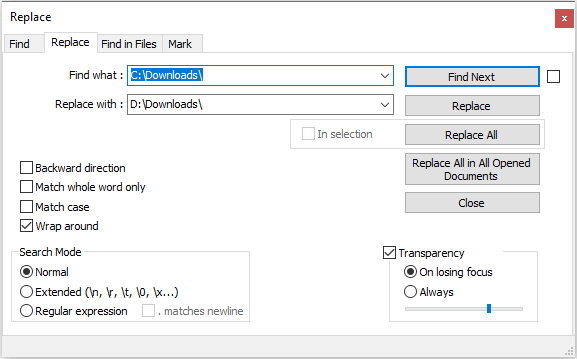
Step 3: Click Search tab in the ribbon bar and choose Replace. Input the incorrect path in the Find what box, input the correct one in the Replace with box, and click Replace All button.
Once it’s done, save that file and then restart your computer. Now, the uTorrent error former volume not mounted should be removed.
How to resolve uTorrent former volume not mounted error? Here are 6 solutions for you.Click to Tweet
Bottom Line
This article has introduced 6 possible solutions to the former volume not mounted error in torrent client. If you have any better workarounds, you can share them with us by posting them in the following comment zone. We will keep improving this article.
As for any problems while using MiniTool software, you can contact us via [email protected].
User Comments :