Windows Defender is a useful tool that helps us avoid virus. Do you know that you can customize max CPU usage for Defender scan on Windows 10? In this post, MiniTool shows you how to check current maximum CPU usage for Windows Defender scan and customize max CPU usage for Defender scan.
To protect our computer against malware like virus, spyware, and other potentially dangerous software, we usually utilize Windows Defender or some antivirus, including Bitdefender (Bitdefender & Windows Defender).
Windows Defender is an anti-malware component of Microsoft Windows. By default, the antivirus app is set to utilize the maximum of 50% CPU usage when performing an antivirus scan. But you are able to limit this default maximum number on Windows 10 so that it never uses the CPU too much.
Before showing the tutorial on how to customize CPU usage for Defender scan, let’s check current maximum CPU usage for Windows Defender scan first.
Check Current Maximum CPU Usage for Windows Defender Scan
Step 1: Run Windows PowerShell as administrator:
- Type Windows PowerShell in the Cortana’s search bar,
- Select the best-matched search result and right-click it to select Run as administrator on the right-click menu.
Step 2: Copy and paste the following command on the Windows PowerShell window and then hit the Enter key to run this command.
Get-MpPreference | select ScanAvgCPULoadFac
Now, you should see the current maximum CPU usage for Windows Defender scan and you can customize the percentage CPU usage.
Customize CPU Usage for Defender Scan
You can customize CPU usage for Defender Scan via Windows PowerShell, Group Policy Editor, and Windows Registry. Let’s see how to use the three Windows tools to increase or reduce the CPU usage for Windows Defender scan.
1. Using Windows PowerShell
Step 1: Launch Windows PowerShell as administrator.
Step 2: Type Set-MpPreference -ScanAvgCPULoadFactor # (# refers to the percentage CPU usage and the valid value varies from 5 to 100) on the Windows PowerShell window and then hit the Enter key to run this command.
2. Using Group Policy Editor
Step 1: Run Group Policy Editor.
- Press Windows + R to call out the Run
- Type gpedit.msc on the Run window and then click the OK button.
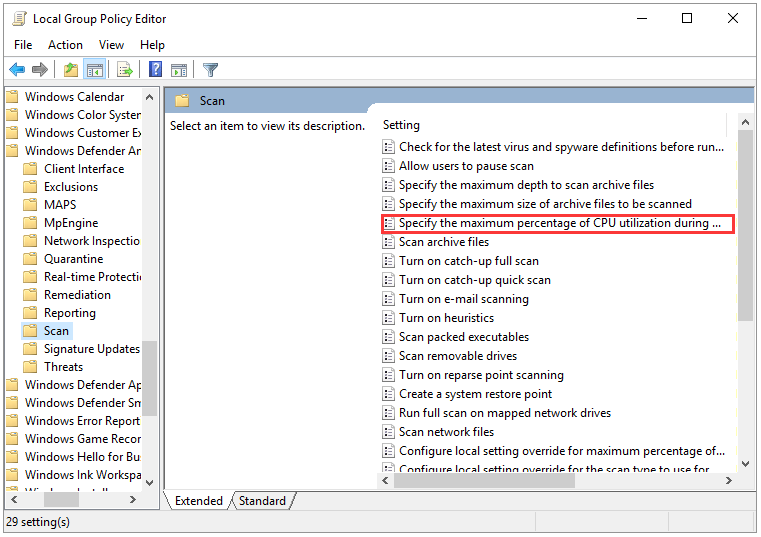
Step 2: On the Group Policy Editor window, please navigate to the path below:
Computer Configuration > Administrative Templates > Windows Components > Windows Defender Antivirus > Scan
Step 3: In the right pane, find and double-click Specify the maximum percentage of CPU utilization during a scan.
Step 4: On the newly popping-up window, select enabled and set a value in the Options section.
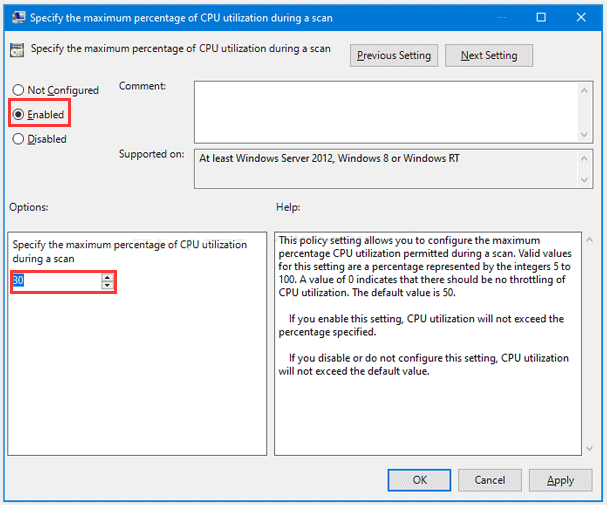
Step 5: Click the Apply button and the OK button and then restart your computer.
3. Using Windows Registry Editor
Step 1: Type regedit in the Cortana’s search and then select regedit or Registry Editor.
Step 2: Navigate to the path below:
HKEY_LOCAL_MACHINE > SOFTWARE > Policies > Microsoft > Windows Defender
Step 3: Create a folder by right-clicking the Windows Defender folder, selecting New > Key, and naming it as Scan.
Step 4: Right-click the Scan key and then select New > DWORD (32-bit) Value. Name this DWORD as AvgCPULoadFactor, switch the value data editor to Decimal, and set the value data to a value of 5 to 100.

Bottom Line
This article comes to an end. You may be able to customize max CPU usage for Windows Defender scan after referring to the three methods in this article. If you have any doubts about the above steps, please a message in the following comment zone and we will reply to you ASAP.
User Comments :