What Is BIOS FlashBack?
BIOS FlashBack is a feature that allows users to update the firmware (BIOS/UEFI) without needing to have a CPU or RAM module installed. This feature is very wonderful and is only offered by some high-end motherboards.
These motherboards include many X570, B550, B450, and X470 motherboards for AMD CPUs and some Z490 motherboards for Intel CPUs. In addition, those famous manufacturers that provide motherboards with BIOS FlashBack include ASUS, Gigabyte, MSI, and ASRock.
1. You can go to the manufacturer’s official website to see whether your motherboard supports this feature.
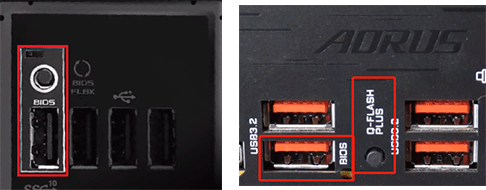
2. The BIOS FlashBack feature is usually named USB BIOS Flashback, but for Gigabyte boards, it is named Q-Flash Plus.
If your motherboard supports the BIOS FlashBack feature, there will be a BIOS FlashBack button and a special designated USB port on the motherboard.
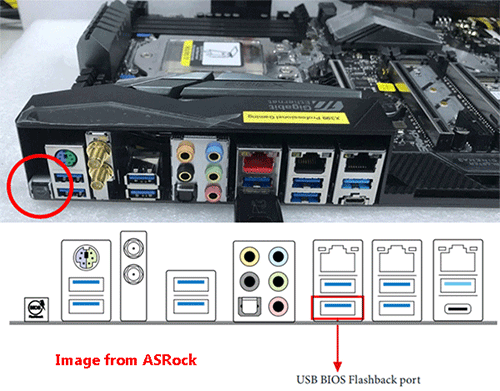
If you place the motherboard into the PC chassis, the BIOS FlashBack button and the BIOS FlashBack USB port should be on the back of the PC chassis. In addition, the chassis will mark them with letters and icons, just like the following picture:
When to Use BIOS FlashBack?
Case 1. The BIOS Is Corrupt
In most cases, you are able to flash BIOS through one of the following methods:
- Enter the operating system, download the executable BIOS update file and run it in the operating system.
- Download the executable BIOS update file, place it into a bootable USB drive, enter BIOS to make the PC boot from the USB drive, and then run the executable BIOS file to update BIOS.
- Download the BIOS update file (a .CAP file, not an executable file), place it into a USB drive, and then enter BIOS to enable BIOS update utility. This utility will detect BIOS file from USB drive and then update BIOS automatically.
If the BIOS update fails, you can try the above methods to flash BIOS once again. However, all of the above BIOS update methods require that the BIOS is working well or part of BIOS is OK (like bootloader). What if the BIOS is corrupt radically?
This case is rare but can happen for various reasons, for example, a sudden power off during BIOS update. In this case, USB BIOS FlashBack is a good solution.
Case 2. No CPU or RAM Is Installed
Another case where you need to use the BIOS FlashBack feature is that the CPU or RAM has not been installed. For example, you have bought a newly-released CPU but your current motherboard BIOS doesn’t support this CPU. You need to update the BIOS to the latest version.
In this case, you can install an older compatible CPU to the motherboard and then update the BIOS to the latest. However, what if you don’t have any older CPUs? In this case, BIOS FlashBack feature is a good choice.
How to Flash BIOS with BIOS FlashBack
In the following content, I will show you how to update BIOS without CPU.
Stage 1. Prepare a Proper USB Drive
To use the BIOS FlashBack feature, you should prepare a USB drive. The USB drive should be a MBR disk and formatted with FAT32/16 file system. Here is the guide on how to prepare such a USB drive:
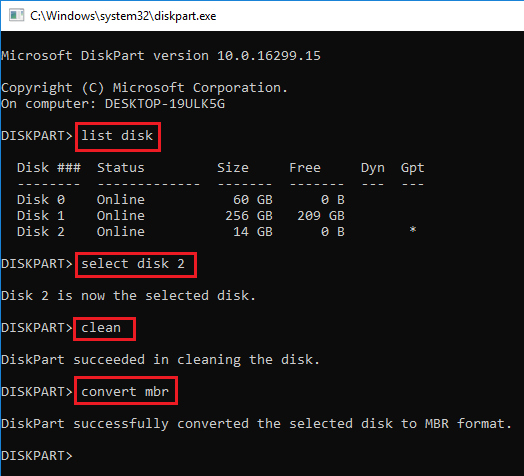
Step 1: Insert a USB drive into a normal running PC. Press Windows key + R to open Run box. Type “diskpart” into the Run box and press Enter to open run diskpart.exe.
Step 2: Execute the following commands one by one to convert the USB drive to an MBR disk:
- List disk
- Select disk # (# is the drive number of the USB drive.)
- Clean (This command will destroy data in the USB drive. Please back up data before running this command.)
- Convert mbr
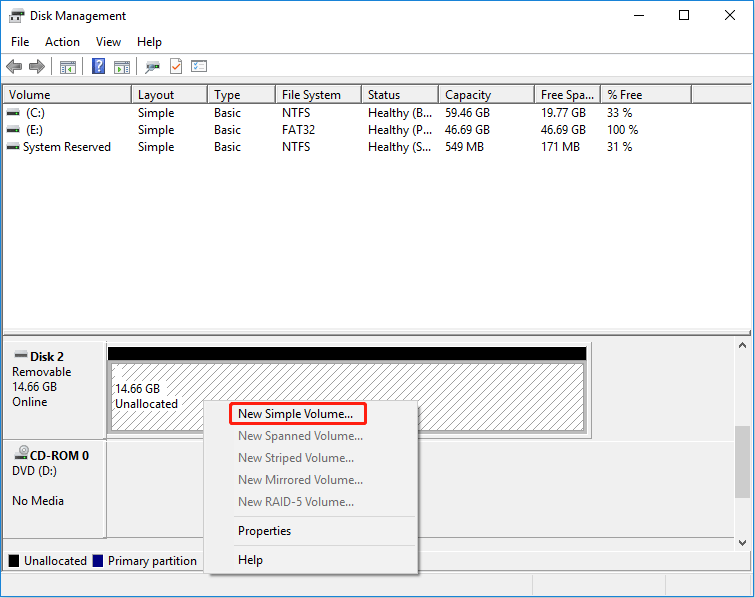
Step 3: Open Disk Management to create a FAT32 partition.
- Open the Run box, type “msc” and press Enter to open Disk Management tool.
- Right-click on the unallocated space of the removable disk and choose New Simple Volume.
- Follow the on-screen instructions to create a FAT32 partition.
If your USB drive is larger than 32GB, I will recommend you to use MiniTool Partition Wizard, because Windows is unable to create a FAT32 partition larger than 32GB and it’s also unable to format a partition larger than 32GB to FAT32.
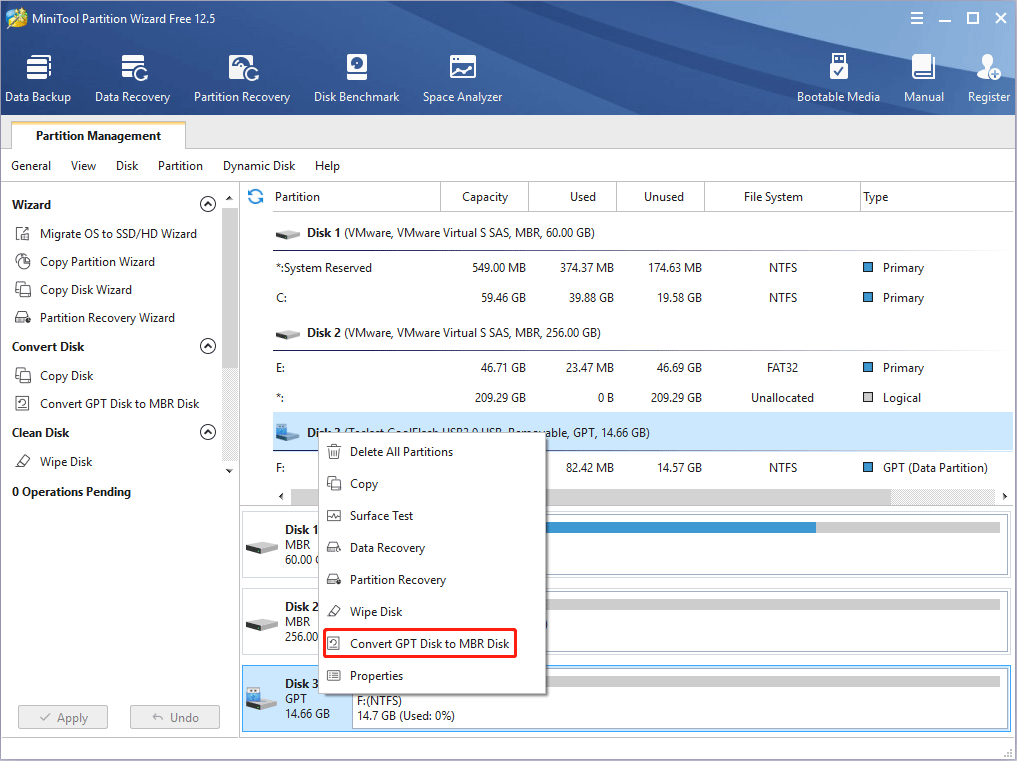
However, as long as your USB drive is smaller than 2TB, MiniTool Partition Wizard can use the full capacity to create a FAT32 partition or reformat the partition to FAT32. In addtition, it also can help you convert the USB drive from GPT to MBR. Here is the guide:
MiniTool Partition Wizard FreeClick to Download100%Clean & Safe
Step 1: Insert the USB drive into a normal running PC. Launch MiniTool Partition Wizard and go to its main interface. Right-click the USB drive and choose Convert GPT Disk to MBR Disk. This feature can convert a GPT disk to MBR disk without needing to delete partitions on the disk.
Step 2: Right-click on the partition of the USB drive and choose Format.
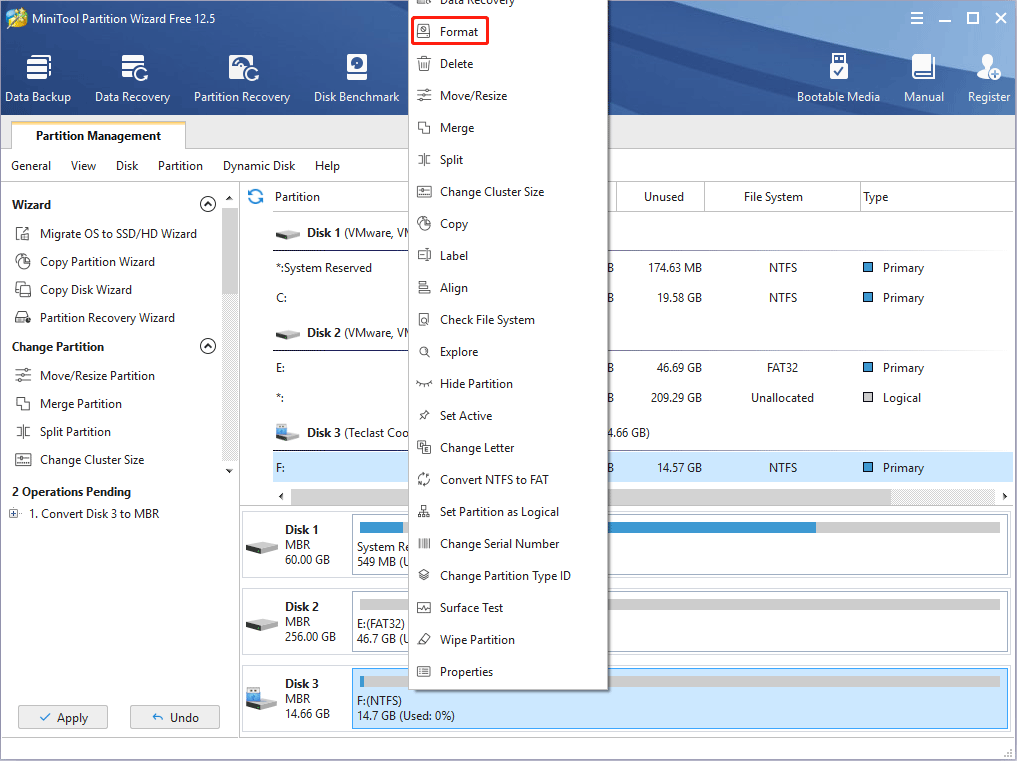
Step 3: Change the File System to FAT32 and click the OK button.

Step 4: Click the Apply button to execute pending operations.

Stage 2. Use BIOS FlashBack
How to use ASUS BIOS FlashBack:
- Go to ASUS website to download a proper BIOS file for your ASUS motherboard (please find the BIOS file according to the motherboard model).
- Unzip the BIOS file and you will see two files (a .CAP file and a BIOSRenamer tool).
- Double-click the BIOSRenamer It will automatically rename the BIOS file (.CAP).
- After the renaming process is completed, press any key to close the BIOSRenamer window.
- Move the renamed BIOS file (.CAP) to the root directory of the USB flash drive.
- Make sure the PC is shut down and the power supply is connected to PC.
- Connect the USB flash drive to the USB FlashBack port and press the BIOS FlashBack button for three seconds until the FlashBack LED blinks three times, indicating that the BIOS FlashBack function is enabled.
- Wait until the light goes out, indicating that the BIOS updating process is completed.

How to use MSI BIOS FlashBack:
- Download a BIOS file for the MSI motherboard.
- Unzip the BIOS file.
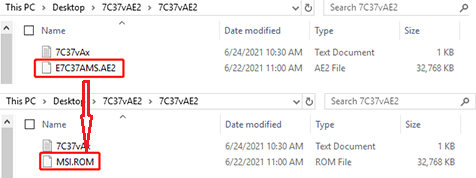
- Rename the BIOS file to ROM. The BIOS file is the biggest file under the BIOS folder. Renaming the file will change the file type.
- Put the renamed BIOS file into the USB drive.
- Shut down the PC.
- Plug the USB drive into the USB FlashBack port and press the BIOS FlashBack button.
- Wait for 5 seconds and then red light will start flashing to indicate BIOS process is in process.
- When the light is off, it means that the BIOS update process is completed.
How to use ASRock BIOS FlashBack:
- Download a BIOS file for your ASRock motherboard (please choose the Instant Flash version).
- Unzip the BIOS file.
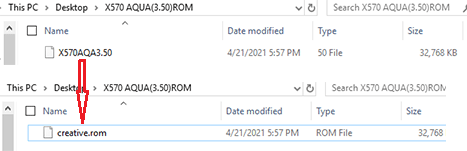
- Rename the file to “rom” and then put it to the root directory of the USB drive.
- Connect the power supply to motherboard but there is no need to power on the system.
- Connect your USB drive to the USB BIOS Flashback port.
- Press the BIOS Flashback button for about three seconds. Then the LED starts to blink.
- Wait until the LED stops blinking.
How to use Gigabyte Q-Flash Plus:
- Download a BIOS file for your Gigabyte motherboard and unzip it.
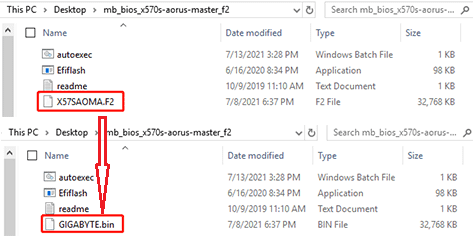
- Open the BIOS folder to find the BIOS file, which is the biggest file under this folder. Rename this file to bin.
- Put the renamed BIOS file to the root directory of the USB drive.
- Insert the USB flash drive into the USB BIOS Flashback port on the back panel.
- Connect the power cables but do not power on the system.
- Press the Q-Flash Plus button and the system will automatically search and match the BIOS file in the USB flash drive on the USB BIOS Flashback port.
- The QFLED and the Q-Flash Plus button on the rear panel will flash during the BIOS matching and flashing process. When the BIOS flashing is completed, the QFLED will stop flashing.
Through the above methods, you can use the BIOS FlashBack to flash BIOS smoothly.
Issues Occurring When Using BIOS FlashBack
When you use the BIOS FlashBack feature, it’s possible that you will encounter some accidents, for example:
- The power supply is shut down suddenly. In this case, reconnect the power supply, remove and plug the USB drive, and press the BIOS FlashBack button again.
- The light is not on. In this case, please make sure the USB drive is connected properly.
- The light doesn’t flash. For example, it turns solid green/blue. This means that the BIOS Flashback is not operating properly. The possible reasons are as follows: incorrect USB port is used; the USB stick has not been formatted properly to FAT32 single partition; BIOS file has not been unzipped or renamed correctly; the BIOS file is not the root directory, etc.
When these issues occur, the BIOS update process doesn’t start actually or the process is interrupted. In this case, you can remove the USB drive directly and then start to troubleshoot these problems.
Bottom Line
Is this post useful to you? Do you have other ideas about BIOS FlashBack? Do you know other brands that offer motherboards with BIOS FlashBack? Please leave a comment in the following zone for sharing. In addition, if you have difficulty in using MiniTool Partition Wizard, please send an email at [email protected]. We will get back to you as soon as possible.
About The Author

Position: Columnist
Linda has been an editor at MiniTool for seven years. She continuously learns about computers and puts her knowledge into practice. Moreover, she is particularly knowledgeable in disk management, data recovery, system installation, and PDF editing. Her articles typically reference multiple examples or are based on her own experience, providing users with the most suitable solutions.
User Comments :