How to download and install Windows 10 update KB5058379? If you don’t know how to install it or encounter issues when you try to install it, you've come to the right place. Here, Partition Magic offers a comprehensive guide for that.
Overview of Windows 10 KB5058379
KB5058379 (OS Builds 19044.5737 and 19045.5737) is a Patch Tuesday update for Windows 10 21H2 (Windows 10 Enterprise LTSC 2021 and Windows 10 IoT Enterprise LTSC 2021) and 22H2. It was released on May 13, 2025.
This security update includes quality improvements that were a part of update KB5055612 (released April 22, 2025) and applies improvements to SBAT for the detection of Linux systems.

How to Download and Install KB5058379?
This update typically downloads and installs automatically on your PC via Windows Update and Microsoft Update. If it doesn’t, choose one of the installation scenarios below to proceed:
- For offline OS image servicing: If your image lacks the July 25, 2023 (KB5028244) or later LCU, install the standalone October 13, 2023 SSU (KB5031539) first.
- For WSUS deployment or manual installation from the Microsoft Update Catalog: If your devices lack the May 11, 2021 (KB5003173) or later LCU, install the standalone August 10, 2021 SSU (KB5005260) before applying this update.
After installing the needed update, you can continue to download and install KB5058379. Here are the detailed steps:
Use Windows Update:
- Press the Win + I keys simultaneously to open the Settings window.
- Go to Update & Security > Windows update.
- If KB5058379 is here, click on Download and Install to get it.
- If not, click the Check for updates button to search for it.
Use Microsoft Catalog:
- Open your browser, and then navigate to Microsoft Update Catalog.
- Type “KB5058379” in the search box and press Enter.
- Find the file that matches your device’s System type.
- Then, click Download.
- Click the links in the pop-up window to start downloading the installation package.
- Double-click the executable file and follow the on-screen instructions to complete the installation process.

How to Fix the KB5058379 Not Installing Issue?
If you encounter the KB5058379 not installing issue, you can try the following ways.
MiniTool Partition Wizard FreeClick to Download100%Clean & Safe
Way 1. Run the Windows Update Troubleshooter
Running the Windows update troubleshooter can troubleshoot issues related to Windows updates. So, you can try running this tool to solve the KB5058379 fails to install issue. Here’s the way:
Step 1. Press the Win + S keys simultaneously to open the Search window. Then, type “troubleshoot” in the search box, and select Troubleshoot settings under Best Match.
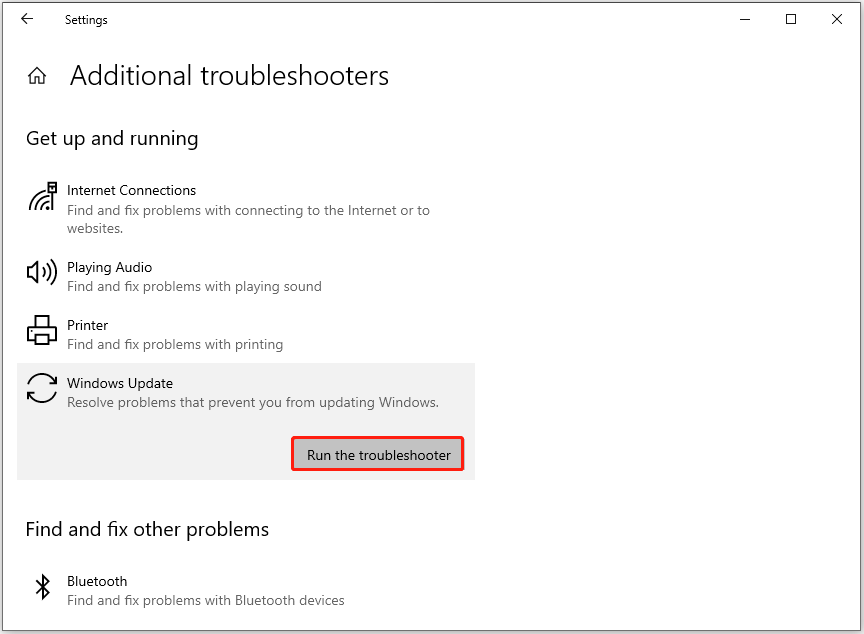
Step 2. In the pop-up window, click Additional troubleshooter.
Step 3. Choose Windows Update and click Run the Troubleshooter. Once done, if there are any issues found, follow the on-screen guide to fix them.
Step 4. After that, restart your PC and check if the KB5058379 fails to install issue has been resolved.
![[Solved] What Should You Do If KB5058392 Not Installing?](https://images.minitool.com/partitionwizard.com/images/uploads/2025/05/kb5058392-not-installing-thumbnail.png)
Way 2. Restart the Update Related Services
Restarting the Windows update-related services can fix various update issues, including the Windows 10 KB5058379 not installing issue. You can have a try. Here’s the way:
Step 1. Press the Win + R keys simultaneously to open the Run window, type “services.msc”, and then press Enter.
Step 2. In the Services window, find Windows Update from the list. Then, double-click it.
Step 3. Set Startup type as Automatic and click Start under the Service status section.

Step 4. Then, click Apply and OK to save the changes.
Step 5. Next, do the same operations with Cryptographic Services and Background Intelligent Transfer Service.
Step 6. Once done, restart your PC and check if you fixed the KB5058379 won’t install issue successfully.
Way 3. Reset Windows Update Components
Restarting Windows Components can also fix the KB5058379 fails to install issue. You can have a try. If you don’t know how to reset Windows Update Components, you can follow the guide in this post:
Step 1. Open the Search window, type “cmd” in the search box. Then, right-click Command Prompt from the search result and select Run as an administrator.
Step 2. Run the following commands to stop Windows Update-related services:
- net stop wuauserv
- net stop bits
- net stop cryptsvc
Step 3. Next, execute the following commands to delete the caches.
- ren C:\Windows\SoftwareDistribution SoftwareDistribution.old
- ren C:\Windows\System32\catroot2 catroot2.old
Step 4. After that, type the following commands to restart the Windows Update service:
- net start wuauserv
- net start bits
- net start cryptsvc
Step 5. Once done, you can restart the Windows components successfully. Then, you can try installing Windows 10 KB5058379 again to check if the error has been resolved.
Windows 10 KB5058379 Update Triggers BitLocker Recovery on Some Devices
Some people report that the KB5058379 causes their devices to boot into Windows Recovery or requires BitLocker recovery keys on boot. In some cases, there’s a BSOD as well. For example, here is a user report from the answers.microsoft.com forum:
May 13 -KB5058379 Windows 10 leads to corruption and endpoints asking for the BitLocker key. - Any known issues?
Hi, the latest KB5058379 released May 13 quality update failed in Windows 10 devices. In some devices, it caused the BitLocker key window to appear after the restart. Still Update seems failed. Some fall into a loop of restarts. Is there any known issue? … Can someone shed some light here? MGhttps://answers.microsoft.com/en-us/windows/forum/all/may-13-kb5058379-windows-10-leads-to-corruption/58b3b179-70a0-4bd8-abae-c9b89dd9c9b9
After searching for this issue on the Internet, I found that the following versions/editions/OEMs of Windows 10 are affected: Windows 10 22H2; Windows 10 21H2 LTSC / Enterprise; Dell, HP and Lenovo PCs. Also, most of them are using SCCM or WSUS.
Are you also encountering the same issue? If so, no worries. I summarize some steps to help you fix the issue:
Step 1. Disable Intel TXT / Trusted Execution
The first step you can try to fix BitLocker Recovery triggered by Windows 10 KB5058379 is to disable Intel TXT / Trusted Execution. Here are the steps:
- Reboot into BIOS/UEFI (For most Dell/HP/Lenovo: Press F2, F10/F12, or Esc immediately after power-on to enter BIOS/UEFI).
- Go to Security > Virtualization/Advanced CPU Settings.
- Then, turn off Intel TXT. It could also be referred to as “Trusted Execution” or “OS Kernel DMA Support”.
- You can leave the VT for Direct I/O (or VT-d) option enabled.
- After that, save changes and exit BIOS.
Step 2. Disable Secure Boot
If you still encounter the error, you can try disabling Secure Boot to fix the issue. Here’s the way:
- Boot into the BIOS/Firmware settings.
- Find the Secure Boot option.
- Set it to Disabled.
- Next, save the changes and reboot the device.
Step 3. Disable Virtualization Technologies
If the issue persists, try the following steps to disable Virtualization Technologies to solve the issue:
- Re-enter BIOS/Firmware settings.
- Disable all virtualization options, including Intel VT-d (VTD) and Intel VT-x (VTX).
Step 4. Check Microsoft Defender System Guard Firmware Protection Status
If you still have the same issue, you can continue to check Microsoft Defender System Guard Firmware Protection Status. Here are two ways to help you do that:
Option 1. Use Registry Editor:
- Open the Run window.
- Type “regedit” in the box and press Enter to open the Registry Editor window.
- Navigate to this path: HKEY_LOCAL_MACHINE\SYSTEM\CurrentControlSet\Control\DeviceGuard\Scenarios\SystemGuard
- Check the enabled DWORD value. 1 means Firmware protection is enabled, 0 or missing means Firmware protection is disabled or not configured.
Option 2. GUI Method
- Open the Search window.
- Type “Windows Security” and press Enter to access the Windows Security window.
- Select Device Security.
- Then check Core Isolation or Firmware Protection.
Step 5. Disable Firmware Protection via Group Policy (if restricted by policy)
If firmware protection settings are hidden due to Group Policy, you can do the following steps:
Method 1. Using Group Policy Editor
- Open the Run window.
- Type “gpedit.msc” and press Enter.
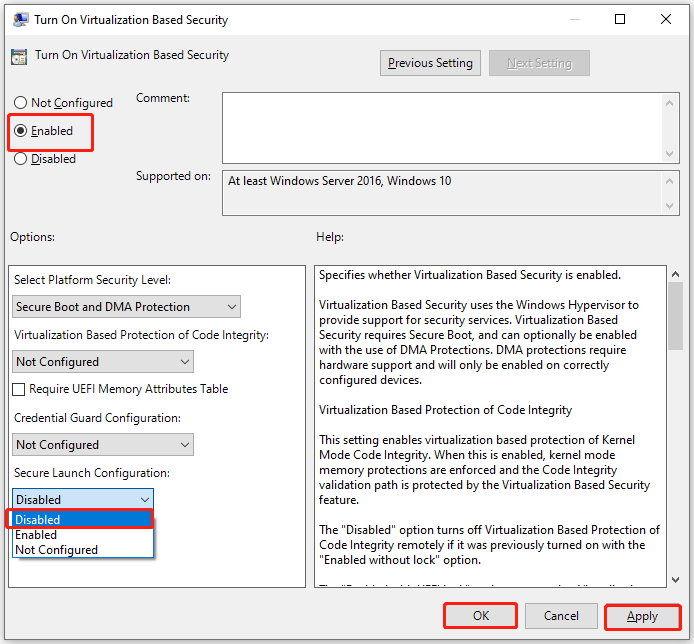
- Navigate to: Computer Configuration > Administrative Templates > System > Device Guard > Turn On Virtualization Based Security.
- Select Enabled.
- Then, select Disabled from the drop-down menu under the Secure Launch Configuration section.
- Next, click Apply and OK to save the changes.
Method 2. via Registry Editor
- Open the Registry Editor window.
- Go to this path: HKEY_LOCAL_MACHINE\SYSTEM\CurrentControlSet\Control\DeviceGuard\Scenarios\SystemGuard
- “Enabled“=dword:00000000
- After that, restart your system to make this change take effect.
Once you’ve installed Windows 10 update KB5058379 successfully, you won’t encounter the BSOD or BitLocker is triggered issue anymore.
To Sum Up
This article shows a detailed guide for installing Windows 10 update KB5058379. Besides, it provides some helpful solutions to fix the Windows 10 KB5058379 not installing issue, and the Windows 10 KB5058379 update triggers BitLocker recovery issue.
About The Author

Position: Columnist
Charlotte is a technology columnist with a strong focus on the Windows operating system, specializing in disk management, backup, and data recovery. She is passionate about analyzing computer errors, identifying root causes, and delivering practical solutions. In her free time, she stays updated on the latest developments in computer systems and hardware while continuously learning new technologies to broaden her expertise. Her writing style is clear and easy to understand, making complex technical topics accessible even to users with limited computer knowledge.
User Comments :