How to fix the “unable to right-click on Windows Start Menu” issue? If you don’t know how to fix the issue, this post is worth reading. Here, Partition Magic provides some useful ways to help you solve the issue.
Many users have reported experiencing the issue of being unable to right-click on the Windows Start Menu. This can be quite inconvenient for those who rely on Windows for their daily work and studies. Are you facing this issue on your computer as well? If so, don’t worry. Keep reading for some helpful solutions.
Solution 1. Restart Windows Explorer
When you find Windows 10 can’t right-click on Start Menu, you can try restarting your Windows Explorer to fix the issue. Here’s the way:
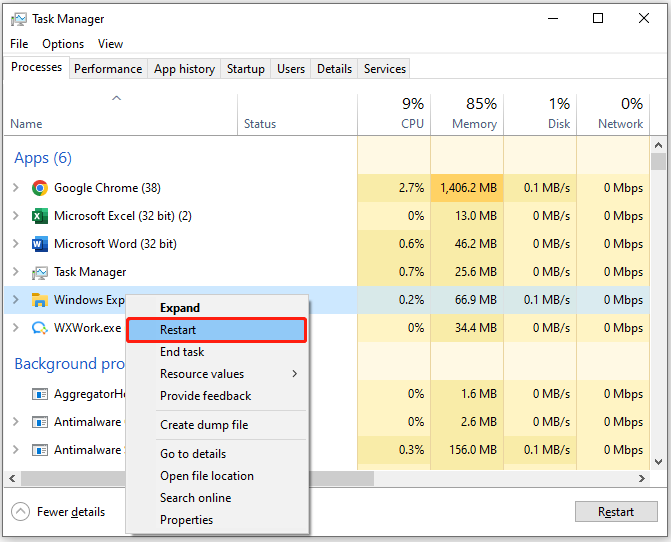
- Press the Ctrl + Shift + Esc keys simultaneously to open the Task Manager window.
- Under the Processes tab, find Windows Explorer.
- Right-click it and select Restart.
- Once done, check if the “Windows 10 can’t right-click on Start Menu” issue is fixed.
Solution 2. Clear File Explorer History
If restarting the Windows Explorer window is unable to help you fix the “right-click not working on Start Menu or Taskbar” issue, you can try clearing File Explorer history to solve the issue. Here’s the way:
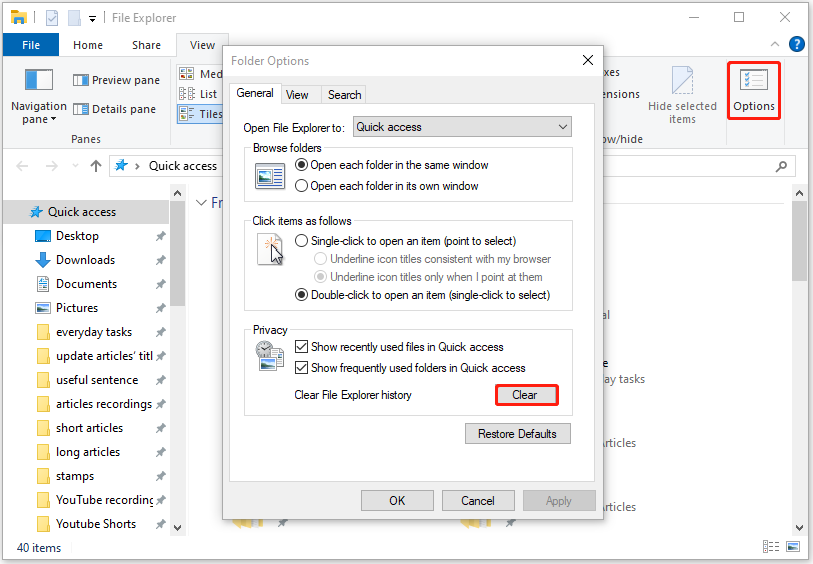
Step 1. Press the Win + E keys simultaneously to open the File Explorer window.
Step 2. Open the Options window.
- Windows 10: Go to View > Options
- Windows 11: Click three dots > Options
Step 3. In the pop-up window, go to the Privacy section. Then, find the Clear button next to the Clear File Explorer history option, and click it.
Solution 3. Run SFC and DISM
Corrupted system image files may also trigger the “Windows 10 can’t right-click on Start Menu” issue. In this case, you can try running SFC and DISM to fix the issue. Here’s the way:
Step 1. Press the Win + S keys simultaneously to open the Search window.
Step 2. Type “cmd” in the search box, right-click Command Prompt, and then select Run as administrator.
Step 3. In the elevated Command Prompt window, type “sfc /scannow” and press Enter.

Step 4. After that, restart your PC and check if the error has been resolved. If not, run Command Prompt as administrator and run DISM. Here’re the DISM commands:
- DISM.exe /Online /Cleanup-image /Scanhealth
- DISM.exe /Online /Cleanup-image /Checkhealth
- DISM.exe /Online /Cleanup-image /Restorehealth
Solution 4. Run PowerShell
You can also try running PowerShell to fix the “unable to right-click on Windows Start Menu” issue. Here’s the way:
Step 1. Press the Win + X keys simultaneously to open the Quick Link menu and select Windows PowerShell (Admin) from it.
Step 2. Then, type the following command and press Enter:
Get-AppXPackage -AllUsers | Foreach {Add-AppxPackage -DisableDevelopmentMode -Register “$($_.InstallLocation)\AppXManifest.xml”}
Step 3. Once done, check if the issue is fixed.
Solution 5. Uninstall the Recent Windows Update
If you encounter the “unable to right-click on Windows Start Menu” issue after installing a Windows update, you can try uninstalling the recent Windows update to fix the issue. Here’s the way:
Step 1. Open the Search window, type “control panel” in the search box, and press Enter.
Step 2. Set View by as Category, and click Uninstall a program under the Programs section.
Step 3. Click View installed updates from the left pane.
Step 4. Choose the latest update from the list, and click Uninstall.
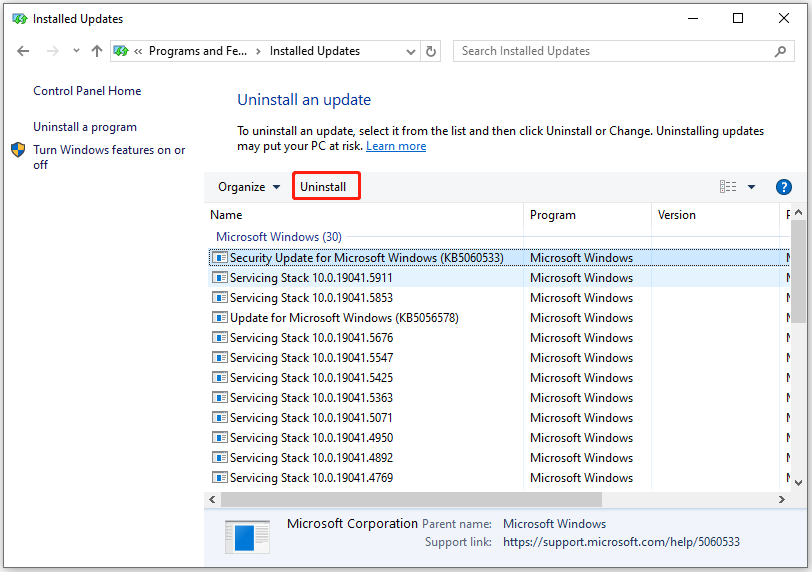
Step 5. Once done, restart your PC and check if the issue has been resolved.
Solution 6. Modify The UseExperience Registry Value
Some people fix the “unable to right-click on Windows Start Menu” issue successfully by modifying the UseExperience registry value. If you also want to try this way, you can do the following steps:
Step 1. Press the Win + R keys simultaneously to open the Run window.
Step 2. Type “regedit” in the box and press Enter to open Registry Editor.
Step 3. Navigate to this path: HKEY_LOCAL_MACHINE\SOFTWARE\Microsoft\Windows\CurrentVersion\ImmersiveShell\Launcher.
Step 4. In the right panel, double-click UseExperience to enter its Properties window.
Step 5. If UseExperience doesn’t show here, you have to create a new one. Here’s the way:
- Right-click anywhere on the right panel.
- Select New > DWORD (32-bit) Value.
- Name it as UseExperience.
Step 6. Then, set Value data to 0 and click OK to save the change.
Step 7. Close Registry Editor and restart your PC. Then, check if the “unable to right-click on Windows Start Menu” issue has been resolved.
Solution 7. Try Other Ways
If none of the above solutions can help you fix the “right-click not working on Start Menu or Taskbar” issue, you can try the following ways to fix the issue. Some people use these ways to fix the issues successfully.
- Disable Shell Extensions (if you installed)
- Replace the contents of the Winx folder
- Run a Clean Boot
- Reset your PC
If you lost your files after fixing the issue or resetting your PC, you can use MiniTool Partition Wizard’s Data Recovery feature to retrieve them. Besides, this feature-rich tool can also help you partition hard drive, change cluster size, check disk for errors, convert MBR to GPT, etc.
MiniTool Partition Wizard DemoClick to Download100%Clean & Safe
Bottom Line
How to fix the “unable to right-click on Windows Start Menu” issue? This post provides several effective solutions to fix the issue. If you encounter the same issue, you can try these solutions one by one until you fix the issue successfully.
About The Author

Position: Columnist
Charlotte is a technology columnist with a strong focus on the Windows operating system, specializing in disk management, backup, and data recovery. She is passionate about analyzing computer errors, identifying root causes, and delivering practical solutions. In her free time, she stays updated on the latest developments in computer systems and hardware while continuously learning new technologies to broaden her expertise. Her writing style is clear and easy to understand, making complex technical topics accessible even to users with limited computer knowledge.
User Comments :