Have you ever encountered the “snipping tool keeps opening automatically” issue on your Windows 11 computer? If so, this post is worth reading. Here, MiniTool Partition Wizard provides 6 practical fixes to help you solve this issue.
There is a built-in snipping tool on the Windows operating system that can help us to screenshots with ease. However, some people have reported recently that they encountered the “snipping tool keeps opening automatically” issue on their Windows 11 computers. Here’s an example from the answers.microsoft.com forum:
Recently something weird has happened to my laptop. The snipping tool keeps opening automatically. I know the print screen button is a shortcut to the snipping tool app but I have checked my print screen button is working fine… Any help will be appreciated.https://answers.microsoft.com/en-us/windows/forum/all/snipping-tool-keeps-opening-automatically/c0bb8d21-f059-4bc0-a5a4-58e277b8c1ca
If you encounter the same error and want to know how to fix the “snipping tool keeps opening automatically” issue, please continue reading.
Fix 1. Update Windows
Outdated Windows can cause the “snipping tool keeps opening automatically” issue with ease. So, you can try updating your Windows to the latest version to fix the error. To do that, you can refer to this post: Update Windows 11/10 to Download & Install Latest Updates.

Fix 2. Run SFC and DISM
Corrupted system files can also cause the “snipping tool keeps opening automatically” issue. If you suspect the Windows 11 snipping tool issue on your PC is caused by this reason, you can try performing SFC and DISM to fix the issue. Here’s the way:
Step 1. Press the Win + S keys simultaneously to open the Search window. Type “cmd” in the search box, right-click Command Prompt under Best Match, and then select Run as administrator.
Step 2. In the elevated Command Prompt window, type “sfc /scannow” and press Enter.
Step 3. Once the process is complete, restart your PC and check if the error has been resolved. If not, pro If not, proceed by initiating a DISM scan. Here are the DISM commands:
- DISM.exe /Online /Cleanup-image /Scanhealth
- DISM.exe /Online /Cleanup-image /Checkhealth
- DISM.exe /Online /Cleanup-image /Restorehealth
Fix 3. Change the Accessibility Setting
Changing the Accessibility settings can also fix the Windows 11 snipping tool issue, you can also have a try. Here’s the way:
Step 1. Press the Windows and I keys simultaneously to open the Settings window.
Step 2. Go to Accessibility, and then scroll down to the Interaction section.
Step 3. Select Keyboard, and then turn off Use the Print screen button to open screen snipping.

Step 4. After that, you can fix the “snipping tool keeps opening automatically” issue.
If the setting is greyed out or the issue occurs when it is off, you can use Registry to change the “Print Screen setting” entry to fix the issue:
Step 1. Open the Search window, type “regedit.exe” and press Enter.
Step 2. Navigate to this location: Computer\HKEY_CURRENT_USER\Control Panel\Keyboard.
Step 3. Double-click DWORD PrintScreenKeyForSnippingEnabled.
Step 4. Change the Value data to 0 and click OK.
Step 5. Once done, restart your PC and see if the issue is fixed.

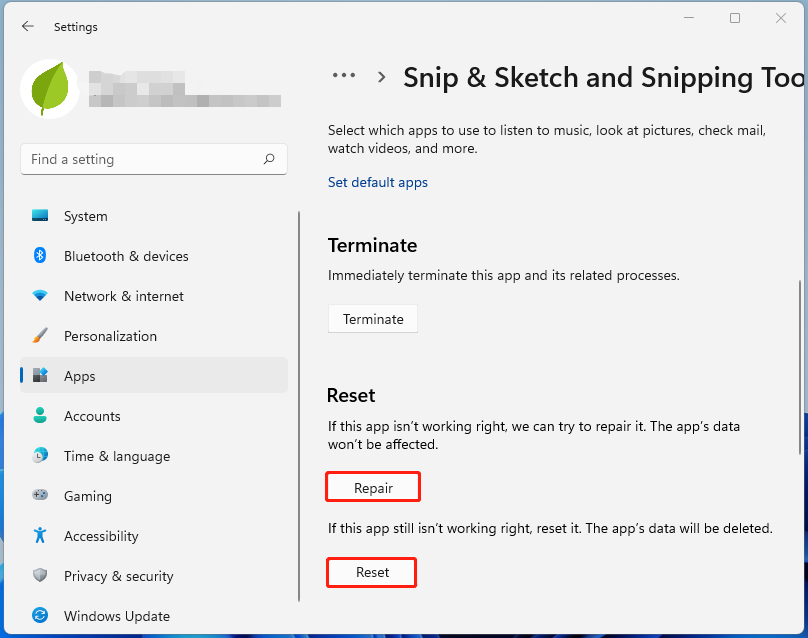
Fix 4. Reset Snipping Tool
Sometimes, resetting the snipping tool may also be helpful to the “snipping tool keeps opening automatically” issue. To do that, you can do as follows:
- Open the Settings window, and then navigate to Apps > Apps & features.
- Locate the snipping tool in the list and click three dots.
- Select Advanced options.
- Scroll down to the Reset section and click on Repair.
- After that, check if the problem is solved.
- If the Sipping tool still opens, click on Reset.
Fix 5. Uninstall and Reinstall the Snipping Tool
If resetting the snipping tool is still unable to help you fix the “snipping tool keeps opening automatically” issue, you can try uninstalling and reinstalling the snipping tool to fix the error. Here’s how to do it:
- Navigate to Settings > Apps > Apps & features.
- Locate the snipping tool in the list and click three dots.
- Select Advanced options.
- Scroll down to the Uninstall section and click Uninstall.
- After that, open the Microsoft Store and download and install snipping tool from it.
- Once the installation is complete, check if the error has been resolved.

Fix 6. Try a Clean Boot
If you suspect the “snipping tool keeps opening automatically” issue is caused by the other programs on your PC, you can try a clean boot to find out the culprit. Here’s the guide: How To Perform A Clean Boot On Your Windows 11 PC.
Bottom Line
How to fix the “snipping tool keeps opening automatically” issue? This post provides 6 practical solutions to fix this issue. You can try these fixes now to fix the error on your own.
In addition, MiniTool Partition Wizard is a professional and feature-rich tool that can help you format USB to FAT32, format SD card FAT32, convert MBR to GPT, check disk errors, recover data from hard drive, rebuild MBR, move/resize partitions, clone partitions/disks, and more.
MiniTool Partition Wizard FreeClick to Download100%Clean & Safe
About The Author

Position: Columnist
Charlotte is a technology columnist with a strong focus on the Windows operating system, specializing in disk management, backup, and data recovery. She is passionate about analyzing computer errors, identifying root causes, and delivering practical solutions. In her free time, she stays updated on the latest developments in computer systems and hardware while continuously learning new technologies to broaden her expertise. Her writing style is clear and easy to understand, making complex technical topics accessible even to users with limited computer knowledge.
User Comments :