Snipping Tool is Microsoft’s pre-loaded screenshot utility for Windows Vista and later. It’s very useful for capturing screenshots or creating screen recordings on your Windows PC. However, sometimes when you try to record something on your PC, you may fail and receive the “Recording stopped Snipping Tool” error.
Once the “Snipping Tool Recording stopped” issue happens, you will see a message that says: Something happened, and we’ve stopped recording. To help out, we summarize several feasible troubleshooting fixes for this issue.
Fix 1: Disable Screen Projection
If you use multiple displays, you may experience the “Snipping Tool Recording stopped something happened” issue. Therefore, to solve it, you should make sure you disable display projection. You can do this easily by pressing Windows + P to open the Project panel and then selecting PC screen only.
Fix 2: Run the Windows Apps Troubleshooter
When facing the “Recording stopped Snipping Tool” issue, you can also try to fix it using the Windows Store Apps troubleshooter. It’s a Windows built-in tool that can help troubleshoot problems related to Windows Store apps.
Step 1: Open Windows Settings by pressing Windows + I. Then select Update & Security.
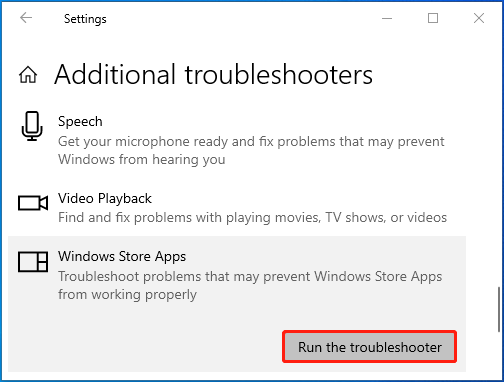
Step 2: Go to Troubleshoot and then click Additional troubleshooters from the right side.
Step 3: In the next window, locate Windows Store Apps. Then click Run the troubleshooter.
Step 4: After the process finishes, follow the on-screen instructions to fix problems if any are found.

Fix 3: Run SFC and DISM Scans
The “Recording stopped Snipping Tool” issue may also result from corrupted or missing system files. To troubleshoot it, you can use the SFC and DISM utilities. Here’s how to do this.
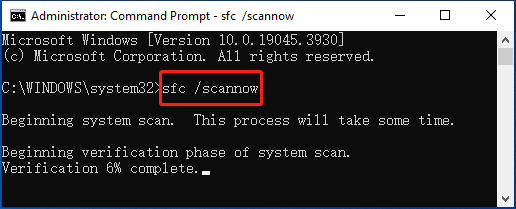
Step 1: Type cmd in the search bar. Then right-click Command Prompt in Best match and select Run as administrator.
Step 2: In the elevated Command Prompt, type sfc /scannow and press Enter.
Step 3: Wait for the scan to complete. Then restart your computer and run Command Prompt as an administrator again.
Step 4: Type the following commands and press Enter after each.
- DISM /Online /Cleanup-Image /CheckHealth
- DISM /Online /Cleanup-Image /ScanHealth
- DISM /Online /Cleanup-Image /RestoreHealth
Step 5: Once the process ends, restart your PC to check if the error disappears.
Fix 4: Change the Recordings Save Location
Changing the default save location of the screen recordings may also help solve the “Snipping Tool Recording stopped” issue. You can do this with the following guide.
Step 1: Press Windows + E to open File Explorer. Then go to This PC.
Step 2: Open Videos under Folders. Then right-click the Captures folder inside Videos and select Properties.
Step 3: Switch to the Location tab and then click the Move button.
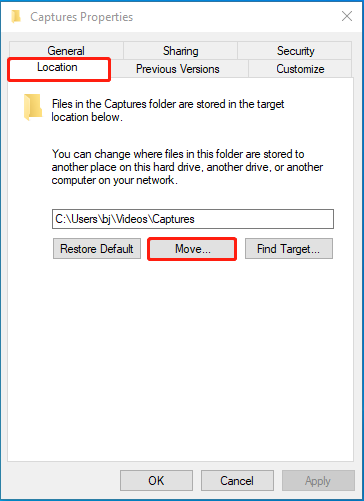
Step 4: After that, choose a preferred location and click Select Folder.
Step 5: Finally, click Apply > OK to save the change.
Fix 5: Repair/Reset Snipping Tool
If the “Recording stopped Snipping Tool” issue occurs due to damaged local app data, you may need to repair or reset Snipping Tool. To do this, follow the steps below.
Step 1: Open Windows Settings and select Apps.
Step 2: In the Apps & features section, scroll down to find and click Snipping Tool. Then click Advanced options under the app.
Step 3: In the next window, click Repair to see if the error will be solved. If the error persists, you should then click Reset to reset the app.
Fix 6: Update/Reinstall Snipping Tool
The outdated or buggy app may also lead to the “Snipping Tool Recording stopped something happened” issue. As for this, you’d better try updating or reinstalling this app to fix the problem.
To update the Snipping Tool, you need to launch Microsoft Store, go to Library, and then click the Get updates button.
For the app uninstallation and reinstallation, access the Apps & features section, scroll down to locate Snipping Tool, click Uninstall, and then reinstall it from Microsoft Store.
Fix 7: Perform an In-place Upgrade
It’s also possible for you to fix the “Snipping Tool Recording stopped” issue by performing a Windows in-place upgrade. You can execute the operation via a Windows ISO file or bootable USB drive.
If you find some files missing after the Windows upgrade, you can recover them using MiniTool Partition Wizard. It’s a powerful data recovery tool. Also, it’s a professional partition manager that enables you to partition/clone a hard drive, format USB to FAT32/NTFS/exFAT, convert MBR to GPT and vice versa, migrate OS to SSD, etc.
MiniTool Partition Wizard DemoClick to Download100%Clean & Safe
This post shows you how to fix the “Recording stopped Snipping Tool” issue in detail. When you suffer from this issue, you can try to fix it with the above methods.
User Comments :