The File History feature in Windows 10/11 allows your system to regularly back up important files. However, sometimes the scheduled backup may fail and show a reconnect your drive notification. It may pop up due to multiple reasons, like disabled File History, incompatible backup drive, outdated driver, etc.
To get rid of the reconnect your drive notification Windows 11/10, you can try the following methods.
MiniTool ShadowMaker TrialClick to Download100%Clean & Safe
Method 1: Manually Run the Backup
When the Windows 10 notification reconnect your drive pops up, the first thing you can try is to start the backup manually. To do this, follow the steps below.
Step 1: Connect the external hard drive you use for backups to your computer.
Step 2: Press Windows + I to open Settings. Then select Update & Security.
Step 3: Go to Backup and make sure you turn on the Automatically back up my files feature. Then click More options.
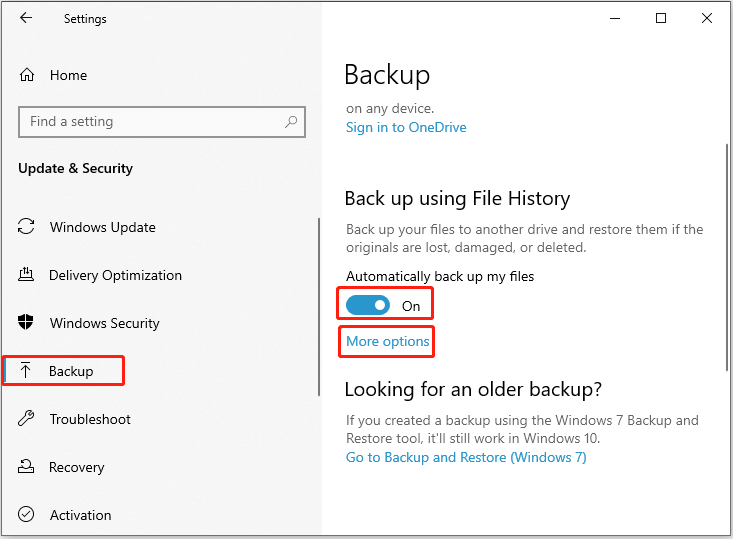
Step 4: In the next window, click Back up now to start the backup process.
![[Solved] File History Doesn’t Recognize This Drive in Win10/11?](https://images.minitool.com/partitionwizard.com/images/uploads/2023/07/file-history-doesnt-recognize-this-drive-thumbnail.png)
Method 2: Use A Different File History Drive
If you have more than one hard drive, you can try using a different drive for file backup. By doing so, you are also likely to solve the reconnect your drive notification Windows 11/10. The following are the detailed steps.
Step 1: Open Control Panel and then navigate to System and Security > File History.
Step 2: After that, click Select drive in the left panel.
Step 3: Then select a desired drive and click OK. If prompted, click Yes to move the existing files to the new drive.
Method 3: Reset the File History Configuration Settings
It’s also possible to remove the reconnect your drive notification by resetting the File History configuration settings. Here’s how to do this.
Step 1: Open File Explorer and click View from the top toolbar. Then tick the checkbox next to Hidden items.
Step 2: Press Windows + R to open the Run dialog. Then type %localappdata% in the box and press Enter.
Step 3: After that, go to Microsoft > Windows > FileHistory > Configuration.
Step 4: Select all the files inside the Configuration folder and press Delete to remove them.
Step 5: Reconnect your drive and run the backup again to check if the notification disappears.
Method 4: Update Your Drivers
The outdated disk driver may be another reason for the Windows 10 notification reconnect your drive. Therefore, to solve this annoying notification, you’d better update your driver to the latest version. You can learn how to complete this operation from this post: How to Update Device Drivers Windows 10 (2 Ways).
Method 5: Format the Backup Drive
Another way you can try to remove the reconnect your drive notification is to format the backup drive. You can perform the format with Windows built-in tools like Disk Management and Diskpart.
Here, we mainly tell how to format the drive with MiniTool Partition Wizard, a third-party partition manager. It enables you to format USB to FAT32 even though it’s larger than 32GB. Also, you can use this free partition software to partition hard drive, clone hard drive to SSD, and more.
To format the hard drive via MiniTool Partition Wizard, you should get this program installed on your computer first and then follow the given instructions.
MiniTool Partition Wizard FreeClick to Download100%Clean & Safe
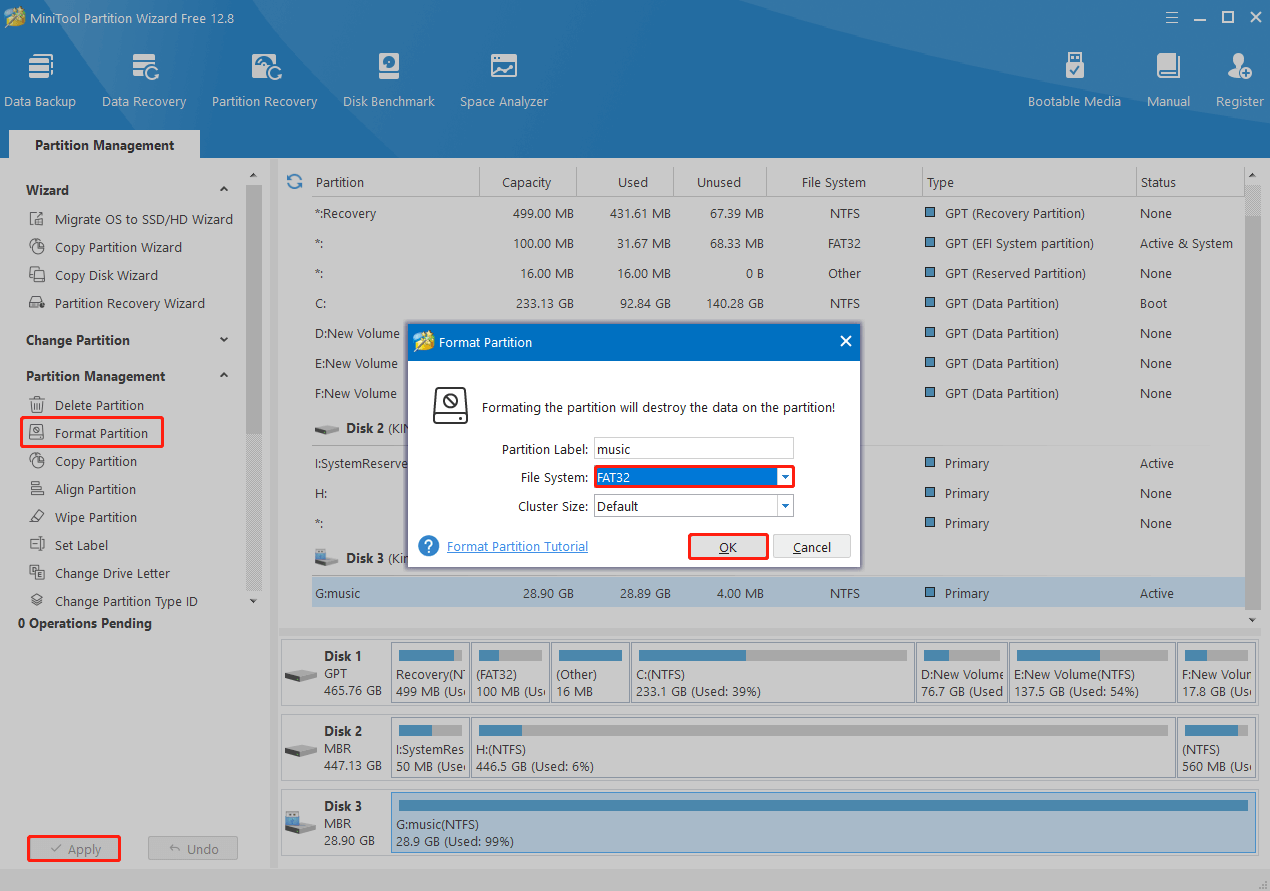
- Connect the target drive on your PC and launch MiniTool Partition Wizard.
- Right-click the target partition on the backup drive and select Format.
- In the pop-up window, select a proper file system and click OK.
- Finally, click Apply to save the change.
All these methods mentioned above are available. You can follow them to remove the reconnect your drive notification. If you have any problems with this issue, you can leave a message in our comment part below.
User Comments :