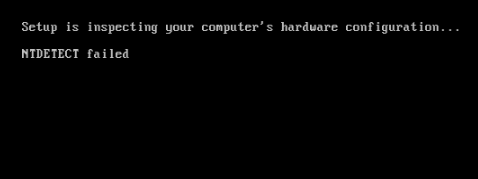
About NTDETECT Failed
NTLDR, short for NT Loader, is the boot loader for most versions of the Windows operating system and including Windows 10, XP, 7, etc. It usually runs from the primary hard drive, but you can also run from portable devices such as CD-ROMs, USB flash drives, etc.
To run successfully, NT Loader requires NTDETECT.COM. This file starts an NT-based operating system by detecting basic hardware data needed to boot successfully.
The NTDETECT failed error occurs when the file fails to detect basic hardware data. It also pops up when NTLDR is missing or corrupted. Many situations can cause this error, and we’ll explore them further in this article.
Do you know why NTLDR is missing? In general, many possible factors can cause NTDETECT failure issues.
- Incompatible NTDECT version
- NTDETECT file is corrupt or missing
- Compressed NTDETECT file
- Fragmentation of the NTDETECT file
Now, how do you fix NTDETECT failed Windows XP error? Keep reading.
![[Fixed]Failed to Create a New Partition on Selected Unused Space](https://images.minitool.com/partitionwizard.com/images/uploads/2023/08/failed-to-create-new-partition-selected-unused-space-thumbnail.png)
Methods to Fix NTDETECT Failed
Method 1: Restore NTDETECT.com
If NTDETECT errors occur due to corrupt NTDETECT files, restoring NTDETECT.com might be the right solution. This solution also works if you have an older version of NTDETECT installed on your system partition.
To restore the NTDETECT.com file, you will need the correct Windows installation CD. Using the Windows XP CD can help you restore the original NTDETECT file.
Step 1: Insert the Windows XP installation CD into the PC. Then boot your PC from the Windows XP CD and press any key when you see Press any key to boot from CD.
Step 2: Press R when you see the Windows XP Professional Setup screen to enter Recovery Console.
Step 3: Choose the Windows installation, and then enter your administrator password.
Step 4: When you reach the Command Prompt, type the following two commands and press Enter after each one:
- copy d:\i386\ntldr c:\
- copy d:\i386\ntdetect.com c:\
Once you copy these files, remove the installation disk from the PC and then restart the PC.
Method 2: Defrag NTDETECT.com File
If the NTDETECT failed error occurs due to file fragmentation, try defragmenting the NTDETECT.com file. You can use the free contig utility from Microsoft.
Step 1: Download contig.zip from Microsoft. After downloading the zip file, unzip contig.exe to continue.
Step 2: Launch a Command Prompt window and navigate to the location of the contig.exe file.
Step 3: Run the contig.exe file against the NTDETECT files that need to be defragmented.
Step 4: Wait for the defragmentation to complete, the PC console output should look like this after the defragmentation process is complete.
Method 3: Repair the Corrupted System File
If the NTDETECT failed error is caused by a damaged boot or system partition, you can fix it by scanning the partition for malware or errors. Using the CHKDSK command will repair corrupted system files.
Step 1: Open Recovery Console as above. Then enter the administrator password.
Step 2: At the command prompt, type chkdsk /r and press Enter.
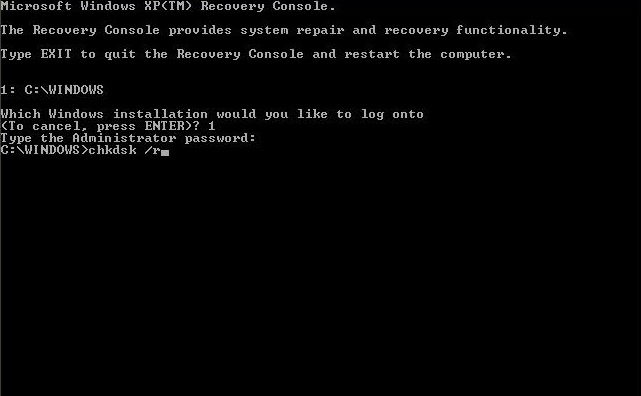
Image from Wondershare.com
Step 3: After the process is complete, restart your computer.
![How to Fix BSOD Error Stop Code 0xC0000218? [4 Ways]](https://images.minitool.com/partitionwizard.com/images/uploads/2023/08/0xc0000218-thumbnail.png)
Recover Data when NTDETECT Failed
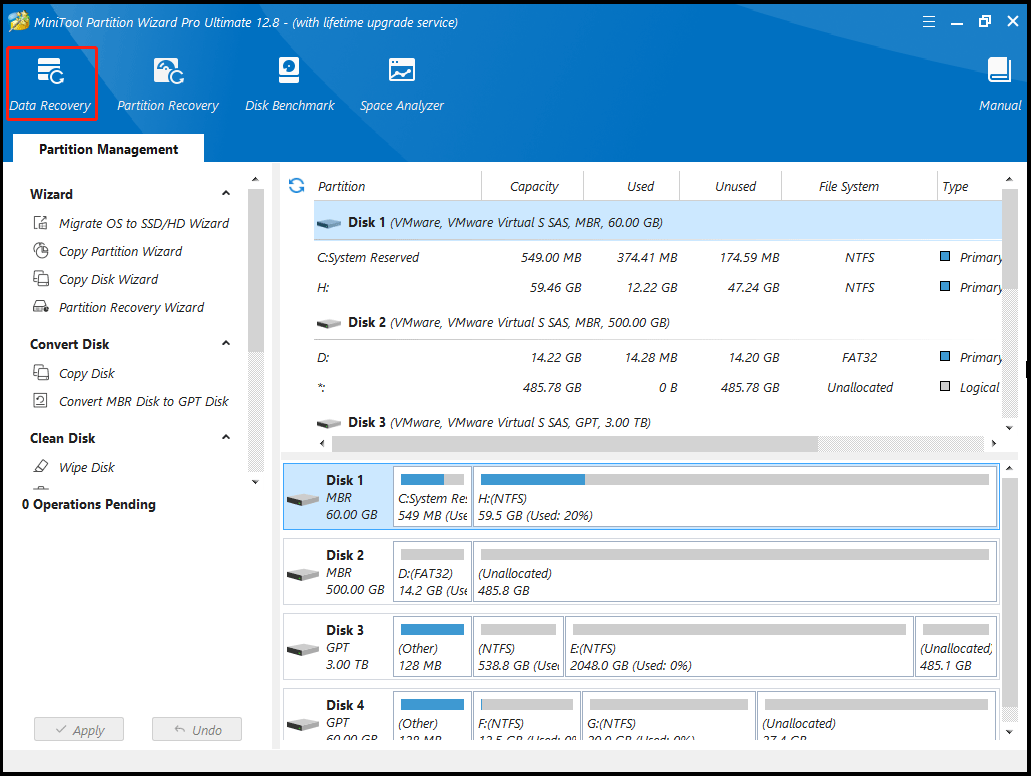
If your PC won’t start due to an NTDETECT failed error, your PC may freeze and lose access to your data. In this case, you will need the help of a professional Windows data recovery tool.
MiniTool Partition Wizard is a good choice because it can not only help recover files lost after accidental deletion but also recover files from lost/formatted partitions.
Step 1: Create a USB bootable media using its Bootable Media feature。
Step 2: Use the USB bootable media to boot your computer which suffers from BSOD.
Step 3: In the main interface of MiniTool Partition Wizard, click on Data Recovery from the top toolbar.
Step 4: Click on the Scan button under the partition you need to recover the data.
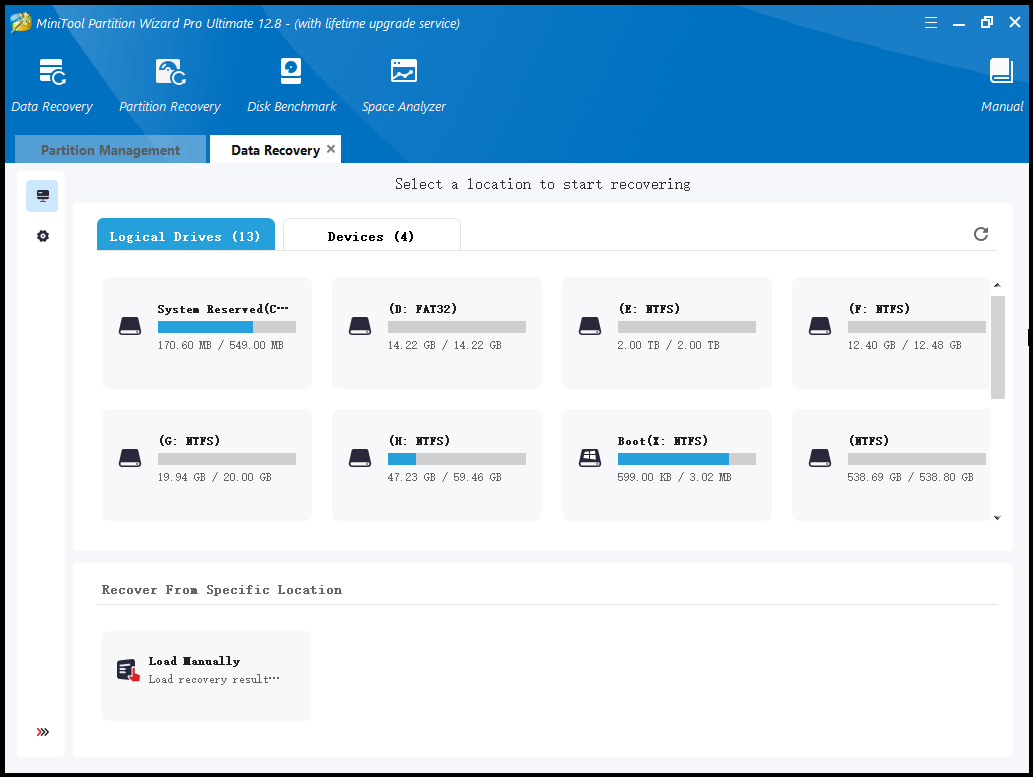
Step 5: Then wait for the scan to complete. Once the scan is complete, check all items that you need to recover and click on Save.
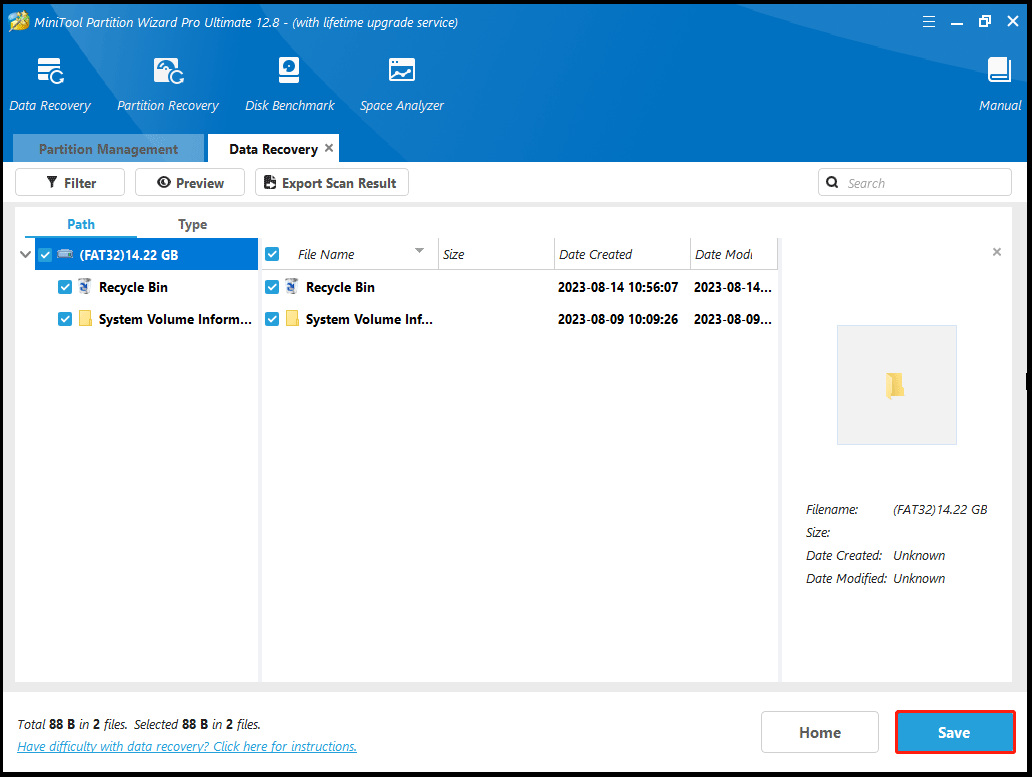
Step 6: Then select a directory to save the selected files and click on OK. You’d better save the recovered files to another drive. Otherwise, the lost/deleted data could be overwritten.
![How to Fix Windows Boot Error 0xc00000ba? [4 Ways]](https://images.minitool.com/partitionwizard.com/images/uploads/2023/08/0xc00000ba-thumbnail.png)
Bottom Line
When faced with NTDETECT Failed during setup you can try three methods shared in this guide. We recommend first recovering your data using a reliable data recovery software called MiniTool Partition Wizard.
About The Author

Position: Columnist
Vega enjoys helping people with computer problems, including disk management, data recovery, data backup, and more. She is constantly expanding her knowledge in related fields. And she will continue to bring more easy-to-understand professional articles to help people solve various problems on the PC.
User Comments :