If you find there is no audio after installing Windows update KB5034123 on your Windows 11, you come to the right place. In this post, MiniTool Partition Wizard provides several practical ways to help you troubleshoot the “no audio after Windows 11 KB5034123 update” issue.
Recently, some people reported that Windows 11 KB5034123 causes audio issues on their PC. This issue bothers them a lot, so it is urgent to get some solutions. For example, here is a user report from the answers.microsoft.com forum:
Since the last update (KB5033920 and KB5034123) that was installed on Jan 11, 2024, my audio has stopped working ... The PC has also frozen a couple of times since the update and I have had to manually turn it off by holding in the power button and then restart... Should I try to uninstall it? It is the only thing I have yet to try.https://answers.microsoft.com/en-us/windows/forum/all/why-has-my-audio-stopped-working-since-the-last/91e400a6-13cf-45c6-a3ce-114cf0157362
Are you also the one who suffering from this disappointing issue? Do you know how to fix the “no audio after Windows 11 KB5034123 update” issue? Don’t worry. This post provides 6 useful ways to help you to solve this issue. Continue reading and get them!
# 1. Try Some Basic Tricks
Before trying the advanced ways, you can try some basic tricks first.
- Restart your laptop or computer.
- Press the Fn +Mute keys to unmute your laptop.
- Ensure the specific output device you’re using isn’t muted in Sound settings.
- Make sure the sound output device is correctly plugged into your PC and its cable connection isn’t loose.
- Check and install any pending updates for your Windows 11 PC.
# 2. Select the Right Audio Output Device
If you have connected several audio devices to your Windows 11 laptop, you need to ensure the right device is selected, or you can also encounter the “no audio after Windows 11 KB5034123 update” issue. Here’s how to check it:
- Press the Win + I keys to open the Settings window.
- In the System tab, select Sound from the right panel.
- Next, under the Output section select your default audio device.
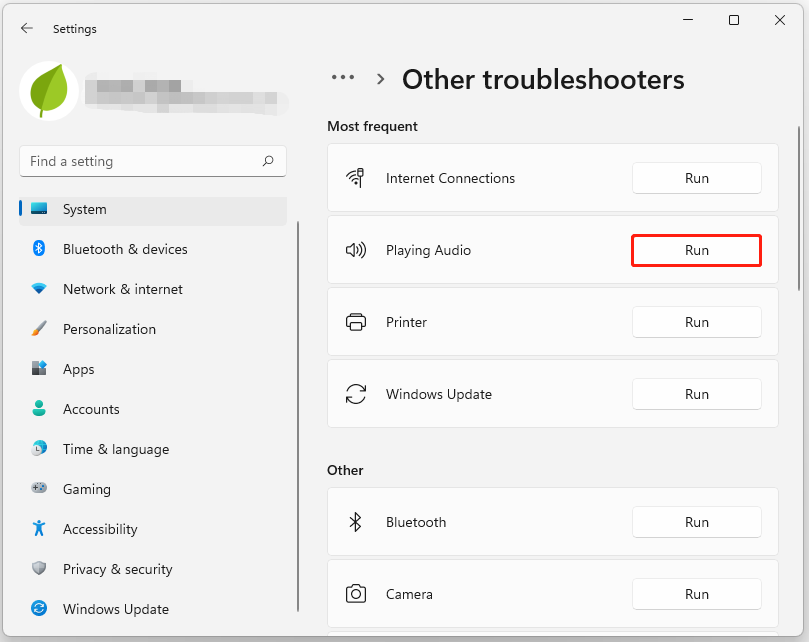
# 3. Run the Windows Audio Troubleshooter
There is a built-in Windows Audio troubleshooter on your PC which is quite effective in finding and fixing common audio problems. So, you can use it to troubleshoot errors when you find the Windows 11 KB5034123 causes audio issues on your PC. Here’s how to use it:
Step 1. Open the Settings window, and then select Troubleshoot from the right panel.
Step 2. Click Other troubleshooters, and then click Run beside Playing Audio.
Step 3. Follow the on-screen instructions to complete the troubleshooting process.
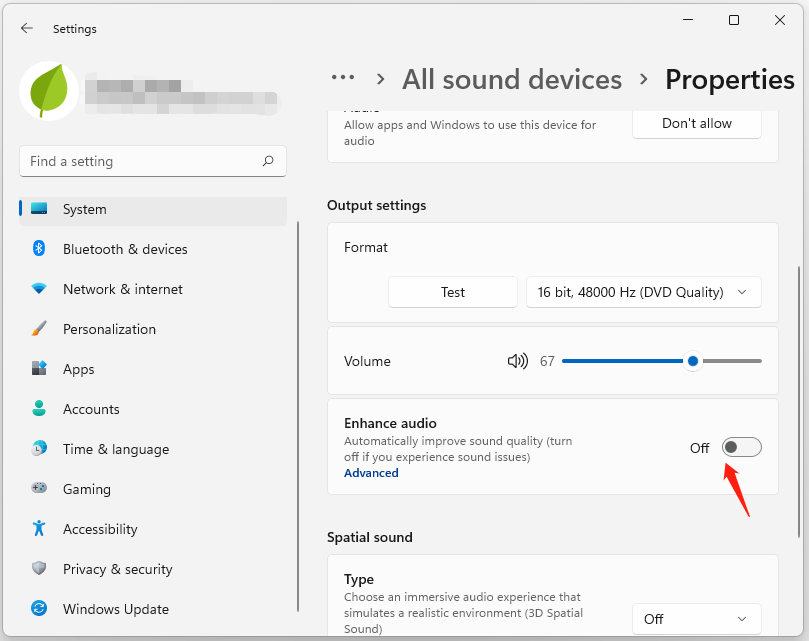
# 4. Disable Audio Enhancement
Windows 11 PCs come with audio enhancement packages for optimal sound output. So, you can try disabling them to fix the “no audio after installing Windows update KB5034123” issue. Here’s the guide:
- Go to Settings > System > Sound.
- Scroll down to the Advanced section.
- Click All sound devices.
- Select the output device that causing the issue.
- Scroll down to the Output settings.
- Then toggle off the switch next to Enhance Audio.
# 5. Update/Roll Back/Reinstall Audio Driver
If you suspect the “no audio after installing Windows update KB5034123” issue is responsible for the audio driver, you can also try updating/rolling back/reinstalling the audio driver to fix the issue. Here’re the guides:
- How To Update Audio Drivers On Windows Manually
- How to Reinstall Audio Driver Windows 10 – 2 Ways
- How to Roll Back a Driver in Windows? A Step-by-Step Guide
# 6. Restart the Audio Service
If the Windows Audio service is not started or stuck running, you can also encounter the “no audio after Windows 11 KB5034123” issue. In this case, you can try restarting the audio service to check whether the issue can be fixed. Here’s the way:
Step 1. Press the Win + R keys to open the Run window, type “services.msc” and press Enter to open the Services window.
Step 2. Scroll down to find the Windows Audio service, right-click it and select Restart.
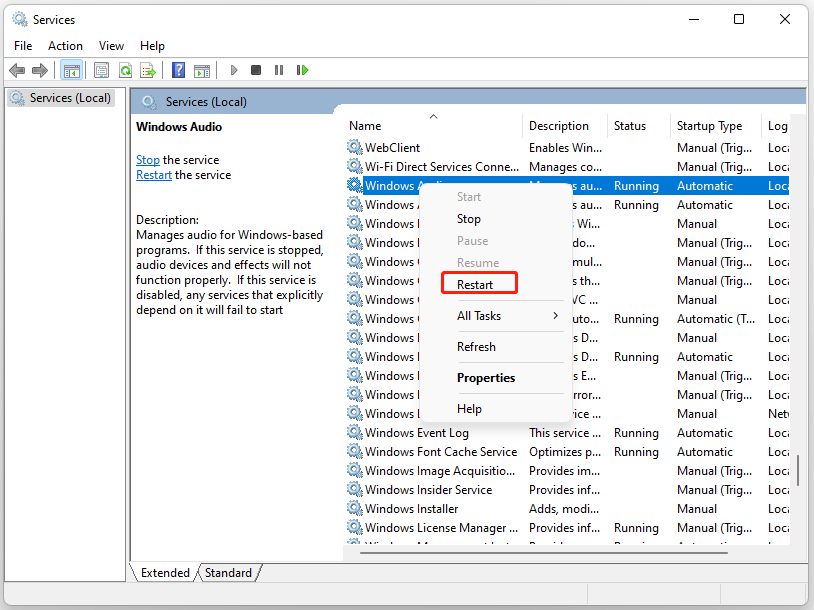
Step 3. Then double-click the service to open its properties and change its Startup type Automatic.
Step 4. Repeat the above process to restart the Windows Audio Endpoint Builder and Remote Procedure Call (RPC) service as well.
Step 5. Once done, restart your computer and check the audio status of your laptop or PC.
Have A Try Now
How to fix the “no audio after Windows 11 KB5034123 update” issue? Now, you may already know the answers. This post provides 6 practical ways to fix the issue. You can try them one by one until you fix it successfully.
In addition, MiniTool Partition Wizard can help you format SD card FAT32, convert MBR to GPT, clone the system, manage disks better, recover data from hard drive, and more. If you have any of these needs, you can download it to your PC.
MiniTool Partition Wizard FreeClick to Download100%Clean & Safe
About The Author

Position: Columnist
Charlotte is a technology columnist with a strong focus on the Windows operating system, specializing in disk management, backup, and data recovery. She is passionate about analyzing computer errors, identifying root causes, and delivering practical solutions. In her free time, she stays updated on the latest developments in computer systems and hardware while continuously learning new technologies to broaden her expertise. Her writing style is clear and easy to understand, making complex technical topics accessible even to users with limited computer knowledge.
User Comments :