This post provides you with 3 methods to mount VMware disk to Windows disk. You can pick one method from them to mount a VMDK image file in Windows. Simply follow the steps offered by Partition Magic.
VMware Disk Mounting Limits
Mounting VMware disk to Windows disk enables you to connect to the virtual disk without opening a virtual machine (VM). So, you can access VM data in urgent situations even if the VM fails. However, there are some limitations when you mount VMware disk to Windows disk.
- You can’t mount a virtual disk that is being used by a running or suspended virtual machine. In other others, you can only mount disks in a powered-off VM, or disks not associated with a VM.
- You can mount and read Windows virtual disks on Windows hosts (with one NTFS volume at least) or Linux virtual disks on Linux hosts.
- You cannot mount encrypted virtual disks.
- You can’t mount a virtual disk if any of its .vmdk files are compressed or have read-only permissions. If necessary, you should change these attributes before mounting the virtual disk.
- You can’t map a virtual hard disk for a shared or remote virtual machine.
- On Windows hosts, you must mount virtual disks as drive D: or greater. Please note that you can’t specify a drive letter already in use on the host.
- On Windows hosts, you can only mount volumes formatted with FAT (12/16/32) or NTFS. (Tip: MiniTool Partition Wizard allows you to format volumes to FAT32, NTFS, exFAT, and other file systems with ease.)
- If you specify a virtual disk with snapshots, this command locates and mounts the last snapshot. On Windows, you can mount previous snapshots read-only. On Linux, you can’t mount previous snapshots.
After you map the virtual disk to a drive on the host system, the mapped local disk is temporarily inaccessible on the local host and can only be accessed when you power off the VM.
#1: Mount VMware Disk to Windows Disk via VMware Workstation
VMware Workstation is the VMware’s desktop solution for virtualization. Its Map Virtual Disks feature allows you to open VMDK in a wider format and map VMware disk to Windows disk. If File Explorer doesn’t work, try using VMware Workstation to mount the virtual disk.
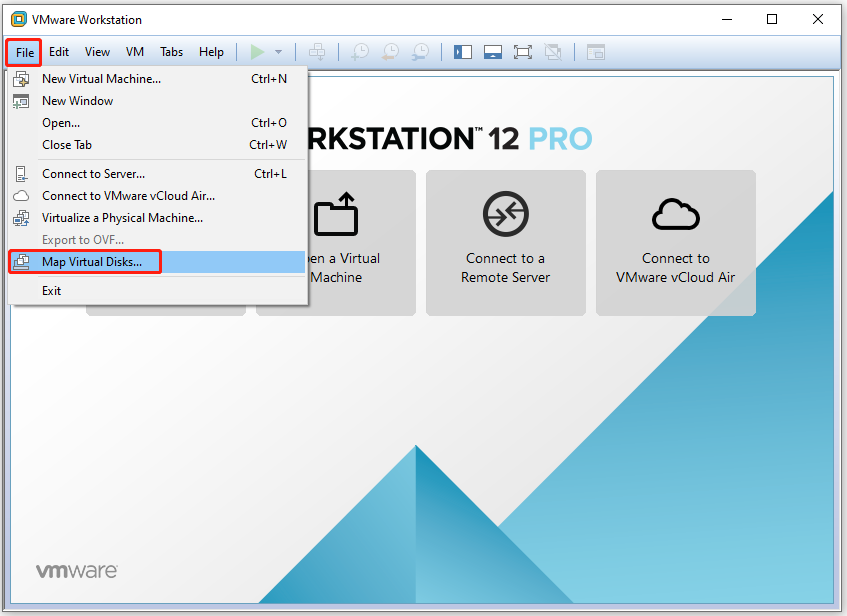
Step 1: Open the VMware Workstation and click on the File tab > choose Map Virtual Disks.
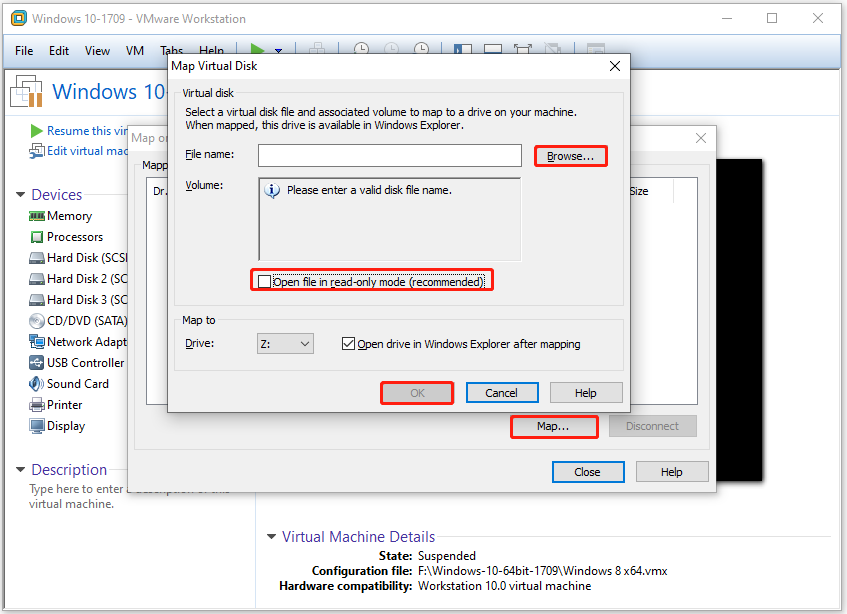
Step 2: In the pop-up window, click Map.
Step 3: In the next window, click Browse and then find and open the target virtual disk.
Step 4: Uncheck the Open file in (read-only) mode checkbox and choose the drive letter from the drop-down menu to decide the destination of the mapping. Finally, click OK to save changes.
Step 5: Then the virtual disk will be mounted to the Windows disk. If you want to unmount the virtual disk, right-click on it in Explorer and choose Disconnect Virtual Disk.
#2: Mount VMware Disk to Windows Disk via Disk Mount Utility
As its name indicates, the VMware Disk Mount utility is used to mount VMware disk to Windows disk. After mounting the disk, you can access and manipulate the data stored inside VMDK files without running the VM. Now, perform VMware disk mount operation using the steps below.
Step 1: Download the VMware Disk Mount utility from the official VMware website. It’s recommended to download the latest version to be compatible with Windows 10.
Step 2: Run the installer and follow the on-screen instructions to complete the installation process.
Step 3: Launch the VMware Disk Mount utility from the Start menu or the Command Prompt.
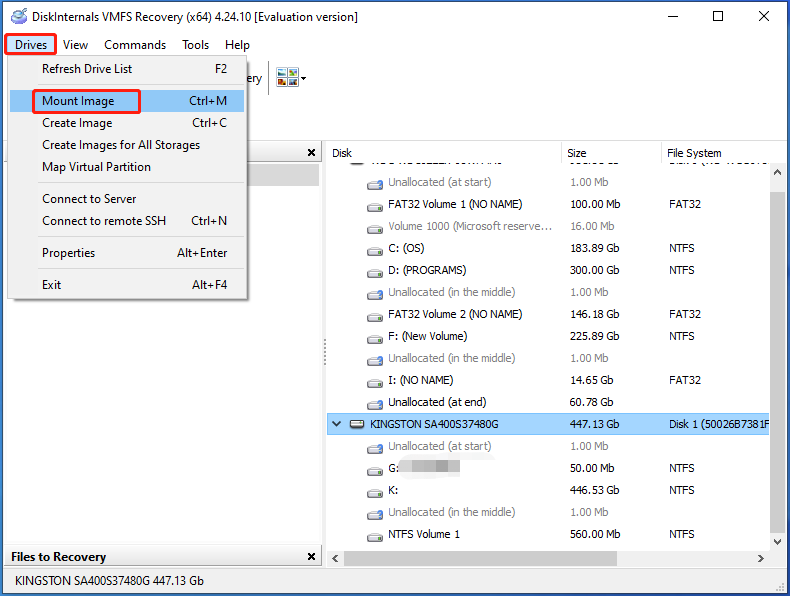
Step 4: Tap on the Drives tab and then click Mount Image from the drop-down menu.
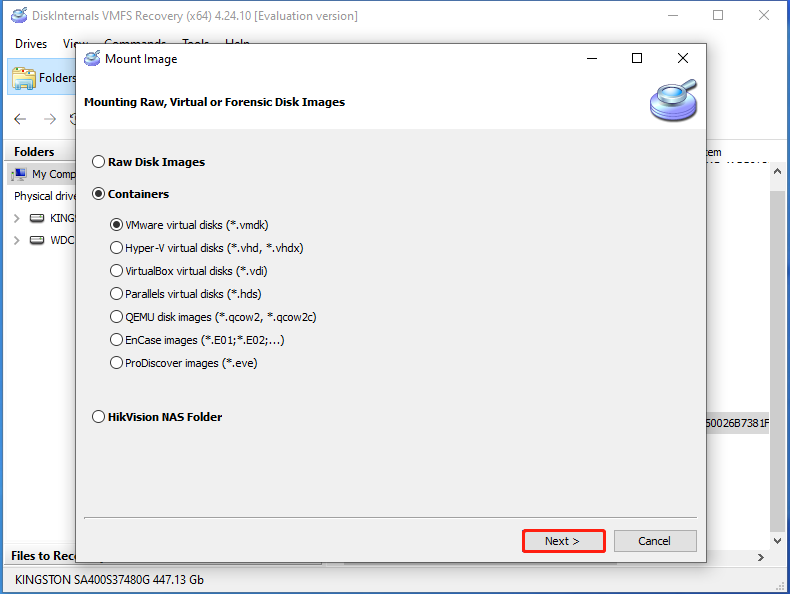
Step 5: In the prompted window, select the type of your virtual disk and click Next.
Step 6: In the opened window, find and open the virtual disk file. Then follow the on-screen instructions to complete the operation.
#3: Mount VMware Disk to Windows Disk via vSphere Disk Development Kit
The VMware-mount, a part of the vSphere Disk Development Kit, can help you map VMware disk to Windows disk. The following steps show you how to do that in detail.
To mount a VMDK file (saved at D:\temp) in read-only mode, run the command below:
vmware-mount.exe X: “D:\Temp\TestVM.vmdk”
If the VMDK file contains more than one partition, use the parameter /v:x to mount the other volumes:
vmware-mount.exe /v:2 X: “C:\Temp\TestVM.vmdk”
To get a writeable access, use the parameter “/m:w“. This is helpful if you want to replace a broken system file.
vmware-mount.exe /m:w X: “C:\Temp\TestVM.vmdk”
To list all the mounted virtual disks, use /L:
vmware-mount.exe /L
Related articles:
How to Mount and Unmount Drive in Windows 10
How to Mount a Drive as a Folder in Windows 11 [Guide]
How to Mount Windows 11 ISO and How to Unmount? See Ways Here!
Windows 11 Mount ISO Slow | Why and How to Fix It
How to mount a VMDK image file in Windows? There are 3 available methods for you. Try them now!
User Comments :