By default, drives are mounted using letters (also known as drive letters). However, with the help of this guide from MiniTool Partition Wizard, you can mount a drive as a folder instead of letters in Windows 11.
Why mount drives as folders on Windows? When Windows detects a new drive, it assigns a letter to the drive. This helps distinguish between the different storage volumes available on your computer.
When you have multiple disk drives or disk partitions, it can sometimes be confusing to find the drive you need based solely on the drive letter. So, it would be easier to mount them as desktop folders and then give each folder a descriptive name. This is especially useful if someone else uses a computer.
If you want your new drive to look and behave like a folder, here’s how to set it up on Windows.
How to Mount a Drive as a Folder
To mount a drive as a folder rather than a letter in Windows 11, you can use Windows Settings. Here’s how:
Step 1: First, you need to create a folder that you want to use to open the desired drive.
Step 2: Press the Win + I key to open Windows Settings, and then navigate to System > Storage > Advanced storage settings.
Step 3: Click Disks & volumes and look for the drive you want to mount as a folder.
Step 4: Select the drive, and then click the Properties button. Here you can then see the details of the disk drive, including the assigned letter.
Step 5: Click the + icon in the Paths section. Then click Browse and select the folder you created earlier.

Step 6: When you have finished, click the OK button. Following that, you can double-click on that folder to open the drive.
The folder looks like standard Windows folders, but anything you put in them is actually stored on the drive. If you remove the hard drive, the folders assigned to it will not open until it is reconnected.
If you no longer wish to mount the drive as a folder, you can easily delete the path. Repeat the above steps to go to System > Storage > Disks & volumes. Find the path to the folder in the Paths section and click Remove.
How to Mount Unallocated Drive as a Folder
If your hard drive or drive partition does not currently have a letter assigned, you can mount it as a folder. To do it, you can use Disk Management. The detailed steps are as follows:
Before following these steps, make sure you have created a folder. If you haven’t already done so, it is recommended to create a folder and name it accordingly.
Step 1: Type Disk Management in Windows Search. Then click Create and manage hard disk partitions in the search results.
Step 2: In the Disk Management window, right-click on the unallocated partition and select the New Simple Volume option.
Step 3: Select the Mount in the following empty NTFS folder option and click on the Browse button.
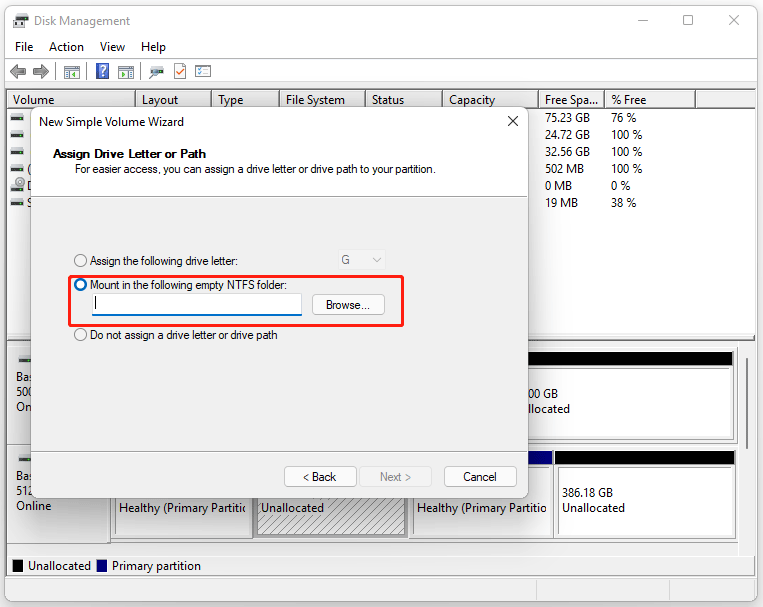
Step 4: Select the folder you want to mount to the drive. Once done, click on the Next button. Then you can set some policies to format the partition and click Next.
Once done, you can double-click a predefined folder and open the selected drive.
About The Author

Position: Columnist
Vega enjoys helping people with computer problems, including disk management, data recovery, data backup, and more. She is constantly expanding her knowledge in related fields. And she will continue to bring more easy-to-understand professional articles to help people solve various problems on the PC.
User Comments :