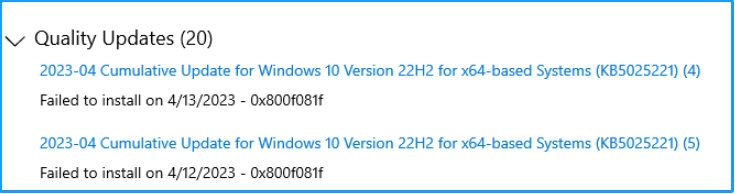
Windows updates play an important role in your system, such as, ensuring your device runs smoothly and protecting against potential security vulnerabilities. However, some people encounter issues when they install the update KB5025221 on their Windows 10 PC.
Have you also encountered the same issue and don’t know how to fix the “Windows 10 can not install update KB5025221” issue? Don’t worry. This post provides a full guide to solving it.
Method 1. Check the Update-Related Services
Windows update-related services are essential for Windows update installation. So, if there is anything wrong with them, you can encounter the “KB5025221 fails to install” issue easily. To resolve this issue, you can try restarting the services by following the steps mentioned below:
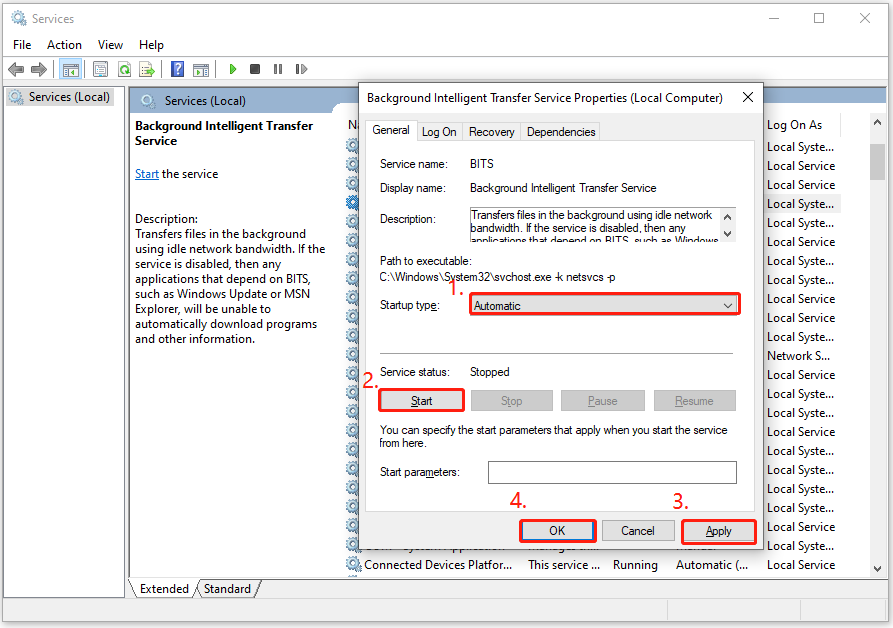
- Press the Win + R keys to open the Run window, type “services.msc”, and then press Enter.
- In the Services window, double-click Windows Update from the list.
- From the Startup type field, select Automatic from its drop-down menu.
- Go to the “Service status” and click on Start.
- Then, click Apply and OK to save the changes.
- Next, do the same operations with Cryptographic Services and Background Intelligent Transfer Service.
- Once done, restart your PC and check if you fixed the “KB5025221 fails to install” issue successfully.
Method 2. Run Windows Update Troubleshooter
Windows Update troubleshooter is a built-in tool on the Windows operating system that can diagnose and fix issues related to Windows updates. So, you can also run it to fix the “KB5025221 failed to install” issue. Here’s the way:
Step 1. Press the Win + S keys simultaneously to open the Search window, type “troubleshoot settings” and select Troubleshoot Settings from the search result.
Step 2. Click the Additional troubleshooters link in the right panel.
Step 3. Select Windows Update and click Run the troubleshooter.
Step 4. Wait for the scanning process to complete and check if the “KB5025221 failed to install” issue has been resolved.
Method 3. Clean Your Disk from Junk
Insufficient disk space can also result in the “update KB5025221 not installing” issue on Windows 10. In this case, you can try running the Disk Cleanup to clean your system and fix the issue. Here’s the guide:
- Open the Run window, type “cleanmgr” and press Enter.
- Select your system drive and click OK.
- Click Clean up system files at the right bottom of the pop-up window.
- Select your system drive and click OK again.
- Tick the box of the files that you want to delete and click OK to clear them.
- After that, restart your PC and check if the “KB5025221 fails to install” issue is fixed.
However, some people may encounter errors when using the Disk Cleanup tool. If you are also the one, you can use MiniTool Partition Wizard as an alternative. It is a professional and reliable partition disk manager that provides the Space Analyzer feature to help you remove unwanted files.
Besides, this multifunctional tool can also help you recover data from hard drives, check disk errors, create/delete partitions, format SD card FAT32, change cluster size, rebuild MBR, convert MBR to GPT, and more.
MiniTool Partition Wizard FreeClick to Download100%Clean & Safe
Method 4. Disable Security or Other Software
Sometimes, the security and other software (such as firewall settings, and VPN software) may conflict with the Windows update files and then result in the “update KB5025221 not installing” issue. In this situation, you can try temporarily disabling them to fix the issue.
Method 5. Run SFC and DISM
Corrupted system files are also responsible for the “KB5025221 is not installing” issue. So, you can try running SFC and DISM to fix it. Here’s the way:
Step 1. Open the Search window, and then type “cmd” in the search box.
Step 2. Next, right-click Command Prompt under Best Match, and then select Run as administrator.
Step 3. In the elevated Command Prompt window, type “sfc /scannow” and press Enter.
Step 4. Once the process is complete, restart your PC and check if the error has been resolved. If not, pro If not, proceed by initiating a DISM scan. Here are the DISM commands:
- DISM.exe /Online /Cleanup-image /Scanhealth
- DISM.exe /Online /Cleanup-image /Checkhealth
- DISM.exe /Online /Cleanup-image /Restorehealth
Method 6. Install the Update Manually
Some people report that they fixed the “KB5025221 is not installing” issue successfully by installing the update manually. You can also have a try. Here are the detailed steps:
- Open your browser, and then navigate to Microsoft Updates Catalog.
- Type “KB5025221” in the search box and press Enter.
- Find the file that matches your device’s System type.
- Then, click Download.
- Click the links in the pop-up window to start downloading the installation package.
- Double-click the execute file and follow the on-screen instructions to complete the installation process.
- Once done, you may fix the “can’t install KB5025221 update at Windows 10” issue has been resolved successfully.
Method 7. Use Media Creation Tool
If none of the above solutions can help you fix the “can’t install KB5025221 update at Windows 10” issue, you can try using the Media Creation tool to install the update KB5025221 and fix the issue. If you don’t know how to use it, you can refer to this post: A Complete Guide to Use Windows 10 Media Creation Tool.
Wrapping Things Up
How to fix the “Windows 10 can not install update KB5025221” issue? This post provides 7 practical methods to fix it. You can try these methods one by one until the issue gets fixed.
About The Author

Position: Columnist
Charlotte is a technology columnist with a strong focus on the Windows operating system, specializing in disk management, backup, and data recovery. She is passionate about analyzing computer errors, identifying root causes, and delivering practical solutions. In her free time, she stays updated on the latest developments in computer systems and hardware while continuously learning new technologies to broaden her expertise. Her writing style is clear and easy to understand, making complex technical topics accessible even to users with limited computer knowledge.
User Comments :